# Home
Welcome to iAdvize’s Developer Platform!
If you're looking to customize the iAdvize solution or create new integrations, you're in the right place.
Whether you're a developer, integrator, customer, or simply curious, you will find an overview of how to get started, our Developer Guidelines, and all technical references with practical examples.
### Getting Started
General Informations
Learn more about iAdvize and the Developer Platform.
# General Information
## What is iAdvize?
[iAdvize](https://iadvize.com/) is a conversational marketing platform that enables businesses to engage their customers and prospects whether they’re on the website or on social media from one single messaging solution (chat, voice, video). Visitors can get real-time advice from customer service but also from advocates, and members of the brand community via [ibbü](https://www.ibbu.com/en/) - our on-demand pool of experts.
Implementing iAdvize is child's play. You just have to insert a tag on each page of your website. Once the solution is deployed, your customer service and marketing teams are completely independent and can set up the solution as they wish.
The iAdvize platform has 2 interfaces:
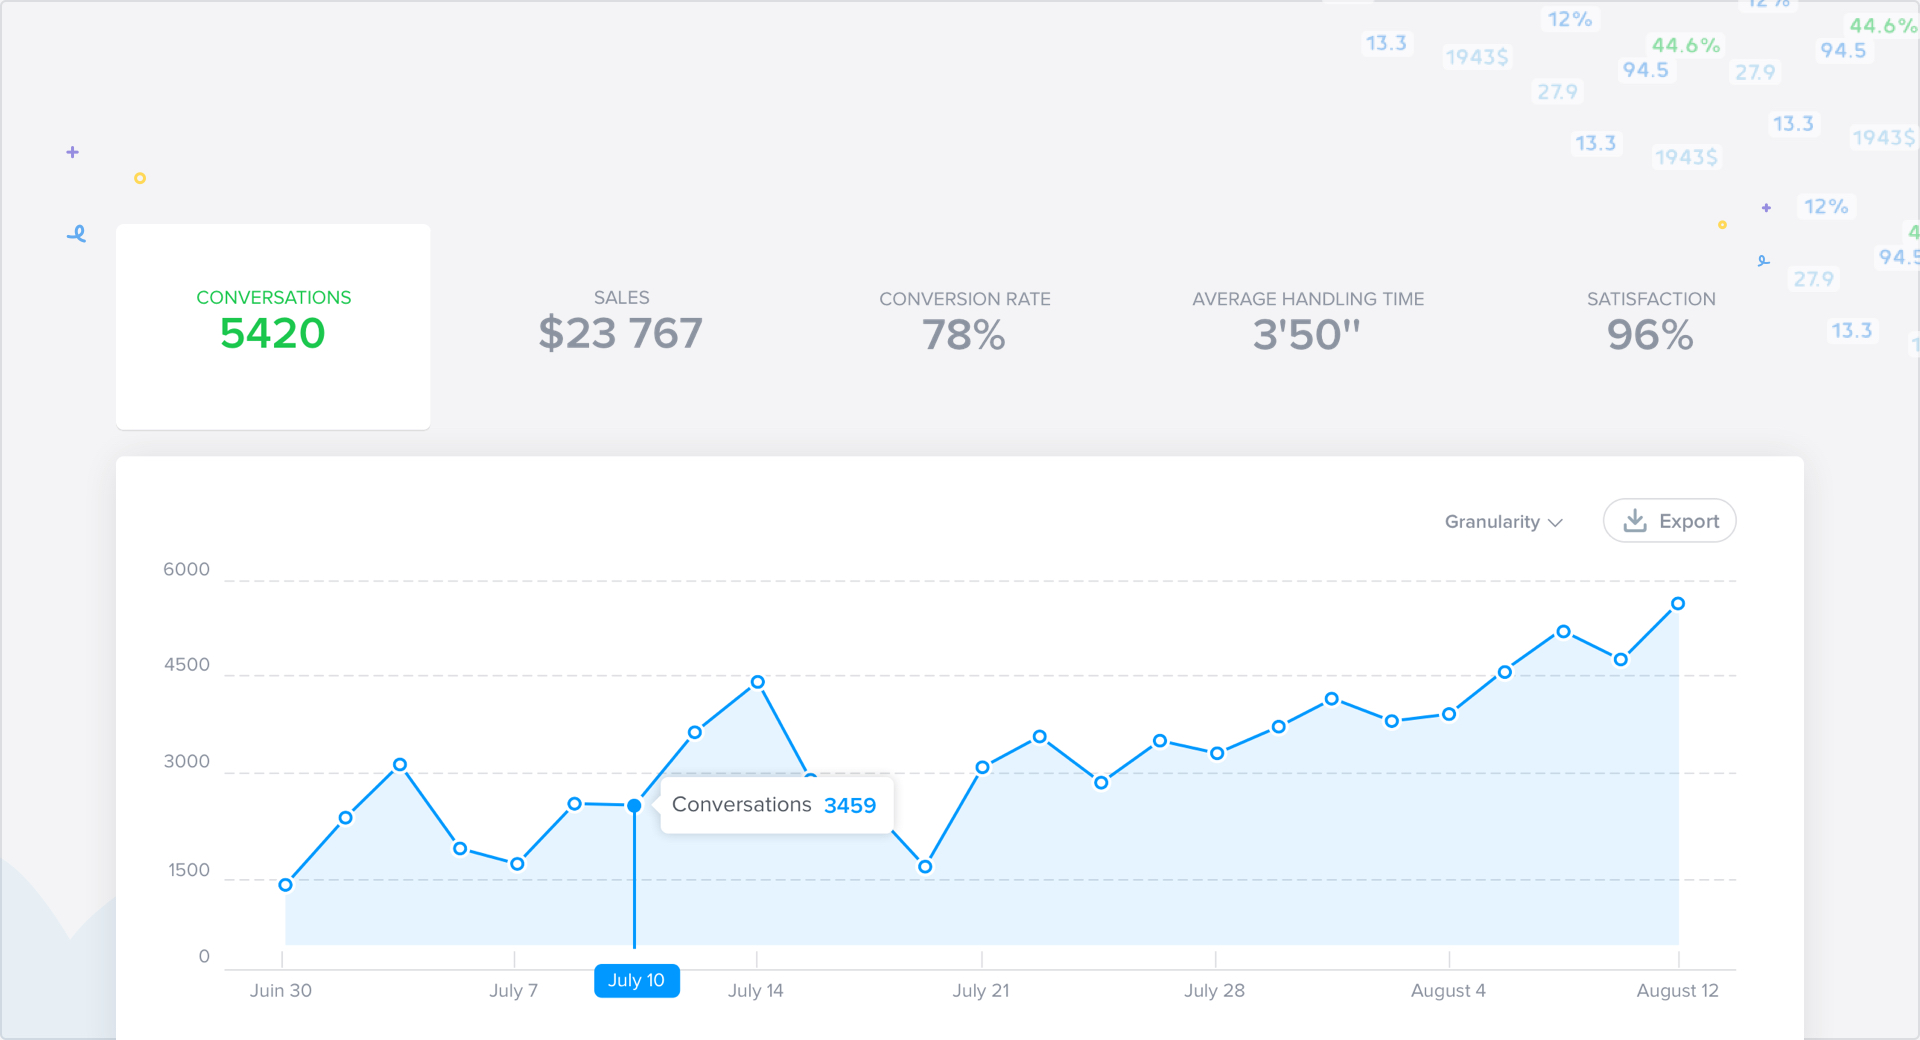
* The administration: administrators and managers of the solution can configure the platform's settings and monitor the agent's activity.
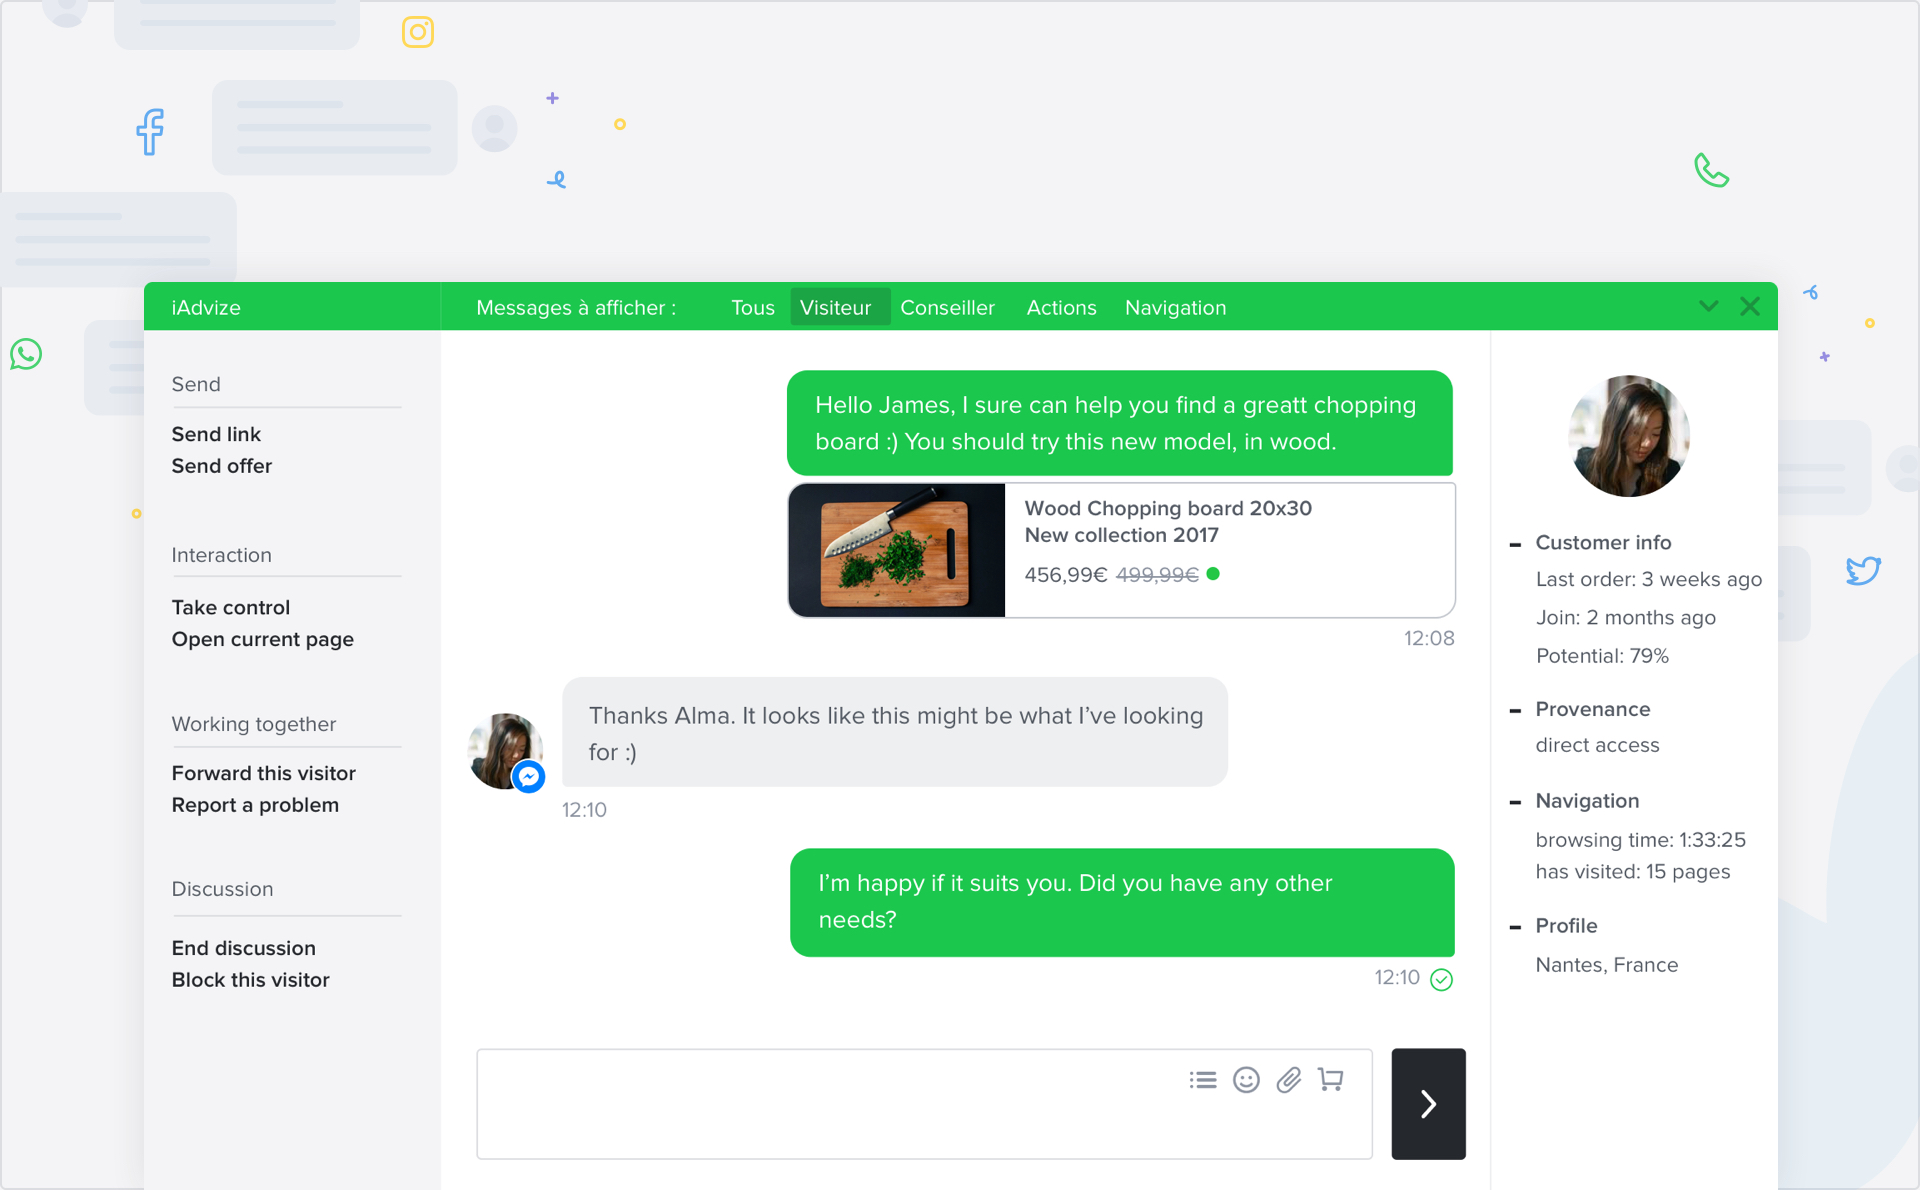
* The agent's console panel: it gives superpowers to your agents. That's the place where professional agents or experts can respond intuitively to all the messages they receive.
## What is the Developer Platform?
The iAdvize Developer platform provides complete and detailed documentation to use our integration resources: technical references, step-by-step guides, and good practices.
The Developer Platform also allows developers to build apps. If you want to develop an app, we are providing you with documentation and a private testing environment.
### Why build apps on iAdvize?
There are two main reasons for building an app with the iAdvize Developer Platform:
* You build apps and publish them for our customer community. (We've got more than 500 customers to amaze!)
* You build apps in private mode and make them available only for one or more specific customers
Here is an example of a potential protocol between iAdvize and CRM software thanks to a connector:
# Features Overview
The developer platform offers many resources to customize your solution and integrate it into your company's stack.
You can choose from the main sections the one that meets your needs:
* **Apps:** Consult the list of public applications available to easily integrate with your tools (Salesforce, Zendesk, and others) or create your own application to meet a particular integration case.
* **Use Cases:** browse our use cases and follow our step-by-step guides to implement them in your environment (install the iAdvize tag, identify your visitors, automate the creation of your users, etc.).
* **Technologies:** Find our technical references and discover all the functions available to personalize or automate your processing (API, SDK, SSO, etc.).
Browse through each section and choose the theme that interests you to obtain complete and detailed information.
# Security: IP Whitelisting
In order for the iAdvize SaaS solution to operate correctly, certain features require communication between our systems and your servers. To secure these exchanges in accordance with your internal security policies, you may need to whitelist specific iAdvize IP addresses.
### Outgoing Connections from iAdvize – Use Cases
Here are a few common scenarios where iAdvize may initiate outgoing requests to your infrastructure:
* When a bot connects to an [**external API**](https://help.iadvize.com/hc/en-gb/articles/4439565717906) to retrieve or send information
* When deploying an [**external bot**](/technologies/external-bot)
* For the use of [**Webhooks**](/technologies/webhooks)
* When running [**Custom Apps**](/technologies/custom-app-in-iadvize-desk) from the agent interface
* When using an [**App**](/apps/build-your-app/app-plugins) (also known as a connector) integrated into iAdvize
* During testing or staging phases carried out by iAdvize teams on protected environments
* ...
***
### IP Addresses to Whitelist
#### 1. **iAdvize Server IP Addresses**
These IPs are used by our production servers to initiate outgoing connections to your systems:
```
35.158.241.155
35.158.90.142
35.156.32.28
```
> 💡 These addresses should be whitelisted if your APIs or services are restricted to allow traffic only from trusted IPs.
***
#### 2. **iAdvize VPN IP Addresses (Human/Test Access)**
In some situations, iAdvize teams may need direct access to your systems via VPN — for example, to access a protected test environment or to perform validations during implementation or troubleshooting.
The following IPs are used for such VPN-based access:
```
193.39.2.173
185.160.53.38
185.160.53.166
34.107.108.253
34.86.72.25
```
***
### Recommendations
* **IP Restrictions**: To enhance security, we recommend allowing access to your systems only from the IP addresses listed above.
* **Regular Review**: This list may evolve over time. Please consult your iAdvize contact or check our technical documentation regularly for updates.
* **Segmentation**: Clearly distinguish between **machine/server access** and **human/VPN access** in your access control policies.
# Public Apps
Discover our Public Apps
## We are connected with your internal tools!
Easily install iAdvize - AI Copilot™ on your Shopify store!
## Description
Install the iAdvize tag and set up your chat box with just a few clicks.
* The app leverages your existing Shopify theme to automatically deploy our conversation tag on your website and enable iAdvize Copilot™ for Shoppers.
* Identify the product viewed by your customer by adding a tag to your product pages so the bot knows what product is being viewed and can answer customer questions correctly.
* Collect data and visualize Copilot sales by installing our conversion tag on your order status page (additional script provided).
Automatically and securely connect the Copilot to your Shopify product catalog and FAQ sources.
* Collect product data from your Shopify store and create a knowledge source to power your Copilot.
* Transform your website content into AI-ready information (FAQs, sizing guides. etc.) and add it to our FAQ knowledge source to power your Copilot while ensuring accurate data from your Shopify feed.
[Install iAdvize Copilot™ from Shopify App Store](https://apps.shopify.com/iadvize-ai-copilot)
## Changelog
Update May 29, 2024 - iadvize-ai-shopping-assistant-26\\
# Salesforce
Introduction to the Salesforce App
## Description
The iAdvize Salesforce connector allows you to manage your conversational marketing strategy from Salesforce while being integrated with your workflow through the Process Builder. It’s compatible with both Salesforce Classic and Lightening Experience.
* Create and Map Your Contact, Person Account, Business - Account, Marketing Lead, Support Case objects with Visitors coming from your website
* Synchronize the iAdvize Conversation Transcripts with Salesforce Service Cloud. - Synchronize the files shared during conversations you have with your website visitors
* Synchronize visitor satisfaction
* Single Authentication for your agents
* User Synchronization & Provisionning
To install the Salesforce connector, please contact your iAdvize Customer Succes Manager. A paid package is required.
## Changelog
Update 04/28/2023 - Version 2.11
# Zendesk
Introduction to the Zendesk App
## Description
The iAdvize Zendesk App allows your agents to trigger escalation tickets and to keep track of every conversation. The App is compatible with pro agents and ibbü experts.
Every ticket created through the App will be linked to an existing customer using the email as a mapping key. If the App finds no customer we will create a new customer in Zendesk.
Key features
* Auto-Save: Decide if you want to save every conversation in Zendesk or not. If activated a ticket will be created in status solved for each conversation handled by your agents.
* Escalation: Activate an option to allow your agents to escalate a ticket in Zendesk if they judge it to be necessary. Use the ticket form of your choosing directly in the iAdvize console as well as a private note.
## **Changelog**
* Update: 01/14/2019 - Version: 2.2.0
# Google Analytics
Introduction to Google Analytics App
## Description
Google Analytics is the internet's most widely used web analytics tool with more than 70% of the market. Google enables its users to monitor website traffic and provides key information for web indexing, optimizing user experience, and following the browsing behavior of website visitors.
The Google Analytics application for iAdvize offers the report of iAdvize events per channel (chats, calls, video chats) within Google Analytics.
## Changelog
\-
# Build your App
Overview
###
# Getting started
Getting started with Apps
### Get a Developer Account
To build apps that iAdvize’s customers can use, first, you need to get a developer account. We invite you to apply thanks to our [online form](https://docs.google.com/forms/d/e/1FAIpQLSfKbBBwHtXU60D0bw6dPejF1_h2VBiPAf60LpQWtJ7h6dvXeg/viewform?usp=sf_link).
* Apply and share your integration project with our team,
* The iAdvize team will contact you within 48 hours.
### Features Overview
iAdvize's Developer Platform will provide you with some easy-to-use tools so you can:
* Manager the privacy mode of your app for it to be public or private
* Set up the authentication process for your app
* Define custom settings such as object mapping (In progress)
* Create plugins to enhance some of iAdvize's predefined features
* Use outgoing webhooks to receive updates in real-time
Once your app is ready, you will be able to submit your connector for review. Then, the iAdvize team will review your app to make sure it fits the Developer Platform policies, and will get back to you within 48 hours (on working days). And then hurrah... You can publish your app on iAdvize’s marketplace!
### Milestones of the app creation process
Here are the different steps of app creation:
* Sign up for our [developer platform](https://developers.iadvize.com/login) to access our App builder.
* You'll receive within 48 hours a confirmation of your subscription and your credentials to access your test environment.
* You build your awesome app and send it for approval when it's finished.
* You get notified of the acceptance or not of your app publication (see app validation process section).
* If your app is approved, congratulations, iAdvize customers can now benefit from your work!
* If your app is private: one or a few selected customers can install it on their production environment.
* If your app is public: any iAdvize customer can install it directly on the marketplace.
* If you need to create a new version of your app, please refer to the "versioning of your apps" section of this documentation.
# My Apps
My apps is the place where you can see the list of all the apps you have built on iAdvize. You can also see their current status:
* **Published**: your app is ready to be installed on the iAdvize Marketplace
* **Under review**: your app has been submitted for review
* **Sandbox**: you can edit your app
# App information
App information is where you will be able to define your app's profile. Also, this is where you can set the Privacy mode of your application: public or private.
**How does the Private mode work?** Your App can be available for all iAdvize's customers or for selected customers. Our team is still working on the accessibility mode under the Private mode. We will make it available manually for the specific customers you have selected.
### Health check
In order to ensure satisfaction from our customers we require that every integrator provide an health check route. Using the provided endpoint iAdvize must be able to detect that a connector is healthy and is behaving as expected. You are required to implement an healthcheck endpoint as specified below.
**Healthcheck endpoint**
**Request - GET method**
| Query parameter | Description | Values |
| --------------- | ----------- | ------ |
| No parameter | | |
**Response - status object**
```json
{
"status": "UP"
}
```
| Field | Description | Values | Required |
| ------ | ------------------------------------ | ------ | -------- |
| status | The current status of your connector | `UP` | ✓ |
Note that this endpoint will be checked on a regular basis at the url you specified in the App information section. It **MUST** be public and **MUST** return `200` status or it will be considered unhealthy.
# App Parameters
By adding parameters to the installation process, the client has the possibility to configure your connector.
You can request two kinds of parameters:
* sensitive parameters such as API keys, emails... it must be declared under the [Authentication parameter step](https://docs.iadvize.dev/apps/build-your-app/app-parameters#id-1.-define-authentication-parameters)
* regular parameters such as texts, boolean it must be declared under the [App parameter step](https://docs.iadvize.dev/apps/build-your-app/app-parameters#id-2.-define-app-settings-parameters)
A connector parameter has 4 to 5 properties:
* Key: the key of your parameter according to your code.
* Label: the name of your parameter, this is what users will see in the marketplace during the installation process
* Type: it defines the type of entry. (For instance: text)
* URL: only required for type "selectpicker". To dynamically retrieve options from the given url
* Required: specify if the parameter is required for your connector
Currently, we support 3 types of parameters:
* **Text,** for textual input values
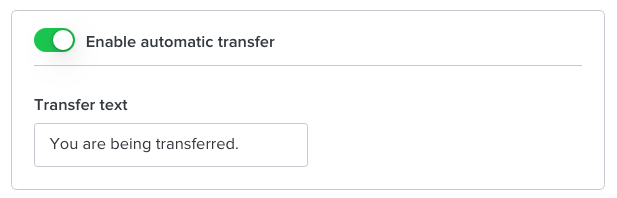
* **Toggle,** for enabling/disabling a part of the parameters. It is useful if you want to allow your clients to enable / disable specific features of your connector
* **Selectpicker,** for dynamically loaded options from the configured URL
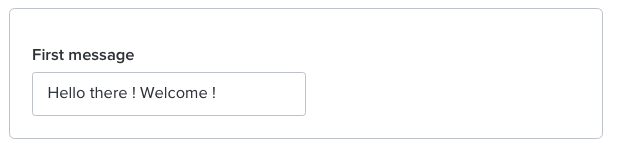
#### **Text parameter**
Usage in the dev platform

Result in the marketplace
#### **Toggle parameter**
Usage in the dev platform
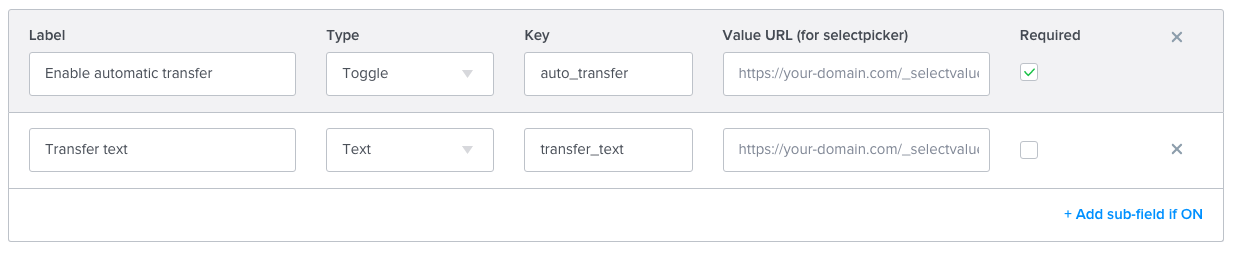
Result in the marketplace
#### **Select picker parameter**
Usage in the dev platform

Result in the marketplace
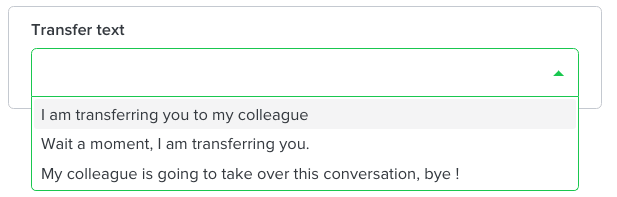
Note: To retrieve the options of the selectpicker, we will call the endpoint:
**Request - GET method**
| Query parameter | Description | Values |
| --------------- | ------------------------------------------------------------------------------ | ----------------- |
| idWebsite | Unique identifier of the website on which your connector is being installed on | ?idWebsite=ha-123 |
**Response - Array of options (must NOT be empty)**
```json
[
{
"label": "I am transferring you to my colleague",
"value": "direct_transfer"
},
{
"label": "Wait a moment, I am transferring you.",
"value": "wait_a_moment"
},
{
"label": "My colleague is going to take over this conversation, bye !",
"value": "colleague_take_over"
}
]
```
| Field | Description | Values | Required |
| ----- | ---------------------------------------- | ------ | -------- |
| label | The displayed label in the select picker | String | ✓ |
| value | The value of the option | String | ✓ |
## 1. Define Authentication parameters
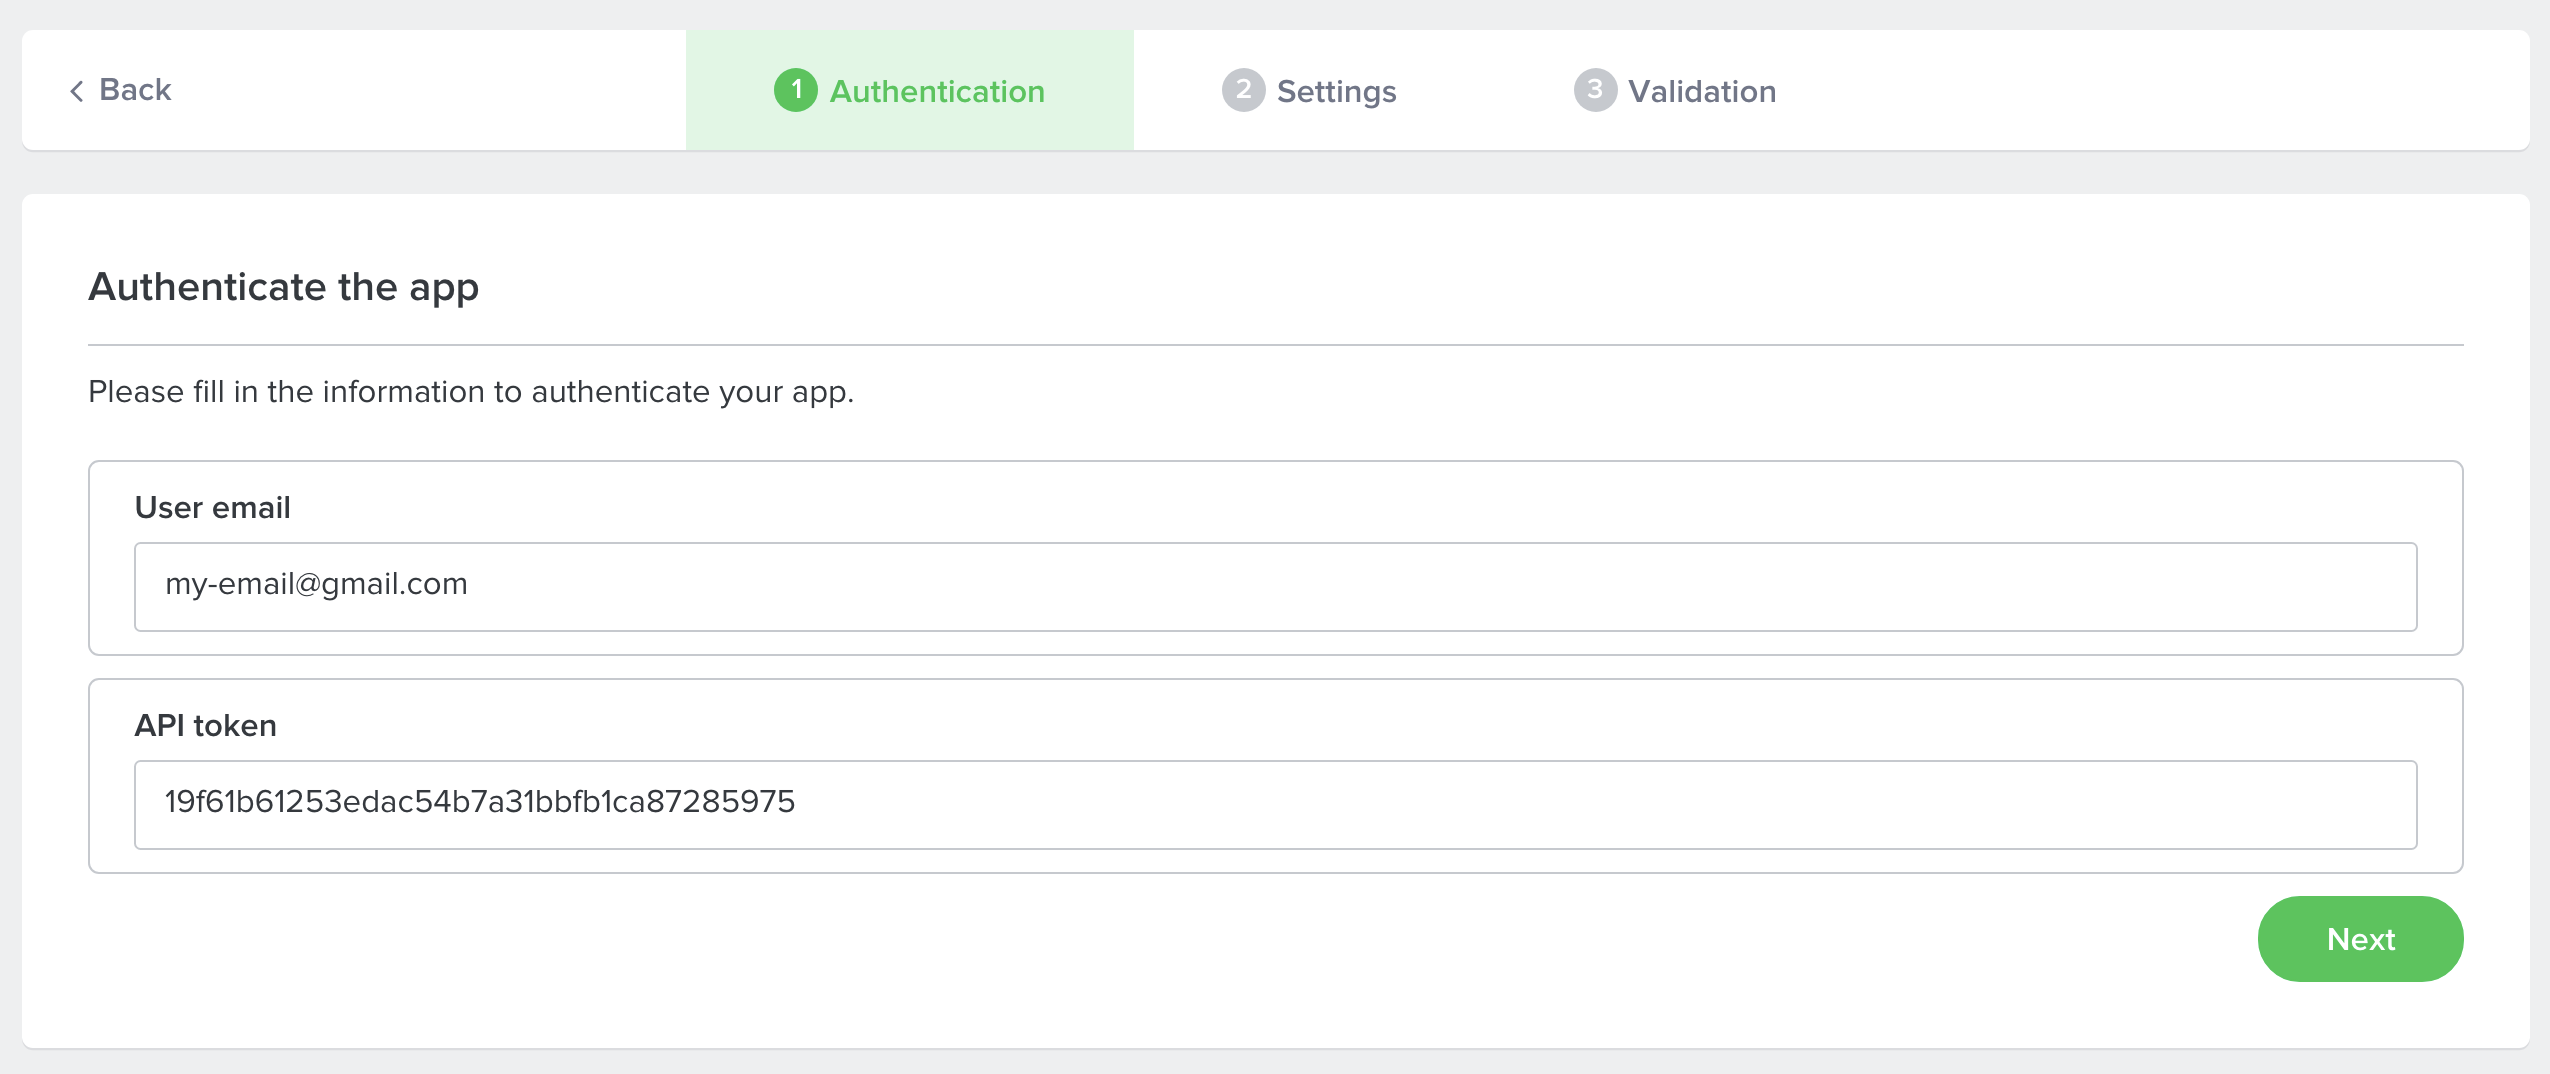
The App Authentication section is where you can set the authentication information that the final user will have to enter in order to install your connector. Once the user is authenticated, the connector will be able to access the right data from iAdvize and from the third-party app. For example, you can ask the user for his/her third app's email and password. Users will need to follow these authentication steps to install your app.
You can add parameters and define the type of entry you need (text, numeric, etc.).
You can add as much parameters as you need. This is the first thing users will see once they click on the "install" button on the iAdvize Marketplace. Parameters appear to users according to their order of creation (the 1st entry created is the 1st on displayed on the page).
*i.e. if your primary goal is to know your users’ usernames, it is the first information you should ask them for.*
*i.e. users might be required to authenticate with an email and a password. In this case, you need to create two different parameters, one for the email and one for the password.*
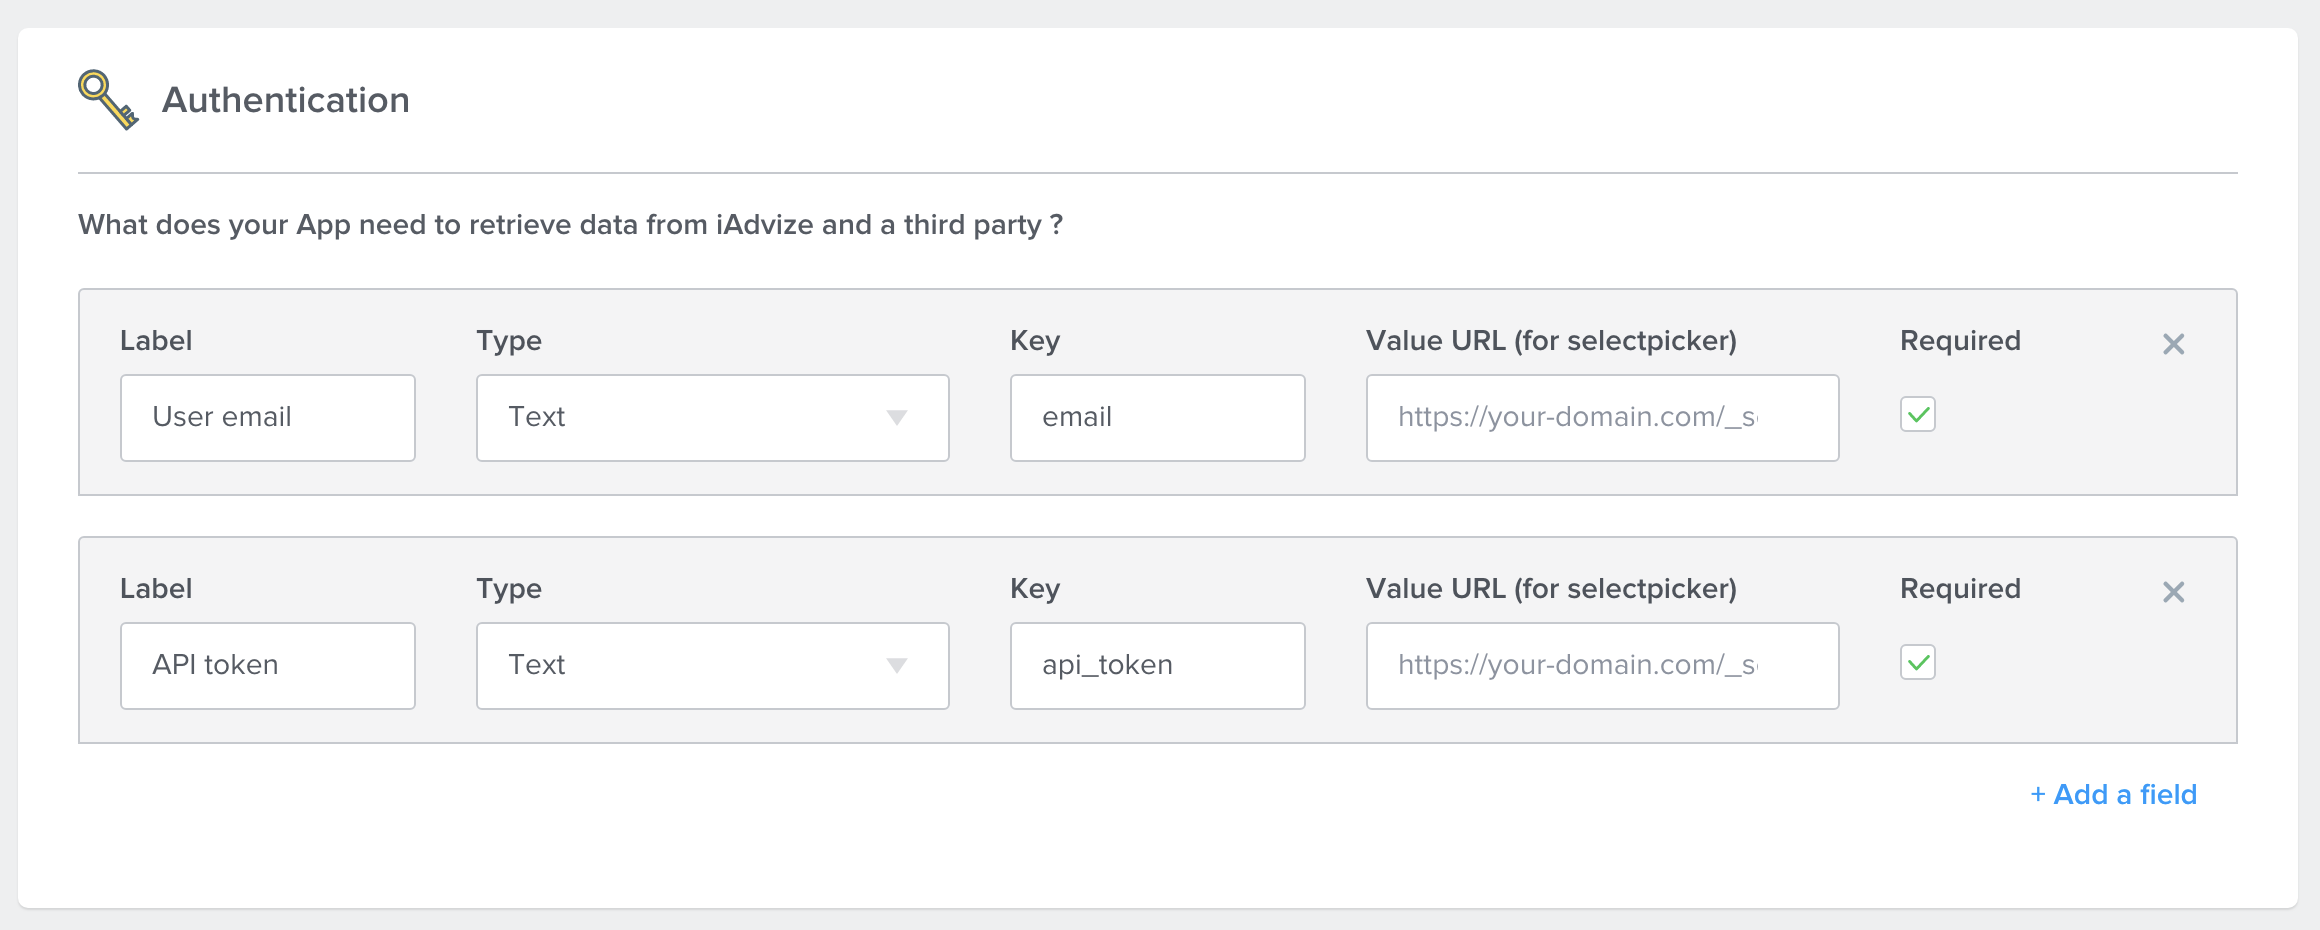
Users have to fill in the parameters during the installation process first, on the iAdvize Marketplace.
## 2. Define App Settings parameters
Just as in the section dedicated to your app's authentication, you are able to set the parameters that users will need to install your connector. These are the parameters that the iAdvize administrator will fill in to install and configure your connector from the iAdvize Marketplace.
Define your app's settings parameters
You can add as many parameters as the installation and configuration of your application requires. For each of these parameters you will have to specify the type of input required.
*Label: it is the name of your parameter. (This is what the users will see). For instance it could be: Username* Type: it defines the type of entry. (For instance: alphanumeric) \*ID: the identifier (key) of your parameter according to your code.
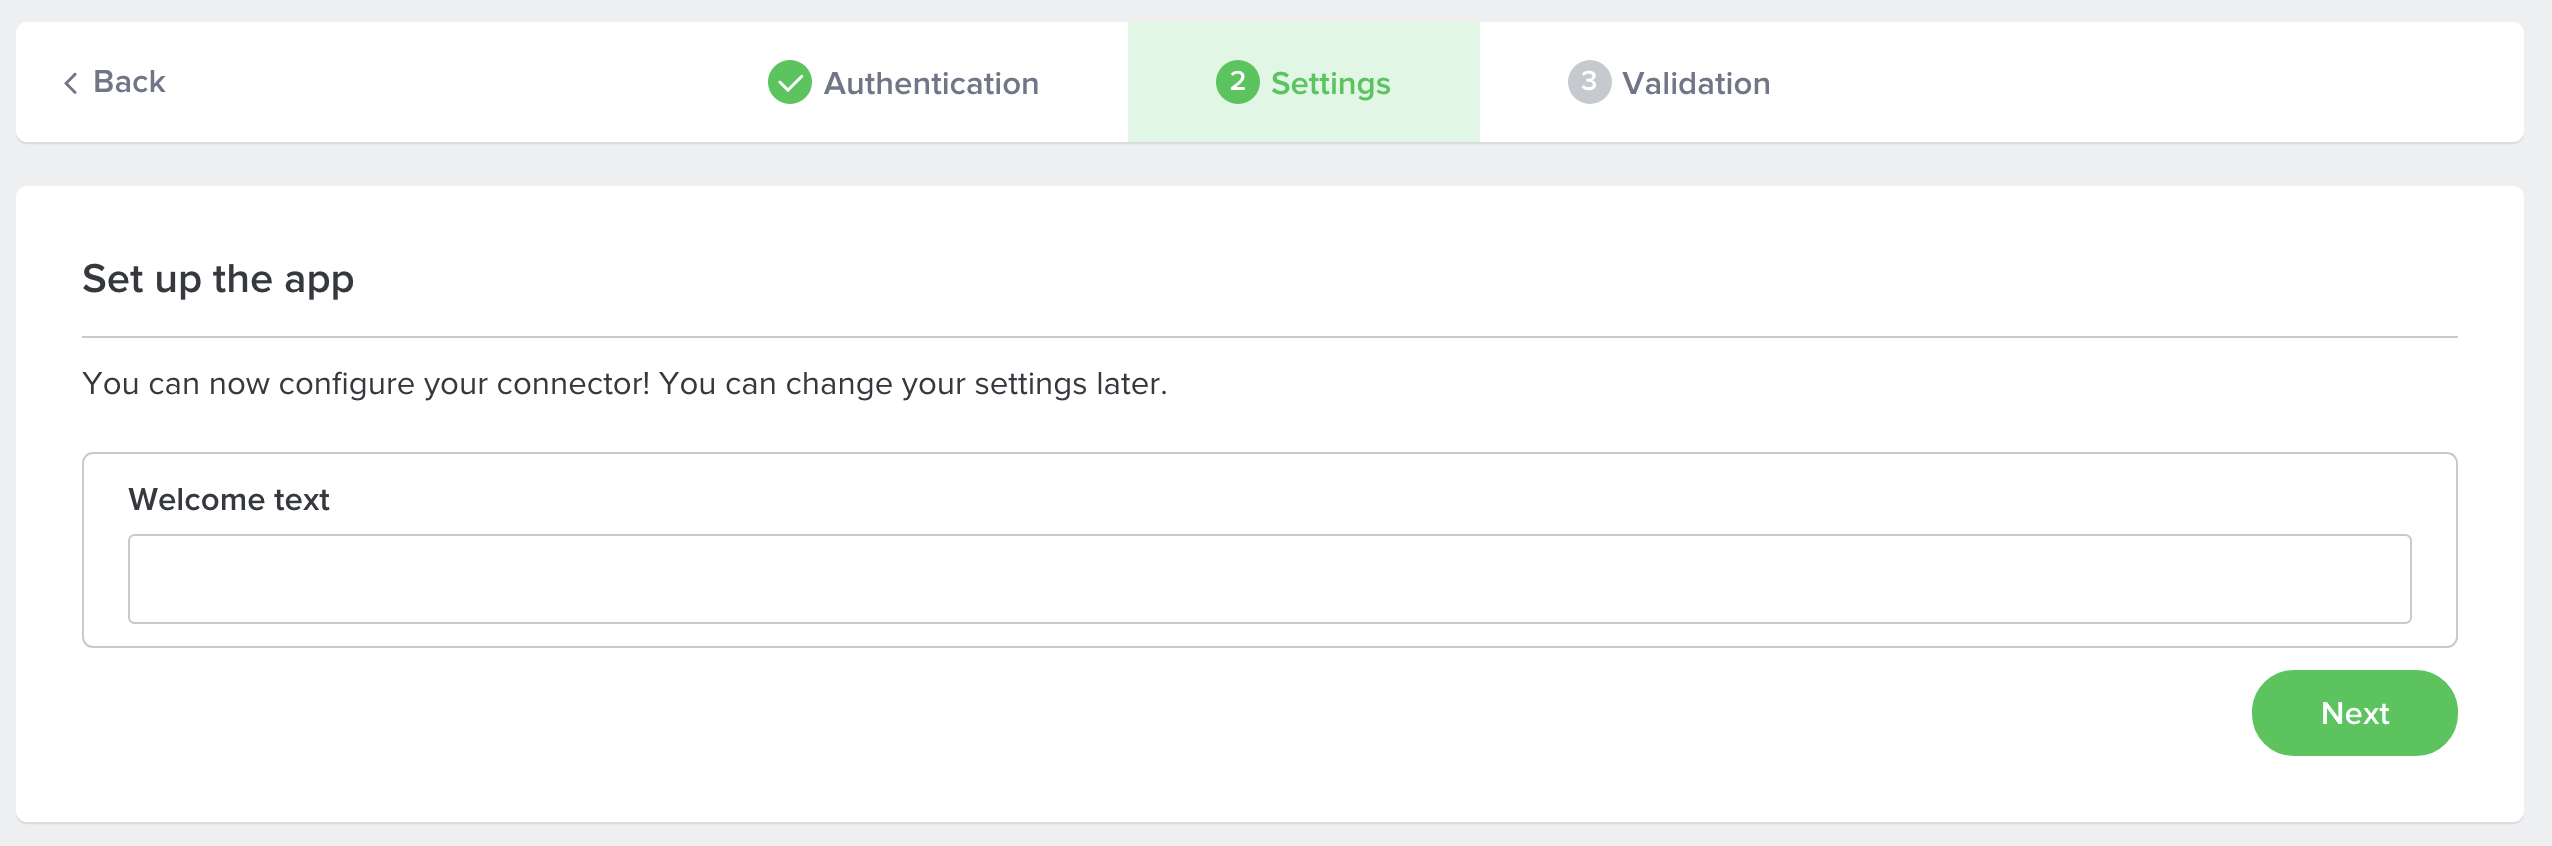
These configuration steps will take place immediately after authentication (if any). The order of appearance of the steps depends on their order of creation. The first created parameter will appear first and the last created parameter will appear last to the user.
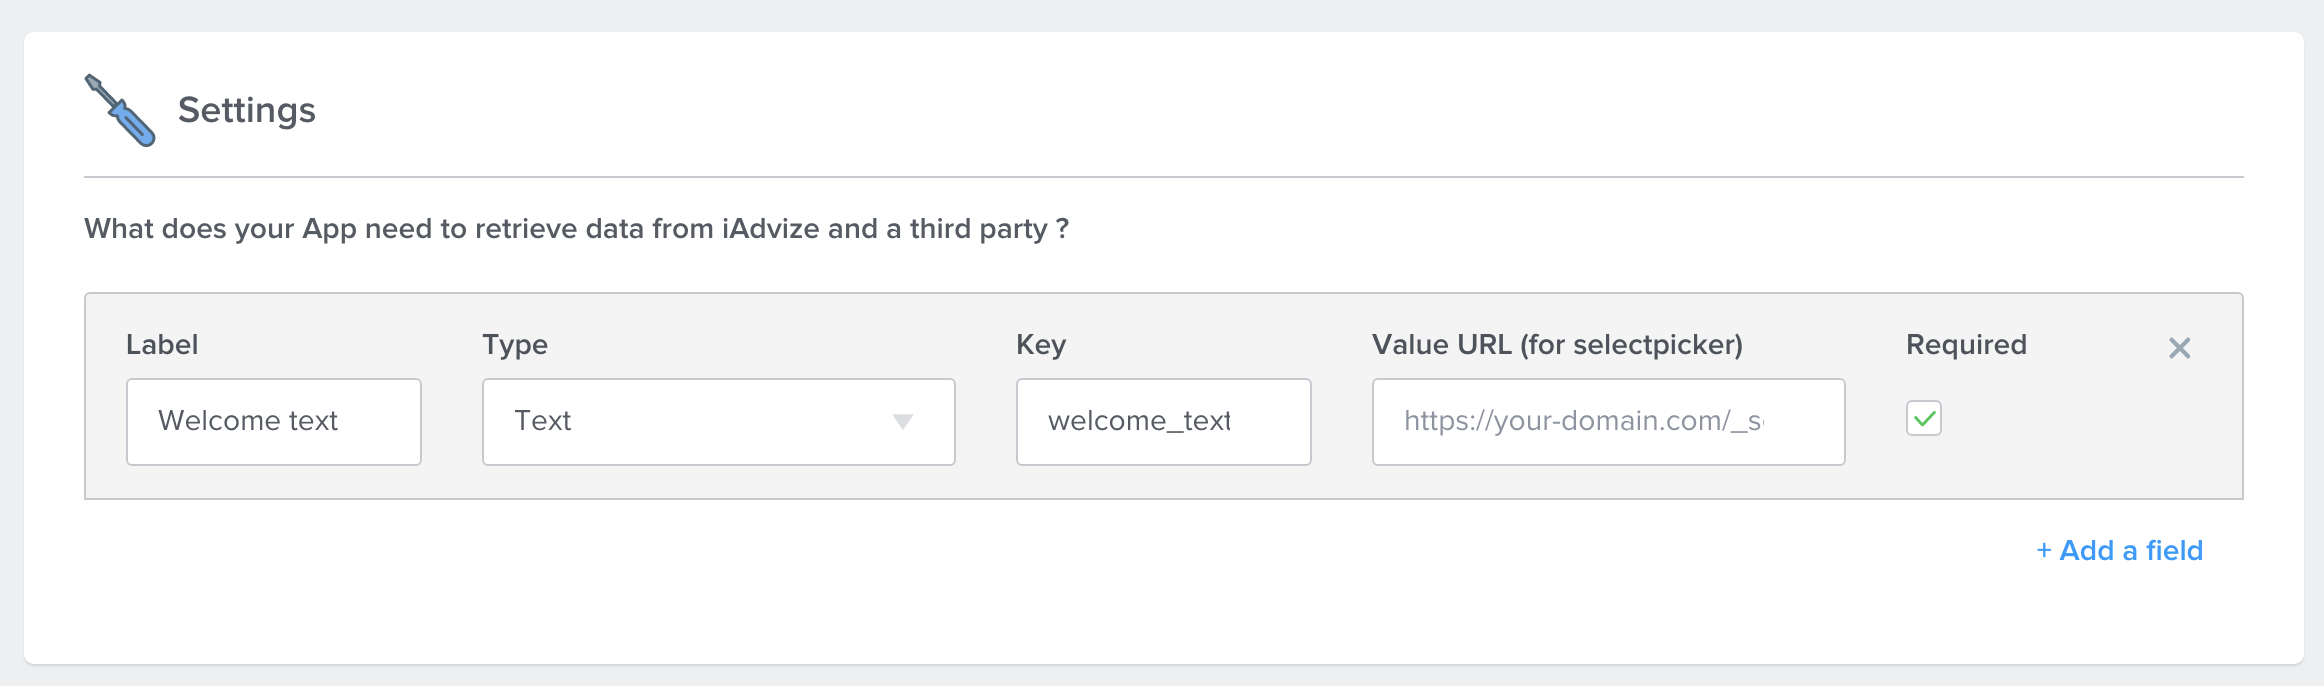
Users have to fill in the parameters during the installation process first, on the iAdvize Marketplace.
# App Plugins
Use plugins to enhance the iAdvize interface by adding or editing predefined features.
Plugins are basically HTTP endpoints whose json responses fit the plugin json-schema. For each plugin one or more endpoint have to be defined. When a plugin is used on user interface, we will make a GET http call to endpoint with documented query parameters. Your http response have to comply with plugin json-schema. You can find a link of the json schema below each plugin route. It can be used to validate your http responses on your side.
The plugins already available are:
* [The product List (on the discussion panel)](#product-list)
* [The customer information (on the discussion panel)](#customer-information)
* [The conversation closing form (on the discussion panel)](#conversation-closing-form)
* [Custom App (on the discussion panel)](#conversation-panel-app)
* [The bot (add an external bot within iadvize chatbox)](#external-bots)
## Product list
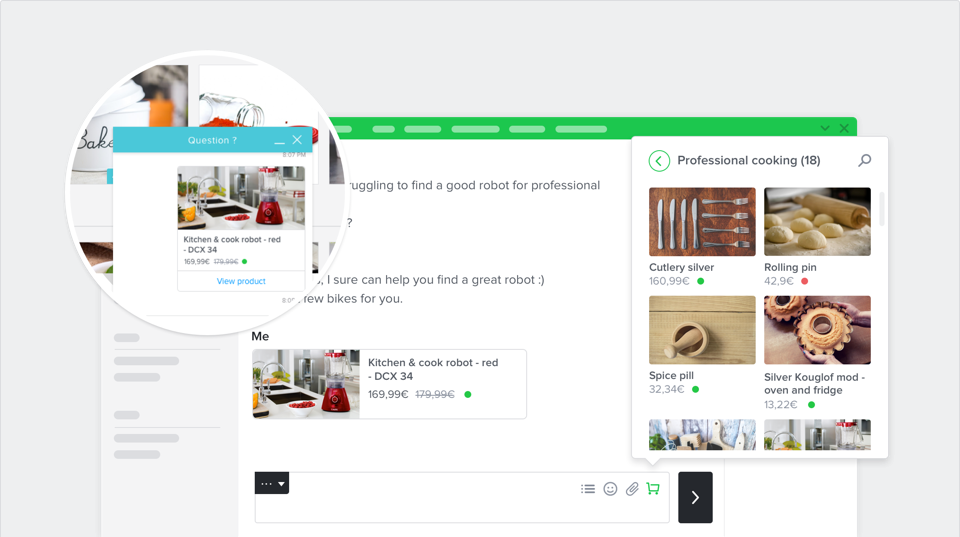
The integration of the product list enables iAdvize's Console panel users to browse a product catalog from the iAdvize discussion panel. Agents can look for a product while they are chatting and send it in just a click within their conversation.
Products are displayed in a popup window just over the conversations view: When shared, visitors can see their image, title, availability and price. By clicking on the "view product" button, visitors are redirected to the product page on your website.
**Add the Product list plugin**
To make sure your connector uses the Product list plugin correctly, all you have to do is to declare:
* The product list URL - this is your catalog’s URL
* The categories url - this is where your connector will get the list of your product categories
**Categories data**
**Request - GET method**
| Query parameter | Description | Values |
| ------------------ | --------------------------------------------------------------------- | -------------------------------------------------------- |
| idConnectorVersion | Connector version id | ?idConnectorVersion=c008849d-7cb1-40ca-9503-d6df2c5cddd8 |
| idParent | Unique identifier of the parent category | ?idParent=123 |
| idWebsite | Unique identifier of the website on which your connector is installed | ?idWebsite=ha-123 |
| idOperator | Unique identifier of the operator loading the categories | ?idOperator=9999 |
| limit | Maximum number of resources per page | ?limit=10 |
| offset | Number of resources skipped before beginning to return resources | ?offset=10 |
**Response - Array of categories**
```json
[
{
"id": "123",
"idParent": "123",
"label": "category",
"products": [
"123",
"456"
],
"productsCount": 3
},
{
"id": "456",
"idParent": null,
"label": "category",
"products": null,
"productsCount": 7
}
]
```
| Field | Description | Values | Required |
| ------------- | ---------------------------------------- | ---------------- | -------- |
| id | Unique identifier | Integer | ✓ |
| idParent | Unique identifier of the parent category | Integer | |
| label | Label | String | ✓ |
| products | products | Array of strings | |
| productsCount | Number of products | Integer | ✓ |
You can validate your response data format with the associated [json schema](https://developers.iadvize.com/json-schemas/product-list/category.json)
**Products data**
**Request - GET method**
| Query parameter | Description | Values |
| ------------------ | --------------------------------------------------------------------- | -------------------------------------------------------- |
| idConnectorVersion | Connector version id | ?idConnectorVersion=c008849d-7cb1-40ca-9503-d6df2c5cddd8 |
| idCategory | Category id | ?idCategory=123 |
| idWebsite | Unique identifier of the website on which your connector is installed | ?idWebsite=ha-123 |
| idOperator | Unique identifier of the operator loading the products | ?idOperator=9999 |
| limit | Maximum number of resources per page | ?limit=10 |
| offset | Number of resources skipped before beginning to return resources | ?offset=10 |
| searchQuery | Product search query | ?searchQuery=query |
**Response - Array of products**
```json
[
{
"id": "123",
"title": "Product's title",
"productUrl": "http://www.e-commerce.com/url-product",
"brand": "brand",
"description": "product's description",
"shortDescription": "shrot description",
"available": true,
"imageUrl": "http://www.e-commerce.com/url-product-image.jpg",
"reference": "reference",
"priceCatalog": "99.9 €",
"pricePromotion": "90 €",
"priceSpecial": "80 €"
},
{
"id": "456",
"title": "Product's title",
"productUrl": "http://www.e-commerce.com/url-product",
"brand": null,
"description": "product's description",
"shortDescription": null,
"available": true,
"imageUrl": "http://www.e-commerce.com/url-product-image.jpg",
"reference": null,
"priceCatalog": "9.9 €",
"pricePromotion": null,
"priceSpecial": null
}
]
```
| Field | Description | Values | Required |
| ---------------- | ----------------- | ------- | -------- |
| id | Unique identifier | Integer | ✓ |
| title | Title | String | ✓ |
| productUrl | Product's url | String | ✓ |
| brand | Brand | String | |
| description | Description | String | ✓ |
| shortDescription | Short description | String | |
| available | Availability | Boolean | |
| imageUrl | Image's url | String | ✓ |
| reference | Reference | String | ✓ |
| priceCatalog | Price catalog | String | ✓ |
| pricePromotion | Price promotion | String | |
| priceSpecial | Price special | String | |
You can validate your response data format with the associated [json schema](https://developers.iadvize.com/json-schemas/product-list/product.json).
## Customer information
The customer information plugin enables iAdvize's Console panel users to access to customer information in a single click. Agents can overview the customer information in a new window while they are chatting. Operators can then edit it or simply look for information.
To be able to retrieve the customer information, iAdvize must be able to identify the visitor thanks to an email and/or an external ID.
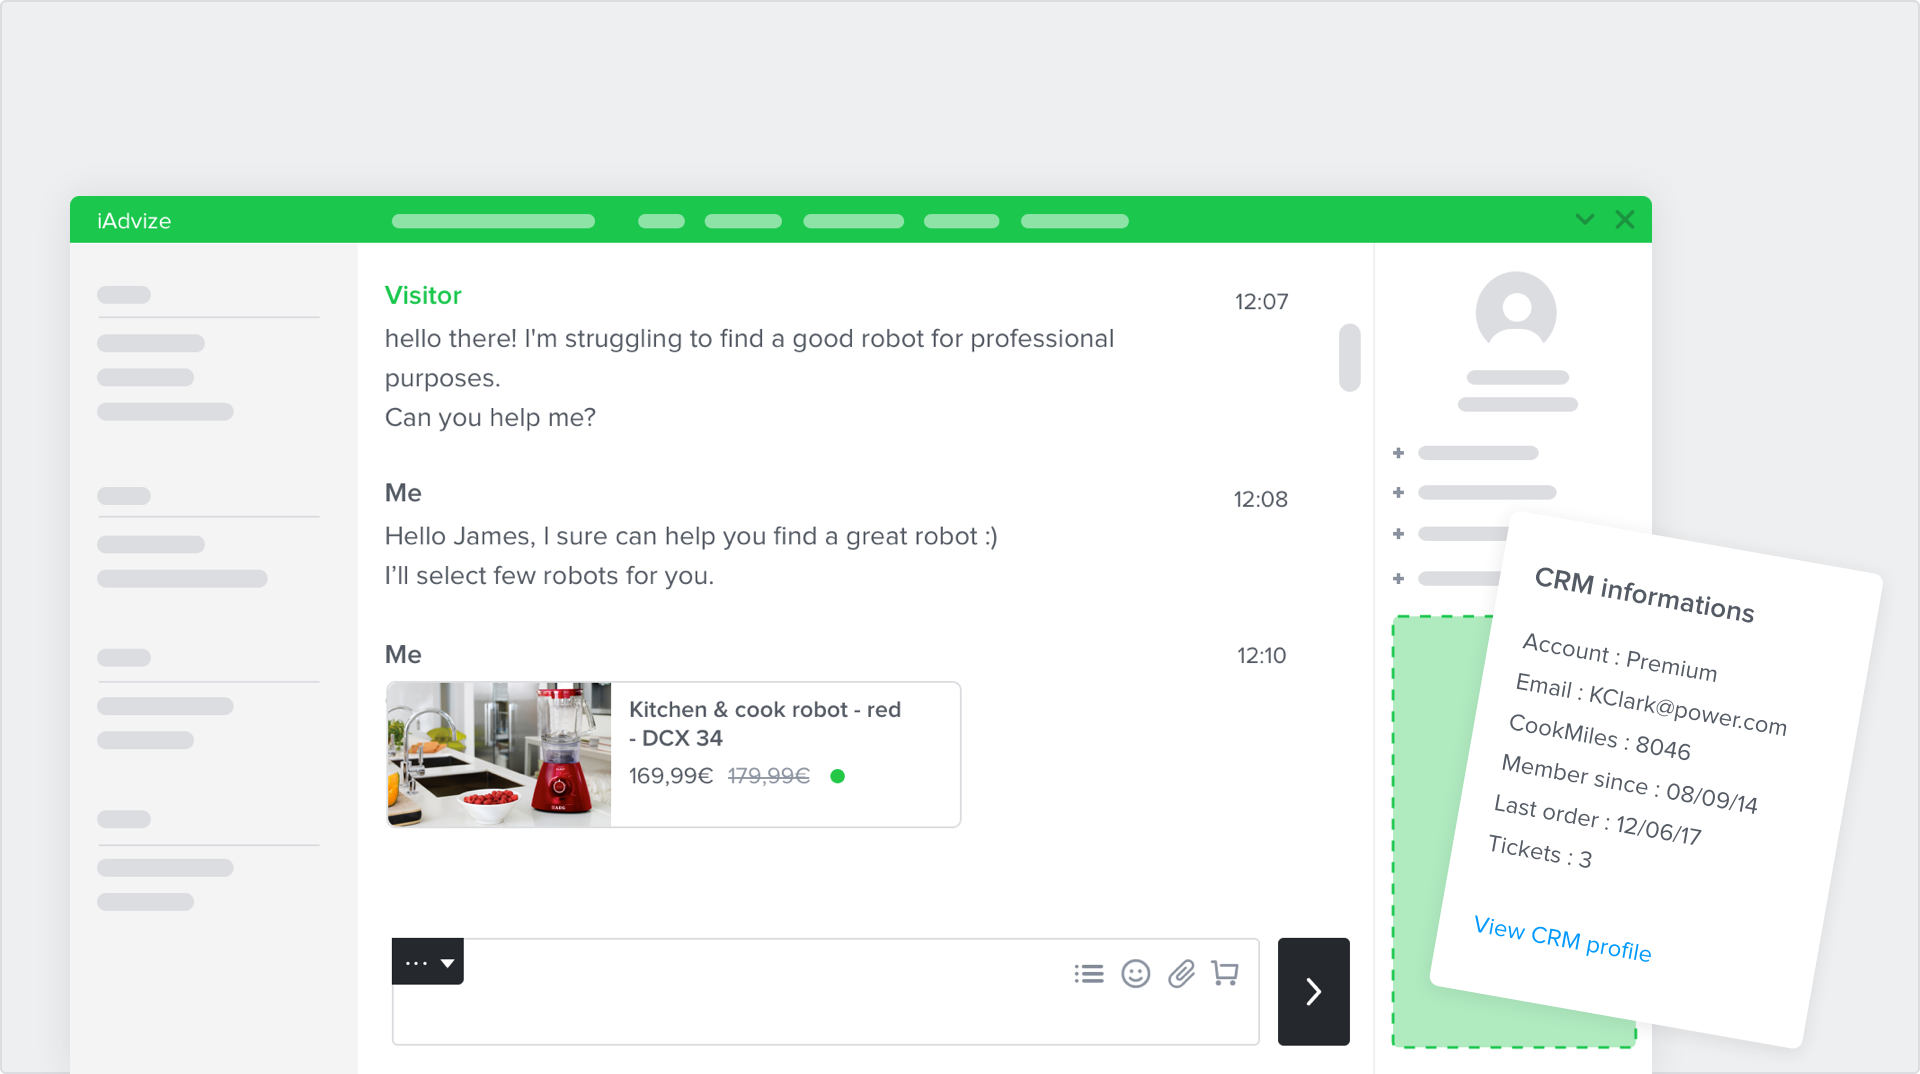
**Add the customer information plugin** In order to set the right plugin parameters, all you have to do is to declare:
* The customer information URL - this is your customer information URL (mandatory).
* The customer information action URL - This URL will be triggered, if agent click on ACTION type field. This field is not mandatory.
**Customer information data**
**Request - GET method**
| Query parameter | Description | Values |
| ------------------ | --------------------------------------------------------------------- | -------------------------------------------------------------- |
| emailVisitor | Visitor email | ?emailVisitor= |
| idConnectorVersion | Connector version id | ?idConnectorVersion=c008849d-7cb1-40ca-9503-d6df2c5cddd8 |
| idVisitorExternal | Visitor external id | ?idVisitorExternal=123 |
| idVisitorUnique | Visitor unique id | ?idVisitorUnique=a7b94266db827c5b8f04586e8e543abd4b7e976e9a723 |
| idWebsite | Unique identifier of the website on which your connector is installed | ?idWebsite=ha-123 |
| operatorLocale | Operator locale | ?operatorLocale=en |
| idOperator | Unique identifier of the operator loading the visitor profile | ?idOperator=9999 |
**Response - Array of fields**
```json
[
{
"id":"crm_profile_link",
"label": "CRM profile",
"value": "https://www.crm.fr/customer-information",
"fieldType":"URL"
},
{
"id":"crm_visitor_tag",
"label": "CRM tag",
"value": "tag",
"fieldType": "TEXT"
},
{
"id":"crm_create_case_action",
"label": "Create a case",
"value": "OPEN_CASE",
"fieldType": "ACTION"
}
]
```
| Field | Description | Values | Required |
| --------- | ----------------- | ------------------------- | -------- |
| id | Unique identifier | String | ✓ |
| label | Label | String | ✓ |
| value | Value | String | ✓ |
| fieldType | Field type | `ACTION`, `TEXT` or `URL` | ✓ |
You can validate your response data format with the associated [json schema](https://developers.iadvize.com/json-schemas/customer/information.json).
**Customer information action URL**
**Request - POST method**
| Body parameters | Description | Values |
| ------------------ | --------------------------------------------------------------------- | --------------------------------------------- |
| action | Action to execute on the connector | OPEN\_CASE |
| idConnectorVersion | Connector version id | c008849d-7cb1-40ca-9503-d6df2c5cddd8 |
| idVisitorUnique | Visitor unique id | a7b94266db827c5b8f04586e8e543abd4b7e976e9a723 |
| idWebsite | Unique identifier of the website on which your connector is installed | ha-123 |
| idConversation | Identifier of the current conversation | ha-123 |
| idOperator | Operator identifier who has clicked on the action | ha-12345 |
**Response - Array of fields**
```json
{
"success": true,
"message": "Case created with success"
}
```
| Field | Description | Values | Required |
| ------- | ---------------------------- | ------- | -------- |
| success | Result of the action | Boolean | ✓ |
| message | Result message of the action | String | |
You can validate your response data format with the associated [json schema](https://developers.iadvize.com/json-schemas/customer/action.json).
## Conversation closing form
The conversation closing form plugin enables iAdvize's Console panel users to provide additional information manually at the end of conversation. **This plugin is only available for Chat / Call and Video channels**. 3rd part channels are not supported.
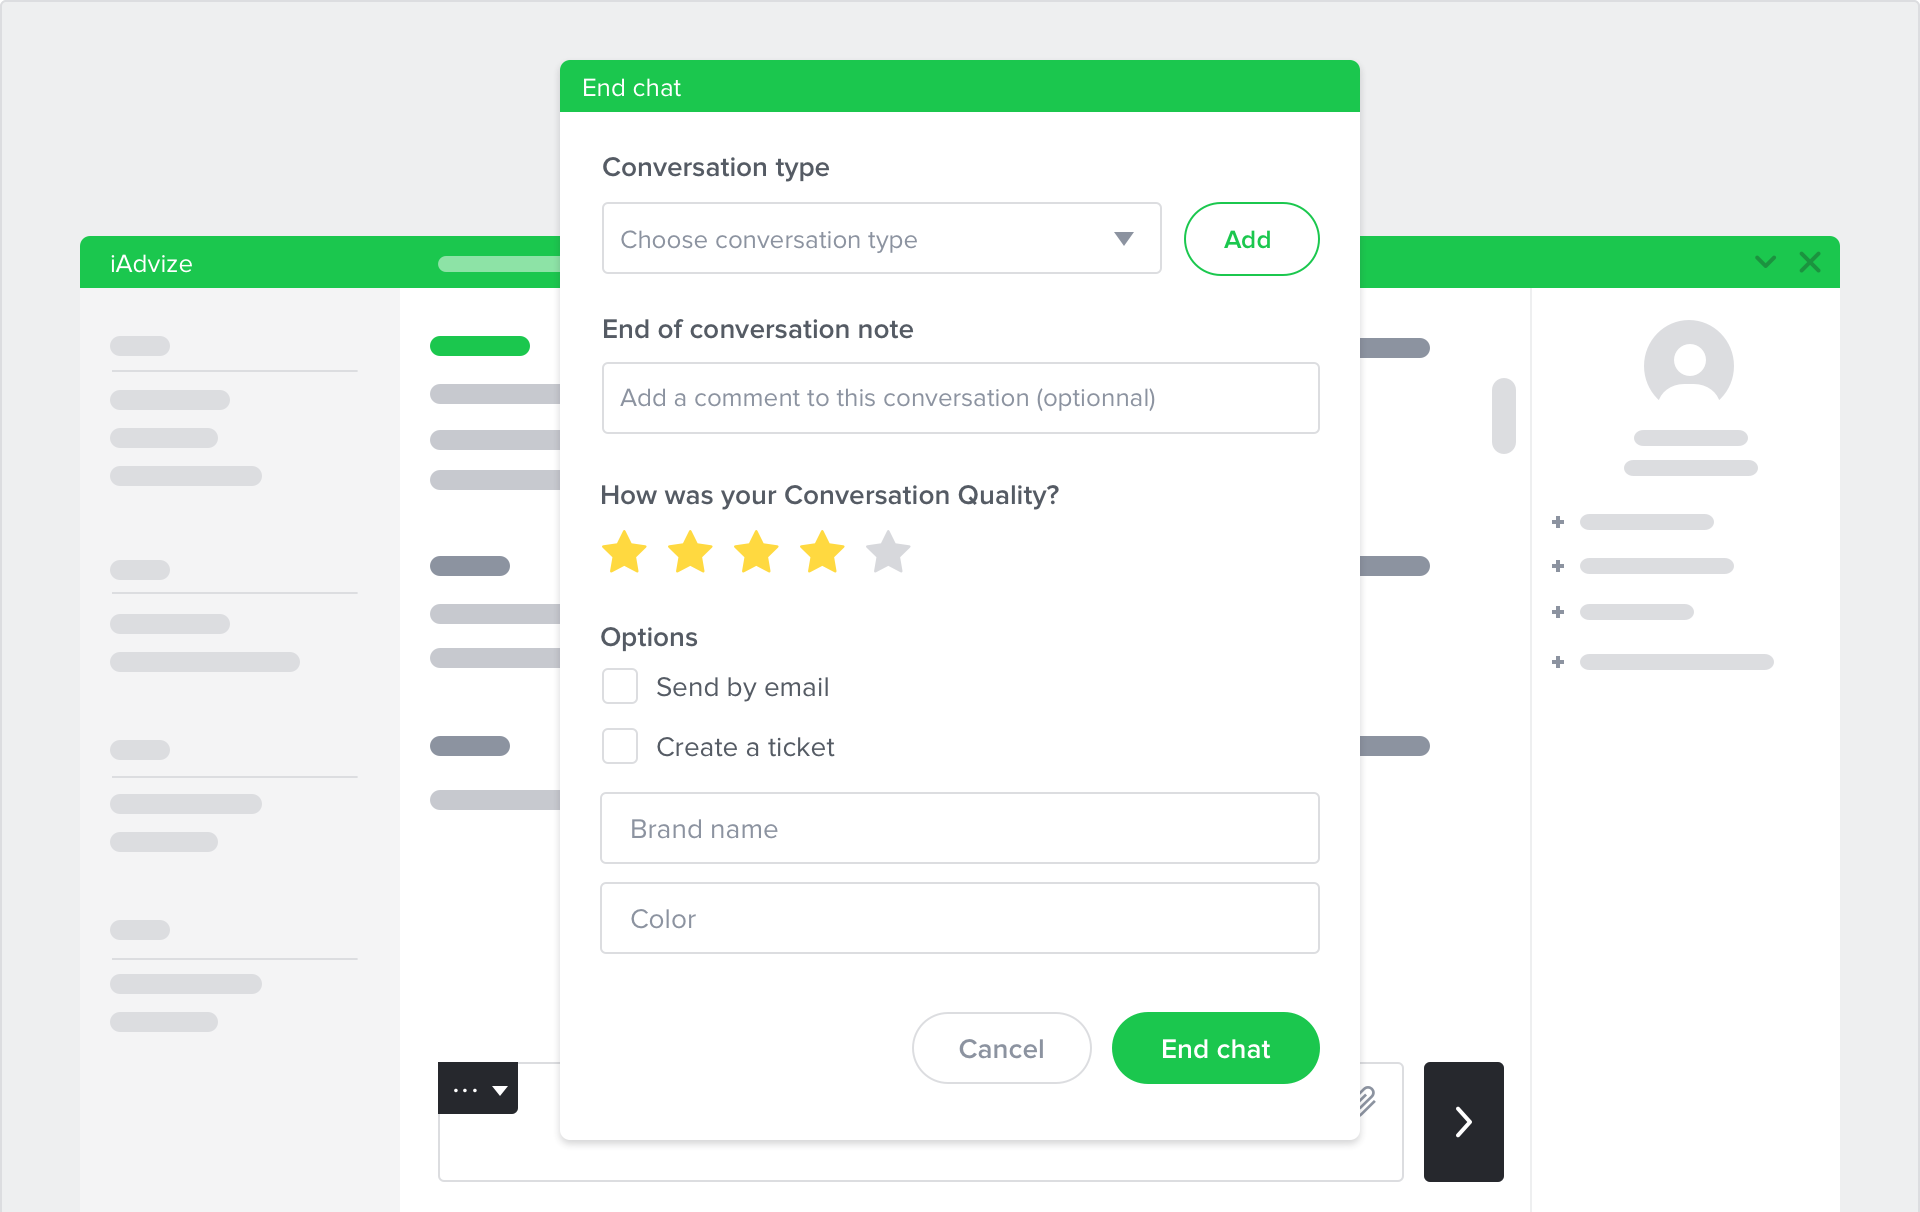
**Add the conversation closing form plugin**
In order to set the right plugin parameters, all you have to do is to declare:
* The connector URL - this is your form's url
**Conversation Closing Form data**
**Request - GET method**
| Query parameter | Description | Values |
| ------------------ | ------------------------------------------------------------------------ | -------------------------------------------------------- |
| idConnectorVersion | Connector version id | ?idConnectorVersion=c008849d-7cb1-40ca-9503-d6df2c5cddd8 |
| idWebsite | Unique identifier of the associated website (assigned to you by iAdvize) | ?idWebsite=ha-123 |
| operatorLocale | Operator locale | ?operatorLocale=en |
| idOperator | Unique identifier of the operator loading the form | ?idOperator=9999 |
**Response - Array of inputs**
| Field | Description | Values | Required |
| ---------------- | ------------------------------------------------------------------------- | ---------------------------------------------------------------- | -------- |
| id | Unique identifier | string | ✓ |
| idParent | Parent identifier, if the field depends on it | string | |
| label | Label | string | ✓ |
| fieldType | Field type | `TEXT`, `CHECKBOX`, `SELECT`, `TEXTAREA`, `INTEGER` or `DECIMAL` | ✓ |
| isRequired | Required | Boolean | ✓ |
| options | List of options object for `SELECT` type | array | |
| options.label | Label displayed for this option | string | ✓ |
| options.value | Value saved when option is selected | string | ✓ |
| conditionalValue | Value of the parent field that determines whether this field is displayed | string | |
```json
[
{
"id": "create_crm_ticket",
"label": "Create a CRM ticket",
"fieldType": "CHECKBOX",
"isRequired": true
},
{
"id": "brand_name",
"label": "Brand name",
"fieldType": "TEXT",
"isRequired": true
},
{
"id": "brand_description",
"label": "Brand name brings a totally new concept \n to their customers.",
"fieldType": "TEXTAREA",
"isRequired": true
},
{
"id": "ticket_priority",
"idParent": "create_crm_ticket",
"label": "Priority",
"fieldType": "SELECT",
"isRequired": true,
"options": [
{
"label": "Major",
"value": "MAJOR"
},
{
"label": "Minor",
"value": "MINOR"
},
{
"label": "Trivial",
"value": "TRIVIAL"
}
]
},
{
"id": "ticket_priority_major_description",
"label": "Major description",
"fieldType": "TEXTAREA",
"isRequired": true,
"idParent": "ticket_priority",
"conditionalValue": "MAJOR"
},
{
"id": "order_id",
"label": "The order id related to the claim",
"fieldType": "INTEGER",
"isRequired": false
},
{
"id": "order_discount",
"label": "The discount granted to the customer",
"fieldType": "DECIMAL",
"isRequired": false
}
]
```
You can validate your response data format with the associated [json schema](https://developers.iadvize.com/json-schemas/conversation-closing-form/field.json).
⚠️ iAdvize can save up to 1024 characters in each field
## Custom App
Custom App extends the capabilities of the Desk by allowing our clients to embed their own apps in a dedicated panel.
Read more about [Custom App](/technologies/custom-app-in-iadvize-desk) technology
## External bots
Let your bot interact with online visitors directly within iAdvize’s chatbox. The External Bot plugin enables iAdvize's Admins and Managers to create users with the role “bot” from iAdvize’s administration. The scenario and availability of the bot are managed by your app.
Read more about [External Bot](/technologies/external-bot) technology
# Add Webhooks
The webhook system allows external applications to subscribe to events (via callback URLs) to receive updates in real-time. When you build your app, you can subscribe to a list of events. When customers install your app, it automatically creates webhooks for these customers as well as for events based on your app's configuration.
This subscription is based on events happening on different domains. See the list of events available in the [Webhooks documentation](/technologies/webhooks).
You can create as much outgoing webhooks as you need. A webhook can cover several events. An event can be linked to a customer (example customers.website.created) or linked to a website (example customers.website.created)
* Name of the webhook: an optional label you can give to the webhook
* webhook URL: the server URL that will receive the webhook
* Security token: Token provided by iAdvize (this field cannot be edited)
* Content-type: Application / json ; Application / x-www-form-urlencoded
* Events: you can select the events in the list. You can subscribe to all iAdvize events, all events of a specific domain, or only one event.
# Submit your Apps
Apps must be submitted to iAdvize for review. The versioning declaration must be done by the developer during the submission process. iAdvize will approve or refuse the app based on specific criteria.
### App Reviewing Process
Once your app is ready you will be able to submit your connector for review. The iAdvize team will review your app to make sure it fits the Developer Platform policies and will get back to you within 48 hours (on working days).
Before submitting your app please make sure your app meet the following requirements:
| Item | Description |
| --------------- | ---------------------------------------------------------------------------------------------------------------------------------------------------------------------------------------------------------------- |
| App description | The provided description of your application will be displayed on the marketplace if your app is public. Event if for private releases, please provide a brief description of your connector. |
| App logo | The icon should be in JPG/PNG/GIF format and respect at least the following dimensions : 165x150. |
| App screenshots | Image should be in JPG/PNG/GIF format and respect a 8:5 ratio. |
| Contact | Please give us the main technical contact for the app as well as a generic support contact in case of emergency and unavailibility of the main contact. |
| Health check | As described in our documentation a [Health check route is required.](https://developers.iadvize.com/documentation/build-apps#health-check) |
| Signature usage | The App must refuse any request containing a missing or bad signature. |
| Demo | If your application is a public app we will ask you for a demo environment in order to be able to test the integration. Please provide us with access for testing through slack when you submit the application. |
# App security
For security reasons, iAdvize provides you with a method to verify and secure your apps. You will be able to make sure that the payloads have not been subjected to modifications, and to verify its source in order for example to limit the requests to those coming from iAdvize.
{% hint style="info" %}
Not applicable for Custom App. Please refer [to this section regarding Custom App security.](https://docs.iadvize.dev/technologies/custom-app-in-iadvize-desk#use-authentication)
{% endhint %}
Once your server is configured to receive payloads, you can set up a secret token and verify the information.
#### Set your secret token
First, you need to get one secret token depending on your connector. You can retrieve this token in the 'App information' section on our developer platform.
Once your server is configured to receive payloads, you can set up a secret token and verify the information.
Note: If you want to use the webhook system without building a connector, you will have to use one token per webhook. To retrieve the token(s) you must contact us at and we will generate the token for you.
#### Validating payloads from iAdvize
Once the secret token set, iAdvize will create a hash signature. This hash signature is passed along with each request in the headers as `x-iadvize-signature`.
For `GET` requests, hash signature starts with the algorithm name `sha256=` and is computed by hashing the **raw query string** with HMAC hexdigest algorithm and your secret token as salt.
For `POST`, `PUT`... requests, hash signature starts with algorithm name `sha256=` and is computed by hashing the **raw body string** with HMAC hexdigest algorithm and your secret token as salt (the result is a string).
```
x-iadvize-signature: sha256=b847f045bde28959da58adbbb8fdb58dca33e9ff5ebb746ea324a7b71cc4f912
```
You have to compute a new hash using your secret token, and to compare it with `x-iadvize-signature` and make sure it matches. Here is an example of a PHP implementation:
```
// Example for a POST request
$secretToken = 'yourSecretToken';
$headers = getallheaders();
$iAdvizeSignature = $headers['x-iadvize-signature'];
// Get alogrithm and hash
list($algorithm, $iAdvizeHash) = explode('=', $iAdvizeSignature, 2);
// Get body payload from webhook
$bodyPayload = file_get_contents('php://input');
// Computed hash with body payload
$bodyPayloadHash = hash_hmac($algorithm, $bodyPayload, $secretToken);
// Final check
if (! hash_equals($iAdvizeHash, $bodyPayloadHash)) {
exit('Validation hash failed');
}
```
We strongly recommend you, to use the **constant time** string comparison method (`hash_equals` vs `===` in our example), to be less vulnerable to timing attacks.
#### Validate our IPs
If necessary, you can find the [IP addresses to whitelist in this article](/getting-started/security).
# Developer Policy
Developers host their code on their own host service.
Developers are responsible for their connector's maintenance.
Developers can set their app’s price (monthly fee per user). If it’s not a free app, the developers must be legal person.
# Copilots
# Product Catalog sync through API
This page will describe how you can use our GraphQL API to synchronize product catalog AI Knowledge with your systems, with the aim to use this knowledge in your generative AI bots.
## Introduction
This feature allows to keep knowledge about products up to date, by allowing you to send updates, creations and deletion operations about the product information your system holds. Upon receiving these events, we'll index the new knowledge such that your bot can use the very latest information to answer your visitors' questions.
To do so, we'll look into how you can create a knowledge source (your product catalog), and insert, update and delete knowledge items (your products information).
## Step 1: Recommended: Configure a product id custom data
Although this step is optional, we highly recommend you take the time to properly configure the custom data that holds the product id. This will enable the generative AI bots to automatically fetch the relevant product information based on the visitor's current page.
You'll find an article describing [how to set up a custom data here.](https://help.iadvize.com/hc/en-gb/articles/203401593-Create-and-use-the-custom-data) Take note of the custom data variable name, it will be useful during step 2.
## Step 2: Create a new KnowledgeSource
This operation will only need to be done once, therefore there is no need to write any code for it.
It consists in using GraphQL to create a new KnowledgeSource, and taking note of the identifier that was attributed to it. This identifier will be used during step 3.
{% tabs %}
{% tab title="Using Apollo" %}
You can open the GraphQL mutation [by clicking on this link](https://iadvize.link/UZ0HRF). You'll need to:
* Be logged in as an administrator.
* Replace the variables in the bottom panel with the identifier of your project, the name of the knowledge you're about to create ("API sync product catalog" for instance), and put the name of the custom data variable.
* Execute the query by clicking the KnowledgeSourceCreate blue button
* Write down the identifier of the KnowledgeSource that will appear in the right panel
{% endtab %}
{% tab title="Manually" %}
{% code title="Graphql Mutation" %}
```graphql
mutation KnowledgeSourceCreate(
  $knowledgeSourceCreateInput: KnowledgeSourceCreateInput!
) {
  knowledgeSourceCreate(knowledgeSourceCreateInput: $knowledgeSourceCreateInput) {
    knowledgeSource {
      id
      name
    }
  }
}
```
{% endcode %}
{% code title="Variables" %}
```json
{
"knowledgeSourceCreateInput": {
"details": {
"productApiSync": {
"customDataName": ""
}
},
"name": "",
"projectId":
}
}
```
{% endcode %}
{% endtab %}
{% endtabs %}
{% hint style="info" %}
If you are requesting our GraphQL API directly, do not forget to [get your GraphQL token](/technologies/graphql-api/authentication) first
{% endhint %}
## Step3: Synchronize your products with us
Now you have a KnowledgeSource, you can add, update or delete items within that source. In order to do this, you'll need to react to events within your system and call our GraphQL API.
### Create or update a product with upsert
You can use this mutation, bearing in mind you can submit up to 20 products in a single mutation.
When using the mutation `knowledgeProductsUpsert` to update a product, you need to send all the product's payload. If you want to only send fields which have changed (eg. price, availability, etc.), please refer to the `knowledgeProductsPatch` mutation [described below](#partially-update-products-patch).
{% hint style="info" %}
When upserting a large number of products or an entire catalog, ensure that you comply with the rate limit of 50 requests per second. This limit is enforced on a per-IP address basis.
{% endhint %}
Below is an example of request you can use to upsert products. **This example only references a subset of fields you can set for products**. Please refer to the [definition of each available field in our GraphQL documentation](https://graphql.iadvize.dev/types/KnowledgeProductInput) and to get the expected type and values for each field.
{% code title="Mutation" %}
```graphql
mutation KnowledgeProductUpsert($input: KnowledgeProductsUpsertInput!) {
knowledgeProductsUpsert(input: $input) {
knowledgeSource {
name
}
upsertedProducts {
productId
status
}
}
}
```
{% endcode %}
{% code title="Variables" %}
```json
{
"input": {
"knowledgeSourceId": "",
"products": [
{
"id": "",
"availability": "IN_STOCK",
"availabilityDate": "2024-01-09",
"brand": "my brand",
"color": "blue",
"condition": "NEW",
"description": "this is my product description",
"gender": "UNISEX",
"imageLink": "https://www.google.com/images/branding/googlelogo/2x/googlelogo_color_272x92dp.png",
"additionalImageLink": "https://www.google.com/images/branding/googlelogo/2x/googlelogo_color_272x92dp.png",
"itemGroupId": "my group id",
"link": "https://www.google.com",
"material": "cotton",
"price": {
"currency": "EUR",
"value": "120.00"
},
"productTypes": [
"t-shirt",
"polo"
],
"size": "XL",
"title": "my product title",
"productDetails": [
{
"attributeName": "my detail name",
"attributeValue": "my detail value"
}
],
"salePrice": {
"currency": "EUR",
"value": "2.0"
},
"crossSellProducts": ["product-id-1", "product-id-2"],
"compatibleWith": ["product-name-1", "product-name-2"]
}
]
}
}
```
{% endcode %}
### Partially update products (patch)
Use this mutation when you only need to change a subset of fields for products that already exist in the knowledge source. Unlike `knowledgeProductsUpsert`, you do not send a full product payload: for each field, **omit** it to leave the stored value unchanged, pass **`null`** to clear it, or pass a **value** to set or replace it.
Value passed in the query for one field
Effect on the product's field on iAdvize's side
non-null value
the current field's value will be replaced with the new value. This behavior also impacts array fields (for example productDetails): setting a new value for the array will override the array. You can't just add or update one value of an array.
null value
field's value will be cleared
no value passed (not even null)
value will remain unchanged
Each object in `products` must include the product `id` plus **at least one** other patchable field (otherwise the request is rejected).
You can patch up to **100** products in a single mutation (compared to 20 for upsert).
> **Note:** The response returns immediately with the list of products that were accepted for update, but indexing is **asynchronous**, like upsert. Respect the same rate limit (**50 requests per second** per IP address) when patching large catalogs.
**Mutation**
```graphql
mutation KnowledgeProductsPatch($input: KnowledgeProductsPatchInput!) {
knowledgeProductsPatch(
input: $input
) {
knowledgeSource {
name
}
upsertedProducts {
productId
status
}
}
}
```
**Variables**
For example if you want to:
1. Set product 1's availability to OUT\_OF\_STOCK
2. Set product 2's price to 14.99 EUR and its availability to IN\_STOCK
3. Remove product 3's brand information (a `null` value will remove the data)
```json
{
"input": {
"knowledgeSourceId": "",
"products": [
{
"id": "1",
"availability": "OUT_OF_STOCK"
},
{
"id": "2",
"price": {
"value": "14.99",
"currency": "EUR"
},
"availability": "IN_STOCK"
},
{
"id": "3",
"brand": null
}
]
}
}
```
### Delete a product
{% code title="Mutation" %}
```graphql
mutation ($input: KnowledgeProductsDeleteInput!) {
knowledgeProductsDelete(input: $input) {
knowledgeSource {
name
}
deletedProducts {
productId
status
}
}
}
```
{% endcode %}
{% code title="Variables" %}
```json
{
"input": {
"knowledgeSourceId": "",
"productIds": [""]
}
}
```
{% endcode %}
## Step 4: Read the products of your knowledge source
Before patching or deleting, you often need to know which products are currently stored in a knowledge source — for example to diff it against your own catalog and decide, product by product, whether to update or remove it.
Two queries are available for this. As with the mutations above, **list only the fields you need** — both queries return a `KnowledgeProduct`, whose full set of fields is [described in our GraphQL documentation](https://graphql.iadvize.dev/types/KnowledgeProduct).
### List the products of a knowledge source
`knowledgeProducts` returns the products of a knowledge source, paginated with a cursor-based connection. Use `first` together with `after` to walk through the whole catalog: pass the `pageInfo.endCursor` of the previous page as the next `after`, and repeat while `pageInfo.hasNextPage` is `true`.
{% code title="Query" %}
```graphql
query KnowledgeProducts($input: KnowledgeProductsSearchInput!, $first: Int, $after: String) {
knowledgeProducts(input: $input, first: $first, after: $after) {
edges {
node {
id
title
}
}
pageInfo {
hasNextPage
endCursor
}
}
}
```
{% endcode %}
{% code title="Variables" %}
```json
{
"input": {
"knowledgeSourceId": ""
},
"first": 100
}
```
{% endcode %}
The optional `searchTerm` in `KnowledgeProductsSearchInput` filters products whose id, item group id or title **contains** the term. It is meant for browsing, not for an exact lookup — for that, use `knowledgeProduct` below.
### Fetch a single product by its id
`knowledgeProduct` returns one product matched **exactly** on its id within a knowledge source. This is the id you supplied when upserting the product (the same one used by `knowledgeProductsPatch` and `knowledgeProductsDelete`).
{% code title="Query" %}
```graphql
query KnowledgeProduct($knowledgeSourceId: UUID!, $productId: String!) {
knowledgeProduct(knowledgeSourceId: $knowledgeSourceId, productId: $productId) {
id
title
}
}
```
{% endcode %}
{% code title="Variables" %}
```json
{
"knowledgeSourceId": "",
"productId": ""
}
```
{% endcode %}
If no product matches the id in that knowledge source, the query returns `null`.
# FAQ sync through API
This page will describe how you can use our GraphQL API to synchronize FAQ AI Knowledge with your systems, with the aim to use this knowledge in your generative AI bots.
{% hint style="info" %}
This feature is under preview, this means we reserve the right to modify the behaviour of this part of the API without maintaining backward compatibility. To learn more about previews, [please follow this link.](/technologies/graphql-api/schema-lifecycle#preview)
The **`Accept`** header to add to HTTP requests in order to gain access to this preview is **`application/vnd.iadvize.knowledge-preview+json`**
{% endhint %}
## Introduction
This feature allows to keep knowledge about FAQs up to date, by allowing you to send updates, creations and deletion operations about the FAQ information your system holds. Upon receiving these events, we'll index the new knowledge such that your bot can use the very latest information to answer your visitors' questions.
To do so, we'll look into how you can create a knowledge source (your FAQ), and insert, update and delete knowledge items (your FAQ information).
## Step 1: Create a new KnowledgeSource
This operation will only need to be done once, therefore there is no need to write any code for it.
It consists in using GraphQL to create a new KnowledgeSource, and taking note of the identifier that was attributed to it. This identifier will be used during step 3.
{% tabs %}
{% tab title="Using Apollo" %}
You can open the GraphQL mutation [by clicking on this link](https://ha.iadvize.com/apollo?explorerURLState=N4IgJg9gxgrgtgUwHYBcQC4RxighigSwiQAIBpJCAdwBsEwBzBAZQhgCcoEBhdhfBAAoAJAGtKtek1YcuvfigQBJJAAcc6chLqMWbTjz4CV6lAEIAlCWAAdUiXHUd0-XKOLBjybpkH5xtQ0SMW0pPVlDBWVAlCtbexIHUJ9XBGs7RMySAjAMrJIkXEQ8xIBfPPKkUpAAGhAAN1x2AlwAIzoAZwwQeMSbEC9ncL93aNN%2BzV7M-rAEPAIaDon0hOmQADNcAEcAQVUCZgBPJChl4Eqs0pqSkn7C4oxbkAAee4QAPn7r1f7VdggAFYIKAoJS5R7PP6A4EoAC0OU%2B9kq1VKQA). You'll need to:
* Be logged in as an administrator.
* Replace the variables in the bottom panel with the identifier of your project, the name of the knowledge you're about to create ("API sync FAQ" for instance).
* Execute the query by clicking the KnowledgeSourceCreate blue button.
* Write down the identifier of the KnowledgeSource that will appear in the right panel.
{% endtab %}
{% tab title="Manually" %}
mutation KnowledgeSourceCreate(
$knowledgeSourceCreateInput: KnowledgeSourceCreateInput!
) {
knowledgeSourceCreate(knowledgeSourceCreateInput: $knowledgeSourceCreateInput) {
knowledgeSource {
id
name
}
}
}
{% code title="Variables" %}
```json
{
"knowledgeSourceCreateInput": {
"details": {
"faqApiSync": {}
},
"name": "",
"projectId":
}
}
```
{% endcode %}
{% endtab %}
{% endtabs %}
{% hint style="info" %}
If you are requesting our GraphQL API directly, do not forget to [get your GraphQL token](/technologies/graphql-api/authentication) first
{% endhint %}
## Step 2: Synchronize your FAQs with us
Now you have a KnowledgeSource, you can add, update or delete items within that source. In order to do this, you'll need to react to events within your system and call our GraphQL API.
### Create or update an FAQ item
You can use this mutation, bearing in mind you can submit up to 100 FAQs in a single mutation.
{% code title="Mutation" %}
```graphql
mutation KnowledgeFAQsUpsert($input: KnowledgeFAQsUpsertInput!) {
knowledgeFAQsUpsert(input: $input) {
upsertedFAQs {
faqId
status
}
}
}
```
{% endcode %}
{% code title="Variables" %}
```json
{
"input": {
"knowledgeSourceId": "",
"faqs": [
{
"id": "1",
"question": "How to return a product?",
"answer": "You must send it to "
}
],
}
}
```
{% endcode %}
### Delete FAQ items
{% code title="Mutation" %}
```graphql
mutation KnowledgeFAQsDelete($input: KnowledgeFAQsDeleteInput!) {
knowledgeFAQsDelete(input: $input) {
deletedFAQs {
faqId
status
}
}
}
```
{% endcode %}
{% code title="Variables" %}
```json
{
"input": {
"knowledgeSourceId": "",
"faqIds": [
""
]
}
}
```
{% endcode %}
# Visitor experience
# Integrating custom buttons into your site
Custom buttons are a way to deeply integrate iAdvize into your web app, customizing entirely their style. You can learn more about it by reading the dedicated [iAdvize Knowledge Base article](https://help.iadvize.com/hc/en-gb/articles/205165908).
### Custom buttons rules
The following rules must be followed when integrating a custom button :
* The CSS selector provided in the admin page **must exactly match the CSS selector** in the DOM. The selectors are case-sensitive.
* The elements targeted by your selectors **must be present in the DOM before the main iAdvize tag is loaded** on your pages.
* Ensure that the element is **not placed inside a parent or ancestor container that is permanently hidden** (e.g. using `display: none`, `visibility: hidden`, or `opacity: 0`), otherwise the visibility detection mechanism (`IntersectionObserver`) will never activate, and the engagement rule **will not be triggered**.\
iAdvize triggers its engagement engine **only when the custom HTML element becomes visible in the viewport**.
* the Online and Busy states **should be hidden by default** with a `display: none` style attribute. Only the Offline state should be visible by default.
The following examples assume that you have set these selectors, but you can use any selector you like :
* Online state: `.idz-online`
* Offline state: `.idz-offline`
* Busy state: `.idz-busy`
### Guides
#### Custom button with one state
In this example, a custom button is shown when an agent is availble to answer. The button is otherwise hidden. Note that a `style="display: none"` must be added to the Online element, so that it is hidden by default (see the [Rules](https://developers.iadvize.com/documentation/custom-buttons#custom-buttons-rules) section).
```html
ONLINE CHAT BUTTON
```
#### Custom button with three states
In this example, a custom button is always shown :
* the button is in an Offline state by default, while the targeting engine fetches the availaibility of agents,
* if an agent is available to answer, the button will switch to its Online state,
* if an agent is online but unavailable to answer, the button will switch to its Busy state,
* otherwise, the button will stay in its Offline state.
In this example, a `display: none;` style attribute must be added to the Online and Busy elements, so that only the Offline element is visible by default (see the [Rules](https://developers.iadvize.com/documentation/custom-buttons#custom-buttons-rules) section).
```html
ONLINE CHAT BUTTON
BUSY CHAT BUTTON
OFFLINE CHAT BUTTON
```
#### Multiple channels
Any number of custom buttons can be used at the same time. For instance, assuming that a custom button is linked to a call channel with the selector `.idz-call_online` as its Online state, we can have both a "Chat" button and a "Call" button :
```html
ONLINE CHAT BUTTON
ONLINE CALL BUTTON
```
#### Custom button with avatars
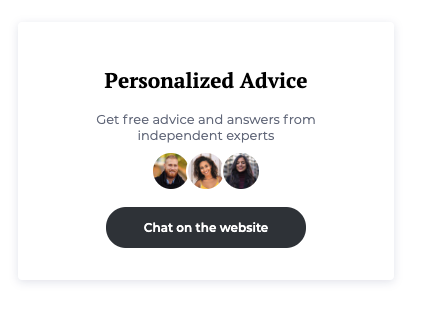
The avatar(s) that will be displayed in the chatbox header are also available on custom buttons. They will be automatically added in the document if an element with the `data-idz-displayed-avatar` data attribute is found inside one of the three selectors (online, offline, busy).
```html
ONLINE CHAT BUTTON
```
If you need to display an avatar before the iAdvize tag is loaded, we also provide the following images :
| Image | URL |
| ----------------------------------------------------------------------------------------------------------------- | -------------------------------------------------------------------------------------------------------- |
|  | |
|  | |
|  | |
|  | |
|  | |
|  | |
|  | |
|  | |
|  | |
|  | |
|  | |
|  | |
|  | |
|  | |
|  | |
|  | |
|  | |
|  | |
|  | |
|  | |
|  | |
|  | |
|  | |
|  | |
|  | |
#### Complex custom buttons
Advanced integrations are enabled via data attributes. They allow access to information such as the unread message count, the chatbox status, the conversation status or the displayed avatars.
| Data-attribute | Value type | Selectors |
| ------------------------------- | -------------------------------------------------------------------------------------------- | --------------------- |
| `data-idz-unread-message-count` | `number`(stringified) | Online |
| `data-idz-chatbox-status` | `"OPENED"`, `"REDUCED"`, or `"CLOSED"` | Online, Busy, Offline |
| `data-idz-conversation-status` | `"NOT_ONGOING"` or `"ONGOING"` | Online |
| `data-idz-displayed-avatar` | Injects the `#` HTML elements in the targeted container | Online, Busy, Offline |
| `data-idz-initiator` | `boolean` (stringified) Whether the custom button was the origin of the ongoing conversation | Online |
Here is an example of what can be built, using these selectors :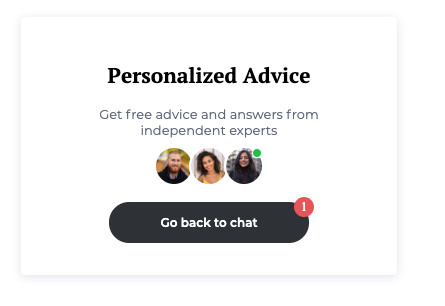
You can edit and see this example live in this sandbox : .
#### Complex custom buttons with multiple channels
Here is an example of a custom button with two channels :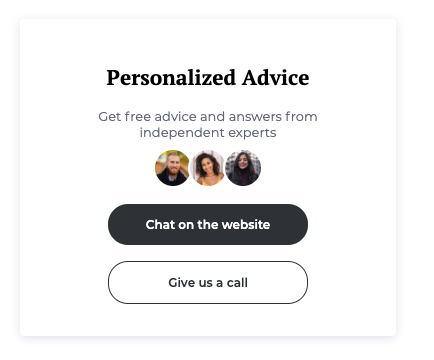
You can edit and see this example live in this sandbox : .
#### Custom button with an animation
Here is an example of a custom button with a CSS animation :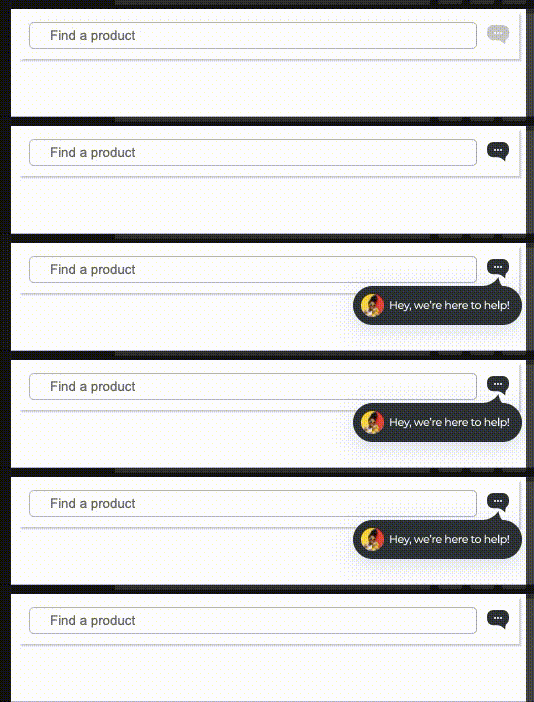
You can edit and see this example live in this sandbox : .
# Check availability before escalating to iAdvize
## Introduction
The purpose of this guide is to explain how you can ensure that there is availability behind an iAdvize distribution rule.
A distribution rule is what defines the strategy for distributing conversations to bots or operators based, for instance, on their availability.
This can be useful, for example, when you want to transfer your visitors to iAdvize from a solution / technology external to iAdvize (IVR, third-party chat tool, form, ...).
## Check availability
The [`RoutingRule`](https://graphql.iadvize.dev/types/RoutingRule) object contains an [`availability`](https://graphql.iadvize.dev/types/RoutingRuleAvailability) property which lets you know the availability of a specific `RoutingRule` at the precise moment you execute the request.
You can check availability for different channels (chat, call, video and thirdParties).
### GraphQL example
The following GraphQL query finds out the availability on the chat channel of the rule `YOUR_ROUTING_RULE_ID` (replace with your own rule UUID for which you want to check availability).
It returns a Boolean indicating whether or not there is availability for each channel you've consulted (here, only the Chat channel).
{% hint style="info" %}
If your are logged in into your iAdvize account, [you can click here to test the request](https://ha.iadvize.com/apollo?explorerURLState=N4IgJg9gxgrgtgUwHYBcQC4QEcYIE4CeABAMICGANhQBQAkeEMKAlkgOYBKMFCAkmOiIBVIbwAiAQgCURYAB0kRIgyatO3BNWYCi9Ri3Zce-GfMVKiZAG5lmFMgCM7zFMTMWLUABZkUshR4ezADOAII2do48AYEAvjFK8eZJsSAANCA2eMxRCMEYIO5EciAqBurGYCWCJQCaAPJCHAD6HI0AKrwAcgDirUIAMgCizeIlCqmxQA)
{% endhint %}
#### Request
```graphql
query Call($routingRuleId: UUID!) {
routingRule(id: $routingRuleId) {
availability {
chat {
isAvailable
}
}
}
}
```
#### Variables
```json
{
"routingRuleId": "YOUR_ROUTING_RULE_ID" // Replace with your own routing rule UUID
}
```
#### Response (example)
```json
{
"data": {
"routingRule": {
"availability": {
"chat": {
"isAvailable": false
}
}
}
}
}
```
# Authenticated Messaging
Why should you implement authenticated messaging?
📱 Ensure conversation continuity across devices
🔐 Ensure conversation confidentiality
👍 Guarantee visitors and agents that iAdvize is a safe place
Authenticated Messaging can be combined with other integrations like:
* Connected Bot,
* Salesforce Connector,
* The Mobile SDK,
* Custom App,
* and much more.
# Introduction
## Why use authenticated messaging?
Authenticating your visitors increases the security of the information as the customer’s identity is verified.
Now, as an iAdvize business, you will be able to provide a messaging experience with secured authentication to your customers.
iAdvize authenticated messaging will allow your visitors to feel more confident on sharing sensitive information during their messaging experience and access to past conversations. They will benefit from a better conversation continuity while they are logged-in across multiple devices, browsers, and channels. Respondents will also be able to know that the conversation is secured while they are chatting with your customers.
## Key benefits
* Secured and trusted conversation for visitors and respondents
* Browsing multiple domains: if your brand offers browsing across different websites, domains, and even your mobile app, authenticating the visitor will make them a single visitor across all domains, with the same continuity of conversation and history
* Cross-device experience: the visitor is viewed as the same person as long as they log-in before or during their conversation for a seamless messaging experience on multiple devices
## **How to set up authenticated messaging on your website or on your mobile App?**
* **Step 1**: your developers will first need to generate a public key and provide it to your iAdvize contact so that we can activate Authenticated Messaging. See [here](https://docs.iadvize.dev/~/changes/39J6v2tWi3Ms7Me1qEFP/technologies/authenticated-messaging/web-backend-implementation/signature-and-encryption-detailed-process#sign-and-encrypt) how to generate a public key.
* **Step 2**: after activation, your developers will need to follow frontend ([web](https://docs.iadvize.dev/~/changes/39J6v2tWi3Ms7Me1qEFP/technologies/authenticated-messaging/web-client-side-implementation) and [mobile](https://developers.iadvize.com/documentation/mobile-sdk#%E2%9A%99%EF%B8%8F-setting-up-the-sdk)) and [backend](https://docs.iadvize.dev/~/changes/39J6v2tWi3Ms7Me1qEFP/technologies/authenticated-messaging/web-backend-implementation). Once this step is completed, you will need to get in touch with your iAdvize contact to finalize the feature activation before launch.
## Authenticated Messaging experience
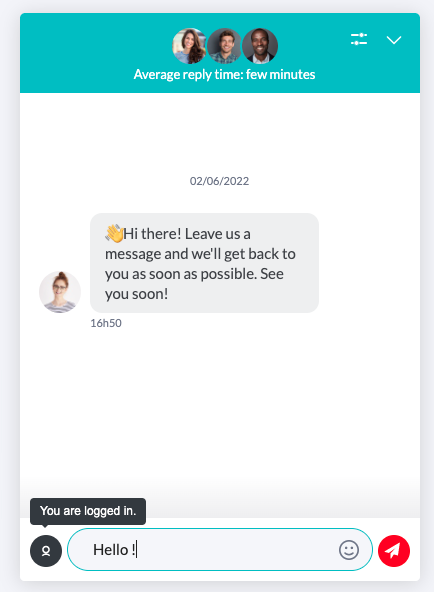
Once an anonymous visitor has logged in during the conversation, they will get the information that they have successfully logged in, and respondents will be able to see that the conversation is secured.
* Visitors will then see a dedicated banner
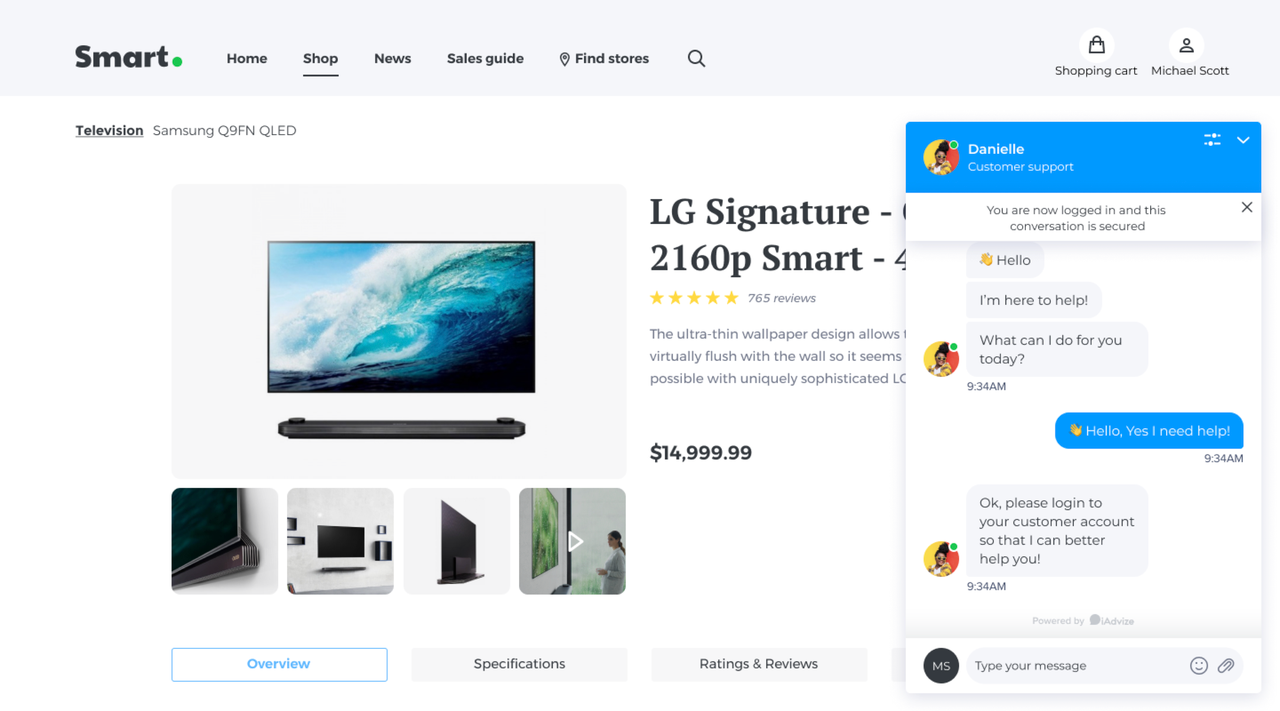 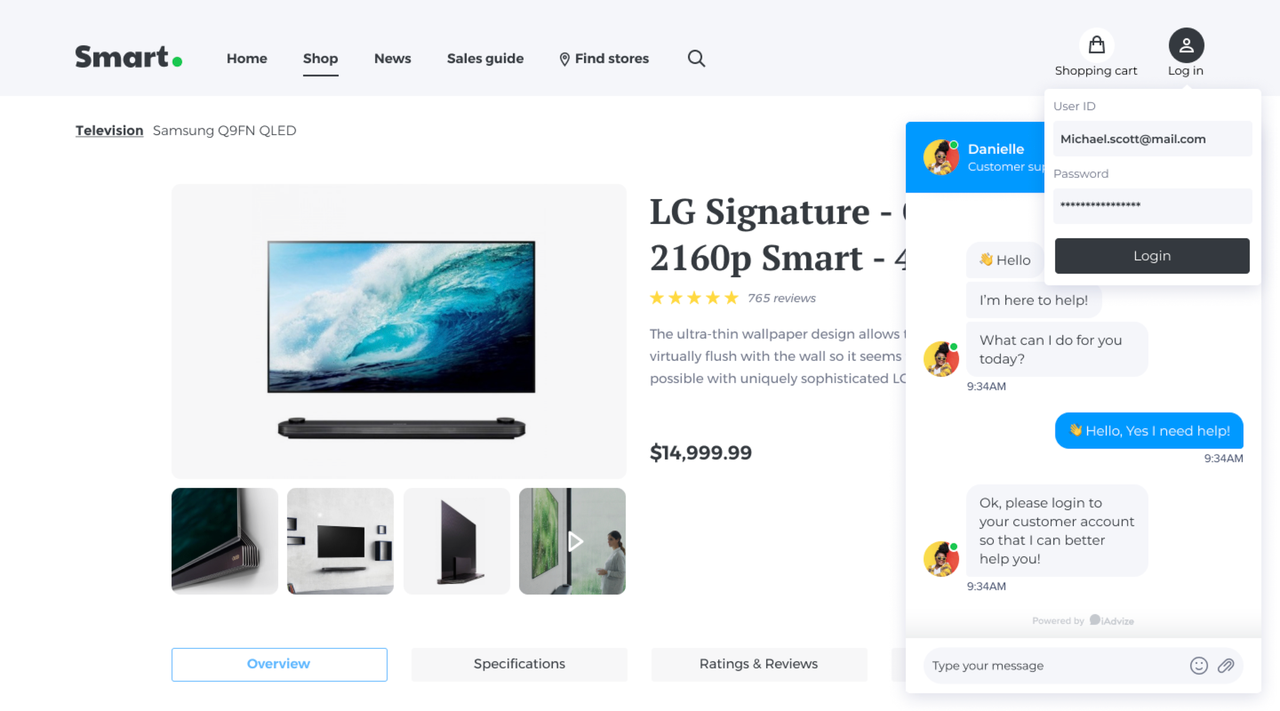
and the following information when hovering the mouse over the chatbox\
\\
* Advisors will see a lock icon
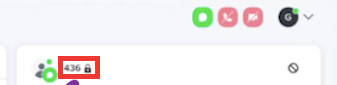
Respondents can know if the conversation is secured if they see the lock icon near the visitor avatar on their desk.
## Limitations
* Visitor profile: the visitor profile is enriched with their unique ID (userId claim)\
with the option to add visitorData claim to the JWT (more info [here](https://docs.iadvize.dev/use-cases/authenticated-messaging/web-backend-implementation/important-information-and-recommendations#sending-visitor-data-in-the-jwt-token)).
* Channels: chat, video, and call only. This is not compatible with 3rd parties channels.
# Web client-side implementation
This article is intended for developers who will be doing the front integration.
In this section, you will learn how to :
* Enable authenticated mode
* Setup authentication
* Sign-in
* Logout
* Deal with activation success or failure
* Deal with visitor identity expiration.\\
Conversation scenario
Scenario
1
Across multiple computers / browsers
Sarah visits the website on her personal mobile
Sarah starts a conversation as an anonymous visitor
Sarah authenticates in the customer space, and can continue her conversation
Sarah visits again the day after (whatever the delay) on her professional computer
Sarah authenticates in the customer space
Sarah sees her ongoing conversation again
2
Across mobile site & mobile app of the brand using one device
Sarah visits the mobile site on her smartphone / tablet etc.
Sarah starts a conversation as an anonymous visitor
Sarah’s conversation is closed or not by an agent
Sarah visits the mobile app on her smartphone / tablet etc.
Sarah authenticates in the customer space
Sarah doesn’t see her ongoing conversation or closed conversation, she can just see the last authenticated conversation
3
Multiple on-going conversation
Sarah visits the mobile site on her smartphone / tablet etc.
Sarah authenticates in the customer space
Sarah starts a conversation, but leaves it open
Sarah visits again the day after (whatever the delay) on her computer
Sarah starts a conversation as an anonymous visitor
Sarah authenticates in her customer space
Sarah starts a conversation
Sarah sees the on-going conversation she created on her smartphone, and she can’t continue the anonymous conversation she just created. If she wants to get back at her anonymous conversation, she has to logout.
4
Expired Session
Sarah visits the mobile site on her smartphone / tablet etc.
Sarah authenticates in the customer space
Sarah starts a conversation, and leaves it open
Sarah leaves the site without logout, and visits again the day after (whatever the delay) on her smartphone / tablet etc. The session has expired, she’s not authenticated anymore. She can’t see anymore the conversation.
Sarah authenticates in the customer space
Sarah sees her ongoing conversation again
5
Multiple visitors
Sarah visits the website on her family computer
Sarah starts a conversation as an anonymous visitor
Sarah’s conversation is not closed by an agent
Sarah leave the website
Paul visits the website the day after (whatever the delay) on the same computer
Paul authenticates in the customer space
If Paul never had an authenticated conversation before, he sees Sarah’s on-going anonymous conversation. But if he already have one, then he sees his conversation and not Sarah’s.
# Authenticated Messaging overview
Here is an overview of how our authenticated messaging works. Every step will be detailed below.\
It is important to keep in mind that here, anonymous means the visitor has not signed in their authenticated space, but is still identified by the iAdvize system.
# Brief timeline of the integration process
There are 4 main steps:
1. Brand creates and shares its public key as described in the documentation
2. Brand implements backend and frontend logics as described in the documentation
3. If Brand plans on launching the authenticated messaging on web but wants to keep Mobile SDK on simple mode, then we need to activate the flag hybrid mode on the iAdvize side
4. When those implementations are ready, iAdvize saves the Brand's public key in its database and activates the authentication
# How to enable authenticated mode in the administration portal?
Authenticated mode is still in early access: get in touch with your iAdvize main contact (CSM) to set it up.
When this mode is activated, the iAdvize tag will wait for an identity before starting. See the section below : **How to implement the customer authentication backend (token provider)**
# How to implement the customer authentication backend (token provider)?
To set up authentication, see section [Web backend implementation](https://docs.iadvize.dev/use-cases/authenticated-messaging/web-backend-implementation)
# How to authenticate with iAdvize in client's website?
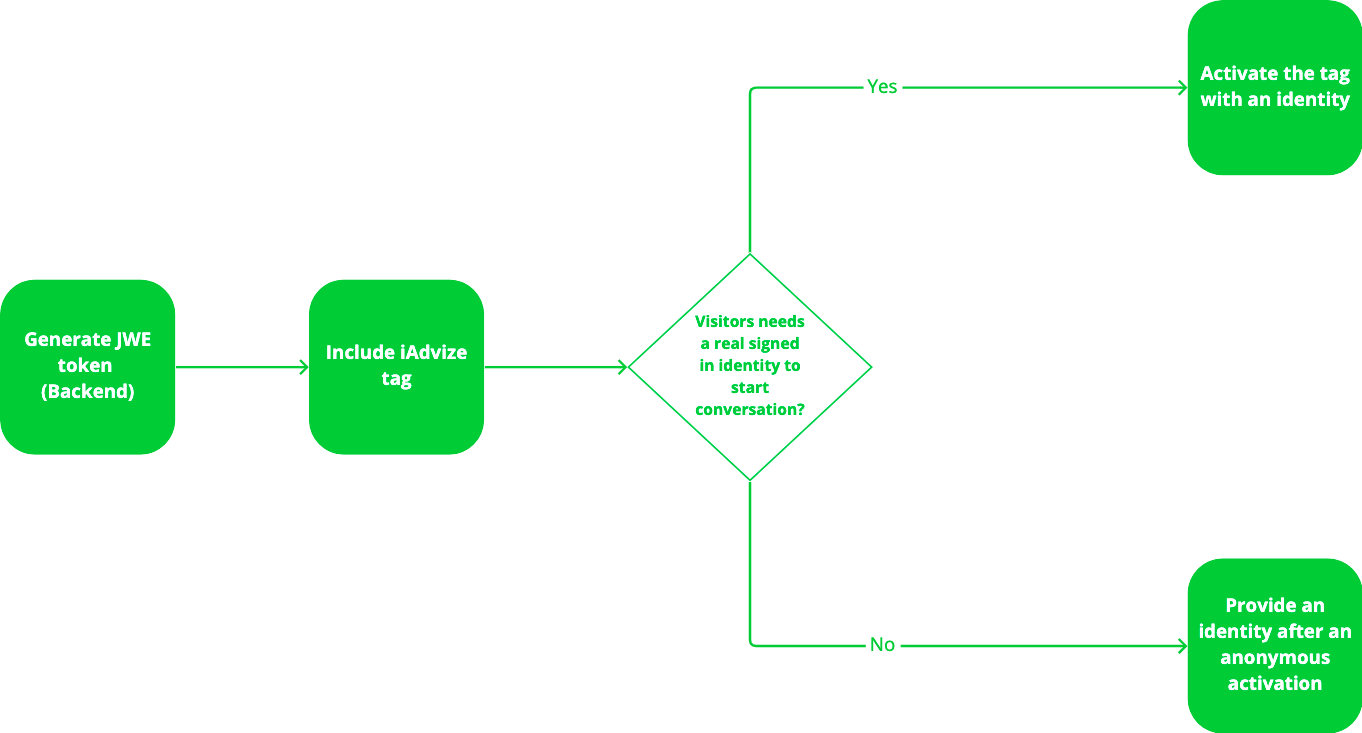
To enforce a proper secured visitor authentication, the authentication mode needs to be activated. Therefore, the iAdvize tag will wait for an “authentication” instruction before loading and engaging the visitor in a conversation. It differs from the standard non-authenticated mode.
However, it is also possible to let the visitor chat in an anonymous way with authenticated mode on. Details are provided below.
## Include the tag
You can dispatch the authentication instruction before the tag is included, or after. Either way, you will need to include the main iAdvize tag this way:
```
```
You will need to replace \`\\` with your actual site ID, which can be found on the admin :
## Activate the tag with an identity
When the authenticated mode is on, the tag won’t activate until an authentication instruction is dispatched.
* Case A - if the visitor needs a real signed in identity from the client server needs, the system waits for a token,
* Case B - if the visitor can chat without a real identity, use an anonymous authentication.\
If the visitor later signs in (see next section), the conversation will continue - either with the content of the previous signed in conversation (if it exists), or with the content of the previously anonymous conversation.
```javascript
// Secured authentication - case A
iAdvizeInterface.push((iAdvize) => {
iAdvize.activate(async () => {
const visitor_token = await ... // your backend logic to generate a JWE
return {
authenticationOption : { type: 'SECURED_AUTHENTICATION', token: visitor_token }
};
});
});
// OR Anonymous authentication - case B
iAdvizeInterface.push((iAdvize) => {
iAdvize.activate(() => ({
authenticationOption: { type: 'ANONYMOUS' }
}));
});
```
## Provide an identity after an anonymous activation
A common scenario would be a visitor that arrives anonymously on your website, then signs in their authenticated space.
In this scenario, the Case B mentioned above for the activation has been chosen. Which means the tag has been activated anonymously, using this line:
```javascript
iAdvizeInterface.push((iAdvize) => {
iAdvize.activate(() => ({ authenticationOption: { type: 'ANONYMOUS' } }));
});
```
Now, after a successful sign-in, the client needs to feed the iAdvize tag with the token authenticating the visitor. This can be done by triggering the same "activate" method:
```javascript
const afterLoginIadvizeIdentityCallback = () => {
iAdvizeInterface.push((iAdvize) => {
iAdvize.activate(async () => {
const visitor_token = await ... // your backend logic to generate a JWE
return {
authenticationOption : { type: 'SECURED_AUTHENTICATION', token: visitor_token };
};
});
});
}; // it is the brand responsibility to trigger such callback after sign-in
```
## What happens to an ongoing anonymous conversation when the visitor signs in?
If the visitor was chatting anonymously, then signed in:
* they will keep their ongoing conversation if they do not have an ongoing conversation in their authenticated space
* they will get their previous conversation back if they chatted while authenticated before
## Conversation scenarios
Conversation scenario
Scenario
1
Across multiple computers / browsers
Sarah visits the website on her personal mobile
Sarah starts a conversation as an anonymous visitor
Sarah authenticates in the customer space, and can continue her conversation
Sarah visits again the day after (whatever the delay) on her professional computer
Sarah authenticates in the customer space
Sarah sees her ongoing conversation again
2
Across mobile site & mobile app of the brand using one device Only available Q3 2022
Sarah visits the mobile site on her smartphone / tablet etc.
Sarah starts a conversation as an anonymous visitor
Sarah’s conversation is closed or not by an agent
Sarah visits the mobile app on her smartphone / tablet etc.
Sarah authenticates in the customer space
Sarah doesn’t see her ongoing conversation or closed conversation, she can just see the last authenticated conversation - Coming in v2.6 of the mobile SDK
3
Multiple on-going conversation
Sarah visits the mobile site on her smartphone / tablet etc.
Sarah authenticates in the customer space
Sarah starts a conversation, but leaves it open
Sarah visits again the day after (whatever the delay) on her computer
Sarah starts a conversation as an anonymous visitor
Sarah authenticates in her customer space
Sarah starts a conversation
Sarah sees the on-going conversation she created on her smartphone, and she can’t continue the anonymous conversation she just created. If she wants to get back at her anonymous conversation, she has to logout.
4
Expired Session
Sarah visits the mobile site on her smartphone / tablet etc.
Sarah authenticates in the customer space
Sarah starts a conversation, and leaves it open
Sarah leaves the site without logout, and visits again the day after (whatever the delay) on her smartphone / tablet etc. The session has expired, she’s not authenticated anymore. She can’t see anymore the conversation.
Sarah authenticates in the customer space
Sarah sees her ongoing conversation again
5
Multiple visitors
Sarah visits the website on her family computer
Sarah starts a conversation as an anonymous visitor
Sarah’s conversation is not closed by an agent
Sarah leave the website
Paul visits the website the day after (whatever the delay) on the same computer
Paul authenticates in the customer space
If Paul never had an authenticated conversation before, he sees Sarah’s on-going anonymous conversation. But if he already have one, then he sees his conversation and not Sarah’s.
# How to deal with activation success or failure?
Failures happen for various reasons, therefore while creating robust and secure system the implementation needs to cope with such cases. Authentication failures can happen in two places:
## **The sign-in in the visitor’s authenticated space fails**
\
In this case, the backend logic is unable to generate a token : it is then the client’s responsibility to activate the iAdvize tag. In other words, it is the client implementation responsibility to decide whether:
* Not to activate the tag (i.e. not calling "iAdvize.activate" methods)
* Or to fall back to an anonymous activation instead.
If you want to ensure a fully authenticated conversational experience, we recommend the first defensive implementation.
## **The iAdvize "activate" method can also fail**
If the token is ill-formatted or if signature is incorrect, the "iAdvize.activate" can also fail.
To cope with this, the "iAdvize.activate" method takes an optional argument : a function that will be called with an object containing the result of the authentication ("authentication-success" or "authentication-failure"). This object includes the reason the authentication failed: a malformed token, an invalid key, a double login attempt, ...
```javascript
const iAdvizeActivationCallback = (activation) => {
console.log(activation);
}
/* In case of success, logs :
{
authentication: {
option: { type: 'SECURED_AUTHENTICATION', token: '' },
status: 'authentication-success'
}
}
/* In case of failure, logs :
{
authentication: {
option: { type: 'SECURED_AUTHENTICATION', token: '' },
status: 'authentication-failure',
reason: 'A login is already ongoing' // Or another relevant error
}
}
iAdvizeInterface.push(async (iAdvize) => {
const activation = await iAdvize.activate(async () => {
const token = await ... // your backend logic to generate a JWE - note that this can be called at anytime for refresh
return {
authenticationOption: { type: 'SECURED_AUTHENTICATION', token }
};
}) ;
iAdvizeActivationCallback(activation);
});
```
In case of failure, we recommend that you do not fallback to the anonymous activation.
**Note** : iAdvize javascript logic has already retry policies implemented. It will automatically retry 3 times in case of error. If it does not succeed, iAdvize systems return an error. We do not recommend that the client implementation adds additional retries.
# How to logout?
When the visitor actively logouts from your website or their website session expires, you must also log them out of iAdvize. To do so, you can simply use `logout` like so:
```
iAdvizeInterface.push(async (iAdvize) => {
await iAdvize.logout();
}) ;
```
The visitor won’t be able to start a new conversation until a new activation is performed.\
This is how you would log out then start the targeting engine, that could lead to a new conversation:
```
iAdvizeInterface.push(async (iAdvize) => {
await iAdvize.logout();
await iAdvize.activate(() => ({ authenticationOption: { type: 'ANONYMOUS' }}));
});
```
# Compatibility with Mobile SDK
## Context
Before starting the integration of authenticated messaging, you need to make sure to plan the deployment of the feature depending on your use case.
If you are planning on deploying this feature on the web and on the mobile SDK, there are a few things you need to know:
* Will end-users authenticate on the app AND on the website?
* If so, will you deploy authenticated messaging at the same time on the mobile app and the website?
## How is authenticated messaging implemented on the Mobile SDK?
There is a full section dedicated to Mobile SDK where you will find the information regarding authenticated messaging.
Basically, you can choose between multiple authentication options:
Anonymous
For an unidentified user browsing your app.
Simple
For a logged in user in your app. You must pass a unique string identifier so that the visitor will retrieve his conversation history across multiple devices and platforms.
The identifier that you pass must be unique and non-discoverable for each different logged-in user.
Secured
Use it in conjunction with your in-house authentication system. You must pass a JWE provider callback that will be called when an authentication is required, you will then have to call your third party authentication system for a valid JWE to provide to the SDK.
For a full understanding of how the secured authentication works in the iAdvize platform you can refer to thissection.
> **Important:** if you want to start using the secured mode as a second step, we strongly advise that you implement the anonymous mode as a first step. Indeed, if you choose the simple mode first, your users will loose all their conversation history the day you decide to switch to the secured mode. If however you implemented the anonymous mode, they will be able to keep it.
## Implementation scenarios
| Context | Actions |
| ------------------------------------------------------------------------------------------------------------------------- | ----------------------------------------------------------------------------------------------------------------------------------------------------------------------------------------------------------------------------------------------------------------------------------------------------------------------------------------------------- |
| I want to launch on web only (no Mobile SDK used) | Follow this [documentation](/use-cases/visitor-experience/authenticated-messaging/web-client-side-implementation) - nothing specific to keep in mind regarding the Mobile SDK |
| I want to launch on web only (and I do use the Mobile SDK at the same time but I don't want the feature there) | Follow this [documentation](/use-cases/visitor-experience/authenticated-messaging/web-client-side-implementation) AND make sure the iAdvize hybrid flag is activated (ask an iAdvize TAM). This will allow you to use the [simple mode](/technologies/web-and-mobile-sdk/mobile-sdk) on Mobile SDK while having the feature deployed for your website |
| I want to launch on Mobile SDK only (no Web used) | Follow this [documentation](/technologies/web-and-mobile-sdk/mobile-sdk) (choose the secured option) - nothing specific to keep in mind regarding the web |
| I want to launch on Mobile SDK only (and I have the chat on my website but I don't want the feature to be deployed there) | Follow this [documentation](/technologies/web-and-mobile-sdk/mobile-sdk) and choose the secured option |
| I want to launch on both: web and Mobile SDK at the same time. | Follow this [documentation](/use-cases/visitor-experience/authenticated-messaging/web-client-side-implementation) for the web part and this [documentation](/technologies/web-and-mobile-sdk/mobile-sdk) for Mobile SDK (choose the secured option) |
## What is actually happening in the logout within the SDK that could restore the chat the next time the user is logging in again?
This is dependent on the type of activation that was made.
If the user was logged in anonymously, then the SDK keeps some information during the logout.
This is designed so that if an anonymous visitor starts chatting then logs into your app, the SDK calls to logout / activate (simple or secured) would keep the user's ongoing conversation / conversation history.
If the user was logged in "non-anonymously" (either with simple auth or secured auth), then the logout clears the whole user session.\
\
Please note however that if you log a user with an “already known" user id, the visitor session (history, parameters) will be pulled back. This is designed for chat history continuity across devices.
```
1. activate anonymous
2. starts a chat
3. logout (sdk keeps visitor info)
4. activate (simple or secured)
==> the chat history is retrieved
1. activate (simple or secured), user-id = foo
2. starts a chat
3. logout (sdk keeps visitor info)
4. activate (simple or secured), user-id = foo
==> the chat history / gdpr conset etc... are retrieved
1. activate (simple or secured), user-id = foo
2. starts a chat
3. logout (sdk keeps visitor info)
4. activate (simple or secured), user-id = bar
==> a new user session starts
```
\\
# FAQ
## **Where could I find the iAdvize public key?**
Please see [2.4 iAdvize Public key (use for Production)](https://help.iadvize.com/hc/en-gb/articles/6047518326290-iAdvize-Authenticated-Messaging-web-backend-implementation#h_01G5EDYWKE4NZ6V59Y9ZK2TDEQ)
## Expiration: session & token
There are 2 distinct things:
* the [lifetime of the encrypted token](https://help.iadvize.com/hc/en-gb/articles/6047518326290-iAdvize-Authenticated-Messaging-web-backend-implementation#01H821774P61TBPBDKZYJS51QV) that the brand provides, for which we recommend a lifetime of 1 minute (but it could equal the session duration desired by the brand) (by default, it is set at 1 minute).\\
* and the lifetime of the iAdvize session, which specifies when the engagement/conversation session must re-verify the visitor's identity, and this one is based on the brand's use case: A bank would prefer a short delay (for example 7 minutes). For an electricity supplier, 20-30 minutes seems acceptable (by default, it is set at 60 minute).
## How do we know that the visitor is authenticated?
Read this [section](/use-cases/visitor-experience/authenticated-messaging/introduction#authenticated-messaging-experience) to see examples of what is seen on the agent side and on the visitor side.
## **When do I need to call the activate function?**
The activate function needs to be called every time that the iAdvize tag is loaded. It means that you will need to call the activate function on every page change, once per page.
## What happens when a visitor logs in and logs out?
Visitor id might change during the conversation if the visitor logs in and logs out.
userId defined in the JWE should remain static and constant.\
Visitor id (used when the visitor isn't authenticated) is different and is an iAdvize internal data. All the cases of authentication during a conversation, that could impact the visitor id (but not the userId) are described [here](https://docs.iadvize.dev/use-cases/visitor-experience/authenticated-messaging/web-client-side-implementation/how-to-authenticate-with-iadvize-in-clients-website).
## **My visitor is authenticated (a JWT is in the local storage) but I don’t have a padlock 🔒 on the desk of the agent**
Be sure, when you are in an authenticated space of your website where the visitor authentication is enabled, to remove the usage of the \`extId\` system: [About the External ID usage (extId)](https://help.iadvize.com/hc/en-gb/articles/204497293-Connect-your-client-identifiers-to-your-visitors-using-custom-data-extID-)
## **Activation success or failure**
### **How can I test my JWE?**
Test your JWE with this GraphQL API call:
```javascript
curl --request POST \
--url https://api.iadvize.com/graphql \
--header 'Authorization: Bearer ' \
--header 'Content-Type: application/json' \
--data '{"query":"mutation TestJWE {\n testVisitorAuthenticateFromCredentials(input: {projectId: \"YOUR PROJECT SID\", credentials: \"\"}) {\n visitorSessionToken {\n accessToken\n }\n }\n}\n","operationName":"TestJWE"}'
```
Otherwise, with this implementation:
```javascript
const activation = await iAdvize.activate(async () => {
return {
authenticationOption: {
type: "SECURED_AUTHENTICATION",
token: visitor_token,
},
};
});
console.log(`activation : ${JSON.stringify(activation, null, 2)}`);
```
You should see this in the console:
```javascript
activation : {
"authentication": {
"option": {
"type": "SECURED_AUTHENTICATION",
"token": ""
},
"status": "authentication-success"
}
}
```
| Error type | Why it happens | What to do about it |
| ------------------------------------------------------------------------------------------------------------- | ---------------------------------------------------------------------------------------------- | --------------------------------------------------------------------------------------------------------------------------------------------------------- |
| A valid authentication option must be provided, | The brand makes a mistake on authenticaton.option | Give valid arguments: authenticationOption : { type: 'SECURED\_AUTHENTICATION', token: visitor\_token } |
| An activation is already ongoing | The brand calls activate several times in a row before resolving the first one | Wait for call to finish (you can await iAdvize.activate) |
| Can't activate twice, please logout first | The brand calls activate several times in a row after the first has been successfully resolved |
Logout before login if already authenticated
|
| Failed to fetch authentication with a server error | Something went wrong on the server side | In this case, there could be different errors: wrong keys, no flag set, wrong token, etc. (this is on the iAdvize side so the client can create a ticket) |
|
Failed to authenticate visitor from credentials : the website is not correctly setup (null)
|
|
|
### **JWT not valid**
Ensure you set all the required claims with the right prefixes
```javascript
{
"https://iadvize.com/userId":"myuserid",
"iss":"https://livechat.iadvize.com",
"exp":1602060589
}
```
Ensure the JWT is signed with the right algorithm
```javascript
{
"alg": "RS256"
}
```
Ensure the JWE is encrypted with the right algorithm
```javascript
{
"enc": "A256GCM",
"alg": "RSA-OAEP-256"
}
```
Ensure you use the right private key and the right iAdvize public key. Ensure iAdvize setup your public key in your settings.
# Web backend implementation
The visitor authentication process consists of a creation of a signed and encrypted token forged on your backend and forwarded to the iAdvize tag through your frontend (website) in order for iAdvize to be able to recognize the visitor and display relative visitor and conversational data accordingly.
# Important information and recommendations
## User identifier
**⚠** It should be unique per user - the user ID cannot be recycled from one user to another.\
\
\&#xNAN;**⚠** It should be max 255 characters.\
\
\&#xNAN;**⚠** If you don’t respect these guidelines, iAdvize will consider all visitors as one and the same visitor. We will then associate all the conversations of visitors with the same user ID. This creates a confidentiality issue: visitors will then have access to the content of each-other's conversations, including text and attachments.
## Token encryption
When you generate a JWE which contains your user identifier, your library to generate this token should support A256GCM and RSA\_OAEP\_256 for creating the JWE. The inner JWS must be signed with RS256.
## Private Key storage
We store our private key using an external security tool call Vault, so our private key is not exposed through our code or any database access.
## About the external id usage (extId)
The visitor authentication system fully replaces the usage of the "ExtID". Then, if you use the visitor authentication system in an authenticated space of your website, you have to ensure that you are not using the "ExtID" system in parallel.
## Sending visitor data in the JWT token
In addition to the **userId** claim, an optional **visitorData** claim can be added to the JWT. This is how it would look like, before encryption:
It may contain the following fields, all optional strings:
```
address
city
country
email
firstName
lastName
phoneNumber
zipCode
```
# Signature and Encryption Detailed Process
## Key pair generation and sharing
You will need to generate a key pair: a public key/private key. You will have to share your public key with iAdvize.\
iAdvize provides you with its public key.
One way to generate your keys (you can adjust the number of bits):
```
openssl genpkey -out rsaPrivateKey.pem -algorithm RSA -pkeyopt rsa_keygen_bits:2048
openssl rsa -in rsaPrivateKey.pem -pubout -out rsaPublicKey.pem
```
## Sign and encrypt
iAdvize will make the process the other way around which consist of decrypting the JWE (using iAdvize Private key) and verify the token signature (using Customer Public key) in order to finally extract the User ID and create a Visitor Authenticated Session (a new JWS generated by iAdvize internally):
## iAdvize Public Key (use for production)
```
MIIBIjANBgkqhkiG9w0BAQEFAAOCAQ8AMIIBCgKCAQEA1KdAzuUa5rOXgLHavoDRYoNXzwWz/pFhgGypYFbvV8DNjB93XK2AzKTwW+vxT7RYl4f+sKLdEi3dJYgPt2hquhTNmFxAzRvTuolUOKr1XNx7QbDj+7cfLVDYjmds/ydNtyHi8TUHSvfzs8SGXO5E5H13llmayPEslHKShG0cLIDcLNr6hJcfv9fvOZqQlLQ4Bx7to/66IHke9zY+1oidrUdFGzxXG+RGK81mIMuXj6N2EGJ7YYcQqXJfBJnWFlSGCQNttw5Rfj00eZbkMRO3XohhNqGIiBG2tejSjfB53UpiHdbzni+tyB72R5aaq4d+gkkgaOVYn/Or2fArOH2FUQIDAQAB
```
# Technical backend implementation
**Note**: You will have to define a custom claim which will be embedded in the signed token (JWS). You have to prefix all the claims with
**⚠️** The claim **** is optional **⚠️**
## JWT Library
First, to deal with JWT, you will have to choose the right library which fits to your backend language.\
You can find on the [official JWT website](https://jwt.io/) a list of many libraries implemented for many languages.\
The chosen library should support "A256GCM and RSA\_OAEP\_256" for creating the JWE, the inner JWS must be signed with "RS256".
## An example in SCALA
Here you have a technical implementation of the solution in SCALA:
```
import java.security.interfaces.RSAPublicKey
import java.security.spec.{PKCS8EncodedKeySpec, X509EncodedKeySpec}
import java.security.{KeyFactory, KeyPairGenerator, PrivateKey, PublicKey}
import java.util.Date
import com.nimbusds.jose._
import com.nimbusds.jose.crypto._
import com.nimbusds.jwt.{JWTClaimsSet, SignedJWT}
object JWEBuilder {
def main(args: Array[String]): Unit = {
val (clientPubKey, clientPrivateKey) = getClientKeys()
val (iadvizePubKey, iadvizePrivateKey) = getIAdvizeKeys()
val JWS1 = createJWS(clientPrivateKey)
val JWE1 = createJWE(iadvizePubKey, JWS1)
println(s"JWS : ${JWS1.serialize()}")
println(s"JWE : ${JWE1.serialize()}")
val token = JWE1.serialize()
val JWS2 = decryptJWE(iadvizePrivateKey, token)
println(s"Is valid JWS : ${JWS2.verify(new RSASSAVerifier(clientPubKey.asInstanceOf[RSAPublicKey]))}")
println(s"${JWS2.getJWTClaimsSet}")
}
def getClientKeys() : (PublicKey, PrivateKey) = {
val generator = KeyPairGenerator.getInstance("RSA")
generator.initialize(2048)
val pairClient = generator.generateKeyPair
val pubKeyClient = KeyFactory.getInstance("RSA").generatePublic(new X509EncodedKeySpec(pairClient.getPublic.getEncoded))
val privateKeyClient = KeyFactory.getInstance("RSA").generatePrivate(new PKCS8EncodedKeySpec(pairClient.getPrivate.getEncoded))
(pubKeyClient, privateKeyClient)
}
def getIAdvizeKeys() : (PublicKey, PrivateKey) = {
val generator = KeyPairGenerator.getInstance("RSA")
generator.initialize(2048)
val pairIadvize = generator.generateKeyPair
val pubKeyIadvize = KeyFactory.getInstance("RSA").generatePublic(new X509EncodedKeySpec(pairIadvize.getPublic.getEncoded))
val privateKeyIadvize = KeyFactory.getInstance("RSA").generatePrivate(new PKCS8EncodedKeySpec(pairIadvize.getPrivate.getEncoded))
(pubKeyIadvize, privateKeyIadvize)
}
def createJWS(clientPrivateKey: PrivateKey) : SignedJWT = {
val claimsSet = new JWTClaimsSet.Builder()
// You can define custom claims. Here you can define your User ID which will be embed in the signed token(JWS).
// You have to prefix all the claims with `https://iadvize.com/”.
// The claim https://iadvize.com/userId is mandatory.
claimsSet.claim("https://iadvize.com/userId","c42ab96d-0637-4d1e-8be3-0a872d9d1ef1")
// For security reason it’s better to set a quick expiration time. As this token will just be used to initialise a new secured visitor session on iAdvize 1 minute seems a good duration.
claimsSet.expirationTime(ZonedDateTime.now().plusMinutes(1))
val signer = new RSASSASigner(clientPrivateKey)
val signedJWT = new SignedJWT(new JWSHeader(JWSAlgorithm.RS256), claimsSet.build())
signedJWT.sign(signer)
signedJWT
}
def createJWE(iadvizePublicKey : PublicKey, jws : SignedJWT) : JWEObject = {
val header = new JWEHeader.Builder(JWEAlgorithm.RSA_OAEP_256, EncryptionMethod.A256GCM).build()
val payload = new Payload(jws)
val jwe = new JWEObject(header, payload)
jwe.encrypt(new com.nimbusds.jose.crypto.RSAEncrypter(iadvizePublicKey.asInstanceOf[java.security.interfaces.RSAPublicKey]))
jwe
}
def decryptJWE(iadvizePrivateKey: PrivateKey, token : String): SignedJWT = {
val o = JWEObject.parse(token)
o.decrypt(new RSADecrypter(iadvizePrivateKey))
o.getPayload.toSignedJWT
}
}
```
The key parts for you are the functions createJWS() and createJWE() which we will detail below.
createJWS()
```
def createJWS(yourPrivateKey: PrivateKey) : SignedJWT = {
val claimsSet = new JWTClaimsSet.Builder()
claimsSet.claim("https://iadvize.com/userId","c42ab96d-0637-4d1e-8be3-0a872d9d1ef1")
// For security reason, it’s better to set a quick expiration time. As this token will just be used to initialise a new secured visitor session on iAdvize 1 minute seems a good duration.
claimsSet.expirationTime(ZonedDateTime.now().plusMinutes(1))
val signer = new RSASSASigner(clientPrivateKey)
val signedJWT = new SignedJWT(new JWSHeader(JWSAlgorithm.RS256), claimsSet.build())
// Sign the JWT using your private key: it became a JWS.
signedJWT.sign(signer)
signedJWT
}
```
For security reason, it’s better to set a quick expiration time. As this token will just be used to initialize a new secured visitor session on iAdvize 1 minute seems a good duration. createJWE() Once we have a signed JWT, a JWS, we could encrypt this JWS to finally have a JWE.
```
def createJWE(iadvizePublicKey : PublicKey, jws : SignedJWT) : JWEObject =
{
// Specify the header(encryption algorithms) and the payload (the JWS generated in the previous step).
val header = new JWEHeader.Builder(JWEAlgorithm.RSA_OAEP_256, EncryptionMethod.A128CBC_HS256).build()
val payload = new Payload(jws)
val jwe = new JWEObject(header, payload)
// Encrypt the token using the iAdvize Public key.
jwe.encrypt(new com.nimbusds.jose.crypto.RSAEncrypter(iadvizePublicKey.asInstanceOf[java.security.interfaces.RSAPublicKey]))
jwe
}
```
Here is how the createJWS function would be modified to add the firstName and the lastName fields:
```
def createJWS(clientPrivateKey: PrivateKey) : SignedJWT = {
val claimsSet = new JWTClaimsSet.Builder()
claimsSet.claim("https://iadvize.com/userId","c42ab96d-0637-4d1e-8be3-0a872d9d1ef1")
claimsSet.claim("https://iadvize.com/visitorData", JSONObjectUtils.parse("""{"firstName: "Jane", "lastName": "Doe"}"""))
// For security reason, it’s better to set a quick expiration time. As this token will just be used to initialise a new secured visitor
session on iAdvize 1 minute seems a good duration.
claimsSet.expirationTime(ZonedDateTime.now().plusMinutes(1))
val signer = new RSASSASigner(clientPrivateKey)
val signedJWT = new SignedJWT(new JWSHeader(JWSAlgorithm.RS256), claimsSet.build())
//Sign the JWT using your private key: it became a JWS.
signedJWT.sign(signer)
signedJWT
}
```
In the example above, the visitorData claim is a JSON object containing the “firstName” and “lastName” fields. Here is a complete example with all possible fields:
```
{
"country": "France",
"firstName": "Jane",
"lastName": "Doe",
"zipCode": "44000",
"address": "9 rue Nina Simone",
"phoneNumber": "+33651229856",
"city": "Nantes",
"email": "jane.doe@email.com"
}
```
## An example in Node.js
Here is how the same function would look in Node.js:
```
const jwt = require("jsonwebtoken");
function createJWS(clientPrivateKey) {
return jwt.sign(
{
"https://iadvize.com/userId": "test_documentation",
iss: "https://test.iadvize.com",
"https://iadvize.com/visitorData": {
firstName: "Jane",
lastName: "Doe",
},
// For security reasons, it’s better to set a small expiration time. As this token will just be used to initialise a new secured visitor session on iAdvize, 1 minute seems like a good duration.
exp: Date.now() + 60 * 1000,
},
clientPrivateKey
);
}
```
# FAQ
## Where can I find the iAdvize public key?
* Please see [here](/use-cases/visitor-experience/authenticated-messaging/web-backend-implementation/signature-and-encryption-detailed-process#iadvize-public-key-use-for-production).
## **My visitor is authenticated (a JWT is in the local storage) but I don’t have a padlock 🔒 on the desk of the agent**
* Be sure, when you are in an authenticated space of your website where the visitor authentication is enabled, to remove the usage of the \`extId\` system: [About the External ID usage (extId)](https://help.iadvize.com/hc/en-gb/articles/6047518326290-iAdvize-Authenticated-Messaging-web-backend-implementation#h_01GHGEWCPJR1RT7NQBW3DPCGJX)
## JWT not valid
* Ensure you set all the required claims with the right prefixes
```
{
"https://iadvize.com/userId":"myuserid",
"iss":"https://livechat.iadvize.com",
"exp":1602060589
}
```
* Ensure the JWT is signed with the right algorithm
```
{
"alg": "RS256"
}
```
* Ensure the JWE is encrypted with the right algorithm
```
{
"enc": "A256GCM",
"alg": "RSA-OAEP-256"
}
```
* Ensure you use the right private key and the right iAdvize public key. Ensure iAdvize set up your public key in your settings
# Cross-domain Conversation Continuity
Implement cross-domain conversation continuity in the era of first-party cookies.
{% hint style="info" %}
Discover how iAdvize handles data storage in this Help Center article :
{% endhint %}
Since the [2024 phase-out of third-party cookies](https://developer.mozilla.org/en-US/blog/goodbye-third-party-cookies/), iAdvize can no longer reliably link visitor identities across domains. While this is good news for privacy in general, it means that multi-domain clients need to add a query parameter to their pages to maintain conversation continuity between websites that do not share a top-level domain.\
\
The principle is as follows. First, you need to detect whether the visitor browsing the website is in the middle of a conversation. To do this, we need to use the iAdvize web SDK and, more specifically, the [iAdvize.get method](https://docs.iadvize.dev/technologies/web-and-mobile-sdk/javascript-web-sdk/reference#iadvize.get) on the conversation:id property. If the Web SDK returns a conversation identifier, then a conversation is in progress.
If the visitor is in the middle of a conversation on site A, and clicks on a link that will take him to site B, you'll need to add a specific url parameter to this link (named “idzconvid”, and which will take as its value the conversation identifier retrieved from the iAdvize.get method) so as to guarantee conversation continuity between site A and site B.
This is how it should be implemented :
1. Use the iAdvize WebSDK to retrieve the `conversationId` when a conversation is ongoing :
```javascript
window.iAdvizeInterface.push((iAdvize) => {
iAdvize.on("conversation:idChange", (conversationId) => {
// This is triggered when :
// - a conversation starts : conversationId is a string
// - a conversation ends : conversationId is null
});
});
```
2. Add the conversationId to all relevant links.
Here is a full example of what it might look like :
```html
```
See an example in this codesandbox :
# Customize replies with Markdown
Bot and operator messages can be further customized using Markdown syntax to add style, linking, tables, lists, etc.
Some Markdown features are fully functional, some are partially supported and some are not supported.
{% hint style="danger" %}
As not all social channels support markdown in the same way, be careful with the tags you use.
{% endhint %}
## Reference
| **Feature** | **Example** | Web/Livechat Support | Mobile SDK support |
| ------------------------------------------------- | ------------------------------------------------------------------------------------------------------------------------------- | ------------------------------------------------------------------------------------------------------------------------------------------------------------------------------------------------------------------ | ------------------------------------------------------------- |
| Bold | `**bold**` | 🟢 Yes | 🟢 Yes |
| Bold italic | `***bold italic***` | 🟢 Yes |
🟢 Yes Indent with four spaces or use three backticks
| 🔴 No |
| Table | \`\\ |
🟢 Yes Syntax \
| 🔴 No |
| Horizontal rule | `\n\n---` |
🟢 Yes For compatibility, put blank lines before and after horizontal rules.
|
🔴 No Android only
|
|
Blockquote (Multiple paragraphs)
| `> I'm a\n> multiple lines blockquotes` |
🔵 Partially Line break is supported but not paragraph
| 🔴 No |
|
Blockquote (Nested)
| `> Nested\n>> Blockquotes` | 🟢 Yes | 🔴 No |
|
Blockquote (Single line)
| `> I'm a single line blockquote` | 🟢 Yes | 🔴 No |
|
Blockquote (With other elements inside)
| `> # Title\n> ***bold italic***\n> - List item 1\n> - List item 2\n> - Sub item 1` |
🔵 Partially Refer to this table to know what is supported inside blockquotes
| 🔴 No |
| Images | `` |
🔵 Partially Instead of an embedded image in the chat, a link is displayed.
|
🔴 No Android only
|
| Link | `[iAdvize](https://www.iadvize.com "Go on the iAdvize Website")` |
🔵 Partially Link description is not displayed on hover
| 🟢 Yes |
|
Link (email address)
| `` |
🟢 Yes Quickly turn an email into a "mailto" url
|
🔴 No Android only
|
|
Link (on anchor)
| `[iAdvize](#iadvize)` | 🔴 No | 🔴 No |
|
Link (quick link)
| `` |
🟢 Yes Quickly turn a URL into a link
|
🔴 No Android only
|
| Footnote | `Here's a sentence with a footnote. [^1]\n\n[^1]: This is the footnote.` | 🟢 Yes | 🔴 No |
|
List (Definition)
| `term:\n definition` | 🔴 No | 🔴 No |
|
List (nested blockquote)
| `- First item\n > Nested blockquote` |
🟢 Yes Indent with four spaces then use > (greater-than sign) for nested blockquote
| 🔴 No |
|
List (nested code block)
| `- First item\n var foo = 'bar';\n alert('foo:', foo);` |
🟢 Yes Indent with four spaces then another four spaces (or use three backticks) for nested code block.
| 🔴 No |
|
List (Nested paragraph)
| `- First item\n Nested paragraph` |
🔵 Partially Indent with four spaces for nested paragraph. Line break is supported but not multiple paragraphs
| 🔴 No |
|
List (Ordered)
| `1. First item\n2. Second item\n 1. Sub item` |
🟢 Yes Indent item for nested list
|
🔵 Partially One level only (no sub-items)
|
|
List (Tasks)
| `- [x] Test Markdown` | 🟢 Yes | 🔴 No |
|
List (Unordered)
| `- First item\n- Second item\n - Sub item` |
🟢 Yes Indent item for nested list
|
🔵 Partially One level only (no sub-items)
|
| Escaping | `\*Not italic\*` |
🟢 Yes You can escape specials characters with a backslash (\). Depending on your code and the way you return the message, maybe you’ll need to escape with two backslashes
| 🔴 No |
# Agent workspace
# Custom App example and step-by-step tutorial
## Overview
### Context
You will learn how to set up your environment to create a custom app and the tools to interact with the desk using NextJS.
A complete breakdown of our guidelines for Conversation Panel Apps can be found in [our knowledge base](https://help.iadvize.com/hc/en-gb/articles/4404351307026-Conversation-Panel-Apps-Guidelines).
Please note that one iframe is created per conversation in order to keep a context for an app for each conversation. It is recommended to keep the app very lightweight and avoid heavy processing or streaming updates.
### Objectives
You will learn the following things
* [How to create your custom app on the developer platform](/use-cases/agent-workspace/custom-app-example-and-step-by-step-tutorial/get-started#create-your-custom-app-on-the-developer-platform)
* [How to create your app repository](/use-cases/agent-workspace/custom-app-example-and-step-by-step-tutorial/get-started#create-your-app-repository)
* [How to launch your app](/use-cases/agent-workspace/custom-app-example-and-step-by-step-tutorial/get-started#launch-your-app)
* [How to link your app and the Custom Apps](/use-cases/agent-workspace/custom-app-example-and-step-by-step-tutorial/get-started#link-your-app-and-the-custom-app)
* [How to call the client](/use-cases/agent-workspace/custom-app-example-and-step-by-step-tutorial/work-with-the-desk#call-the-client)
* [How to store the client](/use-cases/agent-workspace/custom-app-example-and-step-by-step-tutorial/work-with-the-desk#store-the-client)
* [How to put text in the compose box](/use-cases/agent-workspace/custom-app-example-and-step-by-step-tutorial/work-with-the-desk#send-text)
* [How to send a card](/use-cases/agent-workspace/custom-app-example-and-step-by-step-tutorial/work-with-the-desk#send-cards)
* [How to send a card bundle](/use-cases/agent-workspace/custom-app-example-and-step-by-step-tutorial/work-with-the-desk#send-card-bundle)
* [How to get client's messages using a server](/use-cases/agent-workspace/custom-app-example-and-step-by-step-tutorial/intent-trigger#get-the-clients-message)
* [How to use those messages](/use-cases/agent-workspace/custom-app-example-and-step-by-step-tutorial/intent-trigger#using-those-messages)
* [How to transfer message from the server to the custom app](/use-cases/agent-workspace/custom-app-example-and-step-by-step-tutorial/intent-trigger)
* [How to get the JWT](/use-cases/agent-workspace/custom-app-example-and-step-by-step-tutorial/jwt#get-the-jwt)
* [How to use a Middleware](/use-cases/agent-workspace/custom-app-example-and-step-by-step-tutorial/jwt#how-to-use-a-middleware)
## Prerequisites
This tutorial was made using Node v14.21.3 and NextJS 13.3.1. Custom Apps available on the iAdvize iOS and Android apps must use the version 2.0.3 or greater.
## Steps to follow
This is a tutorial to learn how to install your application in the desk and make your app interact with it. If you want to start the tutoriel, go to [Get Started](https://github.com/iadvize/public-developers-documentation/blob/master/use-cases/agent-workspace/custom-app-example-and-step-by-step-tutorial/broken-reference/README.md), if you want to know how to make your app interact with the desk, you can find every commands in [References](https://github.com/iadvize/public-developers-documentation/blob/master/use-cases/agent-workspace/custom-app-example-and-step-by-step-tutorial/broken-reference/README.md)
# Get Started
Welcome, in this documentation, you will learn how to setup your environment to create a custom app and some tools to send informations to the desk using NextJS.
{% hint style="info" %}
This tutorial was made using Node v14.21.3 and NextJS 13.3.1
{% endhint %}
You will follow me through the creation of my app. The goal is to help the agent by giving him tools and informations about the coffee that he sells. I'm going to ask you to complete my code, you will find comments in it to know where to put the code
Here is what you will learn from this tutorial
* How to create your custom app on the developer platform
* How to create your app repository
* How to launch your app
* How to link your app and the Custom Apps
### Create your custom app on the developer platform
To start a custom app, you need to create it. Go to the developer platform :
Go to "my apps" and click in the green "build" button in the left panel. Give it a name and accept the terms to build it
After that, you need to fill the description, the App icon (this one is my favorite ), the dev contact in case your app has a problem and a Health check URL.\
Define if it's public or private then save the changes.
Now that you created your app, you need to define it as a custom app. Go to "plugins" in the left panel and select Conversation Panel App on the plugin list.
You can find your app at the bottom of "My Apps"
**App name**
This is the name that will show in the toolbar button that starts your app. The name must be provided as a json object that contains a `default` name and then names for each language the app needs to support. For instance `{"default": "Orders", "EN": "Orders", "FR": "Commandes"}`.
#### iFrame URL
iFrame URL is the URL of your app but we'll get to this later. Leave it blank for now\
Leave the onMessage trigger URL alone too
#### **Icon name**
The icon name refers to a set of predefined icons provided by iAdvize that will appear in the button that starts the app.
Here is the list of available options by domain - the name must be entered in upper case.
**Enable for operators**
Check this checkbox to make the app available for operators.
**Enable for experts**
Check this checkbox to make the app available for ibbü experts.
**Use authentication**
Check this checkbox if your app requires a proof that the CPA is loaded within the desk or if you want the ID of the operator, it may come in handy on the JWT section
And save !
Congratulation ! Your custom app is ready to be installed on a desk !
### Create your app repository
If you want to create your app from the beginning, you can follow this tutorial \
\
If you want to follow the tutorial, clone this repository and let me guide you !
The repository i gave you contains the steps of the tutorial, the same coffee app but in differents states
NextJS always takes the "pages" file to execute `index.tsx`. To go from a version to another, you need to rename the concerned folder to "pages". If there already is a "pages" folder, rename it back to its previous name (if you don't remember it, there is a .txt file with its name in it)
I invite you to go to the "1GetStarted" folder and rename it "pages"
### Launch your app
To run your website, you need to do the following command in your terminal at the root of the project (getStarted folder for us)
```sh
npm run dev
```
The website runs on localhost, it shows what is on `src/pages/`, which shows what is on `src/pages/index.tsx` in our case, the coffee app.
### Link your app and the Custom App
Remember the "Iframe URL" field in the dev platform ? That's where you will put the url of your website.
However, the dev platform don't like when you put a localhost in this section. Let me show you how to get around it
#### Override your localhost
The dev platform don't like when you put a localhost in this section so if you're working on local, let me show you how to get around it.
You need to install the extension "Requestly" ()[ ](https://chrome.google.com/webstore/detail/requestly-open-source-htt/mdnleldcmiljblolnjhpnblkcekpdkpa)Install here
It let you convert any url to another one to your client. The trick is to get a valid URL in the iframe URL (make sure it's not already taken) and override it locally with localhost.
Click on the Requestly icon to start the extension. Once you're in it, create a new rule -> redirect request
in the developer platform
Create the rule
Don't forget to save and to make sure the rule and the group are on
Now that the custom app is ready, you can find it and add it to your project on Apps in the supervision panel.\
Now when you go to your desk, you should find the app
Screenshot of the coffee app in the desk
Screenshot of the profile of the coffee app
## Next steps ?
Since you have your website ready, you can go to the next step and start working with the desk
# Work with the Desk
This tutorial explain how to interact and make actions with the desk.
In this section, you will learn
* [How to call the client](#call-the-client)
* [How to store the client](#store-the-client)
* [How to put text in the compose box](#send-text)
* [How to send a card](#send-cards)
* [How to send a card bundle](#send-card-bundle)
{% hint style="danger" %}
If you work locally, the desk won’t like it. You need to go to the desk, inspect (f12), go to “application”, local storage, ha and add a key “localCpaDev” and put it to “true”
{% endhint %}
### Call the client
To interact with the desk, we need some commands, let's install the bundle that contains them.\
Go into `src/pages/_document.tsx` and add to the body :
```html
```
Now if you go in the `index.tsx`of `1Getstarted`, you should be able to call the client in the main function.
Since NextJS uses server-side rendering, the window object we use to call the client isn't loaded at the start. You need to wait until it's loaded. The useEffect function trigger when the component is loaded/changed so that's where you're going to put the call of the client (line 77 of `index.tsx`).
```typescript
useEffect(() =>{
const client = (window as any).idz.init()
//some code
})
```
{% hint style="info" %}
The client is a Promise, you need to do a client.then() to use the following commands.
{% endhint %}
However, we want to call the client once, not every time useEffect is called. To solve that, we’re going to create a Singleton.
### Store the client
A singleton is a design pattern that permits the creation of only one instance of an object. Go to file named `singleton.tsx` in your designpattern folder and create your singleton :
```typescript
export default class Singleton {
private static instance: Singleton = new Singleton;
private variable : any;
public static getInstance(): Singleton {
return Singleton.instance;
}
public setVariable(obj : any){
if (!this.variable){
this.variable = obj
}
}
public getVariable() : any{
return this.variable
}
}
```
Then, back in `index.tsx`, we import Singleton and use it to store our client.\
And instead of creating a client variable, we use setVariable of the singleton\\
Add this at the top of `index.tsx`
```typescript
import Singleton from "./designpattern/singleton"
const instance = Singleton.getInstance()
```
Update your client call
```typescript
useEffect(() =>{
instance.setVariable((window as any).idzCpa.init())
})
```
Now to access your client, you just have to do `instance.getVariable()`, it'll return the Promise
### Send text
You can put any text you want in the text bar, ready to send. You just need to input the command :
```typescript
client.insertTextInComposeBox(yourString).
```
Go to your 2SendText repository and rename it pages
I added a "Send link" button in the Profile, when it's clicked, it launch the function "insert text" with the link of the coffee page in the website. Find insertText at line 94 of `index.tsx`and add the following code
```typescript
instance.getVariable().then((client : any)=>{. //get the client
client.insertTextInComposeBox(text) //use the client to insert text
})
```
A screenshot of the profile of a coffee, now with a "send link" button
### Send cards
You have the possibility to send cards with a text, a picture and an action when you click on it.
I created a “products” API where I can get the name, the description, the picture and the website of my different products. The goal is to send a card of my products.
First, let’s define the “Card” object and the “Action” object
```typescript
type Card = {
title?: string;
text?: string;
actions: Action[];
image?: {
url: string;
description: string;
}
};
type Action = {
type: “LINK”;
title: string;
url: string
}
```
I want you to rename 3SendCards to pages and work on it. You'll add Card and Action in the `index.tsx` outside the components (line 20/22)
Once you created your card, you can send it using the command :
```typescript
client.pushCardInConversationThread(Card)
```
I created a button "Send Card" that run the function `insertCard(product : Product)`. The goal is to send a card of the product when the button is pressed, the card is already created, just un-comment the "card" type at the creation of the constant (line 109). Call the client and push the card at the end of the insertCard function (line 125)
```typescript
instance.getVariable().then((client : any)=>{
client.pushCardInConversationThread(card)
})
```
The screenshot of the profile of the coffee, now with a "send card" button
### Send card bundle
You can send multiple cards in a single message.\
If you successfully sent a card, this one is going to be very easy. To send a card bundle, you need to create a Carousel. A Carousel is just an array of Card with a title.
```typescript
type Carousel = {
title?:string;
cards: Card[]
}
```
Change your 4SendCardBundle to "pages" and add the type Carousel to `index.tsx` (line 36)
Some coffees are on discount now ! I created a button that sends all discounted coffee and a button that sends all coffees in a bundle. They both run the insertBundle(number\[]) that takes a list of coffee ids to send a card bundle
Push the card into the carousel using this command, put it in your `index.tsx` (line 170)
```typescript
carousel.cards.push(card)
```
Once your Carousel is created, just run this command (line 174)
```typescript
instance.getVariable().then((client : any)=>{
client.pushCardBundleInConversationThread(carousel)
})
```
The screenshot of the coffee app, now with a "send all" and a "send discounted" button
## Next steps ?
Now, you know how to send informations to the desk, the next things to learn is how to get informations from the desk. Check the Intent/trigger to know how to do it.
You can also check the JWT tutorial to learn how to secure your API calls
# Intent / Trigger
In this part, you will learn how to receive and use the client's message. The purpose is to analyze what the client sends and identify key words for your app to use.
You will learn :
* [How to get client's messages using a server](#get-the-clients-message)
* [How to use those messages](#using-those-messages)
* How to transfer message from the server to the custom app
### Introduction to Intents/Triggers
#### Intent
Intent happens at the launch of the custom app, the app sends every message the client sent to a server. Then this server sends some information to the custom app, like an action to do or data for the app to use. In our example, the server detects the name of every coffee, highlights them, and places a purple dot on them.
#### Trigger
When a word is detected by intent, a small icon appears next to the message it's in. When you click on it, the custom app can read highlighted words from the message and use them. In our example above, when you click on the icon, the app goes to the profile of the first named coffee
Intent: First, the desk receives the conversation, then it sends messages to the server. The server returns a list of commands for every message. After that, the desk highlights the text in the message, places the icon on the message and sends the list of commands to the Custom App. Trigger: When the user clicks on the icon, it loads the custom app and sends the list of strings returned by intent in this message to the Custom App.
```mermaid
sequenceDiagram
participant A as User
participant B as Desk
participant C as Custom App iframe
participant D as Custom App Server
note over B: conversation received
B->>D: call onMessage trigger with all messages
D->>B: return list of commands to add Custom App actions
Note over B: Highlight messages and add contextual actions in thread and add badge to the custom app
A->>B: user click on action
Note over B: load custom app in iframe
B->>C: send intents.entities via postMessage
note over C: load entities in Custom App
C->>D: request entity details
D->>C: entities
note over C: show entity details
```
### Get the client's message
#### Create a server
To get a message from the client, you need to create a server. The desk will send every message to the server, it will them gives the instruction to your custom app using the message he got.
To learn more about it, feel free to check the API part of the tutorial. It's not mandatory to create the server.
First take your "5IntentTrigger" file and rename it "pages". If you check the api file you'll see the `onMessage.tsx` that wasn't here before. That's your server.
You need to tell the desk to call this server at launch and when you receive messages. To do that, go to the dev platform, in you app's parameters and go to "plugins". Update the settings of the custom app by adding the url of the server () on the "onMessage trigger URL" field.
The url of the server inside the onMessage trigger URL
#### Get messages
When the desk is launched, all the previous messages are sent to this URL, when a customer writes a message, it is sent to this url.
When the link is called, it automatically calls the default exported function in onMessage.tsx.
```typescript
export default async function handler(req: NextApiRequest, res : NextApiResponse){
//code
}
```
In order to use it, we need to import NextApiRequest and NextApiResponse from next :
```typescript
Import type { NextApiRequest, NextApiResponse } from ‘next’
```
Now, to access the messages, you need to use the req object. Req.body.messages contains a list of Message Objects :
```typescript
type Message = {
id : string,
authorType: string,
text: string
}
```
### Using those messages
#### Create a command
Now that you have those messages, you need to send to the desk what you want to do for each of them. Those instructions will take the form of actions, you will link those actions to the message using commands
```typescript
type Action = {
“highlight”:string,
“intent”:{
“key”: string,
“payload” : {
any : any
}
}
}
type Commande = {
“type”: string,
“messageId”: string,
“actions”:Action[]
}
```
An action is composed of highlight and intent. Highlight is the part of the text that will be highlighted
{% hint style="info" %}
Intent is the object you want to send to the custom app
{% endhint %}
Commande contains a type (usually “addMessageActions”), messageId (the id of your message) and actions (the action linked to the message).
You can only do mulitple Commande objects for one message.
Finish your handler by sending your array of Commande
```typescript
res.send({ “commands” : Commande[]})
```
### Cors errors
You may encounter Cors errors : here's how you can fix them
First, in your terminal
```
npm install cors
```
Then in onMessage
```typescript
import Cors from ‘cors’
```
Still in onMessage : create the const cors
```typescript
const cors = Cors({
methods: ['POST', 'GET', 'HEAD'],
})
```
After that, create a function runMiddleware that you will call at the start of your handler
```typescript
function runMiddleware(
req: NextApiRequest,
res: NextApiResponse,
fn: Function
) {
return new Promise((resolve, reject) => {
fn(req, res, (result: any) => {
if (result instanceof Error) {
return reject(result)
}
return resolve(result)
})
})
}
```
A picture of the desk with the coffee app. The name of the coffee are highlighted and a purple dot are placed next to the coffee mentioned in the conversation
Notice how the important text is highlighted and the inclusion of the small icon next to the message. I also replaced the "send all" button by a "Send suggestions" button. Let's see why he was made in the next part.
### Get the messages we set up
#### Receive the messages
Go back to your `index.tsx`, that's where you will get the commands you sent from the server
We need to edit your init to add some parameters
```typescript
useEffect(()=>{
instance.setVariable((window as any).idzCpa.init({
onIntent : handleIntent, //a function that takes an array of Intent in parameter
onTrigger : handleTrigger //a function that takes an array of string in parameter
}))
})
```
{% hint style="info" %}
Reminder : an Intent takes this form\
type Intent = {\
“key”: string,
“payload” : {
any : any
}
}
\
You should replace the “any : any” by “any : the type you passed into the payload.
For example, i passed a Product so i put
“payload”: {
any : Product
}
{% endhint %}
#### onIntent
This function is called at the opening of the Custom App and at every message sent. That’s where you get the payload you sent in the server. It takes a list of Intent in parameters, it's the list the server "onMessage" send
```typescript
function handleIntent(intents : Intent[]){
setUsedWordsintents.map(intent=>{
return(
intent.payload.any.name
)
}))
}
```
In this example, i take the name of the coffee in my payload and put it in the usedWords list, which put a purple dot on the picture of the coffee. The button "Send suggestions" send a bundle of every highlighted coffee in the conversation
#### onTrigger
When the icon is pressed, this function will run. The strings array contains the words identified by the intent in this message
function handleTrigger(strings : string[]){
  const product = coffees.findLast((coffee)=>coffee.name == strings[0])
  if (typeof product != "undefined"){
      launchProduct(product.id)
  }
}
A screenshot of the app. Clicking on the small icon next to the message redirects to the profile of the coffee
# JWT
JWT stands for Json Web Tokens, they are encrypted Json objects sent by the website. We use them to transmit confidential informations or verify your identity
In this tutorial, you will learn
* [How to get the JWT](#get-the-jwt)
* [How to use a Middleware](#how-to-use-a-middleware)
### Get the JWT
Take your "6JWT" file and rename it "pages"
You need to call the client to get the JWT. The client is in instance.getVariable().
```typescript
instance.getVariable().then((client : any) =>{ //ligne 143
client.getJWT().then(
(newJwt : string)=>{
//Your api call
})
)
})
```
In you api call, you should add one parameter in addition to the url (line 14)
```typescript
const res = await fetch(api, {
method: 'GET',
headers: {
'Content-Type': 'application/json',
'Authorization': `Bearer ${jwt}` // Add the JWT to the Authorization header
}
})
```
### How to use a Middleware
Modify each API to decode the jwt is a way to secure them, but it's terribly inefficient. We are going to use a middleware. A middleware test the jwt for every api call and run the call only if the JWT is verified.
#### Get your secret
You secret is the "key" to decrypt your JWT, if the JWT can be decrypted with this key, it's a valid one.
This secret is in the developer platform, in your app information. In the "Security" section, under the "secret token" field. You can put it in your "const" file
The secret token in the "security" section
You may have noticed the "middleware.tsx" in your file. It's time to use it, move it to the src file (src/pages/middleware.tsx -> src/middleware.tsx). This file is always called when you make an api call.
This file is divided into 3 parts :
* Imports
* The middleware
* Get the token
* Test if there is a token
* Test if the token is allowed
* Config the paths
You have 4 things to import
```typescript
import { NextResponse,NextRequest } from 'next/server';
import { jwtVerify } from "jose"
import { secret } from './pages/consts';
```
NextResponse and NextRequest are from nextJS\
JwtVerify is what we'll use to verify our JWT.\
Secret is the secret you took from the dev platform
The middleware is used to get the token, test if there is a token, test if the token is allowed and return an error otherwise
To test if the token is allowed, we're going to use jose. To install it, simply do the following command in your terminal
```
npm install jose
```
This is your middleware
```typescript
export async function middleware(request: NextRequest) {
const bearerToken = request.headers.get("authorization")?.split(' ')[1];
//bearerToken contains your JWT
if (!bearerToken) {
return new NextResponse(
JSON.stringify({ success: false, message: 'Authentication failed' }),
{ status: 401, headers: { 'content-type': 'application/json' } },
);
}
//if there is no token, the middleware returns an error 401
try {
const decoded = await jwtVerify(bearerToken, new TextEncoder().encode(secret));
return NextResponse.next();
//if the JWT is decoded, the middleware allows the api call
} catch (error) {
return new NextResponse(
JSON.stringify({ success: false, message: 'Invalid JWT' }),
{ status: 401, headers: { 'content-type': 'application/json' } },
);
//if the JWT is not decoded, the middleware returns an error 401
}
}
```
But how do the middleware know when he needs to be called ? It's all thanks to the config const
```typescript
export const config = {
matcher: '/api/:path*',
};
```
This line tells the middleware to apply when the file called is in "/api/\*".
{% hint style="info" %}
If you're working locally, the redirection of "onMessage" may delete the headers including the JWT. Don't be surprise if your intent/trigger don't work. You can fix it temporarily by using Requestly to add a header rule. The solution is to console.log the jwt given by your client and inject it when you call onMessage. Be aware that the JWT expire after 1h so you may need to change it multiple time
{% endhint %}
Add a JWT key to the headers
# References
## Use the library
Include this javascript bundle in the html
```html
```
## Client
### idzCpa
Global cariable used as the entry point of the CPA library, stored in window
#### init() : Promise
Client is obtained using idzCpa.init that returns a Promise
```typescript
window.idzCpa.init().then(client => {
//some code
})
```
#### context
Returns the client's information in the form of a Context object
```typescript
type Context = {
conversationId: string;
projectId: string;
channel: Channel;
language: string;
}
```
conversationId : id of the conversation between the client and the operator
projectId : Id of the project you launch the desk on
channel : Type of channel :
```
AppleBusinessChat = 'APPLE_BUSINESS_CHAT',
Call = 'CALL',
Chat = 'CHAT',
Facebook = 'FACEBOOK',
FacebookBusinessOnMessenger = 'FACEBOOK_BUSINESS_ON_MESSENGER',
MobileApp = 'MOBILE_APP',
Sms = 'SMS',
Video = 'VIDEO',
Whatsapp = 'WHATSAPP',
```
language : language of the client
### insertTextInComposeBox(string)
Insert the text passed in parameters into the compose box
### pushCardInConversationThreat(Card)
Push the card passed in parameters into the conversation thread
```typescript
type Action = {
type: "LINK";
title: string;
url: string;
};
type Card = {
title?: string;
text?: string;
actions: Action[];
image?: {
url: string;
description: string;
}
};
```
### pushCardBundleInConversationThread(Carousel)
Push the card bundle passed in parameters in the conversation thread
```typescript
type Carousel = {
title?:string;
cards: Card[]
}
```
### getJWT() : string
Returns the JWT of the desk
## ApplePay
### pushApplePayPaymentRequestInConversationThread(ApplePayPaymentRequestType) : Promise
Insert an ApplePay payment request in the conversation, returns a promise.\
If the payment is successful => execute `promise.then(()=>{ })`\
If there is an error in the payment => execute `promise.catch((e : ActionError)=>{ })`
```typescript
type ApplePayPaymentRequestType = {
requestIdentifier: UUID;
payment: ApplePayPaymentRequest;
receivedMessage: ApplePayReceivedMessage;
}
// Detail for payment field type
type ApplePayPaymentRequest {
currencyCode: string;
lineItems: PaymentItem[];
requiredBillingContactFields: ApplePayContactField[];
requiredShippingContactFields: ApplePayContactField[];
shippingMethods: ShippingMethod[];
total: PaymentItem;
}
type PaymentItem = {
amount: string;
label: string;
type: ApplePayLineItemType;
};
enum ApplePayLineItemType {
final,
pending,
}
type ShippingMethod = {
amount: string;
detail: string;
identifier: string;
label: string;
};
enum ApplePayContactField {
email = 'email',
name = 'name',
phone = 'phone',
postalAddress = 'postalAddress',
phoneticName = 'phoneticName',
}
// type for receivedMessage field
type ApplePayReceivedMessage {
type: 'CARD';
data: CardType;
}
type CardType = {
title?: string;
text?: string;
image?: CardImage;
actions: LinkAction[];
};
type CardImage = {
url: string;
description: string;
};
type LinkAction = {
type: 'LINK';
title: string;
url: string;
};
// Error
type ActionError = {
message: string;
details?: string[];
}
client.pushApplePayPaymentRequestInConversationThread(applePayPaymentRequest: ApplePayPaymentRequestType): Promise
```
# Administration
# Users
# SAML SSO Authentication — Implementation Guide
Let your operators sign in to iAdvize through your own centralized authentication system (your Identity Provider), instead of managing a separate iAdvize login and password.
### Why use SAML SSO?
SAML 2.0 is one of the most widely adopted SSO protocols in the enterprise. It is worth setting up for two reasons:
* **Security** — your users authenticate to iAdvize (and your other tools) from a single centralized account. You control authentication and access policies from one place.
* **Deployment at scale** — you can onboard hundreds or thousands of users without creating and maintaining an individual password for each one. Authentication relies on your existing directory (domain controller / Active Directory / user database).
### How it works
iAdvize acts as the **Service Provider (SP)** and delegates authentication to your **Identity Provider (IdP)** — for example Okta, Microsoft Entra ID, or AD FS.
* A user opens iAdvize, gets redirected to your IdP, authenticates there, and is redirected back to iAdvize, signed in.
* The flow is **SP-initiated only**. IdP-initiated SSO is not supported, for security reasons.
* iAdvize matches your users to iAdvize accounts using their **email address**.
> iAdvize integrates as a Service Provider only. It cannot serve as the Identity Provider for your other applications, nor issue SAML assertions to third-party services — bring your own IdP to authenticate against.
### Prerequisites
* **Create your iAdvize users first.** iAdvize uses the email address as a unique key, so each email must be unique and must match exactly the email exposed by your IdP. See [how to create or edit a user](https://help.iadvize.com/hc/en-gb/articles/203433397).
* **Provision your users in your IdP / directory** (domain controller, Active Directory, or database) beforehand.
* There is no auto-provisioning. Users must exist on both sides (you can create iAdvize users in bulk through the [GraphQL API](https://docs.iadvize.dev/technologies/graphql-api/authentication)).
### Getting started
To enable SAML SSO, get in touch with your Customer Success Manager. A Technical Project Manager will then guide you through the configuration.
### Implementation steps
#### 1. Provide your IdP information to iAdvize
| Item | Details |
| ---------------------------------------------- | ---------------------------------------------------------------------------------------------------------------------------------------------------------------------------------- |
| **X.509 signing certificate** | Your IdP public key, encoded in PEM or CER format (see formatting note below). |
| **Sign-in URL** | The URL where your users authenticate against your IdP. |
| **Email exposed as Name ID or SAML attribute** | iAdvize maps your users by email. Expose it in the `NameID`, or in a standard attribute such as `email` / `emailAddress` if your IdP does not put the email in `NameID`. |
| **Email domain** *(optional)* | The domain of your operators' email addresses. Required only if you want SSO to trigger automatically from the iAdvize login page or use the mobile app (see "Connecting a user"). |
The easiest way to share the first three is to send the **metadata file** generated by your IdP — it already contains the sign-in URL and the X.509 certificate.
#### 2. iAdvize Service Provider configuration
If your IdP requires SP details to create the connection on your side, use the following values. Replace `{CID}` with your iAdvize client ID.
| Setting | Value |
| ---------------------------------------- | ------------------------------------------------------------------ |
| **Entity ID / Audience URI** | `urn:auth0:iadvize:saml-ha-{CID}` |
| **Assertion Consumer Service (ACS) URL** | `https://auth.iadvize.com/login/callback?connection=saml-ha-{CID}` |
| **iAdvize SP metadata** | `https://auth.iadvize.com/samlp/metadata?connection=saml-ha-{CID}` |
#### 3. Certificate format
The X.509 certificate must be in valid PEM format:
* Wrap the Base64 content with `-----BEGIN CERTIFICATE-----` and `-----END CERTIFICATE-----`.
* Lines of 64 characters maximum.
* Save as `.pem` in UTF-8, without a BOM.
You can validate the certificate locally with `openssl x509 -in your-cert.pem -noout -text` before sending it.
> X.509 certificates expire (typically every 1 to 3 years). Track the expiry date: an expired certificate breaks authentication with no warning. Send your renewed certificate to your iAdvize contact ahead of the expiry date.
### Connecting a user
There are two ways to sign in. If you are not sure which fits your use case, discuss it with your Customer Success Manager and the Technical Project Manager on the project.
#### Option A — Direct link (recommended)
Sign a user straight into iAdvize through a dedicated link:
```
https://ha.iadvize.com/admin/login?connectionId=saml-ha-{CID}
```
When a user opens this link, they are redirected to your IdP and signed in to iAdvize. If they already have an active IdP session, the redirect is immediate. This is the preferred option: it simplifies onboarding and requires no change in your environment. It is especially useful when a single email domain is shared across several iAdvize accounts, where automatic domain-based routing is not possible.
> The direct link cannot be used on the mobile apps.
#### Option B — iAdvize login page
Users sign in from the standard login page at [https://ha.iadvize.com](https://ha.iadvize.com/). The **domain** of the email they enter routes them to the IdP configured for that domain, and they are redirected to authenticate.
This requires the optional email domain (step 1) to be configured. **It is the only SAML option on the mobile apps.**
### Current limitations
* **No SSO logout** — signing out of iAdvize does not sign the user out of the IdP.
* **No auto-provisioning** — users are not created automatically from SAML assertions. Create them manually or through the [GraphQL API](https://docs.iadvize.dev/technologies/graphql-api/authentication).
* **SP-initiated only** — IdP-initiated SSO is not supported, for security reasons.
* **One email domain per connection** — each iAdvize account (CID) maps to a single email domain for automatic routing. If a domain is shared across several accounts, use the direct link (Option A).
# Create, update and delete users via API
You can use the iAdvize API to import your users, create new ones or update them automatically.
Importing or modifying users allows you to automate the management of your users to:
* create your users in bulk,
* synchronise your users between applications (user provisioning),
* automate the creation of a user according to your needs,
* update user information (username, password, group, ...),
* modify the configuration of your users' communication channels\
etc.
## Pre-requisite: recovery of your GraphQL API keys
API authentication uses temporary and revocable access keys.
Please note that the lifetime of the key is 24 hours
You can generate an access key by calling the url mentioned in [this link](https://developers.iadvize.com/documentation/graphql-api#graphql-api) with a user email and a password. [See more ](https://docs.iadvize.dev/technologies/graphql-api/authentication)about GraphQL authentification.
## Create a user
### Description of mutation field
To create a new user via the [GraphQL API](https://developers.iadvize.com/documentation/graphql-api#graphql-api), you can enter all the fields below - only those with a star are required:
| Informations | Descriptions |
| --------------------------------------------------------------------------------------------------------------------------------------------------------------------------------------------------------------------------------------------------------------------------------------------------------------------------------------------------------------------------------------------------------------------------------------------------------------------------------------------------------------------------------------------------------------------------------------------------------------------------------------------------------------------------------------------------------------------------------------------------- | ------------------------------------------------------------------------------------------------------------------------------------------------------------------------------------------------------------------------------------------------------------------------------------------------------------------------------------------------------------------------------------------------------------- |
| **avatar**\* | Avatar’s URL |
|
channels
callConfiguration
clickToCallPhoneNumber
hasPriorityOnCall\*
isAlwaysAskForNumber\*
isEnabled\*
respondFrom\*
x CLICK\_TO\_CALL\_NUMBER
x DESK
chatConfiguration
hasPriorityOnChat\*
isAllowChatToVideo\*
isEnabled\*
isSimultaneousCallAllowed
numberOfSlots\*
thirdPartyConfiguration
isEnabled\*
numberOfSlots\*
videoConfiguration
hasPriorityOnVideo\*
isEnabled\*
| Configuration of user communication channel(s) |
|
countryPreferences\*
dateFormat
DMY
MDY
YMD
interfaceLanguage
languages
timeFormat
CLASSIC
MERIDIAN
timezone
|
Date format:
DMY Example: 31/12/2024
MDY Example: 12/31/2024
YMD Example: 2023-12-31
User’s interface language (ISO format)
User’s language (ISO format)
Time format:
CLASSIC Example: 13:55
MERIDIAN Example: 01:55 PM
User’s timezone:
Example: "Europe/Paris"
|
| **email\*** | User email |
| **externalId** | Id representing the user in the client’s system |
| **firstName** | User first name |
| **groupId** | Groups are used to partition information and user exchanges in the iAdvize administration. For more information on user groups, please see the following documentation: [Help Center - Use the user groups](https://help.iadvize.com/hc/en-gb/articles/203280696-Use-the-user-groups) |
| **lastName\*** | User last name |
| **password\*** | User password (that he will change on first connection) |
| **projectIds\*** |
Projects assigned to the user, determining which projects the user can manage conversations for
|
| **skillIds** | Skills can be managed after user creation through `userSkillsAdd`, `userSkillsRemove`, `userSkillsSet` mutations. The user's skills can be used to determine which routing group the user will be a member of. For more information on creating and using skills, please see the following documentation: [Help Center - Use the skills](https://help.iadvize.com/hc/en-gb/articles/203444283-Use-the-skills) |
| **userName\*** | Displayed under the user’s avatar in the chatbox |
### Examples of user creation
{% tabs %}
{% tab title="Operateur account (roleId = 2)" %}
```graphql
mutation MyMutation {
userCreate(input: {lastName: "Vergez", email: "mvergez@test.com", password: "iAdvize123!", roleId: 6, userName: "Matt", avatar: "https://ha.iadvize.com/admin/public/images/account/profile-pic-icon.svg", projectIds: 6661, firstName: "Matt", countryPreferences: {interfaceLanguage: fr, languages: "fr"}}) {
user {
avatarUrl
email
firstName
id
lastName
projects {
edges {
node {
id
name
}
}
}
userName
createdAt
deletedAt
avatar
interfaceLanguage
isDeleted
spokenLanguages
pseudo
}
userErrors {
... on UserError {
__typename
message
}
}
}
}
```
{% endtab %}
{% tab title="Developer account (roleId = 6)" %}
```graphql
mutation MyMutation {
userCreate(input: {lastName: "Vergez", email: "mvergez@test.com", password: "iAdvize123!", roleId: 6, userName: "Matt", avatar: "https://ha.iadvize.com/admin/public/images/account/profile-pic-icon.svg", projectIds: 6661, firstName: "Matt", countryPreferences: {interfaceLanguage: fr, languages: "fr"}}) {
user {
avatarUrl
email
firstName
id
lastName
projects {
edges {
node {
id
name
}
}
}
userName
createdAt
deletedAt
avatar
interfaceLanguage
isDeleted
spokenLanguages
pseudo
}
userErrors {
... on UserError {
__typename
message
}
}
}
}
```
{% endtab %}
{% endtabs %}
## Update a user
Use the mutation "`userUpdate`" instead of "`userCreate`". All the fields in the [Create a user](#create-a-user) part are editable except for the userId field. However, this field is mandatory in the mutation to ensure that the correct user is modified.
{% hint style="info" %}
In this mutation, only the fields to be modified must be filled in. Fields that are not filled in won’t be updated.
{% endhint %}
## Delete a user
You will need the **userId in 6 digit format**.
Here is an example of a GraphQL query to delete the user with userId XXXXXX:
```graphql
mutation MyMutation {
userDelete(input: {userId: XXXXXX}) {
userErrors {
... on UserHasOngoingConversationsUserDeleteError {
__typename
message
}
}
userId
}
}
```
If all goes well, here's the response you'll get from the GraphQL API:
```json
{
"data": {
"userDelete": {
"userErrors": null,
"userId": XXXXXX
}
}
}
```
# Manage the availability of your users with the iAdvize API
## Overview
Managing the availability of your users through the API can meet several integration use cases:
* Synchronize your users' availability between several tools,
* Modify the availability of your users on the different channels according to the current activity,
* View the availability of your users and the number of conversations in progress on each channel in real time.
## Prerequisites
API authentication uses temporary and revocable access keys (tokens). Please note that the lifetime of the key is 24 hours.
To generate your access key, please refer to [this section](/technologies/graphql-api/authentication).
## Steps to follow
### **Check the availability of a user**
The [UserAvailability](/technologies/graphql-api/reference) object is available in the user resource in our GraphQL API and allows you to consult the availability and occupation of a user for each channel (chat, call, video, third party channels).
For each channel, the [UserChannelAvailability](/technologies/graphql-api/reference) object allows you to know:
* if the channel is activated for this user,
* whether the user is currently available on this channel,
* the number of conversations in progress on this channel, for this user,
* the number of simultaneous contacts allowed on this channel, for this user.
The [UserPresence](/technologies/graphql-api/reference) object also lets you know if the user is connected to the solution or not.
### **Changing the status of a user**
The **userAvailabilityStatusUpdate** resource is available in our GraphQL API and allows you to modify in real time the availability of a user (available/unavailable) for each channel (chat, call, video, third-party channels).
{% hint style="info" %}
The webhook user.availability.updated allows you to be informed of each change of status of your users ([webhook reference](https://docs.iadvize.dev/use-cases/administration/users/pages/Btf9Z1ckUjapkIYEdr1L#user.availability.updated))
{% endhint %}
## Good practices
To discover all the resources available to manage your users and their availability, you can consult our [GraphQL documentation.](/technologies/graphql-api)
\\
# Integrate the iAdvize conversation panel into an existing tool
## **Objective**
Allow the iAdvize conversation panel to be opened in external tools used by our clients via an iFrame or through the automatic opening of the conversation panel in a new tab.
## **Use case**
Automatic opening of the iAdvize conversation panel when connecting to the client tool. (for example, a CRM other than Salesforce, Zendesk or Coheris for which we already have connectors).
\
**Process**
------------------------------------------------
### **Prerequisite - definition of the user journey (agent)**
**First**, define “functionally” how you imagine things from a “user journey” perspective.
There are three options for users who connect to the client tool to access the iAdvize conversation:
* **Option 1:** Automatic opening of the conversation panel in a new page/ tab when operators are connected to the client’s tool => solution that would allow them to automatically connect to the iAdvize conversation panel as soon as they arrive in the client’s tool (can be completed with one of the following two solutions).
* **Option 2:** Open the conversation panel in a \
```
{% endhint %}
### **To keep in mind**
#### **1 - Screen resolutions**
The following recommendations apply to the iFrame dimensions of the iAdvize interface:
**The recommended optimal resolution:**
* Width: 1920px
* Height: 930px
**The recommended resolution:**
* Width: 1440px
* Height: 750px
**The minimum recommended resolution:**
* Width: 1280px
* Height: 650px
#### 2 - API call to get your SSO key
```
https://ha.iadvize.com/api/2/operator?key=YOUR_API_KEY&fields=sso_key
```
YOUR\_API\_KEY will be given to you by your Customer Success Manager or Technical Account Manager upon request.
## **Example**
## Go further with our desk events
This [article](/technologies/desk-events) will give you all the information you need regarding the events triggered by the iAdvize desk. Using these events can really improve the integration of the iAdvize console within your tool.
# Anonymize a conversation or visitor data
iAdvize provides two GraphQL mutations to allow you to anonymize a conversation or a visitor. These will be used when you need to delete personal data at the request of the visitor.
In this article, we will describe:
* How to identify conversations and visitors to anonymize
* How to use GraphQL mutations to start the anonymization process
First of all, it's important to recall what these two mutations do
## Description of mutations
### **What does ClosedConversationAnonymize do?**
* It **deletes the messages** exchanged during the conversation (including all messages, system messages, and attachments).
* It also **deletes the custom data** linked to the conversation.
* It **does not delete the conversation object itself or the statistics** associated with it.
### **What does VisitorAnonymize do?**
* It **deletes all the information attached to the visitor**, such as name, first name, email, phone number, etc.\
\&#xNAN;*This could include information provided through custom data, information manually entered by agents from the iAdvize interface, or information provided through our APIs.*
## How to retrieve the list of conversations/visitors to be anonymized?
If you don't have development skills, that's not a problem. We invite you to use the [Apollo interface](https://ha.iadvize.com/apollo) to design and execute your queries. In this article, you'll find examples of ready-to-use queries and links to load them from Apollo. Don't forget to log in to your iAdvize administrator space beforehand, so that you have the necessary rights to execute graphQL queries.
### Search for conversations containing a specific character string
To begin, you will likely need to identify the conversations and the associated visitors in order to request their anonymization. Generally, the need for anonymization follows a visitor’s request, who will provide his name, first name, email to perform a search, but rarely the conversation ID he participated in.
From GraphQL, you can search for the list of conversation IDs that contains a specific string over a given period. From the same query, you can also retrieve the visitor profile ID associated with each conversation.\
Here is an example of a query:
{% hint style="info" %}
You can also [load this query directly from your Apollo interface](https://ha.iadvize.com/apollo?explorerURLState=N4IgJg9gxgrgtgUwHYBcQC4QEcYIE4CeABAMIA2EAzgmCREgG76UCGKAlvZQBQAk7qfAxZl0RAJKC8wsgEIANEV4AzdmRTMx5KjTqNmbTkgBiajXkoBKIsAA6SIkSgVqtekwuGu3AeZlj%2BKRlFVXVNJVDzKxt7R0caAHMEShiHOMckCDAEVPT0qHcDDnpcvPT2MFiyuIZ2SnYUCDxS6riKqtaAXw687rT0voGqvs6QeRBhPHYWACMyZIwQOzTbEF8hEVWxZfTV5TwIOC2iVYAmAAZTgEYAWnOADhurgBYAFXPz9A%2Bv84AtVfkPVWjWOZ0uzzujxe70%2B3w%2B-xAw0BKxAkWYxx2cVWiEorCSlAAyggWHgoAALZKgkAaSgoVbDeyjTpAA) (make sure you are properly connected to your iAdvize administration to be authorized to execute the query).
{% endhint %}
#### **Operation**
#### **Variables**
```json
{
"interval": {
"from": "2021-08-14T00:00:00Z",
"to": "2024-08-14T00:00:00Z"
},
"filters": {
"messagesSearches": ""
}
}
```
{% hint style="info" %}
iAdvize keeps conversation data (messages and custom data) for 3 years by default. The retention period may be shorter if requested by the customer.\
To ensure that your search is exhaustive, we recommend that you carry out your search over the last 3 years from today's date.
{% endhint %}
#### **Response** (example)
```json
{
"data": {
"closedConversations": {
"edges": [
{
"node": {
"conversation": {
"id": "83b04089-90be-41ad-a0f2-998710170212",
"visitor": {
"id": "8a91e839-15f3-48dd-85c7-a7991685baa7"
}
}
}
},
{
"node": {
"conversation": {
"id": "711944bd-cb87-49a7-91b0-c2c3a2668f5g",
"visitor": {
"id": "f41323c0-e76f-4835-b4e0-572e85d8fe2a"
}
}
}
}
]
}
}
}
```
Retrieve the IDs of the conversations and visitors you want to anonymize this way.
### Search for a visitor by email or phone number
If searching the content of conversations doesn't produce any results, you can also search visitor data using an email or phone number.
In this case, you'll need to use the following [Query graphQL to retrieve the id of one or more visitors](https://ha.iadvize.com/apollo?explorerURLState=N4IgJg9gxgrgtgUwHYBcQC4QEcYIE4CeABAGoCWAzmShHhQBQAkADnhAFYJQoCSY6RHqgCEAGiKMEcAIZkANgIDKKPGSQBzAJRFgAHSREiAN0rVaDVhy69%2BEy5259xU2Qokv52vQcNEEYdQQKHX1fXyQIMAQQnzDDMjBQuIBfJMNUnwzkkFEQI2lVaQAjOSCMEG9DXRB7az5qgQA2AE4AFmbRJOqPOQaiapQglAABMmkwEwAvBAA6KAg4av1s5KA), which you'll then need to anonymize:
**Operation**
```graphql
query Visitors($projectId: Int!, $email: String) {
visitors(projectId: $projectId, email: $email) {
edges {
node {
id
}
}
}
}
```
**Variables**
```json
{
"projectId": 6949,
"email": "test@iadvize.com",
"phoneNumber": "+33010120304"
}
```
Response
```json
{
"data": {
"visitors": {
"edges": [
{
"node": {
"id": "2183b42d-464d-4824-abb1-504619724ea9"
}
}
]
}
}
}
```
## How to anonymize the content of a conversation?
\
You need to execute the following GraphQL mutation to anonymize a conversation.\
\&#xNAN;*Here is an* [*example of a GraphQL request* ](https://ha.iadvize.com/apollo?explorerURLState=N4IgJg9gxgrgtgUwHYBcQC4RxighigSwiQAIBhAGwgGcEwziA3BAJ2vyKQEEliBPOAQBeCABQASAkgAOOdOSq16TVu0LEe-QSICSMnABU%2B0hAEIAlCWAAdUiSiK6DJMzYcNvJAOFipslPKS%2BiiWNnYk9ipu6qRhEfH2ABa4SEgIFLYJEQ40dFwomfEAvoUR1DBQUAh0dIUlSEUgADQgjLgsBLgARhQI1BggcSTWIH44I-JDESNQUWqcOmATw%2BAAHLgA7ACcAAy4qwC0W2AIACwHp1AATF0HXWAb56tXuGAAzG9bVwBmXbg7IzqtkaRSAA)*accessible from your Apollo interface.*
#### **Operation**
```graphql
mutation ClosedConversationAnonymize($input: ClosedConversationAnonymizeInputType!) {
closedConversationAnonymize(input: $input) {
conversation {
id
}
succeeded
}
}
```
#### Variables
```json
{
"input": {
"conversationId": ""
}
}
```
#### Response
```json
{
"data": {
"closedConversationAnonymize": {
"conversation": {
"id": "83b04089-90be-41ad-a0f2-998710170212"
},
"succeeded": true
}
}
}
```
#### Error
*for example, when you try to anonymize a conversation a second time.*
```json
{
"data": {
"closedConversationAnonymize": null
},
"errors": [
{
"message": "Conversation 83b04089-90be-41ad-a0f2-998710170212 has been not found during anonymization: it has either been dropped or anonymized",
"path": [
"closedConversationAnonymize"
],
"locations": [
{
"line": 2,
"column": 3
}
],
"extensions": {
"code": "NOT_FOUND",
"name": "NOT_FOUND",
"retryPolicy": "NO_RETRY"
}
}
]
}
```
{% hint style="info" %}
You can use the "succeeded" field to know if the operation was successful. If successful, it will be present with a value of "true." In case of an error, this field is absent, and a JSON "errors" array is returned.
{% endhint %}
## How to anonymize the data of a visitor?
When you anonymize a conversation, we also recommend anonymizing the visitor associated with it. This way, you will delete the personal data contained in both the conversation and the visitor who initiated it.\
\&#xNAN;*Here is an* [*example of graphQL request*](https://ha.iadvize.com/apollo?explorerURLState=N4IgJg9gxgrgtgUwHYBcQC4RxighigSwiQAIA1AgZwJQgCcBBJYgTzgIC8EAKAEgDcqNek1bsuASSQAHHOnJDajZkjacEU2SgCEAShLAAOqRKDqS0avE8zw5WPWa5JAYpEq1kmTn1GTJUzc6A2MAsJIYSgQ6JFxEULCAXwTkpESQABoQflw6AlwAIwAbBEoMED8Aw2ygy08NbxRq%2BUqw6oIwZpJq3AAOADMwAAZcAGYwAFpR3qgCiYAWeaGAVgncQvmJgE4wXAA2KH6AdlGoPa2j6pTjdMSgA) *accessible from your Apollo interface.*
#### **Operation**
```graphql
mutation VisitorAnonymize($visitorAnonymizeInput: VisitorAnonymizeInput!) {
visitorAnonymize(visitorAnonymizeInput: $visitorAnonymizeInput) {
visitor {
id
}
}
}
```
#### **Variables**
```json
{
"visitorAnonymizeInput": {
"id": ""
}
}
```
#### **Response**
```json
{
"data": {
"visitorAnonymize": {
"visitor": {
"id": "74d51373-f091-4d5e-8826-009eeff9e4b3"
}
}
}
}
```
#### **Error**
*For example, when you try to anonymize a wrong Visitor ID.*
```json
{
"errors": [
{
"extensions": {
"name": "INVALID_ARGUMENT",
"retryPolicy": "NO_RETRY"
},
"message": "Variable '$visitorAnonymizeInput' expected value of type 'VisitorAnonymizeInput!' but got: {\"id\":\"74d51373-f091-4d5e-8826-009eeff9e4bddfdsfdsf\"}. Reason: 'id' UUID expected (line 1, column 27):\nmutation VisitorAnonymize($visitorAnonymizeInput: VisitorAnonymizeInput!) {\n ^",
"locations": [
{
"line": 1,
"column": 27
}
]
}
]
}
```
{% hint style="danger" %}
The visitor ID present in GraphQL is not the same as the visitor ID displayed in the iAdvize administration (conversation log).\
It is therefore necessary to systematically use GraphQL to retrieve the visitor ID to be anonymized starting from the conversation and its ID (query \`closedConversations\`).
{% endhint %}
# Data & Analytics
# Extract conversation transcript
This article shows you how to retrieve messages exchanged within a conversation. The aim is to be able to export these messages in Json format.
To do this, you'll need to use the GraphQL resource "conversation". You'll first need to authenticate yourself by [retrieving a GraphQL token.](/technologies/graphql-api/authentication)
You must then retrieve the identifier of the conversation for which you wish to retrieve the messages. For example, you can retrieve all the identifiers of closed conversations over a given period via the "closedconversations" resource.
Once you've retrieved your GraphQL token and conversation identifier, here's an example of the code you'll need to implement to retrieve the messages exchanged during the conversation:
```javascript
const APIToken = "xxxxxxxx";
const convID = "xxxxxxxx";
const options = {
"method": "POST",
"headers": {
"Authorization": `Bearer ${APIToken}`,
"Content-Type": "application/json"
},
"body": JSON.stringify({
query: `query MyQuery($conversationId: UUID!) {
conversation(id: $conversationId) {
messages {
edges {
node {
__typename
... on ParticipantConversationMessage {
text
createdAt
author {
__typename
}
}
}
}
}
}
}`,
variables: {
conversationId: convID
}
})
};
fetch("https://api.iadvize.com/graphql", options).then(async (response) => {
let json = await response.json();
let messages = json.data.conversation.messages.edges
.filter(edge => edge.node.__typename === 'ParticipantConversationMessage')
.map(edge => ({
author: edge.node.author.__typename,
text: edge.node.text,
sentDate: edge.node.createdAt
}));
// Do what you want / need
console.log(messages);
});
```
\\
# Retrieve metrics and KPIs
When using the iAdvize GraphQL API to explore your performance and customer engagement, you have two powerful options depending on your needs:
* **Pre-calculated metrics** via the `metrics` query, which deliver aggregated KPIs.
* **Raw conversation data** via the `closedConversations` query, which lets you analyze each conversation in full detail.
This article introduces both approaches and provides the context you need before diving deeper into each in the dedicated articles that follow.
### Option 1: Pre-calculated metrics
The `metrics` query provides a set of **pre-aggregated indicators** that are calculated by iAdvize and grouped by dimensions such as time, campaign, project, or agent group.
Some of the indicators include:
* Number of conversations
* First response time
* Handling and resolution time
* Contact opportunities
* Targeting rules metrics
These metrics are ideal for trend monitoring or performance dashboards.
For a detailed breakdown of all available metrics and filters, check out the full article [here](/use-cases/data-and-analytics/retrieve-messages-exchanged-within-a-conversation-1/pre-aggregated-indicators).
### Option 2: raw data access via `closedConversations`
When you need more control over the analysis or want to feed conversation-level data into your CRM or reporting system, the `closedConversations` query gives you **raw access** to every closed conversation.
#### What does “raw data” mean?
Using the `closedConversations` query, you can retrieve the **complete set of fields** for each conversation object, including:
* Timestamps and duration
* Participants (visitor, agent, bot)
* All messages exchanged
* Conversation tags and channels
* Satisfaction score (CSAT, NPS)
* Assigned campaigns, routing, and qualification data
You can request a single conversation or pull data in bulk, applying filters and [paginating](/technologies/graphql-api/pagination) through results as needed.\
\
Please check these two articles for full information:\
\- [Understand conversation data 1/2](/use-cases/data-and-analytics/retrieve-messages-exchanged-within-a-conversation-1/find-contact-data-graphql)\
\- [Understand conversation data 2/2](/use-cases/data-and-analytics/retrieve-messages-exchanged-within-a-conversation-1/find-contact-data-graphql-1)
# Pre-aggregated indicators
The metrics query provides a set of pre-aggregated indicators that are calculated by iAdvize and grouped by dimensions such as time, campaign, project, or agent group.
## Introduction
The metrics query provides aggregated performance indicators based on conversations handled on the iAdvize platform.
It is ideal for tracking trends, performance, and outcomes over defined timeframes. This endpoint is not designed for real-time data retrieval, but rather to extract historical KPI summaries for reporting purposes.
Here is the [link](https://graphql.iadvize.dev/queries/metrics) to the publicly available schema.
## What data is available
You can request metrics such as:
* Number of conversations
* Message count (sent, received)
* First response time (reactivity)
* Resolution time/Handling duration
* Conversion info\*
* And many other KPIs related to chat performance (see below)\\
Metrics can be grouped and segmented to give contextual meaning (e.g., per agent, per engagement campaign, routing group etc.).
{% hint style="info" %}
\*make sure you read the info available [here](/use-cases/data-and-analytics/retrieve-messages-exchanged-within-a-conversation-1/understand-transaction-data) regarding transaction
{% endhint %}
## Available filters
You can filter your data using the following criteria :
{% hint style="info" %}
NB: each indicator has its specific filters - please refer to our documentation to know which filter can be applied for each indicator\\
{% endhint %}
* `interval` (required): start and end timestamps
* from: “insert date format [ISO8601](https://en.wikipedia.org/wiki/ISO_8601)” (ex: “2025-03-01T00:00:00Z”)
* to: “insert date format [ISO8601](https://en.wikipedia.org/wiki/ISO_8601)”
* `userGroupIds`: filter by group
* `userIds`: filter by specific agent(s) - including bots
* `channels`: filter by campaign
* `routingRuleIds`: filter by routing rules
* `routingGroupIds`: filter by routing groups
* `projectIds`: filter by project\\
You can also use the interval argument to aggregate results over:\\
* `hour`
* `day`
* `week`
* `month`\\
## Good to know
* This query is optimized for reporting.
* The platform already provides real-time dashboards, so this query is best used for periodic exports and historical analysis.
* Channels include: CHAT, ….
\
List of available metrics
-------------------------
### **agentAvailabilityMetric**
Filters available listed [here](https://graphql.iadvize.dev/types/MetricAgentAvailabilityFiltersInput).
List of metrics available on this resource:
| Indicator | Description | Channels availability\* |
| ----------------------------------------------------- | ------------------------------------------------------------------------------------------------------------------------------ | ----------------------- |
| CONTACT\_PER\_HOUR\_NUMBER | Average number of contacts processed by all agents for an hour of production. | All |
| MAX\_AND\_PARTIAL\_OCCUPATION\_DURATION | Period during which an agent is connected to the panel and is occupied partially or to the maximum. | All |
|
MAX\_AND\_PARTIAL\_OCCUPATION\_RATE
| Part of production time during which an agent is connected to the panel and is occupied partially or to the maximum. | All |
| MAX\_OCCUPATION\_DURATION | Period during which an agent is connected to the panel and is occupied to maximum capacity. | All |
| MAX\_OCCUPATION\_RATE | Part of production time during which an agent is connected to the panel and is occupied to a maximum. | All |
| NON\_OCCUPATION\_DURATION |
Period of time during which an agent is connected to the panel and is simultaneously available and not busy.
| All |
| NON\_OCCUPATION\_RATE | Part of production time during which an agent is connected to the panel and is simultaneously available and not busy. | All |
| NON\_PRODUCTION\_DURATION | Period during which an agent is connected to the panel, unavailable and yet not busy. | All |
| NON\_PRODUCTION\_RATE | Proportion of connection time during which an agent is connected to the panel, unavailable and yet not busy. | All |
| OCCUPATION\_DURATION | Period during which an agent is connected to the panel, unavailable and yet not busy. | All |
| OCCUPATION\_RATE | Part of production time during which an agent is connected to the panel and is partially busy. | All |
| PRESENCE\_DURATION | Total period during which the agents were connected to the desk. | All |
| PRODUCTION\_DURATION | Period during which an agent is connected to the panel and is available or busy. | All |
|
PRODUCTION\_RATE
| Proportion of connection time during which an agent is connected to the panel and is available or busy. | All |
| TRANSACTION\_AFTER\_CONTACT\_AMOUNT\_PER\_HOUR | Average turnover generated by an agent after a contact on an hourly basis | All |
## agentGroupAvailability
Filters available listed [here](https://graphql.iadvize.dev/types/MetricAgentGroupAvailabilityFiltersInput).
| Indicator | Description | Channels availability |
| ----------------------------------------------------- | ------------------------------------------------------------------------------------------------------------------------ | --------------------- |
|
AGENT\_MAX\_NUMBER
| Maximum number of agents connected simultaneously to the desk. Computed for a group over a minimum period of one hour. | All |
|
CONTACT\_PER\_HOUR\_AVERAGE\_NUMBER
| Average number of contacts processed by all agents for an hour of production. | All |
|
NON\_PRESENTATION\_DURATION
| Period during which buttons are not displayable. Length of the time slot covered with no agent available. | All |
| NON\_PRESENTATION\_RATE | Part of period smoothed duration during which buttons are not displayable | All |
|
PRESENCE\_SMOOTHED\_DURATION
| Period during which operators were connected. Length of the time slot covered with at least one agent present. | All |
| PRESENTATION\_DURATION | Period during which buttons are displayable. Length of the time slot covered with at least one agent available. | All |
| PRESENTATION\_RATE | Part of period smoothed duration during which buttons are displayable | All |
| PRODUCTION\_SMOOTHED\_DURATION | Period during which operators were in production. Length of the time slot covered with at least one agent in production. | CHAT, CALL, VIDEO |
## contactOpportunitiesMetric
Filters available listed [here](https://graphql.iadvize.dev/types/MetricContactOpportunitiesFiltersInput).
| Indicator | Description | Channels availability |
| ----------------------------------------------------------------- | ------------------------------------------------------------------------------------------------------------------------ | --------------------- |
|
CONTACT\_MISSED\_NUMBER
| Estimated number of missed contact opportunities because the agents were totally busy, offline or not in production. | CHAT, VIDEO, CALL |
|
CONTACT\_MISSED\_WITH\_BUSY\_AGENTS\_NUMBER
| Estimated number of missed contact opportunities due to agents being totally busy. | CHAT, VIDEO, CALL |
|
CONTACT\_MISSED\_WITH\_NO\_AGENTS\_NUMBER
|
Estimated number of contacts missed because the agents were either not connected or not in production.
| Proportion of displays having generated a contact. | CHAT, VIDEO, CALL |
|
TARGETING\_RULE\_DISPLAY\_NUMBER
|
Number of chat/call displays generated on the website during the period.
| CHAT, VIDEO, CALL |
|
TARGETING\_RULE\_
TRIGGERED
| Number of times a targeting rule has been triggered, as a consequence of visitors meeting the right criteria. | CHAT, VIDEO, CALL |
## transactionsMetric
Filters available listed [here](https://graphql.iadvize.dev/queries/conversions).
| Indicator | Description | Channels availability |
| --------------------------------------------------------- | ---------------------------------------------------------------------------------------------------------------- | --------------------- |
|
CART\_AFTER\_CONTACT\_AMOUNT
| Average order value following a contact. | All |
|
CART\_GLOBAL\_AMOUNT
|
Average Order Value, all visitor categories.
| All |
|
TRANSACTION\_AFTER\_CONTACT\_AMOUNT
| Total turnover from visitors who dialogued and completed a transaction after a contact. | All |
| TRANSACTION\_AFTER\_CONTACT\_DURATION | Average time between the first exchange and the transaction following a contact. | All |
| TRANSACTION\_AFTER\_CONTACT\_NUMBER | Total number of transactions from visitors who dialogued and then completed a transaction following the contact. | All |
| TRANSACTION\_TOTAL\_AMOUNT | Total turnover, all visitor categories. | All |
| TRANSACTION\_TOTAL\_NUMBER | Total number of transactions (all categories). | All |
# Understand transaction data
In iAdvize, transactions (such as purchases or leads) are tracked using the JavaScript transaction tag you install on key pages like the order confirmation or lead submission page.
## What gets sent to iAdvize?
Each time a visitor completes a transaction on your site, the following information is sent to iAdvize:
* Transaction ID (unique identifier)
* Transaction amount
## How transactions are attributed to conversations
By default, iAdvize links a transaction to a conversation if it occurs within 48 hours of the conversation ending.
> *This 48-hour attribution window can be customized. If needed, reach out to your Customer Success Manager (CSM) to adjust this setting.*
{% hint style="info" %}
**Why is this important?**
When you run a query to retrieve transaction data per conversation or per day, keep in mind that a transaction may not fall within the same time interval as the conversation that generated it.\\
{% endhint %}
## Example: How attribution works in practice
Let’s say a visitor chats with your team on Monday and purchases something the next day:
* Monday, Jan 1 — 10:00 AM: Conversation starts
* Monday, Jan 1 — 10:12 AM: Visitor leaves; the conversation is closed
* Tuesday, Jan 2 — 2:08 PM: Visitor completes a purchase on your website\\
This transaction will be attributed to the conversation from Monday, because it occurred within the 48-hour window.
## Important tip for querying
If you run a [**closedConversation**](https://graphql.iadvize.dev/queries/closedConversations) query using an interval that ends on Monday, Jan 1, after 10:12 AM the transaction that occurred on Tuesday, Jan 2 will not appear in the results, even though it’s linked to the Jan 1 conversation.
{% hint style="info" %}
**Best practice:**
When analyzing transactions linked to conversations, always extend your date range to account for the attribution window (48 hours by default, or whatever value is set in your account).
{% endhint %}
\
How to retrieve a list of all your transactions
-----------------------------------------------
The query [**conversions**](https://graphql.iadvize.dev/queries/conversions) allows you to list and filter transactions.
If you wish to catch all transaction as soon as they go through, please make sure you read our information regarding our [transaction webhook](https://docs.iadvize.dev/technologies/webhooks/reference#transaction.attributed).
## What is the best query to use for my need?
* Use the `closedConversations` query to **retrieve transactions attached to specific conversations**. These are available directly within the conversation object (if applicable).
* Use the [`conversions` query](https://graphql.iadvize.dev/queries/conversions) to retrieve **a list of all transactions**, independently of conversations. This is useful for post-processing or analyzing attribution across time.
# Understand conversation data 1/2
The closedConversations and the conversation queries allow you to retrieve detailed information about each conversation that has been closed. These are your go-to queries for raw data export, integration into external systems, or conversation-level audits.
Here is the [link](https://graphql.iadvize.dev/queries/closedConversations) to the publicly available schema.
## What data is available
For each conversation, you can retrieve:
* Unique ID
* Start and end timestamps
* Assigned agent, group, campaign
* Messages (including sender, content, timestamps)
* Tags
* Ratings (CSAT, NPS)
* Contact info and visitor details
* Transactions\\
You can also expand nested fields to retrieve message-level data, user details, and routing logic context.
## Available filters
You can narrow down the results using:
* `interval` (required): defines the period of closed conversations to fetch
* `projectIds`: filter by project (SID)
* `answered`: Filter by conversations that received a response.
* `answeredByHuman`: Filter by conversations answered by a human agent.
* `automationLevels`: Filter by automation level (FULLY\_AUTOMATED, NOT\_AUTOMATED, PARTIALLY\_AUTOMATED)
* `channels`: Filter by conversation channels (e.g., APPLE\_BUSINESS\_CHAT, CALL, CHAT, FACEBOOK, FACEBOOK\_BUSINESS\_ON\_MESSENGER, GOOGLE\_BUSINESS\_MESSAGES, INSTAGRAM, MOBILE\_APP, SMS, TWITTER, VIDEO, WHATSAPP).
* `closeReason`: Filter by reasons for conversation closure (BOT\_TRANSFER\_FAILED, END\_OF\_BOT\_SCENARIO, VISITOR\_DROPPED\_OFF\_SCENARIO)
* `conversationId`: Filter by a specific conversation ID.
* `conversationVisitorIds`: Filter by visitor IDs associated with conversations.
* `customerSatisfaction`: Filter by customer satisfaction scores (1 to 5).
* `engagementCampaignIds`: Filter by engagement campaign IDs.
* `genAiPredictedTopicIds`: Filter by generative AI predicted topic IDs.
* `groupIds`: Filter by group IDs of operators who participated in the conversation.
* `hasConversion`: Filter by presence of a conversion.
* `hasGenerativeAIAnswer`: Filter by presence of generative AI answers.
* `hasGenerativeAIUnansweredQuestion`: Filter by presence of unanswered questions by generative AI.
* `hasVideoCall`: Filter by presence of video calls in the conversation.
* `humanHandlingTimeUpperLimit`: Filter by maximum human handling time in seconds.
* `isAiAssisted`: Filter by conversations where agents were assisted by generative AI.
* `messagesSearches`: Filter by keywords in the content of messages.
* `netPromoterScore`: Filter by Net Promoter Score (0 to 10).
* `projectIds`: Filter by iAdvize project IDs (SID).
* `respondentTypes`: Filter by respondent types (e.g., Copilot, Bot, Expert, Agent).
* `roles`: Filter by roles (e.g., operator, manager, admin, expert, bot).
* `routingGroupIds`: Filter by routing group IDs.
* `tagIds`: Filter by tag IDs.
* `targetingRuleIds`: Filter by targeting rule IDs.
* `userIds`: Filter by user IDs.
* `visitorIds`: Filter by visitor profile IDs.
* `visitorMessagesSearches`: Filter by keywords in visitor messages.
You can also paginate your results using offset and limit.
More about pagination in this [article](https://docs.iadvize.dev/technologies/graphql-api/pagination).
## Fields returned by closedConversations
#### 🆔 Core identifiers
* `id`: Unique ID of the conversation
* `externalId`: Custom external identifier
#### 🕓 Timestamps
* `createdAt`: When the conversation started
* `updatedAt`: Last update timestamp
* `closedAt`: When the conversation was closed
* `duration`: Conversation duration in seconds from visitor initiation time to user closing time using iso 8601 format.
#### 👥 Participants & routing
* `users`: List of users who participated in the conversation
* `visitor`: The visitor (contact) involved in the conversation
* `project`: The iAdvize project the conversation belongs to
* `routingRule`: The routing rule that directed the conversation
* `routingGroup`: Group of operators the conversation was routed to.
#### 💬 Content & messages
* `messages`: All messages exchanged during the conversation (transcripts
* `systemMessage`:A system conversation message attachment (engagement rule triggered, transfer information, etc. full list available [here](https://graphql.iadvize.dev/types/SystemConversationMessageAttachment))
#### 🧠 AI & automation
* `automationLevel`: Level of automation used in the conversation
#### 🔖 Tags & metadata
* `tags`: Tags manually or automatically applied to the conversation
* `language`: Language of the conversation
* `channel`: Channel used (chat, call, etc.)
#### 🧪 Ratings & feedback
* `customerSatisfaction`: Customer satisfaction score (1–5)
* `netPromoterScore`: NPS value (0–10)
* `comment`: Visitor's conversation comment.
#### 📎 Context & tracking
* `targetingRule`: Targeting rule that triggered the chat
* `engagementCampaign`: Associated engagement campaign
* `customData`: A typed conversation custom data for a conversation - more info [here](https://graphql.iadvize.dev/types/ConversationConversationCustomDataEntry)
* `closingformValues`: List all closing form values answered to custom closing form plugins.
\
💶 **Transactions**\*
* `conversions`: A Conversion attributed to a conversation
{% hint style="info" %}
\*make sure you read the info available [here](/use-cases/data-and-analytics/retrieve-messages-exchanged-within-a-conversation-1/understand-transaction-data) regarding transaction
{% endhint %}
## Good to know
* This query is ideal for exporting chat logs, enriching your CRM, or performing detailed analysis on individual conversations.
* Use it to feed reporting pipelines or quality assurance tools.
* If you wish to catch all conversations as soon as they go through, please make sure you read our information regarding our two [conversation webhooks.](https://docs.iadvize.dev/technologies/webhooks)\\
\
\\
\
\\
# Understand conversation data 2/2
Unlike our Rest API, which provides contact indicators, our GraphQL API provides conversation indicators. However, you may wish to go down to a per-contact granularity also for GraphQL indicators.
## Contact vs conversation definition
\- A **contact** is an exchange between a visitor and an operator (agent, expert or bot). It can be a chat, call or video contact.
\- A **conversation** can include several contacts, especially if they have been transferred or snoozed.
A conversation can therefore include several contacts when it is ended.
## Fields to be used
The fields/properties mentioned are available in the [**`Conversation`**](https://graphql.iadvize.dev/types/Conversation) type/object. This [**`Conversation`**](https://graphql.iadvize.dev/types/Conversation) object is available through (depending on your needs) two queries:
* **`closedConversations`**: which returns a paginated list of `Conversation` objects that are closed only.
* **`conversation`**: which returns a `Conversation` object based on its id (in uuid format).
{% hint style="info" %}
As a reminder, GraphQL doesn't explicitly expose the notion of "contact", but it's entirely possible to reconstruct this notion by exploring the lifecycle of the conversation through the various distribution events ([**`routingEvents`**](https://graphql.iadvize.dev/types/RoutingEvent)) or events occurring during the conversation via messages of type [**`SystemMessage`**](https://graphql.iadvize.dev/types/SystemMessage)in the messages property (the[**`ConversationPushedSystemAttachment`**](https://graphql.iadvize.dev/types/ConversationPushedSystemAttachment)attachment that systematically marks the start of a new contact).
{% endhint %}
Here are all the fields/properties of the Conversation object you'll need to make your request:
Field
Comments
DATE/TIME (opening)
The goal is to retrieve the start date of each contact for which a ConversationPushedSystemAttachment message occurs systematically.
DATE/TIME (close)
See point above.
If you need to retrieve the conversation's closing date, it is available in the closedAt property.
ID_
CONTACT (unique)
There's no such thing as a contact id, but it's possible to build one by concatenating various pieces of information, such as the conversation id and the date (createdAt) of the ConversationPushedSystemAttachment attachment.
SITE_ID
This is the id property in the conversation's project property.
CHANNEL (chat/wa/ etc.)
This is the channel property
ID_
OPERATOR
It is possible to retrieve the information (id, name, email, etc.) of the user who has processed a contact. This information can be accessed in the toUser property of the system message whose attachment is of type ConversationPushedSystemAttachment.
ID_
CONVERSATION
This information is available in the id property of the Conversation object.
ROUTING_RULES
The goal is to determine which group(s) of respondents actually handled the contact.
This information is available in the routingEvents property, which retrieves the date on which the event occurred (createdAt), as well as details of the rule and targeting group (routingRule and routingGroup) to which the conversation was distributed.
Chronologically, a distribution event necessarily occurs before one or more ConversationPushedSystemAttachment messages (corresponding to the sending of the conversation to the advisor's console or the reception of the conversation by a bot).
For example, a conversation with two contacts handled by the same operator. We can clearly see two ConversationPushedSystemAttachments that can be linked to distribution information (routingRule and routingGroup).
11:00:00 routingEvent (routingRule+routingGroup)
11:00:01 ConversationPushedSystemAttachment
11:00:05 ConversationSnoozedSystemAttachment
— conversation returns 5 minutes after snooze
11:05:05 ConversationPushedSystemAttachment
…
…
11:10:00 ConversationClosedSystemAttachment
CONTACT_
STATUS (answered, unanswered, transferred, snoozed...)
This involves retrieving events that have occurred during the conversation.
iAdvize exposes all these events in the messages property with the SystemMessage type. It's possible to retrieve the name of this event using the __typename property, as well as information specific to each event, which you can find in our Apollo tool.
Here is an example of some of the events you may encounter:
ConversationClosedSystemAttachment
TransferredToUserSystemAttachment
TransferredToRoutingRuleSystemAttachment
ConversationSnoozedSystemAttachment
…
ENDING_
CONTACT (reason)
The need is to determine whether the contacts have resulted in :
- a closing
- a transfer
- a snooze
- ...
This information can be retrieved via the SystemMessage mentioned above.
## Find conversation contacts through SystemMessage
## Example of a query
In the following example, we retrieve the distribution information as well as the events in the conversation's lifecycle (marking, in particular, the beginning and end of contacts).
We therefore find 3 contacts symbolized by the presence of 3 attachments of type: **`ConversationPushedSystemAttachment`**.
As the conversation has been transferred to distribution rules, we also find 3 distribution events in the **`routingEvents`** property.
### Query
```graphql
query MyQuery {
conversation(id: "b90f9039-f993-4221-9293-0000000000fb") {
id
channel
messages {
edges {
node {
__typename
... on SystemMessage {
attachments {
__typename
... on ConversationPushedSystemAttachment {
toUser {
id
email
firstName
}
}
... on ConversationClosedSystemAttachment {
byUser {
__typename
id
email
firstName
lastName
}
}
... on TransferredToUserSystemAttachment {
reason
toUser {
__typename
id
email
firstName
lastName
}
fromUser {
__typename
id
email
firstName
lastName
}
}
... on TransferredToRoutingRuleSystemAttachment {
reason
fromUser {
__typename
id
email
firstName
lastName
}
}
... on ConversationSnoozedSystemAttachment {
until
byUser {
__typename
id
email
firstName
lastName
}
}
}
createdAt
}
}
}
}
routingEvents {
routingGroup {
id
name
}
createdAt
routingRule {
id
name
}
}
}
}
```
### Response / result
```json
{
"data": {
"conversation": {
"id": "b90f9039-f993-4221-9293-0000000000fb",
"channel": "CHAT",
"messages": {
"edges": [
{
"node": {
"__typename": "ParticipantConversationMessage"
}
},
{
"node": {
"__typename": "SystemMessage",
"attachments": [
{
"__typename": "EngagementRuleTriggeredSystemAttachment"
}
],
"createdAt": "2023-10-08T08:33:04.774429Z"
}
},
{
"node": {
"__typename": "SystemMessage",
"attachments": [
{
"__typename": "NavigationChangedSystemAttachment"
}
],
"createdAt": "2023-10-08T08:33:05Z"
}
},
{
"node": {
"__typename": "SystemMessage",
"attachments": [],
"createdAt": "2023-10-08T08:33:05.411381Z"
}
},
{
"node": {
"__typename": "SystemMessage",
"attachments": [
{
"__typename": "ConversationPushedSystemAttachment",
"toUser": {
"id": 44000,
"email": "ha@bot.iadvize.com",
"firstName": null
}
}
],
"createdAt": "2023-10-08T08:33:05.490789Z"
}
},
{
"node": {
"__typename": "SystemMessage",
"attachments": [
{
"__typename": "NavigationChangedSystemAttachment"
}
],
"createdAt": "2023-10-08T08:33:05.559807Z"
}
},
{
"node": {
"__typename": "ParticipantConversationMessage"
}
},
{
"node": {
"__typename": "ParticipantConversationMessage"
}
},
{
"node": {
"__typename": "SystemMessage",
"attachments": [
{
"__typename": "TransferredToRoutingRuleSystemAttachment",
"reason": "",
"fromUser": {
"__typename": "Bot",
"id": 434024,
"email": "ha2@bot.iadvize.com",
"firstName": null,
"lastName": "Page contact"
}
}
],
"createdAt": "2023-10-08T08:33:10.646767Z"
}
},
{
"node": {
"__typename": "SystemMessage",
"attachments": [
{
"__typename": "VisitorNotificationSettingsRequestedSystemAttachment"
}
],
"createdAt": "2023-10-08T08:33:15.949558Z"
}
},
{
"node": {
"__typename": "SystemMessage",
"attachments": [
{
"__typename": "VisitorNotificationSettingsSetSystemAttachment"
}
],
"createdAt": "2023-10-08T08:33:19.587015Z"
}
},
{
"node": {
"__typename": "SystemMessage",
"attachments": [
{
"__typename": "VisitorNotificationSettingsConfirmedSystemAttachment"
}
],
"createdAt": "2023-10-08T08:33:19.879399Z"
}
},
{
"node": {
"__typename": "ParticipantConversationMessage"
}
},
{
"node": {
"__typename": "SystemMessage",
"attachments": [],
"createdAt": "2023-10-08T08:38:58.366868Z"
}
},
{
"node": {
"__typename": "SystemMessage",
"attachments": [
{
"__typename": "ConversationPushedSystemAttachment",
"toUser": {
"id": 268289,
"email": "test@iadvize.com",
"firstName": "Pierre HACK"
}
}
],
"createdAt": "2023-10-08T08:39:02.422185Z"
}
},
{
"node": {
"__typename": "ParticipantConversationMessage"
}
},
{
"node": {
"__typename": "ParticipantConversationMessage"
}
},
{
"node": {
"__typename": "SystemMessage",
"attachments": [
{
"__typename": "TransferredToRoutingRuleSystemAttachment",
"reason": "j’aimerais faire réparer l’écran de mon téléphone qui est cassé",
"fromUser": {
"__typename": "Professional",
"id": 260000,
"email": "test@iadvize.com",
"firstName": "Pierre HACK",
"lastName": "MU"
}
},
{
"__typename": "UnsupportedSystemMessageAttachment"
}
],
"createdAt": "2023-10-08T08:40:03.249159Z"
}
},
{
"node": {
"__typename": "SystemMessage",
"attachments": [
{
"__typename": "VisitorNotificationSettingsRequestedSystemAttachment"
}
],
"createdAt": "2023-10-08T08:40:09.326441Z"
}
},
{
"node": {
"__typename": "SystemMessage",
"attachments": [],
"createdAt": "2023-10-08T08:43:03.373263Z"
}
},
{
"node": {
"__typename": "SystemMessage",
"attachments": [
{
"__typename": "ConversationPushedSystemAttachment",
"toUser": {
"id": 380000,
"email": "test2@iadvize.com",
"firstName": "AnnH PLEVIN"
}
}
],
"createdAt": "2023-10-08T08:43:04.311492Z"
}
},
{
"node": {
"__typename": "ParticipantConversationMessage"
}
},
{
"node": {
"__typename": "ParticipantConversationMessage"
}
},
{
"node": {
"__typename": "ParticipantConversationMessage"
}
},
{
"node": {
"__typename": "ParticipantConversationMessage"
}
},
{
"node": {
"__typename": "SystemMessage",
"attachments": [
{
"__typename": "ConversationClosedSystemAttachment",
"byUser": {
"__typename": "Professional",
"id": 383512,
"email": "test2@iadvize.com",
"firstName": "AnnH PLEVIN",
"lastName": "CA"
}
}
],
"createdAt": "2023-10-08T08:52:11Z"
}
}
]
},
"routingEvents": [
{
"routingGroup": {
"id": "f3485cc1-2a31-00e2-bc0e-000fd57dcf19",
"name": "Page contact - chatbot routing group"
},
"createdAt": "2023-10-08T08:33:04Z",
"routingRule": {
"id": "594ee64b-b888-4f1a-8273-47eae1f0a566",
"name": "Distribuer à bot Page Contact puis au service client"
}
},
{
"routingGroup": {
"id": "007fce95-561c-000b-89ff-9b5846398d11",
"name": "Groupe Service client 1"
},
"createdAt": "2023-10-08T08:33:10Z",
"routingRule": {
"id": "fed7f40a-0000-43e3-85cd-13eff3c8d64e",
"name": "Transfert Bot vers Service client commercial"
}
},
{
"routingGroup": {
"id": "cbf887b7-e33b-000e-ad2c-33fb7025c03f",
"name": "Groupe Assistance technique"
},
"createdAt": "2023-10-08T08:40:03Z",
"routingRule": {
"id": "6b91bba2-78bc-48d2-a5ff-d9f391f0000",
"name": "Assistance technique"
}
}
]
}
}
}
```
# Understand satisfaction data
Understanding how your customers feel after a conversation is key to improving service quality, coaching your team, and identifying friction points. The `satisfactionSurveyResponses` query in the iAdvize GraphQL API allows you to programmatically retrieve all responses to satisfaction surveys submitted by your customers including structured scores and open feedback.
## What you can retrieve
Each response to a satisfaction survey is composed of up to **three types of data**:
### 1. **CSAT – Customer satisfaction score**
The **CSAT (Customer satisfaction)** score is a numerical rating that indicates how satisfied the visitor was after their conversation.
* **Scoring scale:** 1 (very unsatisfied) to 5 (very satisfied)
{% hint style="info" %}
📌 **Available for channels:**
* Chat (both agent and bot)
* Facebook Messenger
* Apple Messages for Business
* WhatsApp
{% endhint %}
### 2. **NPS – Net Promoter Score**
The **NPS (Net Promoter Score)** is a measure of customer loyalty and satisfaction based on how likely a customer is to recommend your service.
* **Scoring scale:** 0 (Not at all likely) to 10 (Extremely likely)
* **Interpretation:**
* 0–6: Detractors
* 7–8: Passives
* 9–10: Promoters
{% hint style="info" %}
📌 **Available for channels:**
* Chat (both agent and bot)
{% endhint %}
### 3. **Free Comment – Open-Ended Feedback**
This is an optional open-text field where visitors can share qualitative feedback in their own words.
* Allows for:
* Identifying praise or complaints
* Spotting UX issues
* Enriching coaching feedback loops
{% hint style="info" %}
📌 **Available for channels:**
* Chat (both agent and bot)
{% endhint %}
## What the API response includes
When you query `satisfactionSurveyResponses`, you can access:
* **Conversation ID**
* **Survey type** (CSAT or NPS)
* **Score value**
* **Comment** (if left by the visitor)
* **Timestamps** (response date)
* **Agents who participated in the conversation**
The API supports filtering and pagination, allowing you to process large volumes of feedback systematically.
## Ready to use it?
You can explore the `satisfactionSurveyResponses` schema and test live queries in the [iAdvize GraphQL API Explorer](https://graphql.iadvize.dev/queries/satisfactionSurveyResponses).
# Understand production indicators
The `productionIndicator` query provides a **real-time snapshot** of your team's **current conversation load** on the iAdvize platform. It is designed to help you **track ongoing activity and operational load** at any given moment.
## What is the `productionIndicator` query for?
This query returns high-level indicators that reflect the **live state of conversations** being handled by your agents or bots.
## Response fields
The response from `productionIndicator` includes the following **three metrics**:
#### 1. `pendingConversationsCount` (Int)
The number of conversations that are **awaiting an agent or bot response** (meaning the first message hasn't been handled yet).
#### 2. `snoozedConversationsCount` (Int)
The number of conversations that are **temporarily snoozed**. These are ongoing conversations that have been paused by an agent or automation logic and will resume later.
#### 3. `onGoingConversationsCount` (Int)
The total number of conversations currently being **actively handled** by an agent or bot.
## Next steps
To test this query or see the full schema, visit the [iAdvize GraphQL Explorer](https://graphql.iadvize.dev/queries/productionIndicator).
# Understand connected users indicators
The `connectedUsersIndicator` query allows you to monitor **live user availability** on the iAdvize platform. It provides visibility into how many users are connected, how many are available for chat, and how occupied they are, helping you understand **team readiness in real time**.
## What is the `connectedUsersIndicator` query for?
You can use this query to retrieve indicators about users who are currently connected to iAdvize, with details about:
* Their **availability status**
* Their **chat availability**
* Their **occupancy level** in production
## Available filters
You can fine-tune your query with the following filters:
| Filter | Description |
| -------------------- | ----------------------------------------------------------------- |
| `availabilityStatus` | Filter by user availability status (AVAILABLE, BUSY, TOGGLE\_OFF) |
| `chatAvailability` | Filter by chat availability (AVAILABLE, BUSY, TOGGLE\_OFF) |
| `groupIds` | Filter by user group IDs |
| `projectIds` | Filter by project ID(s) |
| `roles` | Filter by user role(s): operator, manager, admin, expert, bot |
| `routingGroupIds` | Filter by routing group IDs |
| `userIds` | Filter by specific user ID(s) |
You can combine multiple filters to scope the results to specific teams, projects, or user segments.
## Response fields
The API response includes **three key indicators**:
#### 1. `connectedUsersCount` (Int!)
> Total number of users **currently connected** to the iAdvize desk.
* This reflects all users actively logged in, regardless of availability or role.
#### 2. `countByChatAvailabilityStatus` (ChannelGroupAvailabilityStatus)
> Number of users currently connected and available, **broken down by chat availability status** (AVAILABLE, BUSY, TOGGLE\_OFF).
* This allows you to see how many users are available or busy on the chat channel.
* It helps you assess how ready your team is to handle new incoming conversations.
#### 3. `usersInProductionChatOccupancy` (UsersInProductionOccupancy)
> **Detailed average chat occupancy** of users currently in production. This includes:
| Field | Description |
| ------------------------------------------------- | ----------------------------------------------------------------------------------------------------------------------------------------------------------------------------------- |
| `maximumSimultaneousConversationAverage` (Float!) | Average of max processing capacity (maxSlots) of agents in production, on the Chat channel |
| `simultaneousConversationAverage` (Float!) | Average slots (currentSlots) currently taken by agents in production |
| `occupancyRate` (Float!) % | Total number of slots currently taken by agents in production divided by the total number of slots defined by these agents in the chat channel. (sum(currentSlots) / sum(maxSlots)) |
{% hint style="info" %}
**What does occupancy represent?**\
Occupancy reflects the period during which an agent is logged in to the conversation panel and is partially occupied or occupied to maximum capacity.
{% endhint %}
### Next steps
You can test this query and explore the full schema in the [iAdvize GraphQL API Explorer](https://graphql.iadvize.dev/queries/connectedUsersIndicator).
For more insights on building complete dashboards, you may also be interested in:
* [Production Indicator](https://docs.iadvize.dev/use-cases/data-and-analytics/retrieve-messages-exchanged-within-a-conversation-1/understand-production-indicators)
* [Pre-aggregated Indicators](https://docs.iadvize.dev/use-cases/data-and-analytics/retrieve-messages-exchanged-within-a-conversation-1/pre-aggregated-indicators)
# Track iAdvize events in your Analytics tool
### Overview
When integrating iAdvize on your website, you may want to measure and analyse visitor engagement, conversation activity, and AI Shopping Assistant interactions within your existing analytics stack. Whether you use **Google Analytics 4**, **Adobe Analytics**, or **Piano Analytics**, the recommended approach is to push iAdvize events into the **dataLayer** and route them through your tag management system (e.g. Google Tag Manager).The iAdvize Web SDK exposes a set of lifecycle events covering the full visitor journey:
* iAdvize tag initialization
* Cookie and GDPR consent status
* Engagement rule triggers
* Widget impressions and clicks
* Shopping Panel state changes
* Conversation start and end
* Add-to-Cart actions from the AI Shopping Assistant
By listening to these events and forwarding them to the `window.dataLayer`, you gain full visibility into iAdvize engagement metrics alongside your existing analytics data, without requiring any direct integration with individual analytics platforms.
### Prerequisites
* The iAdvize main tag must be deployed on your website.
* `window.dataLayer` must be initialized (this happens automatically if Google Tag Manager is already in place).
> **Note:** Event names and property keys used in this guide are suggestions. Feel free to adapt them to your internal naming conventions.
### General Structure
All iAdvize event listeners must be registered inside the callback passed to `window.iAdvizeInterface.push`. This callback executes as soon as the iAdvize main tag is fully loaded and ready.
```javascript
window.dataLayer = window.dataLayer || [];
window.iAdvizeInterface = window.iAdvizeInterface || [];
window.iAdvizeInterface.push(function (iAdvize) {
// Register all your iAdvize.on(...) listeners here
});
```
#### dataLayer Object Convention
All iAdvize-specific properties are grouped under an `iAdvize` key in each pushed object. This prevents naming collisions with other properties already present on your site.
```javascript
window.dataLayer.push({
event: "iAdvize...",
iAdvize: {
property: "value"
}
});
```
In Google Tag Manager, Data Layer Variables are accessible using dot notation: `iAdvize.widgetType`, `iAdvize.conversationId`, etc.
### Available Events
#### 1. iAdvize Main Tag Loaded
**When it fires:** As soon as the iAdvize main tag has finished loading and initializing on the page.
```javascript
window.iAdvizeInterface.push(function (iAdvize) {
window.dataLayer.push({
event: "iAdvizeMainTagLoaded"
});
});
```
No additional properties. This event signals that the SDK is ready.
#### 2. Visitor Consent Status
**When it fires:**
* `get`: Returns the current consent value at the time of the call. Returns `null` if the visitor has not yet made a choice, `true` if accepted, `false` if refused.
* `on (change)`: Fires each time the cookie or GDPR consent value changes, typically when the visitor interacts with the consent banner, or implicitly when they start a conversation (both cookie and GDPR consents are automatically accepted upon conversation creation).
```javascript
// ── Cookie Consent ──
// Status on page load
window.dataLayer.push({
event: "iAdvizeCookiesConsentStatus",
iAdvize: {
cookiesConsentValue: iAdvize.get("visitor:cookiesConsent") // true, false or null
}
});
// Changes during the session
iAdvize.on("visitor:cookiesConsentChange", function (visitorCookiesConsent) {
window.dataLayer.push({
event: "iAdvizeCookiesConsentUpdated",
iAdvize: {
cookiesConsentValue: visitorCookiesConsent // true = accepted, false = refused
}
});
});
// ── GDPR Consent ──
// Status on page load
window.dataLayer.push({
event: "iAdvizeGDPRConsentStatus",
iAdvize: {
gdprConsentValue: iAdvize.get("visitor:GDPRConsent") // true, false or null
}
});
// Changes during the session
iAdvize.on("visitor:GDPRConsentChange", function (visitorGDPRConsent) {
window.dataLayer.push({
event: "iAdvizeGDPRConsentUpdated",
iAdvize: {
gdprConsentValue: visitorGDPRConsent // true = accepted, false = refused
}
});
});
```
| Event | GTM Key | Possible Values |
| ------------------------------ | ----------------------------- | ----------------------- |
| `iAdvizeCookiesConsentStatus` | `iAdvize.cookiesConsentValue` | `true`, `false`, `null` |
| `iAdvizeCookiesConsentUpdated` | `iAdvize.cookiesConsentValue` | `true`, `false` |
| `iAdvizeGDPRConsentStatus` | `iAdvize.gdprConsentValue` | `true`, `false`, `null` |
| `iAdvizeGDPRConsentUpdated` | `iAdvize.gdprConsentValue` | `true`, `false` |
#### 3. Engagement Rule Triggered
**When it fires:** When an engagement rule (also called a "targeting rule") is evaluated and executed on the visitor's side. This means:
1. The visitor meets the rule conditions (URL, time spent, pages viewed, etc.)
2. The rule is not capped (display limit not reached)
3. The `ruleId` is emitted only once per rule per page
> ⚠️ **Important distinction:** This event fires *before* the widget is displayed. A rule can be "triggered" but the widget may not appear (e.g. if the required CSS selector is not found on the page).
```javascript
iAdvize.on("engagementRule:triggered", function (ruleId) {
window.dataLayer.push({
event: "iAdvizeEngagementRuleTriggered",
iAdvize: {
engagementRuleId: ruleId
}
});
});
```
| GTM Key | Value |
| -------------------------- | ------------------ |
| `iAdvize.engagementRuleId` | Engagement rule ID |
#### 4. Widget Displayed
**When it fires:** When a widget or notification is actually rendered on the page. This occurs *after*:
1. The engagement rule has been triggered (`engagementRule:triggered`)
2. Rendering prerequisites are met (CSS selector found for embedded buttons, viewport conditions, etc.)
```javascript
iAdvize.on("engagementNotification:displayed", function (notification) {
window.dataLayer.push({
event: "iAdvizeWidgetDisplayed",
iAdvize: {
widgetType: notification.type,
widgetId: notification.id,
engagementRuleId: notification.ruleId
}
});
});
```
| GTM Key | Value |
| -------------------------- | ----------------------------------------------------------------------------------------------------------------------------------------------------- |
| `iAdvize.widgetType` | `"BADGE"`, `"CLASSIC"`, `"MESSAGING"`, `"INVITATION"`, `"MINI_BADGE"`, `"CHATBOX"`, `"MESSAGE"`, `"CUSTOM_BUTTON"`, `"EMBEDDED_CONVERSATION_STARTER"` |
| `iAdvize.widgetId` | Widget ID |
| `iAdvize.engagementRuleId` | Associated engagement rule ID |
#### 5. Widget Clicked
**When it fires:** When the visitor clicks on a widget or notification and the engagement is accepted.
```javascript
iAdvize.on("engagementNotification:clicked", function (notification) {
var properties = {
widgetType: notification.type,
widgetId: notification.id,
engagementRuleId: notification.ruleId
};
// Only populated for Conversation Starters:
// contains the text of the question the visitor clicked on
if (notification.text) {
properties.conversationStarterText = notification.text;
}
window.dataLayer.push({
event: "iAdvizeWidgetClicked",
iAdvize: properties
});
});
```
| GTM Key | Value |
| --------------------------------- | ----------------------------------------------------------------------- |
| `iAdvize.widgetType` | Widget type |
| `iAdvize.widgetId` | Widget ID |
| `iAdvize.engagementRuleId` | Engagement rule ID |
| `iAdvize.conversationStarterText` | (Only for `EMBEDDED_CONVERSATION_STARTER`) Text of the clicked question |
#### 6. Shopping Panel State Change
**When it fires:**
* `OPENED`: When the Shopping Panel opens (click on notification, programmatic opening, conversation resumption)
* `REDUCED`: When the visitor minimizes the panel
* `CLOSED`: When the visitor fully closes the panel
```javascript
iAdvize.on("chatbox:statusChange", function (status) {
window.dataLayer.push({
event: "iAdvizeShoppingPanelStatusChanged",
iAdvize: {
shoppingPanelStatus: status // "OPENED", "REDUCED" or "CLOSED"
}
});
});
```
| GTM Key | Value |
| ----------------------------- | ------------------------------------- |
| `iAdvize.shoppingPanelStatus` | `"OPENED"`, `"REDUCED"` or `"CLOSED"` |
#### 7. Conversation Started / Ended
**When it fires:**
* **Start** (`conversationId` changes from `null` to non-null): When a chat conversation is effectively created server-side. This occurs after the visitor clicks the widget and sends the initial message.
* **End** (`conversationId` changes from non-null to `null`): When the conversation is closed by the agent or the AI Shopping Assistant.
```javascript
iAdvize.on("conversation:idChange", function (conversationId, previousConversationId) {
window.dataLayer.push({
event: conversationId ? "iAdvizeConversationStarted" : "iAdvizeConversationEnded",
iAdvize: {
conversationId: conversationId || previousConversationId
}
});
});
```
| Case | `event` | `iAdvize.conversationId` |
| ----- | ------------------------------ | ------------------------ |
| Start | `"iAdvizeConversationStarted"` | New conversation ID |
| End | `"iAdvizeConversationEnded"` | Ended conversation ID |
#### 8. Add to Cart Click (AI Shopping Assistant)
**When it fires:** When the visitor clicks [the "Add to Cart" button](https://help.iadvize.com/hc/en-gb/articles/25165287553298) on a product card recommended by the AI Shopping Assistant within the conversation.
> ⚠️ **Prerequisite:** The functional `addToCart:clicked` callback (with `resolve`/`reject`) must already be implemented in your site's native code for the Add to Cart button to appear in the conversation. Do not implement this analytics listener independently without the functional callback already in place, as it could activate the Add to Cart feature in iAdvize conversations before your site's cart logic is ready.
```javascript
// Analytics-only listener (does not interfere with the functional callback)
iAdvize.on("addToCart:clicked", function ({ productId }) {
window.dataLayer.push({
event: "iAdvizeAddToCartClicked",
iAdvize: {
productId: productId
}
});
});
```
To also track the outcome (success or failure), add the dataLayer pushes inside the existing functional callback:
```javascript
iAdvize.on("addToCart:clicked", function ({ productId, resolve, reject }) {
addToCart(productId)
.then(function (response) {
if (response.success) {
resolve(true);
window.dataLayer.push({ event: "iAdvizeAddToCartSucceeded", iAdvize: { productId: productId } }); // ← add
} else {
resolve(false);
window.dataLayer.push({ event: "iAdvizeAddToCartFailed", iAdvize: { productId: productId } }); // ← add
}
})
.catch(function (error) {
reject(error);
window.dataLayer.push({ event: "iAdvizeAddToCartFailed", iAdvize: { productId: productId } }); // ← add
});
});
```
| Event | Triggered when | `iAdvize.productId` |
| ----------------------------- | ----------------------------- | ------------------- |
| `"iAdvizeAddToCartClicked"` | Button clicked | Product ID |
| `"iAdvizeAddToCartSucceeded"` | Cart addition succeeded | Product ID |
| `"iAdvizeAddToCartFailed"` | Cart addition failed or error | Product ID |
### Full Consolidated Script
Here is a complete script combining all events described in this guide. You can implement it as-is or select only the events relevant to your use case. Event names can also be renamed to match your analytics taxonomy.
```javascript
window.dataLayer = window.dataLayer || [];
window.iAdvizeInterface = window.iAdvizeInterface || [];
window.iAdvizeInterface.push(function (iAdvize) {
// ── 1. iAdvize main tag loaded ──
window.dataLayer.push({
event: "iAdvizeMainTagLoaded"
});
// ── 2a. Cookie consent - status on load ──
window.dataLayer.push({
event: "iAdvizeCookiesConsentStatus",
iAdvize: {
cookiesConsentValue: iAdvize.get("visitor:cookiesConsent")
}
});
// ── 2b. Cookie consent - changes ──
iAdvize.on("visitor:cookiesConsentChange", function (visitorCookiesConsent) {
window.dataLayer.push({
event: "iAdvizeCookiesConsentUpdated",
iAdvize: {
cookiesConsentValue: visitorCookiesConsent
}
});
});
// ── 2c. GDPR consent - status on load ──
window.dataLayer.push({
event: "iAdvizeGDPRConsentStatus",
iAdvize: {
gdprConsentValue: iAdvize.get("visitor:GDPRConsent")
}
});
// ── 2d. GDPR consent - changes ──
iAdvize.on("visitor:GDPRConsentChange", function (visitorGDPRConsent) {
window.dataLayer.push({
event: "iAdvizeGDPRConsentUpdated",
iAdvize: {
gdprConsentValue: visitorGDPRConsent
}
});
});
// ── 3. Engagement rule triggered ──
iAdvize.on("engagementRule:triggered", function (ruleId) {
window.dataLayer.push({
event: "iAdvizeEngagementRuleTriggered",
iAdvize: {
engagementRuleId: ruleId
}
});
});
// ── 4. Widget displayed ──
iAdvize.on("engagementNotification:displayed", function (notification) {
window.dataLayer.push({
event: "iAdvizeWidgetDisplayed",
iAdvize: {
widgetType: notification.type,
widgetId: notification.id,
engagementRuleId: notification.ruleId
}
});
});
// ── 5. Widget clicked ──
iAdvize.on("engagementNotification:clicked", function (notification) {
var properties = {
widgetType: notification.type,
widgetId: notification.id,
engagementRuleId: notification.ruleId
};
if (notification.text) {
properties.conversationStarterText = notification.text;
}
window.dataLayer.push({
event: "iAdvizeWidgetClicked",
iAdvize: properties
});
});
// ── 6. Shopping Panel state change ──
iAdvize.on("chatbox:statusChange", function (status) {
window.dataLayer.push({
event: "iAdvizeShoppingPanelStatusChanged",
iAdvize: {
shoppingPanelStatus: status
}
});
});
// ── 7. Conversation started / ended ──
iAdvize.on("conversation:idChange", function (conversationId, previousConversationId) {
window.dataLayer.push({
event: conversationId ? "iAdvizeConversationStarted" : "iAdvizeConversationEnded",
iAdvize: {
conversationId: conversationId || previousConversationId
}
});
});
// ── 8. Add to Cart - click tracking ──
// The SDK supports multiple listeners on addToCart:clicked.
// This listener runs without interfering with the site's functional callback.
iAdvize.on("addToCart:clicked", function ({ productId }) {
window.dataLayer.push({
event: "iAdvizeAddToCartClicked",
iAdvize: {
productId: productId
}
});
});
});
```
### Connecting to Your Analytics Tool via GTM
#### Step 1 - Deploy the Tracking Script
Create a **Custom HTML tag** in GTM with the full script above. Use an **Initialization** trigger to fire it as early as possible in the page lifecycle.
> ⚠️ The `iAdvizeAddToCartSucceeded` and `iAdvizeAddToCartFailed` events require integration within the site's native source code, inside the existing functional `addToCart:clicked` callback.
#### Step 2 - Create GTM Data Layer Variables
In GTM, create **Data Layer Variable** variables using dot notation to access iAdvize properties:
| GTM Variable Name | dataLayer Path |
| ----------------------------------- | --------------------------------- |
| iAdvize - Cookies Consent Value | `iAdvize.cookiesConsentValue` |
| iAdvize - GDPR Consent Value | `iAdvize.gdprConsentValue` |
| iAdvize - Engagement Rule ID | `iAdvize.engagementRuleId` |
| iAdvize - Widget Type | `iAdvize.widgetType` |
| iAdvize - Widget ID | `iAdvize.widgetId` |
| iAdvize - Conversation Starter Text | `iAdvize.conversationStarterText` |
| iAdvize - Shopping Panel Status | `iAdvize.shoppingPanelStatus` |
| iAdvize - Conversation ID | `iAdvize.conversationId` |
| iAdvize - Product ID | `iAdvize.productId` |
#### Step 3 - Create GTM Triggers
Create one **Custom Event** trigger per event you want to forward to your analytics tool. Then configure your analytics tags (GA4, Piano Analytics, Adobe Analytics, etc.) to fire on these triggers, using the Data Layer Variables defined above as event parameters.
| dataLayer Event | Suggested Analytics Use Case |
| ----------------------------------- | ----------------------------------------------- |
| `iAdvizeMainTagLoaded` | Initialization / debug |
| `iAdvizeCookiesConsentStatus` | Cookie consent audit on load |
| `iAdvizeCookiesConsentUpdated` | Cookie consent change tracking |
| `iAdvizeGDPRConsentStatus` | GDPR consent audit on load |
| `iAdvizeGDPRConsentUpdated` | GDPR consent change tracking |
| `iAdvizeEngagementRuleTriggered` | Active engagement rule measurement |
| `iAdvizeWidgetDisplayed` | Widget impression |
| `iAdvizeWidgetClicked` | Widget click / Conversation Starter interaction |
| `iAdvizeShoppingPanelStatusChanged` | Panel open / minimize / close |
| `iAdvizeConversationStarted` | Conversation start |
| `iAdvizeConversationEnded` | Conversation end |
| `iAdvizeAddToCartClicked` | Add to Cart click |
| `iAdvizeAddToCartSucceeded` | Successful cart addition |
| `iAdvizeAddToCartFailed` | Failed cart addition |
### End-to-End Example
This section walks through a complete, concrete example of sending the `iAdvizeConversationStarted` event to **Google Analytics 4** via Google Tag Manager. The same logic applies to any other event in this guide.
#### What we want to achieve
When a visitor starts a conversation with iAdvize, send a GA4 event named `iadvize_conversation_started` with the conversation ID as a custom parameter.
#### Step 1 - Push the event to the dataLayer
The following listener (already part of the consolidated script above) pushes the event when a conversation begins:
```javascript
iAdvize.on("conversation:idChange", function (conversationId, previousConversationId) {
if (conversationId) {
window.dataLayer.push({
event: "iAdvizeConversationStarted",
iAdvize: {
conversationId: conversationId
}
});
}
});
```
#### Step 2 - Create a Data Layer Variable in GTM
In GTM, go to **Variables > User-Defined Variables > New** and create a **Data Layer Variable**:
| Field | Value |
| ------------------------ | --------------------------- |
| Variable Name | `iAdvize - Conversation ID` |
| Data Layer Variable Name | `iAdvize.conversationId` |
| Data Layer Version | Version 2 |
#### Step 3 - Create a Custom Event Trigger in GTM
Go to **Triggers > New** and create a **Custom Event** trigger:
| Field | Value |
| ------------ | -------------------------------- |
| Trigger Name | `iAdvize - Conversation Started` |
| Event Name | `iAdvizeConversationStarted` |
| Fire on | All Custom Events |
#### Step 4 - Create a GA4 Event Tag in GTM
Go to **Tags > New** and create a **Google Analytics: GA4 Event** tag:
| Field | Value |
| -------------------- | ---------------------------------------------------------------- |
| Tag Name | `GA4 - iAdvize Conversation Started` |
| Measurement ID | Your GA4 Measurement ID (e.g. `G-XXXXXXXXXX`) |
| Event Name | `iadvize_conversation_started` |
| **Event Parameters** | |
| Parameter Name | `conversation_id` |
| Parameter Value | `{{iAdvize - Conversation ID}}` (the variable created in Step 2) |
| **Triggering** | `iAdvize - Conversation Started` (the trigger created in Step 3) |
#### Step 5 - Verify in GA4 DebugView
1. Enable **Preview mode** in GTM and open your website.
2. Trigger a conversation with iAdvize.
3. In GTM Preview, confirm the tag `GA4 - iAdvize Conversation Started` fired on the `iAdvizeConversationStarted` event.
4. In GA4, open **Admin > DebugView** and verify the `iadvize_conversation_started` event appears with the `conversation_id` parameter populated.
Once validated, **submit and publish** your GTM container.
> 💡 **Reusable pattern:** This exact same flow applies to any other iAdvize event. Simply swap the trigger (`iAdvizeWidgetDisplayed`, `iAdvizeWidgetClicked`, etc.) and define the relevant event parameters using the corresponding Data Layer Variables.
# GraphQL API
## About iAdvize GraphQL API
iAdvize GraphQL API offers flexibility and the ability to define precisely the data you want to fetch.
One of the powers of GraphQL API is to allow you to retrieve many resources in one HTTP call and to request only the fields you need.
If you want to learn more about GraphQL in general, please check the official [GraphQL documentation](https://graphql.org/learn/).
It's useful to note that the official documentation also lists a [comprehensive list of clients and other tools here](https://graphql.org/code).
## API Root Endpoint
Our GraphQL API has a single endpoint: `https://api.iadvize.com/graphql`
The endpoint remains constant no matter what operation you perform.
If your environment is on the `SD` platform, your endpoint is: `https://api.iadvize.com/graphql?platform=sd`
The iAdvize GraphQL API is served over HTTPS.
## Building queries with GraphQL
Because GraphQL operations consist of potentially voluminous JSONs, we strongly recommend using our [Apollo integration to create your GraphQL calls](https://ha.iadvize.com/apollo). But, you can also use cURL or any other HTTP-speaking library.
While with REST we use HTTP verbs to define the operations to perform, in GraphQL we will use the HTTP POST verb. This is because you must provide a JSON-encoded body whether you are performing a query or a mutation.
**Here is an example to list all the routing rules :**
```bash
curl --request POST \
--header 'content-type: application/json' \
--header "Authorization: Bearer {YOUR_ACCESS_TOKEN}" \
--url 'https://api.iadvize.com/graphql' \
--data '{"query":"query {\n routingRules {\n id, name\n }\n}","variables":{}}'
```
{% hint style="warning" %}
The string value of `"query"` must escape quotes and backslash characters or the schema will not parse it correctly.
{% endhint %}
## Apollo
You can discover the schema and run queries on your iAdvize data using Apollo, an integrated development environment in your browser that includes the schema description, syntax highlighting, and validation errors.
[Click here to use Apollo with our GraphQL api.](https://ha.iadvize.com/apollo)
If you want to know more about what can Apollo Explorer can do, you can checkout [their documentation here](https://www.apollographql.com/docs/graphos/explorer/).
# Terminology
In this page we'll walk through commonly used terminology in the world of GraphQL
As GraphQL manipulates different concepts to a REST API, let's take a moment to define commonly used GraphQL terminology. The [official GraphQL documentation](https://graphql.org/learn/) is pretty complete, but you'll find here a very short summary of essential terms.
## Schema
The schema is where we define all the API's types. We'll find objects and their fields, their relations, the definitions of queries as well as mutation. This schema is [publicly available](https://graphql.iadvize.dev/) and can be used both as a reference to know what can be done, but also to [generate code](https://graphql.org/code/) that will access our API.
A GraphQL query or mutation will be validated against that schema. To learn more about this topic, head over to the official [GraphQL documentation](https://graphql.org/learn/schema/).
## Field
Fields are named properties of an object. They go from being simple (such as being typed as a number or a boolean) to being more complicated (such as being a complete description of a user). Fields are named, have a type, a description and can require arguments.
**Queries** and **mutations** are two special cases of fields, the former allowing to retrieve data, and the later allowing to modify, create or delete data.
## Argument
Arguments are named values that will be passed to fields in order to query or mutate the API. A good example of an argument would be a search criteria to a query data, or an object description passed to a mutation.
## Edge & Node
A node is an object, that could be represented by a point, and an edge is the relation between these objects, that could be represented by a line between these points. Together they could draw a graph, hence the name GraphQL. When making use of [pagination](/technologies/graphql-api/pagination), you'll experience these terms.
# Reference
## Schema Documentation
Our schema documentation lists all the content of our GraphQL API's schema. So you'll find all the queries and mutation that are available, as well as a description of the types manipulated by the API.
Do note that Apollo offers the same capabilities, but where Apollo requires to be authenticated with a valid iAdvize account, the static documentation is available and shareable publicly.
## Apollo
You can discover the schema and run queries on your iAdvize data using Apollo, an integrated development environment in your browser that includes the schema description, syntax highlighting, and validation errors.
### Using Apollo
#### Authentication
You'll need to be authenticated in order to test queries. If you weren't already, you'll automatically be prompted to sign-in when reaching the Apollo page, after which you'll be able to continue using the query editor.
You can test your access by querying your projects:
query {
  projects {
    edges {
      node {
        id
        name
      }
    }
  }
}
{% hint style="info" %}
[Test this query in our editor](https://ha.iadvize.com/apollo?explorerURLState=N4IgJg9gxgrgtgUwHYBcQC4QEcYIE4CeABMADpJFEAOeEAVglCgM4nmWUJgDmCrZFDpSQQwCNoKGUAlmHZThAQ0TyhAX1VENg7WpBqgA)
{% endhint %}
#### **Using the query variables pane**
If you want to learn more about variables in GraphQL you can read this documentation:
# Authentication
The iAdvize authentication mechanism uses temporary tokens that have a 12-hour lifetime.
You can generate your own tokens with a user email & password.
{% hint style="info" %}
Please note the following policy on **authentication**:
* 10 logins per minute per user
* 100 logins per minute per IP address
{% endhint %}
## Create an Access Token
You have make a `POST` call on the following endpoint: `https://api.iadvize.com/oauth2/token` and send the following parameters:
| **Parameter** | **Description** | **Type** | **Mandatory** |
| --------------- | ------------------------------------------------ | -------- | ------------- |
| **username** | User email | String | Yes |
| **password** | User password | String | Yes |
| **grant\_type** | Oauth2 grant type (only `password` is supported) | String | Yes |
{% hint style="warning" %}
Please note that parameters must be sent as `application/x-www-form-urlencoded`
{% endhint %}
**Examples:**
{% tabs %}
{% tab title="cURL" %}
```bash
curl --request POST \
--url https://api.iadvize.com/oauth2/token \
--data "username={EMAIL}&password={PASSWORD}&grant_type=password"
```
{% endtab %}
{% tab title="NodeJS" %}
```javascript
const axios = require('axios');
const querystring = require('querystring');
const authEndpoint = 'https://api.iadvize.com/oauth2/token';
const username = 'YOUR_IADVIZE_USER_EMAIL';
const password = 'YOUR_PASSWORD'
axios
.post(
authEndpoint,
querystring.stringify({
grant_type: 'password',
username,
password
})
)
.then(function (response) {
console.log(response);
});
```
{% endtab %}
{% endtabs %}
#### Response (example):
```json
{
"access_token": "BMU9FSlOV.....UU0UVRPUSJ9.9yZCIsInBl....cm1pc3Npb0.xw3blsLI8gujt....JPX5U8v24o1gUsg",
"expires_in": 86400,
"token_type": "Bearer",
"refresh_token": "none"
}
```
## Authenticate your API calls
To authenticate an API call just pass the access token in an authorization header.
```bash
curl --request POST \
--url https://api.iadvize.com/graphql \
--header "Content-Type: application/json" \
--header "Authorization: Bearer {YOUR_ACCESS_TOKEN}" \
--data "YOUR_QUERY"
```
## Check the validity of an access\_token
You can verify token validity with the authenticated route below.
```bash
curl --request GET \
--url https://api.iadvize.com/_authenticated \
--header "Authorization: Bearer {YOUR_ACCESS_TOKEN}"
```
If your token is valid, you will receive a response that looks like this:
```json
{
"authenticated": true
}
```
If your token is expired or invalid, you will receive the following response:
```json
{
"error_description": "access token not valid",
"error": "invalid_token"
}
```
# Schema lifecycle
How are fields created and deleted from our graphQL API
{% hint style="info" %}
Note In this section, fields, queries and mutations will all be called “field” as queries and mutations are special cases of fields.
{% endhint %}
In the context of our GraphQL API, a field has the following lifecycle:
1. The field is (optionally) created under a preview
2. The field is made generally available
3. The field is deprecated
4. The field is removed from the API
```mermaid
graph LR
A(Preview\n) --> B(General Availability)
B --> C(Deprecated)
C --> D(Deleted)
style A stroke-dasharray: 5 5
```
### Preview
Similarly to how our product has some features in beta (during which we correct and improve the feature), our GraphQL API has some fields under preview. This allows the consumers of our API to benefit from the feature as early as possible, while we gather feedback in order to fix or improve the feature.
While under preview, a field is susceptible to change in behaviour to accommodate for the development of the feature and best cater to your needs. A field that was created under preview will stay under preview for 6 months.
In order to access fields that are under previews, the `Accept` header of the GraphQL HTTP request must contain `application/vnd.iadvize.-preview+json` where `preview-name` is replaced by the name of the feature, as given to you by your iAdvize contact.
This is a equivalent to what [Github has developed with their own API](https://docs.github.com/en/graphql/overview/schema-previews).
{% hint style="info" %}
In order to monitor the usage of previews, we don't list previews available in the Graphql API. If your project requires specific capabilities, your iAdvize contact may give you field names and their respective preview names.
{% endhint %}
### General Availability
Once a field is considered stable, it is made generally available. This is the default state of a field, where it is visible in the public documentation. A generally available field is expected to remain stable: no breaking change are expected to be introduced.
### Deprecation
Our product is in constant evolution, and although we strive to achieve stability, sometimes it is essential to reconsider the usefulness of some of the fields exposed through our API. In such cases we'll mark a field as being deprecated. The deprecation process is the following:
1. We mark the field as being deprecated
2. A minimum of 1 year of maintenance of the feature is guaranteed from that point on
3. The field will then be deleted in the next "breaking release"
### Removal (Breaking releases)
In order to limit the amount of adaptations a client might have to implement in a given year, we batch every modification susceptible to introduce a break in backward compatibility into "breaking releases".
We have two such releases per year: the first Monday of October, and the first Monday of April.
Shortly after these dates we'll release new versions or our API that will remove the fields that have been deprecated for more than a year.
# Error Management
Managing errors is an essential part of the integration with any API. Although we strive to provide a perfectly stable service, it's reasonable to expect technical errors occasionally. In this section we'll list the various error cases you may encounter, and what they mean.
When using our GraphQL API (or any other GraphQL API over HTTP) there are two levels of error to consider: request errors and field errors. But first let's have a look at how a standard GraphQL error is formatted.
## Error format
GraphQL errors are standardised, and you can expect our GraphQL API to follow the format of the [official GraphQL specification](https://spec.graphql.org/October2021/#sec-Errors). In practice here's an example of error you might encounter:
```json
{
"data": null,
"errors": [
{
"message": "Insufficient permissions to perform the operation",
"extensions" : {
"name" : "PERMISSION_DENIED",
"retryPolicy": "NO_RETRY"
}
}
]
}
```
{% hint style="info" %}
Please note that you might find an attribute named `code` under the `extensions` object. This attribute is deprecated and should not be used under any circumstances. If you're looking for a stable error identifier, use the `name` attribute. You can see the most frequent ones [below](#field-errors).
{% endhint %}
## Request errors
A request error occurs when a whole request has been dismissed as being impossible to execute. Causes may vary and could be as wide as an invalid request, to our service being temporarily unavailable. Here are the possible request errors:
HTTP Status Code
Description
400
The request was invalid. This could be because there was: - A syntax error in the request, such as a missing quote or brace. - A schema error in the request, such as a typo in a field name.
The content type provided in the HTTP request is invalid. In practice this means you're probably missing the content-type: application/json header.
429
Rate limit exceeded. The client has sent too many requests and must wait before being allowed to receive data again. When faced with this error, implement an EXPONENTIAL_BACKOFF. See rate limit and retry policy.
500
There was an unexpected technical error during the execution of the request.
502
The GraphQL server is currently unable to process any request.
504
The GraphQL server failed to respond in time to the request.
## Field errors
A field error occurs when a request was valid but a technical error happened while trying to resolve one of the fields. Causes may vary but the errors will always be listed as part of the response payload. This is described [in the official GraphQL specification](https://spec.graphql.org/October2021/#sec-Handling-Field-Errors), and is a behaviour that contrasts with a typical REST API. Indeed, it becomes possible to have a response containing partial data and an error list while returning an HTTP 200 status code.
{% hint style="info" %}
As a user of a GraphQL API you must therefore always check the `errors` array in the response to ensure no error would prevent you from accessing the data you need.
{% endhint %}
Here's an example of such an error:
```json
{
"data": {
"conversation": {
"id": "68eded46-6e63-4603-8849-891dba10bcbe",
"language": "en",
"conversions": null
}
},
"errors": [
{
"message": "Internal server error",
"path": [
"conversation",
"conversions"
],
"locations": [
{
"line": 5,
"column": 5
}
],
"extensions" : {
"name" : "INTERNAL_ERROR",
"retryPolicy": "RETRY_ONCE"
}
}
]
}
```
As you can see in the error above, our errors contain the `extensions` object. As per the GraphQL specs, this object is here to add any data that would be relevant to the error. Our API will always contain a unique identifier under the `name` attribute. This attribute will inform you of the type of error that was encountered. These type of errors are specific to the query or mutation being executed, and will generally be documented on the query or mutation directly, though here's a list of the standard error type you might encounter:
Error name
Description
INTERNAL_ERROR
Our GraphQL encountered a technical error. This error might be temporary (such as hardware failure, network error, etc.) or might be due to a bug that requires fixing on our end.
INVALID_ARGUMENT
One of the arguments of the query or mutation you provided wasn't valid. This could be a type error, parsing error, or another validation. See the message attribute for details.
NOT_FOUND
The resource wasn't found.
PERMISSION_DENIED
The request was successfully authorized, but the permissions of the user aren't sufficient to execute the request.
UNAUTHORIZED
The request failed to be authorized. This is likely caused by an invalid authorization token, such as an expired token.
## Retry Policy
When the whole query has failed, or when a partial result is not acceptable for the consumer, it is sometimes possible to retry the request shortly after encountering an error. Not all errors are retriable, for instance an INVALID\_ARGUMENT will still be invalid even after retrying.
To simplify the logic implemented on the consumer side, we've set an attribute named `retryPolicy` which informs the consumer if a retry is possible, and what to do. Bear in mind that when implementing a retry policy, **avoiding infinite loops is extremely important.** When implementing a retry, please add this header to your HTTP request: `x-iAdvize-retry-count` that contains the number of attempts for a given request.
Here are the possible values for the `retryPolicy` attribute, and what to do with it:
Retry Policy
How to implement it
null or undefined
Same as NO_RETRY
NO_RETRY
No retry should be immediately attempted. This category of error is usually due to a consumer implementation error, such as a permission error or an invalid argument.
RETRY_ONCE
Your program can immediately retry the request. This retry policy is attached to errors that are transient, such as networking failure or hardware failure. Retrying may succeed. When implementing the single retry, be mindful to avoid infinite loops.
EXPONENTIAL_BACKOFF
An exponential backoff policy is useful to retry a request a certain amount of time without overwhelming the server. We recommend using the following settings for your exponential backoff: - Max retry count = 10 - Multiplicator = 2 - Initial wait time = 1s - Max wait time = 10s
We return this type of retry policy if we encountered a critical hardware issue, or if we've experienced a network failure.
## Rate limit
To ensure a good quality of service, we limit how many requests a single client can send to our system. This limit is set above 50 requests per second.
If you were faced with HTTP return codes 429, this would means you've exceeded that rate and you should reduce the rate at which requests are being sent to our systems. You could also implement the `EXPONENTIAL_BACKOFF` as described in the [retry policy](#retry-policy) section.
## Other general good practices
When dealing with errors there are some industry standard practices to put in place, such as logging to help diagnose any issue. A good error log would contain:
* A timestamp with a timezone
* The URL that was hit
* The HTTP request, containing the HTTP verb, the body (such as json), and the headers
* The HTTP response, containing the HTTP status code, the headers and the body
These are crucial pieces of information allowing anyone to then investigate a potential issue.
Other, more advanced, practices such as gathering metrics about response time an error rates might also be useful.
# Pagination
Pagination is a method for dividing the result of a query into several pages of results.
Pagination of results allows :
* **Better performance**: When processing large amounts of data, retrieving everything at once can be very heavy on the server and can result in longer response times. By limiting the number of results returned at a time, we can reduce server effort and thus get faster responses.
* **Better user experience**: if your API requests are one-off, it will be more convenient for you to work with smaller amounts of data. Paginating allows you to work with a more manageable subset of data before moving on to the next “batch” of data.
### GraphQL pagination at iAdvize
{% hint style="info" %}
iAdvize GraphQL API limits results to **a maximum of 100 per page**.
{% endhint %}
To traverse through a paginated data set, you need to use cursors. A cursor represents a specific position in the data set. You can get the first and last cursor on a page, and also indications on previous page or next page existence by asking the `pageInfo` property:
* **startCursor**: cursor of the first element of the page. Could be used for backward pagination.
* **endCursor**: cursor of to the last element of the page. Could be used for forward pagination.
* **hasPreviousPage**: boolean which indicates if there are elements to retrieve in a previous page.
* **hasNextPage**: boolean which indicates if there are elements to retrieve in a next page.
#### Forward Pagination
Forward pagination is accomplished using two arguments:
* **first:** number of elements to retrieves.
* **after:** the cursor to retrieve elements after. Typically, you will pass the `endCursor` of the current page as `after`.
#### Backward Pagination
Backward pagination is accomplished using two arguments:
* **last:** number of elements to retrieves.
* **before:** the cursor to retrieve elements before. Typically, you will pass the `startCursor` of the current page as `before`.
#### Forward Pagination example
Here is an example of a query to retrieve the id, email, first name and the date time of the last connection of agents in project 1.
```graphql
query MyQuery {
users(projectIds: [1], after: null, first: 2) {
pageInfo {
endCursor
hasNextPage
}
edges {
node {
... on Professional {
id
email,
firstName
lastLoggedAt
}
}
}
}
}
```
In this query, **`users`** is the resource we use to obtain users information. We then use three arguments: **`after`**, **`projectIds`** and **`first`**:
* **`projectIds`**: identifiers of projects for which we want to retrieve the list of advisors and their last connection date. In our example, only the project 1.
* **`after`**: In our example, it is `null`, which means we want to start from the very beginning. We will see below how to go to the result of the 2nd page.
* **`first`**: Here we put `2`, so we will obtain the desired information for the first 2 agents.
Here is the result obtained after running this query (1st page of results):
```json
{
"data": {
"users": {
"pageInfo": {
"endCursor": "YXJyYXljb25uZWN0aW9uOjE=",
"hasNextPage": true
},
"edges": [
{
"node": {
"id": 1,
"email": "xxx@iadvize.com",
"firstName": "Émilie",
"lastLoggedAt": "2023-07-18T16:16:17Z"
}
},
{
"node": {
"id": 2,
"email": "xxxx@iadvize.com",
"firstName": "Davy",
"lastLoggedAt": "2023-07-31T14:32:01Z"
}
}
]
}
}
}
```
In the **`pageInfo`** object, we obtain the information necessary to retrieve the following page:
```json
"pageInfo": {
"endCursor": "YXJyYXljb25uZWN0aW9uOjE=",
"hasNextPage": true
}
```
**`endCursor`** : **`YXJyYXljb25uZWN0aW9uOjE=`** gives us the cursor of the end of this results page. This sequence of characters is intended to mark a stop: “I got there”. You can use the value of this cursor by specifying it in the "after" filter in a new request to retrieve the page that follows this cursor. Note that cursors are only meant to be re-transmitted back when paginating, without any modification.
\
\&#xNAN;**`hasNextPage`** : true tells us that there is at least one other result page. If you get hasNextPage : false this means that there is no other page of results after the one you are currently viewing.\\
### How to move to results on subsequent pages?
To move on to the results on page #2 of our initial query, simply assign the value of the end cursor to the argument `after`:
```graphql
query MyQuery {
users(after: "YXJyYXljb25uZWN0aW9uOjE=", projectIds: [1], first: 2) {
pageInfo {
endCursor
hasNextPage
}
edges {
node {
... on Professional {
id
email
firstName
lastLoggedAt
}
}
}
}
}
```
To access to all of the results, you must repeat this same exercise of changing the content of `after` by the value of the last `endCursor` you get in your previous query, as long as property **`hasNextPage`** is **`true`**.
You will know you have reached the last page of results when **`hasNextPage`** is **`false`**.
### Automate the retrieval of all query results
If you want to set up a data export system on a regular basis, you will not be able to apply the manual method described previously.
To automate pagination with GraphQL, you can use a loop that performs successive queries until there are no more pages to retrieve. Each query uses the `endCursor` property from the previous page as the value for the argument `after`, which tells GraphQL where to start fetching data for the next page.
**From our example query, here is an example of a Python/Javascript script:**
{% tabs %}
{% tab title="NodeJS" %}
```javascript
const axios = require('axios');
// API URL
const url = 'https://api.iadvize.com/graphql';
// Headers for the request
const headers = {
"Authorization": "Bearer YOUR_AUTHORIZATION_TOKEN",
"Content-Type": "application/json"
}
// Initial query
const query = `
query MyQuery($after: String) {
users(after: $after, projectIds: [1], first: 100) {
pageInfo {
endCursor
hasNextPage
}
edges {
node {
... on Professional {
id
email
firstName
lastLoggedAt
}
}
}
}
}
`;
let variables = {
"after": null
};
// Fetch all pages
let allResults = [];
const getData = async () => {
try {
const response = await axios.post(url, { query, variables }, { headers });
// Extract data from the response
const users = response.data.data.users;
if (!users) {
throw new Error("No users in response.");
}
allResults.push(...users.edges);
// Check if there is a next page
if (!users.pageInfo.hasNextPage) {
return allResults;
}
// Update the cursor for the next query
variables.after = users.pageInfo.endCursor;
return await getData();
} catch (error) {
console.error(`An error occurred: ${error}`);
return allResults;
}
}
// Fetch all data
getData().then(allResults => {
// Display all results
allResults.forEach(result => {
console.log(result);
});
});
```
This script uses a recursive function `getData` to retrieve all pages. This function queries the first 100 users, then checks to see if a next page exists. If so, she uses the `endCursor` from the current page to make a new query for the next page, and adds the results to the list `allResults`.
This process is repeated until there are no more pages to retrieve. In case of error, it is displayed in the console. Note that you will need **`axios`** package to run this script.
{% endtab %}
{% tab title="Python" %}
```python
import requests
import json
# API URL
url = "https://api.iadvize.com/graphql"
# Header for the request
headers = {
"Authorization": "Bearer YOUR_AUTHORIZATION_TOKEN",
"Content-Type": "application/json"
}
# Initial query
query = """
query MyQuery($after: String) {
users(after: $after, projectIds: 9999, first: 100) {
pageInfo {
endCursor
hasNextPage
}
edges {
node {
... on Professional {
id
email
firstName
lastLoggedAt
}
}
}
}
}
"""
variables = {
"after": null
}
# Fetch all pages
all_results = []
while True:
try:
# Send the request
response = requests.post(
url,
headers=headers,
json={'query': query, 'variables': variables}
)
# Check the request succeeded
response.raise_for_status()
# Extract data from the response
data = response.json()
users = data.get('data', {}).get('users')
if not users:
raise Exception("No users in response.")
all_results.extend(users['edges'])
# Check if there is a next page
if not users['pageInfo']['hasNextPage']:
break
# Update the cursor for the next query
variables['after'] = users['pageInfo']['endCursor']
except requests.HTTPError as http_err:
print(f"HTTP error occurred: {http_err}")
break
except Exception as err:
print(f"An error occurred: {err}")
break
# Display all results
for result in all_results:
print(result)
```
This script runs a query for the first 100 users, then checks if a following page exists. If so, it uses the `endCursor` from the current page to make a new query for the next page, and adds the results to the list `all_results`. This process is repeated until there are no more pages to retrieve.
\
This script also includes error handling (`response.raise_for_status()`) to ensure that it correctly handles any errors that may arise during query execution.
{% endtab %}
{% endtabs %}
Depending on the BI tool you use (PowerBI, Tableau, Talend, etc.), you will need to adapt this script.
### Lean more about pagination
If you want to learn more about pagination in GraphQL, here are two additional resources you might find helpful:
1\. [Pagination in GraphQL](https://graphql.org/learn/pagination/): a detailed explanation of pagination in GraphQL from the creators of GraphQL.
2\. [Shopify Developer Guide: Pagination with GraphQL](https://shopify.dev/docs/api/usage/pagination-graphql): a how-to guide from Shopify explaining how they implemented pagination with GraphQL.
\\
\\
# Guides
# Managing iAdvize API Access Tokens
> iAdvize access tokens are valid for **24 hours**. The authentication endpoint is rate-limited to **10 logins/minute per user** and **100 logins/minute per IP**. The single most important rule: **generate a token once, cache it, and reuse it** for the rest of its lifetime. Treat `POST /oauth2/token` as an expensive operation, not a per-call step.
### 1. Why this guide exists
Many integration issues we see — sudden `429 Too Many Requests` errors, broken cron jobs, flaky CI pipelines — trace back to one anti-pattern: **requesting a new token before every API call**. With a 24-hour token lifetime and a strict rate policy on the login endpoint, this pattern will eventually fail at scale.
This guide gives you the canonical lifecycle for tokens, the patterns to implement, and the mistakes to avoid.
### 2. The authentication policy in one table
| Limit | Value | Scope |
| -------------- | ------------------------------------------- | ----------------------------- |
| Token lifetime | **24 hours** (`expires_in: 86400`) | per token |
| Login rate | **10 / minute** | per user account |
| Login rate | **100 / minute** | per IP address |
| Endpoint | `POST https://api.iadvize.com/oauth2/token` | OAuth2, `grant_type=password` |
Going over either login limit returns an HTTP error and temporarily blocks further token generation from that user or IP.
### 3. The golden rule: cache and reuse
A single token lets you make as many GraphQL calls as you need for 24 hours. The pattern is always the same:
1. **First call** — request a token, store it in memory (or a secure shared store) with its expiry timestamp.
2. **Subsequent calls** — read the cached token and pass it in the `Authorization: Bearer …` header.
3. **Before expiry** — refresh the token *proactively*, ideally a few minutes before the 24-hour mark, not on failure.
If you have multiple processes (workers, lambdas, containers) sharing the same iAdvize user, **share the token between them** via Redis, a secret manager, or any centralized store. Each instance generating its own token will quickly exhaust the 10/min/user budget.
### 4. Reference implementation (Node.js)
A minimal in-memory cache with proactive refresh:
```javascript
const axios = require('axios');
const querystring = require('querystring');
const AUTH_URL = 'https://api.iadvize.com/oauth2/token';
const SAFETY_MARGIN_MS = 5 * 60 * 1000; // refresh 5 min before expiry
let cached = { token: null, expiresAt: 0 };
async function getAccessToken() {
if (cached.token && Date.now() < cached.expiresAt - SAFETY_MARGIN_MS) {
return cached.token;
}
const { data } = await axios.post(
AUTH_URL,
querystring.stringify({
grant_type: 'password',
username: process.env.IADVIZE_USER,
password: process.env.IADVIZE_PASSWORD,
}),
{ headers: { 'Content-Type': 'application/x-www-form-urlencoded' } }
);
cached = {
token: data.access_token,
expiresAt: Date.now() + data.expires_in * 1000,
};
return cached.token;
}
```
Every API call then does:
```javascript
const token = await getAccessToken();
await axios.post('https://api.iadvize.com/graphql', query, {
headers: { Authorization: `Bearer ${token}` },
});
```
That's it. One login per 24 hours per process — well below the 10/min/user limit.
### 5. cURL equivalent (for scripts and CI)
```bash
# Generate once, store in a file or secret manager
TOKEN=$(curl -s --request POST \
--url https://api.iadvize.com/oauth2/token \
--data "username=$IADVIZE_USER&password=$IADVIZE_PASSWORD&grant_type=password" \
| jq -r '.access_token')
# Reuse for all subsequent calls
curl --request POST \
--url https://api.iadvize.com/graphql \
--header "Content-Type: application/json" \
--header "Authorization: Bearer $TOKEN" \
--data "$QUERY"
```
For scheduled jobs, do **not** re-authenticate on every run. Persist the token to a secret store (AWS Secrets Manager, Vault, GCP Secret Manager) and rotate it on a separate daily schedule.
### 6. Handling rate-limit errors gracefully
If you do hit `429 Too Many Requests` on `/oauth2/token`, back off — do not retry immediately.
```javascript
async function getAccessTokenWithBackoff(attempt = 0) {
try {
return await getAccessToken();
} catch (err) {
if (err.response?.status === 429 && attempt < 4) {
const delay = Math.pow(2, attempt) * 1000; // 1s, 2s, 4s, 8s
await new Promise((r) => setTimeout(r, delay));
return getAccessTokenWithBackoff(attempt + 1);
}
throw err;
}
}
```
Exponential backoff is the standard pattern for rate-limited APIs and gives the per-minute counter time to reset.
### 7. Verifying a token
If you're unsure whether a stored token is still valid, hit the dedicated endpoint:
```bash
curl --request GET \
--url https://api.iadvize.com/_authenticated \
--header "Authorization: Bearer $TOKEN"
```
`{"authenticated": true}` means the token is good. `{"error": "invalid_token"}` means you need to regenerate.
Don't poll this endpoint — use it only when debugging or after a long downtime. Your normal flow should rely on the cached expiry timestamp.
### 8. Anti-patterns to avoid
* **Re-authenticating per request.** The most common cause of 429s.
* **One token per worker / lambda invocation.** With 10+ concurrent workers, you'll exceed 10/min/user within a single minute of cold starts.
* **Sharing one user across many independent integrations.** Create dedicated service users per integration so rate limits don't cross-contaminate.
* **Retrying on 429 without backoff.** This turns a 60-second wait into a permanent block.
* **Hardcoding tokens in code or repos.** Tokens last 24 hours — they must be stored in a secret manager and rotated, not committed.
* **Reacting to 401 by re-auth in a tight loop.** A bad password or revoked user will burn through your login budget in seconds.
### 9. Recommended architecture for production
For any integration calling iAdvize from multiple processes:
1. A single **token broker** (cron, lambda, or sidecar) calls `/oauth2/token` once per \~23 hours.
2. The broker writes the token to a **shared secret store** (Redis with TTL, Vault, AWS Secrets Manager).
3. All API clients **read** the token from that store — they never call `/oauth2/token` themselves.
4. The broker is the only component that needs to handle 429s, retries, and credential rotation.
This architecture stays comfortably under 1 login/minute/user, regardless of how many clients you run.
# REST API (deprecated)
Overview
{% hint style="danger" %} Our REST API is deprecated and is replaced by our [GraphQL API](/technologies/graphql-api)
{% endhint %}
## Base URL
All URLs referenced in the documentation have the following base:
| Standard platform | High availability platform |
| ------------------------------ | ------------------------------ |
| `https://sd.iadvize.com/api/2` | `https://ha.iadvize.com/api/2` |
The iAdvize REST API is served over HTTPS.
## Authentication
The API key must be attached to each request. You can use it in one of the following ways:
* Passed in as a `X-API-Key` HTTP header
* Passed in as a `key` GET parameter
* Passed in as the username (with an arbitrary password) via `HTTP Basic authentication`
## Calls, errors & responses
### **Authentication failed**
```
{
meta: {
status: "error",
message: "Forbidden"
}
}
```
### **Read**
**`GET /my_resource`**
```
{
meta: {
status: "success"
},
data: [
{
id: 789,
_link: "/my_resource/789"
},
{
id: 456,
_link: "/my_resource/456"
},
{
id: 123,
_link: "/my_resource/123"
}
],
pagination: {
page: 1,
pages: 1,
limit: 20,
count: 3
}
}
```
#### **Common filters**
| Filter | Description | Values |
| ------ | -------------------------------------------------------------------- | ---------- |
| page | Page number | `?page=1` |
| limit | Maximum number of resources per page (maximum possible value is 100) | `?limit=1` |
| full | Show all fields of the resource | `?full=1` |
Use the `*` character to broaden the scope of your search. E.g.: `filters[name]=*uli*`
**`GET /my_resource/123`**
```
{
meta: {
status: "success"
},
data: {
id: 123,
my_field: "my_value",
_link: "/my_resource/123"
}
}
```
**`GET /my_resource/456` (with error)**
```
{
meta: {
status: "fail",
message: "Unknown 'my_resource' with 'id' 456."
}
}
```
# Statistic (deprecated)
{% hint style="danger" %} **This resource is deprecated.** You should consider using our GraphQL API with the `Metrics` object.
{% endhint %}
## **Get statistics**
`GET /statistic`
See below to discover used fields and see [reading section](/technologies/rest-api#read) to discover some output examples.
### **Filters**
| Filter | Description | Values | Use |
| ----------------------------------------------------------- | ---------------------------------------------------------------------------- | --------------------------------------------------------------------------------------- | ---------------------------------------------------------- |
| website\_id `deprecated, use website_list property instead` | Website identifier | `?filters[website_id]=123` | |
| website\_list | Website identifiers | `?filters[website_list]=123,24,32` | |
| channel | Channel | `chat`, `call`, `facebook`, `facebookBusinessOnMessenger`, `sms`, `whatsapp` or `video` | `?filters[channel]=chat` |
| resource | Resource to group the data by | `operator`, `group`, `skill`, `rule`, `contact_type` or `page_type` | `?filters[resource]=operator` |
| resource\_id | Resource ID to get only the data of this resource | `?filters[resource_id]=32` | |
| indicators | Indicators to filter | See list below | `?filters[indicators]=indicator1,indicator2` |
| from | Date from | `YYYY-MM-DD` or `YYYY-MM-DD HH:MM:SS` | `?filters[from]=YYYY-MM-DD` |
| to | Date to | `YYYY-MM-DD` or `YYYY-MM-DD HH:MM:SS` | `?filters[to]=YYYY-MM-DD` |
| granularity | Get data per hour, per day or per month (only when 1 indicator is requested) | `hour`, `day`, `month` | `?filters[indicators]=indicator1&filters[granularity]=day` |
### **Indicators**
#### **Contact indicators**
available on `chat`, `call`, `video`, `facebook`, `facebookBusinessOnMessenger`, `sms`, `whatsapp`
| Indicator | Label | Description | Value |
| -------------------------------------------------- | ------------------------------------------------------------------------------------------------------- | -------------------------------------------------------------------------------------------------------------------------------------- | ------ |
| contact\_answered\_after\_first\_message\_duration |
Response time after first message (not available for bots -> null value returned)
| Average response time between conversation push event (assignation to an agent or expert) and the first agent's answer. | Second |
| contact\_answered\_duration |
Response time (not available for bots -> null value returned)
| Average response time between a customer's request and the agent's response. | Second |
| contact\_closed\_after\_last\_message\_duration | Length of time between last message and closing of chat (not available for bots -> null value returned) | Average amount of time between the visitor's last message and the closing of the chat discussion on the panel. | Second |
| contact\_duration | Average processing time | Average length of all contacts, the length of a contact being defined as the difference between the end time (closure) and start time. | Second |
| contact\_number | Initiated contacts | Number of contacts initiated during the selected period. | Number |
| contact\_sent\_message\_number | Sent messages | Total number of messages within a conversation sent by the agents. | Number |
| contact\_received\_message\_number | Received messages | Total number of messages within a conversation received by the agents. | Number |
| contact\_unanswered\_number | Contacts initiated with no response | Number of contacts initiated by a visitor with no response from an agent. | Number |
available on `chat`
| Indicator | Label | Description | Value |
| ---------------------------------------------- | -------------------------------------------- | -------------------------------------------------------------------------------------------------------------------- | ------ |
| contact\_missed\_number | Missed contact opportunities | Estimated number of missed contact opportunities because the agents were totally busy, offline or not in production. | Number |
| contact\_missed\_with\_busy\_operators\_number | Missed contact opportunities (agents busy) | Estimated number of missed contact opportunities due to agents being totally busy. | Number |
| contact\_missed\_with\_no\_operators\_number | Missed contact opportunities (agents absent) | Estimated number of contacts missed because the agents were either not connected or not in production. | Number |
| contact\_simultaneous\_number | Simultaneous contacts | Average number of contacts processed simultaneously by an agent during his online presence. | Number |
available on `chat`, `call`, `video`
| Indicator | Label | Description | Value |
| ----------------------------------- | ---------------------------- | ------------------------------------------------------------------------------------------------------------- | ------ |
| contact\_per\_hour\_average\_number | Contacts / hr of the website | Average number of contacts processed by all agents for an hour of production. | Number |
| contact\_per\_hour\_number | Contacts per hour | Average number of contacts processed by an agent for an hour of production. | Number |
| rule\_contact\_rate | Response rate | Proportion of displays having generated a contact. | Rate |
| rule\_display\_number | Displays | Number of chat/call displays generated on the website during the period. | Number |
| targeting\_rule\_triggered | Triggers | Number of times a targeting rule has been triggered, as a consequence of visitors meeting the right criteria. | Number |
#### **Presence indicators**
available on `chat`, `call` and `video`
| Indicator | Label | Description | Number |
| --------------------------------------- | -------------------------------------- | ------------------------------------------------------------------------------------------------------------------------ | ------ |
| max\_and\_partial\_occupation\_duration | Global occupation | Period during which an agent is connected to the panel and is occupied partially or to the maximum. | Second |
| max\_occupation\_duration | Maximum occupation | Period during which an agent is connected to the panel and is occupied to maximum capacity. | Second |
| max\_occupation\_rate | Maximum occupation rate | Part of production time during which an agent is connected to the panel and is occupied to a maximum. | Rate |
| non\_production\_duration | Not in production | Period during which an agent is connected to the panel, unavailable and yet not busy. | Second |
| non\_production\_rate | Not in production rate | Proportion of connection time during which an agent is connected to the panel, unavailable and yet not busy. | Rate |
| presentation\_duration | Smoothed period of button presentation | Period during which buttons are displayable. Length of the time slot covered with at least one agent available. | Second |
| production\_smoothed\_duration | Smoothed period of production | Period during which operators were in production. Length of the time slot covered with at least one agent in production. | Second |
available on `chat`, `call`, `video`, `facebook`, `facebookBusinessOnMessenger`, `sms`, `whatsapp`
| Indicator | Label | Description | Value |
| ----------------------------------- | --------------------------- | --------------------------------------------------------------------------------------------------------------------- | ----- |
| presence\_duration | Total period of presence | Total period during which the agents were connected to the desk. | |
| presence\_smoothed\_duration | Smoothed period of presence | Period during which operators were connected. Length of the time slot covered with at least one agent present. | |
| occupation\_rate | Partial occupation rate | Part of production time during which an agent is connected to the panel and is partially busy. | |
| non\_occupation\_duration | Inocc. | Period of time during which an agent is connected to the panel and is simultaneously available and not busy. | |
| non\_occupation\_rate | Rate of non-occupation | Part of production time during which an agent is connected to the panel and is simultaneously available and not busy. | |
| max\_and\_partial\_occupation\_rate | Global occupation rate | Part of production time during which an agent is connected to the panel and is occupied partially or to the maximum. | |
| production\_duration | In production | Period during which an agent is connected to the panel and is available or busy. | |
#### **Satisfaction indicators (deprecated)**
{% hint style="danger" %} **These indicators are no longer available in our REST API** since the new satisfaction is computed in a different way. You should consider using our GraphQL API with the query `satisfactionSurveyResponses` or with the object `satisfactionSurvey` contained in the `searchClosedConversations` query.
{% endhint %}
available on `chat`, `call` and `video`
| Indicator | Label | Description | Value |
| -------------------------------- | --------------------- | ------------------------------------------------------------------------------------- | ------ |
| satisfaction\_delay\_rate | Waiting time | Visitor satisfaction rate with the waiting time before receiving an answer. | Rate |
| satisfaction\_global\_rate | Overall satisfaction | Overall satisfaction rate of visitors. | Rate |
| satisfaction\_resolution\_rate | Quality of response | Visitors' satisfaction rate with the response given by the agent. | Rate |
| satisfaction\_respondent\_number | Number of respondents | Number of visitors who replied to a satisfaction survey following a discussion. | Number |
| satisfaction\_respondent\_rate | Response rate | Proportion of conversations after which visitors completed the satisfaction survey. | Rate |
| satisfaction\_welcome\_rate | Quality of welcome | Visitor satisfaction rate with the welcome. | Rate |
| occupation\_duration | Partial occupation | Period during which an agent is connected to the panel, unavailable and yet not busy. | Second |
#### **Transactions indicators**
available on `chat`, `call`, `video`, `facebook`, `facebookBusinessOnMessenger`, `sms`, `whatsapp`
| Indicator | Label | Description | Value |
| --------------------------------------------------- | ------------------------------------------------------ | ---------------------------------------------------------------------------------------------------------------- | ------ |
| conversion\_rate | Conversion rate | Proportion of conversations which led to transactions. | Rate |
| cart\_after\_contact\_amount | Average order value after contact | Average order value following a contact. | Number |
| cart\_global\_amount | Average order value on the website | Average Order Value, all visitor categories. | Amount |
| transaction\_after\_contact\_amount | T/O after contact | Total turnover from visitors who dialogued and completed a transaction after a contact. | Amount |
| transaction\_after\_contact\_number | Transactions after contact | Total number of transactions from visitors who dialogued and then completed a transaction following the contact. | Number |
| transaction\_total\_amount | Website T/O | Total turnover, all visitor categories. | Amount |
| transaction\_total\_number | Website transactions | Total number of transactions (all categories). | Number |
| transaction\_after\_contact\_duration | Transformation time after contact | Average time between the first exchange and the transaction following a contact. | Second |
| transaction\_after\_conversation\_amount\_per\_hour | Website transactions amount per hour | Average turnover generated by an agent after a contact on an hourly basis | Amount |
| transaction\_missed\_with\_busy\_operators\_amount | T/O missed (agents totally busy) | Estimated lost turnover due to agents being totally busy. | Amount |
| transaction\_missed\_with\_busy\_operators\_number | Missed transaction opportunities (agents totally busy) | Estimated number of missed transaction opportunities because the agents were totally busy. | Number |
| transaction\_missed\_with\_no\_operators\_amount | Missed T/O opportunity (agents absent) | Estimated turnover missed because the agents were not connected or not in production. | Amount |
| transaction\_missed\_with\_no\_operators\_number | Missed transaction opportunities (agents absent) | Estimated number of missed transaction opportunities because the agents were not connected or not in production. | Number |
| transaction\_amount\_per\_conversation | Website transactions amount per conversation | Average turnover generated for each conversation done | Amount |
# Group (deprecated)
{% hint style="danger" %} **This resource is deprecated.** You should consider using our GraphQL API with the `UserGroup` object. \ You can also use `Users` object filtered on *parentGroupId* if you would like to retrieve users from a specific user group.
{% endhint %}
## **List your groups**
`GET /group`
See below to discover used fields and see [reading section](/technologies/rest-api#read) to discover some output examples.
### **Filters**
| Filter | Description | Use |
| ---------- | ----------------------- | -------------------------- |
| parent\_id | Parent group identifier | `?filters[parent_id]=1987` |
## **Get a group details**
`GET /group/1984`
See [reading section](/technologies/rest-api#read) to discover some output examples.
### **Fields**
| Field | Description | Values |
| ------------------------------------------------------------------------------------------ | ----------------------------- | -------------------------- |
| id | Group identifier | Integer |
| name | Group name | String |
| created\_at | Date of creation | Date `YYYY-MM-DD HH:MM:SS` |
| parent\_id | Parent identifier | Integer |
| operator\_list **Deprecated: use the Operator resource with the group\_id filter instead** | List of operators identifiers | List of integers |
| parent\_list | List of parent's group ids | List of integers |
# Call meeting (deprecated)
{% hint style="danger" %} **This resource is deprecated.** There's no equivalent on graphQL, as call meeting functionality is also deprecated.
{% endhint %}
## **Get call meetings**
`GET /callmeeting`
See below to discover used fields and see [reading section](/technologies/rest-api#read) to discover some output examples.
### **Filters**
Filter
Description
Use
website_id
Website identifier
?filters[website_id]=123
from
Period start date
?filters[from]=2015-03-31 19:00:00
to
Period end date
?filters[to]=2015-06-31 18:00:00
### **Fields**
Field
Description
Values
id
Call meeting identifier
Integer
unique_id
Visitor unique identifier
String
phone_number
Visitor phone number
String
status
Call meeting status (pending, progress, done, failed, working)
String
start_at
Date of call
DateTime
website_id
Website identifier
Integer
targeting_rule_id
Targeting rule identifier associated to call meeting
String
skill_id
Skill identifier associated to call meeting
String
# Operator (deprecated)
{% hint style="danger" %} **This resource is deprecated.** You should consider using our GraphQL API with the `Users` object.
{% endhint %}
## **List your operators**
`GET /operator`
See below to discover used fields and see [reading section](/technologies/rest-api#read) to discover some output examples.
### **Filters**
| Filter | Description | Values | Use |
| ------------- | ------------------- | ------ | -------------------------------------- |
| id | Operator identifier | | `?filters[id]=123` |
| group\_id | Group identifier | | `?filters[group_id]=123` |
| website\_id | Website identifier | | `?filters[website_id]=123` |
| website\_list | Website identifiers | | `?filters[website_list]=1,2,3` |
| skill\_id | Skill identifier | | `?filters[skill_id]=123` |
| name | Operator name | | `?filters[name]=genius` |
| external\_id | External identifier | | `?filters[external_id]=MyExternalId` |
| email | Operator email | | `?filters[email]=my-email@iadvize.com` |
## **Get operator's details**
`GET /operator/1`
See [reading section](/technologies/rest-api#read) to discover some output examples.
### **Fields**
| Field | Description | Values |
| --------------------------------------------- | ------------------------------------------------------------------------------------------------------------------------------------ | --------------------------------------------------------- |
| id | Operator identifier | Integer |
| name | Name | String |
| first\_name | First name | String |
| pseudo | Pseudonym | String |
| email | Email | Valid email |
| external\_id | Your id if provided | String |
| role `deprecated, use roles property instead` | Role | `operator`, `manager` or `admin` |
| roles | Roles | List of string `expert`, `operator`, `manager` or `admin` |
| chat\_enabled | Ability to process chat | Boolean |
| call\_enabled | Ability to process call | Boolean |
| video\_enabled | Ability to process video | Boolean |
| chat\_max\_number | Max. amount of chats an operator can process at the same time | Integer |
| chat\_and\_call | Ability to process chat and call simultaneously | Boolean |
| chat\_to\_video | Ability to handle chat to video escalation | Boolean |
| chat\_priority | Chat priority of the operator | `0` or `10` |
| call\_priority | Call priority of the operator | `0` or `10` |
| video\_priority | Video priority of the operator | `0` or `10` |
| language\_list | List of languages the operator can process | List of ISO2 (e.g. en, fr...) |
| language\_admin | Admin language | `de`, `en`, `es` or `fr` |
| group\_id | Group identifier | Integer |
| website\_list | Website list identifiers | List of integer |
| skill\_list | Skill list identifiers | List of integer |
| sso\_key | [SSO token](https://github.com/iadvize/public-developers-documentation/blob/master/technologies/rest-api/broken-reference/README.md) | String |
| **call\_config** | Configuration of the call pickup mode | `Object` *(optional)* |
#### **call\_config**
| Field | Description | Values |
| ----------------------------------------- | -------------------------------------------------------------------------------------------------------------------------------------------------------------------------------------- | ---------------------------------------------------------------- |
| type | Pickup type. ⚠️ Please note that if the type is `ANSWER_FROM_PHONE` you must either fill in the `phone_number` field or set the `ask_phone_number_at_every_connection` field to `true` | `ANSWER_FROM_PHONE` or `ANSWER_FROM_DESK` *(default)* |
| ask\_phone\_number\_at\_every\_connection | If type is `ANSWER_FROM_PHONE`: allows you to define whether iAdvize proposes to the operator to change his phone number each time he connects to the desk | Boolean *(default: `false`)* |
| phone\_number | If type is `ANSWER_FROM_PHONE`: this is the phone number used to receive calls | Valid phone number with prefix (e.g.: +33123456789) *(optional)* |
## **Create an operator**
`POST /operator`
## **Update an operator**
`PUT /operator/1`
## **Delete an operator**
`DELETE /operator/1`
## **Get operators live availability**
Get the live availability of all of your operators.
`GET /operator/live`
```
{
meta: {
status: "success"
},
data: [
{
id: 456,
connected: true,
chat: {
enabled: true,
slot_number: 2,
slot_max_number: 4,
busy: false,
available: true
},
call: {
enabled: false,
slot_number: 0,
slot_max_number: 1,
busy: false,
available: false
},
video: {
enabled: false,
slot_number: 0,
slot_max_number: 1,
busy: false,
available: false
}
}
]
}
```
You can use previous filters.
* In order to have more accurate results, only available operators are displayed in the default view.
* If you want to display offline operators, we invite you to use the `connected=0` filter. Please note that you will only see agents that logged in to the iAdvize platform at least once.
* If your operators have `skills` or `groups`, you need to specify it in your request.
## **Get operator's live availability**
Get the live availability of an operator.
`GET /operator/123/live`
```
{
meta: {
status: "success"
},
data: {
id: 123,
connected: false,
chat: {
enabled: false,
slot_number: 1,
slot_max_number: 2,
busy: false,
available: false
},
call: {
enabled: true,
slot_number: 1,
slot_max_number: 1,
busy: true,
available: false
},
video: {
enabled: false,
slot_number: 0,
slot_max_number: 1,
busy: false,
available: false
}
}
}
```
## **Set operator's availability**
Set the availability of an operator.
`PUT /operator/123/live`
### **Fields**
| Field | Description | Value |
| ----------------- | ------------------------------------------- | ------------------------------------- |
| chat\[available] | Set operator availability for chat channel | `1` (available) or `0` (unavailable) |
| call\[available] | Set operator availability for call channel | `1` (available) or `0` (unavailable) |
| video\[available] | Set operator availability for video channel | `1` (available) or `0` (unavailable) |
| connected | Set operator connection status | `0` (offline) - unique value possible |
### **Response**
```
{
meta: {
status: "success",
message: "Operator is now available|unavailable for chat channel."
}
}
```
## **Get operators statistics**
`GET /operator/123/statistic`
See [reading section](/technologies/rest-api#read) to discover some output examples.
### **Fields**
| Field | Description | Values |
| ------------------------------------------- | --------------------------------------------------- | --------- |
| id | Operator identifier | Integer |
| conversation\_number | Conversations number done by operator | Integer |
| ~~satisfaction\_global\_rate~~ (deprecated) | ~~Satisfaction average for operator conversations~~ | ~~Float~~ |
| experience | Operator experience | Integer |
### **Response**
```
{
meta: {
status: "success"
},
data: {
id: 123,
conversation_number: 589,
satisfaction_global_rate: 0.86, // deprecated
experience: 5630
}
}
```
## **Get operator's profile**
`GET /operator/123/profile`
See [reading section](/technologies/rest-api#read) to discover some output examples.
### **Fields**
| Field | Description | Values |
| ----------- | ------------------------------------- | ------- |
| user\_id | Operator identifier | Integer |
| status | Short text status written by operator | String |
| description | Operator profile description | String |
| facebook | Facebook identifier | String |
| city | City | String |
| country | Country | String |
### **Response**
```
{
meta: {
status: "success"
},
data: {
user_id: 123,
status: "Je suis disponible pour vous aider",
description: "Passionné par la menuiserie depuis plusieurs années, j'aime vous apporter des conseils.",
facebook: "john.doe",
city: "Nantes",
country: "France"
}
}
```
# Skill (deprecated)
{% hint style="danger" %} **This resource is deprecated.** You should consider using our GraphQL API with the `Skill` object.
{% endhint %}
## **List your skills**
`GET /skill`
See below to discover used fields and see [reading section](/technologies/rest-api#read) to discover some output examples.
### **Filters**
| Filter | Description | Use |
| ------------ | ----------------------- | --------------------------- |
| operator\_id | Operator identifier | `?filters[operator_id]=123` |
| parent\_id | Parent skill identifier | `?filters[parent_id]=123` |
## **Get skill details**
`GET /skill/1984`
See [reading section](/technologies/rest-api#read) to discover some output examples.
### **Fields**
| Field | Description | Values |
| ------------------------------------------------------------------------------------------ | ---------------------------- | -------------------------- |
| id | Skill identifier | Integer |
| name | Name | String |
| order | Order | Integer |
| created\_at | Date of creation | Date `YYYY-MM-DD HH:MM:SS` |
| parent\_id | Parent skill identifier | Integer |
| operator\_list **Deprecated: use the Operator resource with the skill\_id filter instead** | List of operator identifiers | List of integers |
# Transaction (deprecated)
{% hint style="danger" %} **This resource is deprecated.** You should consider using our GraphQL API with the `Conversion` or `Conversions` objects.
{% endhint %}
## **List your transactions**
`GET /transaction`
See below to discover used fields and see [reading section](/technologies/rest-api#read) to discover some output examples.
{% hint style="warning" %} Transactions from a given day will be available on the next day **after 5 am.**
{% endhint %}
### **Filters**
| Filter | Description | Values | Use |
| ---------------- | ----------------------- | -------------------------------------------------------------------------------------------------------------------------- | -------------------------------------------------------------------------------------------------- |
| website\_id | Website identifier | | `?filters[website_id]=123` |
| conversation\_id | Conversation identifier | Conversation identifier. You can also use `!null` & `null` to filter all transactions associated or not to a conversation. | `?filters[conversation_id]=123` `?filters[conversation_id]=null` `?filters[conversation_id]=!null` |
| from | Date from | `YYYY-MM-DD` or `YYYY-MM-DD HH:MM:SS` | `?filters[from]=YYYY-MM-DD HH:MM:SS` |
| to | Date to | `YYYY-MM-DD` or `YYYY-MM-DD HH:MM:SS` | `?filters[to]=YYYY-MM-DD HH:MM:SS` |
{% hint style="warning" %}
The maximum duration allowed between `from` and `to` is 1 month.
{% endhint %}
## **Get a transaction details**
`GET /transaction/123`
See [reading section](/technologies/rest-api#read) to discover some output examples.
### **Fields**
| Field | Description | Values |
| ---------------- | ------------------------- | -------------------------- |
| id | Tag identifier | Integer |
| external\_id | External identifier | String |
| visitor\_uid | Visitor unique identifier | String |
| visitor\_email | Visitor email | String |
| amount | Amount | Double |
| created\_at | Date of creation | Date `YYYY-MM-DD HH:MM:SS` |
| website\_id | Website identifier | Integer |
| operator\_id | Operator identifier | Integer |
| conversation\_id | Conversation identifier | Integer |
# Visitor (deprecated)
{% hint style="danger" %} **This resource is deprecated.** You should consider using our GraphQL API with the `Visitor` or `Visitors` objects.
{% endhint %}
## **Get visitors**
`GET /visitor`
See below to discover used fields and see [reading section](/technologies/rest-api#read) to discover some output examples.
### **Filters**
| Filter | Description | Use |
| ------------ | ------------------- | --------------------------- |
| unique\_id | Unique identifier | `?filters[unique_id]=123` |
| external\_id | External identifier | `?filters[external_id]=123` |
| website\_id | Website identifier | `?filters[website_id]=123` |
## **Get a visitor details**
`GET /visitor/560`
See [reading section](/technologies/rest-api#read) to discover some output examples.
### **Fields**
| Field | Description | Values |
| ------------ | --------------------------- | -------------------------- |
| id | Visitor identifier | Integer |
| unique\_id | Visitor unique identifier | String |
| external\_id | Your id if provided | String |
| lastname | Last name | String |
| firstname | First name | String |
| address | Address | String |
| city | City | String |
| zip | Zip code | String |
| country | Country | String |
| phone | Phone number | String |
| email | Email | String |
| browser | Browser used by visitor | String |
| website\_id | List of website identifiers | List of integers |
| created\_at | Visitor creation date | Date `YYYY-MM-DD HH:MM:SS` |
# Webhooks
Overview
When an event occurs, an HTTP `POST` call is issued on the callback URLs you set up with the event data. Data is sent with `application/json` header content-type, and `json` format as payload. Callback URLs must be defined with HTTPS protocol and should be available with `POST` verb to send data payload. iAdvize expects to have a 20x HTTP status in the callback result.
## Timeouts
The connection timeout (time to establish the HTTP connection) is set to 1 second. Once connected, the server is expected to process the request and send a response within 30 seconds (reply timeout).
## Delivery headers
iAdvize will send the payload with three additional headers:
* x-iadvize-delivery: UUID, unique identifier to describe this webhook delivery
* x-iadvize-correlationid: UUID, event identifier used in a retry webhooks to track same callback calls.
* x-iadvize-signature: Hash signature, cf. Security section
## Webhook retry management
If errors occur during the webhook query (40x, 50x HTTP status codes), we will retry two times. We will try to send you the following requests:
* First time after a delay of 10 seconds,
* and the second time after 20 seconds (so, 30 seconds after the first call).
In case of failure, you may need to track events in error, by following "X-iAdvize-CorrelationId" in headers, or "eventId" in the payload.
## Webhook security
Please refer to [this section](/apps/build-your-app/app-security).
## Webhook timeout
The default timeout is 30 seconds\\
# Reference
Emitted when visitor has answered a customer satisfaction, net promoter score, satisfaction comment or custom question. Will be emitted at every click on answer by visitor.
Emitted when a transaction is attributed to a conversation.
## `v2.conversation.pushed`
Emitted on a beginning of a conversation or a receiving of a conversation transferred by another operator.
```
{
"eventId": "0f0bb3af-5035-4ba3-b3fb-ff4879a3a74d",
"eventType": "v2.conversation.pushed",
"platform": "ha",
"projectId": 1,
"clientId": 335,
"conversationId": "4c8c7408-f73c-42cd-89e9-afbbee7d9024",
"operatorId": 1,
"visitorExternalId": "63429889", // deprecated. Only available for ONSITE conversations. Use `visitorId` field instead.
"channel": "CHAT",
"visitorId": "b05f1b45-c891-4a9c-b47e-91ee6c8ffb44",
"createdAt": "2019-04-12T07:58:35.171Z",
"sentAt": "2019-04-12T07:58:35.496Z"
}
```
Please note :
| Attribute | Description |
| --------- | ------------------------------------------------------------------------------------------------------------------------------------------------------------------------------------------------------------------------------------------------ |
| channel |
For onsite source : -CHAT -CALL -VIDEO
For offsite: -FACEBOOK -FACEBOOK\_BUSINESS\_ON\_MESSENGER -MOBILE\_APP -SMS
|
## `v2.conversation.closed`
Emitted on an end of a conversation. Conversations on offsite channels are automatically closed after 7 days of inactivity.
```
{
"eventId": "0f0bb3af-5035-4ba3-b3fb-ff4879a3a74d",
"eventType": "v2.conversation.closed",
"platform": "ha",
"projectId": 1,
"clientId": 1,
"conversationId": "4c8c7408-f73c-42cd-89e9-afbbee7d9024",
"operatorIds": [
1,
2
],
"visitorExternalId": "63429889", // deprecated. Only available for ONSITE conversations. Use `visitorId` field instead.
"channel": "CHAT",
"visitorId": "b05f1b45-c891-4a9c-b47e-91ee6c8ffb44",
"createdAt": "2019-04-12T07:58:35.171Z",
"sentAt": "2019-04-12T07:58:35.496Z"
}
```
Please note :
| Attribute | Description |
| --------- | ------------------------------------------------------------------------------------------------------------------------------------------------------------------------------------------------------------------------------------------------ |
| channel |
For onsite source : -CHAT -CALL -VIDEO
For offsite: -FACEBOOK -FACEBOOK\_BUSINESS\_ON\_MESSENGER -MOBILE\_APP -SMS
|
## `user.created`
Emitted on user creation in administration or API Rest.
```
{
"eventId": "d36cd3c4-2d16-4a77-97c2-620bde859b29",
"eventType": "user.created",
"platform": "sd",
"clientId": 1,
"userId": 1,
"createdAt": "2017-04-22T11:01:00+02:00",
"sentAt": "2017-04-22T11:01:00+02:00"
}
```
## `user.updated`
Emitted on user update in administration or API Rest.
```
{
"eventId": "d36cd3c4-2d16-4a77-97c2-620bde859b29",
"eventType": "user.updated",
"platform": "sd",
"clientId": 1,
"userId": 1,
"createdAt": "2017-04-22T11:01:00+02:00",
"sentAt": "2017-04-22T11:01:00+02:00"
}
```
## `user.connected`
Emitted when user is connecting to administration or desk.
```
{
"eventId": "d36cd3c4-2d16-4a77-97c2-620bde859b29",
"eventType": "user.connected",
"platform": "sd",
"clientId": 1,
"userId": 1,
"createdAt": "2017-04-22T11:01:00+02:00",
"sentAt": "2017-04-22T11:01:00+02:00"
}
```
## `user.disconnected`
Emitted when user is disconnecting to administration or desk.
```
{
"eventId": "d36cd3c4-2d16-4a77-97c2-620bde859b29",
"eventType": "user.disconnected",
"platform": "sd",
"clientId": 1,
"userId": 1,
"createdAt": "2017-04-22T11:01:00+02:00",
"sentAt": "2017-04-22T11:01:00+02:00"
}
```
## `visitor.updated`
Emitted when a visitor information is updated from desk or admin view.
```
{
"eventId": "d36cd3c4-2d16-4a77-97c2-620bde859b29",
"eventType": "visitor.updated",
"platform": "sd",
"clientId": 1,
"operatorId": 1,
"visitorId": "593de0891b628a50b09835dc6c0e92565329c74baa90e",
"createdAt": "2017-04-22T11:01:00+02:00",
"sentAt": "2017-04-22T11:01:00+02:00"
}
```
## `satisfaction.answered`
Emitted when visitor has answered a customer satisfaction, net promoter score, satisfaction comment or custom question. Will be emitted at every click on an answer by the visitor.
***Example with\*\*\*\***** ****`customerSatisfaction`**** ****\*\*\*\*filled***
```
{
"eventId": "d36cd3c4-2d16-4a77-97c2-620bde859b29",
"eventType": "satisfaction.answered",
"platform": "sd",
"projectId": 1,
"clientId": 1,
"createdAt": "2017-04-22T11:01:00+02:00",
"sentAt": "2017-04-22T11:01:00+02:00",
"conversationId": "2d90a8a2-16df-45f5-897e-31adf9aa165d",
"customerSatisfaction" : 3
}
```
***Example with\*\*\*\***** ****`netPromoterScore`**** ****\*\*\*\*filled***
```
{
"eventId": "d36cd3c4-2d16-4a77-97c2-620bde859b29",
"eventType": "satisfaction.answered",
"platform": "sd",
"projectId": 1,
"clientId": 1,
"createdAt": "2017-04-22T11:01:00+02:00",
"sentAt": "2017-04-22T11:01:00+02:00",
"conversationId": "2d90a8a2-16df-45f5-897e-31adf9aa165d",
"netPromoterScore" : 3
}
```
***Example with\*\*\*\***** ****`satisfactionComment`**** ****\*\*\*\*filled***
```
{
"eventId": "d36cd3c4-2d16-4a77-97c2-620bde859b29",
"eventType": "satisfaction.answered",
"platform": "sd",
"projectId": 1,
"clientId": 1,
"createdAt": "2017-04-22T11:01:00+02:00",
"sentAt": "2017-04-22T11:01:00+02:00",
"conversationId": "2d90a8a2-16df-45f5-897e-31adf9aa165d",
"satisfactionComment" : "It was very helpful"
}
```
***Example with\*\*\*\***** ****`customQuestion`**** ****\*\*\*\*filled***
```
{
"eventId": "d36cd3c4-2d16-4a77-97c2-620bde859b29",
"eventType": "satisfaction.answered",
"platform": "sd",
"projectId": 1,
"clientId": 1,
"createdAt": "2017-04-22T11:01:00+02:00",
"sentAt": "2017-04-22T11:01:00+02:00",
"conversationId": "2d90a8a2-16df-45f5-897e-31adf9aa165d",
"customQuestion" : true
}
```
## `transaction.attributed`
Emit when a transaction is attributed to a conversation.
```
{
"eventId": "d36cd3c4-2d16-4a77-97c2-620bde859b29",
"eventType": "transaction.attributed",
"platform": "sd",
"projectId": 1,
"clientId": 1,
"createdAt": "2017-04-22T11:01:00+02:00",
"sentAt": "2017-04-22T11:01:00+02:00",
"transactionId": "1d94c3e8-8cbe-4e46-933d-0433ec339f79",
"receivedAt": "2017-04-22T11:01:00+02:00",
"externalId": "transaction-1",
"amount": 300.20,
"conversationId": "2d90a8a2-16df-45f5-897e-31adf9aa165d",
"source": "Onsite",
"operatorId": 1
}
```
| Attribute | Description |
| --------- | ------------------------------------------------------------------------------------------------------------------------------------------------------------------------------------------------- |
| source |
|
##
## Deprecated events (legacy)
{% hint style="danger" %} The following events should not be used anymore, they still appear in this documentation for historical purposes only!
{% endhint %}
### **`conversation.started`**
{% hint style="danger" %} PLEASE DO NOT USE (refer to the warning above).
{% endhint %}
```
{
"eventId": "d36cd3c4-2d16-4a77-97c2-620bde859b29",
"eventType": "conversation.started",
"platform": "sd",
"websiteId": 1,
"clientId": 1,
"conversationId": 1,
"operatorId": 1,
"channel": "chat",
"visitorId": "593de0891b628a50b09835dc6c0e92565329c74baa90e",
"createdAt": "2017-04-22T11:01:00+02:00",
"sentAt": "2017-04-22T11:01:00+02:00"
}
```
### **`conversation.transferred`**
{% hint style="danger" %} PLEASE DO NOT USE (refer to the warning above).
{% endhint %}
```
{
"eventId": "d36cd3c4-2d16-4a77-97c2-620bde859b29",
"eventType": "conversation.transferred",
"platform": "sd",
"websiteId": 1,
"clientId": 1,
"conversationId": 2,
"transferredConversationId": 1,
"operatorId": 1,
"channel": "chat",
"visitorId": "593de0891b628a50b09835dc6c0e92565329c74baa90e",
"createdAt": "2017-04-22T11:01:00+02:00",
"sentAt": "2017-04-22T11:01:00+02:00"
}
```
### **`conversation.closed`**
{% hint style="danger" %} PLEASE DO NOT USE (refer to the warning above).
{% endhint %}
```
{
"eventId": "d36cd3c4-2d16-4a77-97c2-620bde859b29",
"eventType": "conversation.closed",
"platform": "sd",
"websiteId": 1,
"clientId": 1,
"conversationId": 1,
"operatorId": 1,
"channel": "chat",
"visitorId": "593de0891b628a50b09835dc6c0e92565329c74baa90e",
"createdAt": "2017-04-22T11:01:00+02:00",
"sentAt": "2017-04-22T11:01:00+02:00"
}
```
# Guides
## Subscribe to your first webhook
In order to subscribe to the webhooks of your website, you need to create an app in our marketplace. You'll need to have a developer account that you can get by signing up on [this page](/apps/build-your-app/getting-started#get-a-developer-account)
You'll then be able to subscribe to all the available webhooks through our webhook building interface:
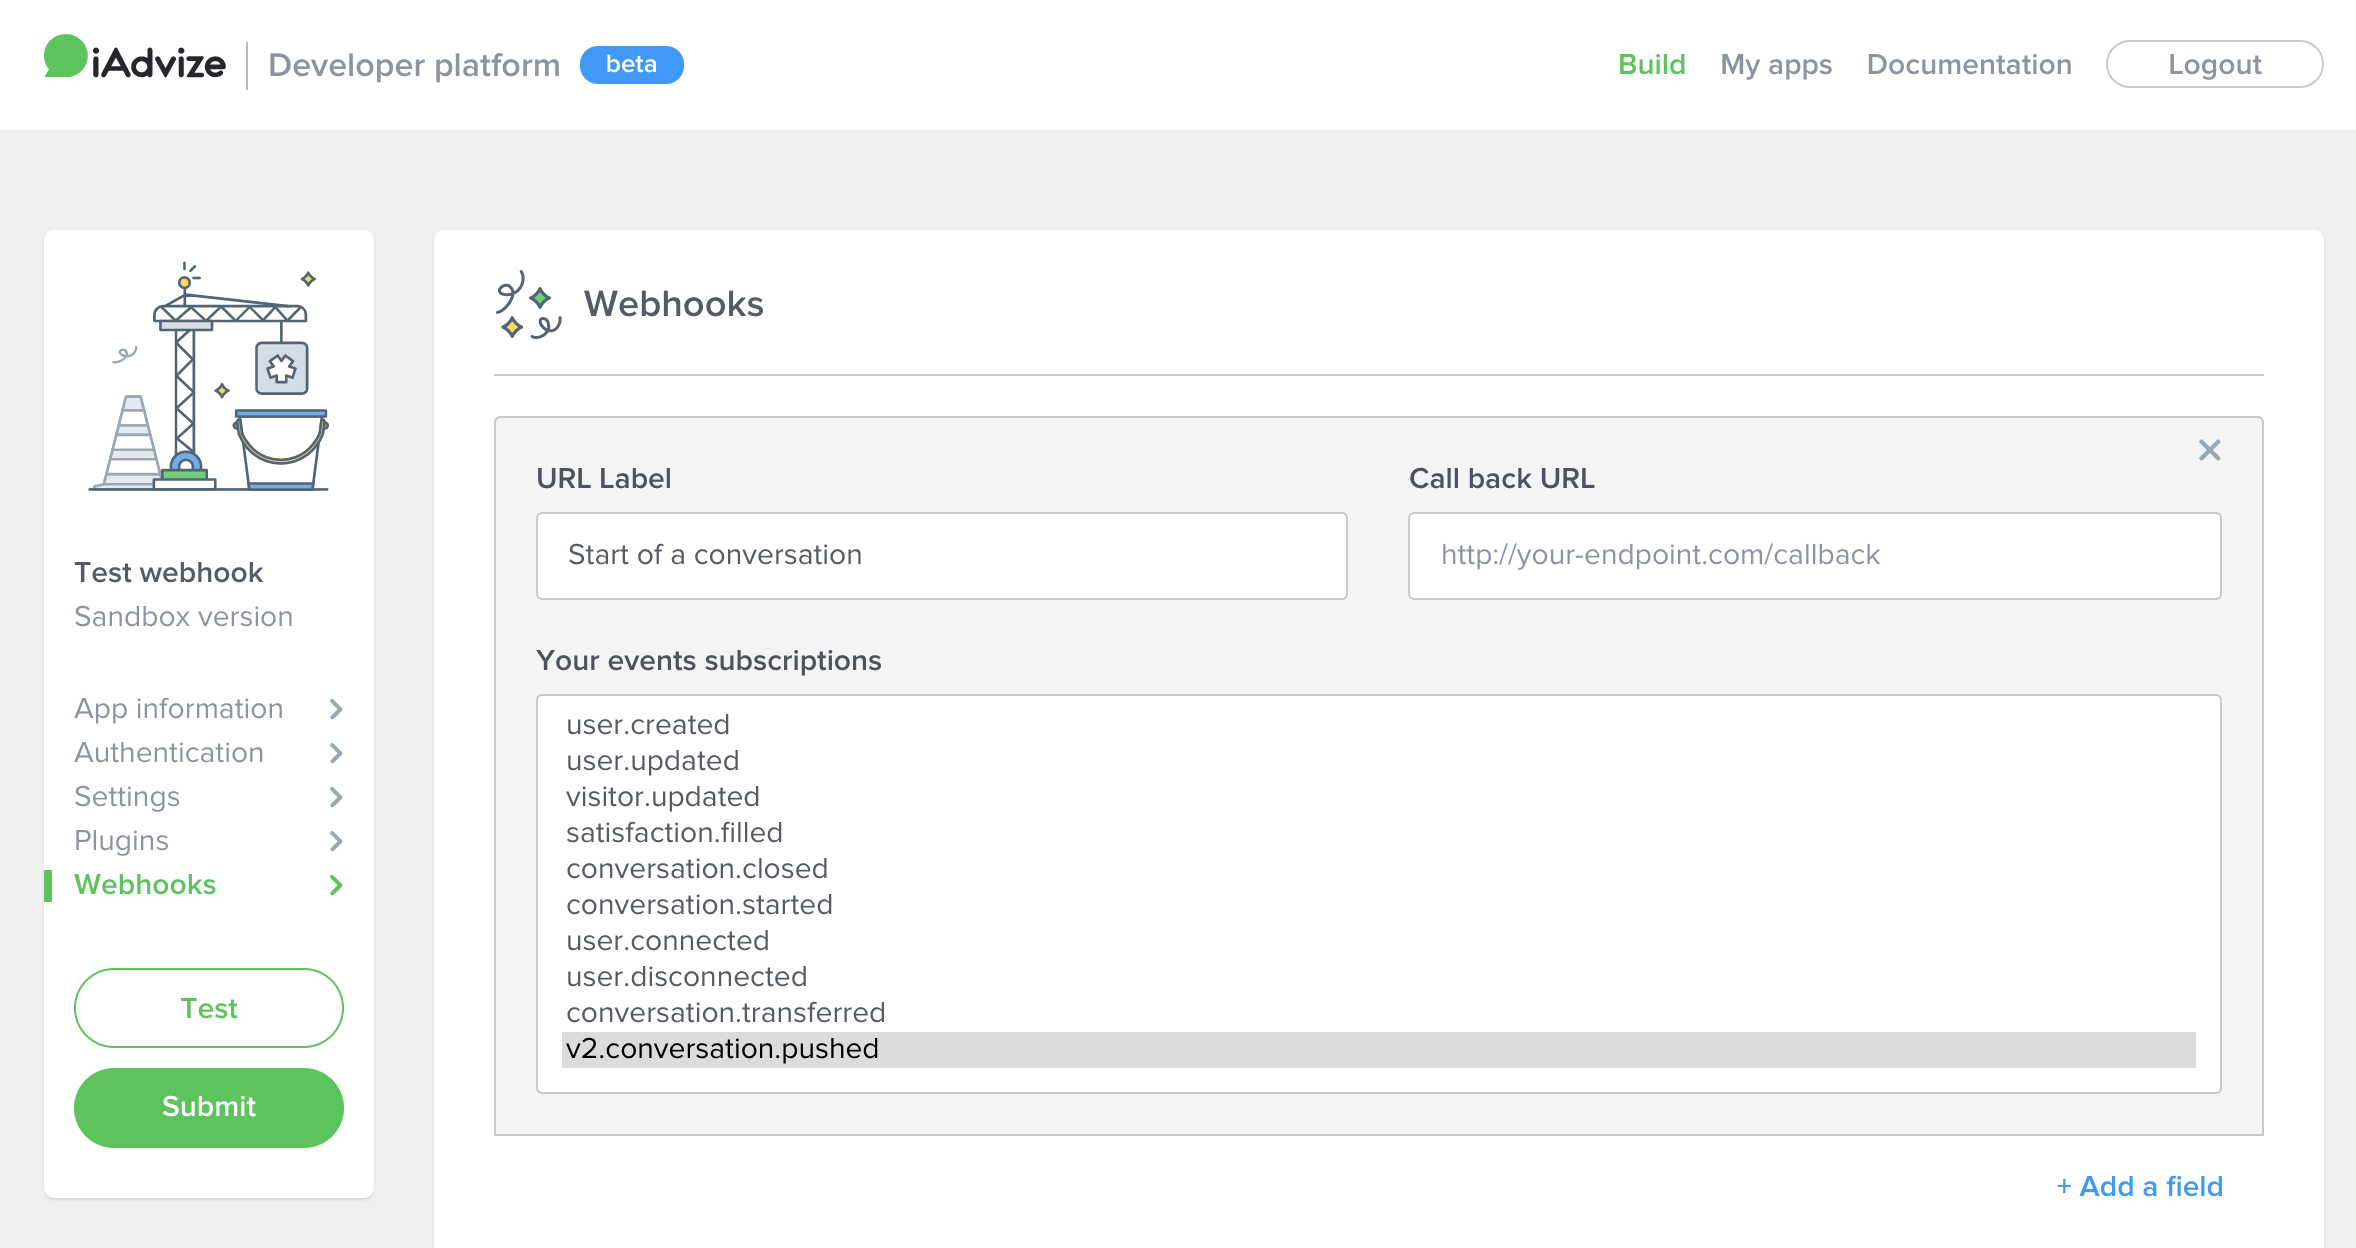
\\
# Desk events
Events triggered by the iAdvize desk
Introduction
In order to improve the integration of the iAdvize console with third-party web applications (such as CRM), the desk is able to send events via the postMessage API of the browser.
These events concern conversations that arrive and leave the iAdvize desk but also when updates occur on visitors.
They allow integrators to react to these events and, for example, to adapt the interface of their tool to what is happening within the iAdvize console. For example, we can imagine the following use cases:
* Show/hide the iAdvize console when conversations arrive in the console or when there are no more conversations.
* Open the CRM customer record related to the visitor in conversation who has the focus in the iAdvize console.
## Implementation example
```javascript
window.addEventListener("message", (event) => {
// Excludes events not issued by the iAdvize desk
if (event.origin !== "https://ha.iadvize.com") return;
console.log("New desk event received:", event.data);
});
```
## Events lifecycle diagram
The description and the payload of events can be viewed in the [Reference](/technologies/desk-events/reference).
# Reference
Triggered each time the agent’s status is updated for all channels available.
The different availability status are:
AVAILABLE: the agent is connected and available on this channel
UNAVAILABLE: the agent is unavailable on this channel (either disconnected or the channel is disabled by an admin)
UNAVAILABLE_FORCED: the agent is available but can’t take new conversations on this channel. This status is possible only for the call and video channels. This way, the agent can avoid taking conversations on those two channels when the agent already has a conversation in progress on the chat channel (non-parallelizable channels).
Triggered each time a visitor, an operator or an ibbü expert send a message in any conversations present on the desk
conversationParticipantType must have different value: Visitor : Message is come from Visitor Professional : Message is come from operator's desk (not ibbü expert) Expert : Message is come from ibbü expert
## CONVERSATION\_ADDED
```json
{
"event": "com.iadvize.desk.CONVERSATION_ADDED",
"conversationId": "c1750366-9483-4372-a57d-844da14071c6",
"projectId": 1234
}
```
## CONVERSATION\_FOCUSED
```json
{
"event": "com.iadvize.desk.CONVERSATION_FOCUSED",
"conversationId": "c1750366-9483-4372-a57d-844da14071c6"
}
```
## CONVERSATION\_FOCUS\_LOST
```json
{
"event": "com.iadvize.desk.CONVERSATION_FOCUS_LOST",
"conversationId": "c1750366-9483-4372-a57d-844da14071c6"
}
```
## CONVERSATION\_STATE\_BOX\_CLICKED
```json
{
"event": "com.iadvize.desk.CONVERSATION_STATE_BOX_CLICKED",
"conversationId": "93d86726-aaf7-4962-877e-104c577d86ae"
}
```
## CONVERSATION\_VISITOR\_UPDATED
```json
{
"event": "com.iadvize.desk.CONVERSATION_VISITOR_UPDATED",
"conversationId": "c1750366-9483-4372-a57d-844da14071c6",
"visitor": {
...allKnownIAdvizeFields
}
}
```
{% hint style="info" %}
The `allKnownIAdvizeFields` refers to the visitor fields available in an [iAdvize visitor profile](https://graphql.iadvize.dev/types/Visitor).
{% endhint %}
## CONVERSATION\_REMOVED
```json
{
"event": "com.iadvize.desk.CONVERSATION_REMOVED",
"conversationId": "c1750366-9483-4372-a57d-844da14071c6"
}
```
## AVAILABILITY\_UPDATED
```json
{
"event": "com.iadvize.desk.AVAILABILITY_UPDATED",
"availabilities": [
{
"channel": "CHAT",
"status": "AVAILABLE"
},
{
"channel": "CALL",
"status": "UNAVAILABLE"
},
{
"channel": "VIDEO",
"status": "UNAVAILABLE_FORCED"
},
{
"channel": "THIRD_PARTY",
"status": "UNAVAILABLE_FORCED"
}
]
}
```
## CONVERSATION\_MESSAGE\_ADDED
```json
{
"event": "com.iadvize.desk.CONVERSATION_MESSAGE_ADDED",
"conversationId": "c1750366-9483-4372-a57d-844da14071c6",
"messageId": "93d86726-aaf7-4962-877e-104c577d86ae",
"projectId": 1234,
"conversationParticipantType": "Professional"
}
```
# Web & Mobile SDK
# Javascript Web SDK
Overview
The Javascript Web SDK is a way to interact with the iAdvize solution from the client side.
## Safely accessing the iAdvize object
If the iAdvize tag was installed using the recommended script (see ), a global `window.iAdvizeInterface` should be available. You can safely push functions inside `window.iAdvizeInterface` : they are guaranteed to be executed once the iAdvize tag is fully loaded.
```javascript
window.iAdvizeInterface = window.iAdvizeInterface || [];
window.iAdvizeInterface.push(function(iAdvize) {
// Ex : accessing the tag version
const tagVersion = iAdvize.get('tag:version');
});
```
# Reference
Changes the current screen and restart the tag, allowing a new targeting run
## iAdvize.help
* Lists all the available methods,
* Lists all the available properties on `get` and `set`,
* Lists all the available events on `on` and `off`.
## iAdvize.activate / iAdvize.logout
These methods are used for authentication. Please see the dedicated Help Center article :
## iAdvize.get
`iAdvize.get` takes a single property argument, and returns the associated value. Properties are keys that reference values that can change over time. These values can be accessed :
* directly, using `iAdvize.get` (ex: `iAdvize.get('visitor:cookiesConsent')`)
* when they change, using iAdvize.on (ex: `iAdvize.on('visitor:cookiesConsentChange', callback)`)
| Property | Description | Values |
| ---------------------------------- | ------------------------------------------------------------------------ | ------------------------------------------------------------------------------------------------------------------------------------------------------------------------------------------------------------------------------------------------------------------------------------------------------------------------------------------------------------------------------------------------------------------------------------------------------------------------ |
| chatbox:status | The status of the chatbox | `OPENED`, `REDUCED`, `CLOSED` (default) |
| conversation:id | The id of the conversation | `string`, `null` (default) |
| tag:version | The tag version | `"LIGHT"`, `"FULL"` |
| visitor:cookiesConsent | Whether the visitor consented to cookies or not | `true`, `false`, `null` (default) |
| visitor:GDPRConsent | Whether the visitor consented to GDPR or not | `true`, `false`, `null` (default) |
| visitor:sourceId | The ID of the visitor | `string`, `null` (default) |
| customData | The current custom data object | `object` |
| engagementRules:triggered | Get all the triggered rules id on the page |
string\[]
Array of ids of engagement rules
|
| engagementNotifications:displayed | Get all the displayed notifications on the page |
|
| incrementTestVisitorGroup | The visitor's group assignment in an A/B increment test | `"EXPOSED"`, `"CONTROL"`, `null` (default) |
#### Example :
```javascript
window.iAdvizeInterface = window.iAdvizeInterface || [];
window.iAdvizeInterface.push(function (iAdvize) {
const visitorCookiesConsent = iAdvize.get('visitor:cookiesConsent');
});
```
## iAdvize.set
Set editable properties.
| Property | Description | Values |
| ------------------------- | --------------------------------------------------------------------------------------------------------------------------------------------------------------------------------------------------------------------------------------------------------------------------------------------------------------------------------------------------------------------------------------------------------------------------------------------------------------------------------------- | -------------------------------- |
| visitor:cookiesConsent | Whether the visitor consented to cookies or not. Optionally accepts a third argument (`ttl` in seconds) when called as `iAdvize.set('visitor:cookiesConsent', hasConsented, ttl)` to customise how long the consent and the generated VUID cookie stay valid (defaults to 31536000 seconds / 365 days when omitted). | `true`, `false` |
| visitor:GDPRConsent | Whether the visitor consented to GDPR or not | `true`, `false` |
| customData | Shallow‑merge the provided key/value pairs into the custom data store (accessible via `iAdvize.get('customData')`) to enrich targeting, notifications, and conversation payloads. Updates are debounced (\~500 ms) and re‑evaluate engagement rules that depend on custom data; related experiences that rely on these values may refresh accordingly. | `object` |
| incrementTestVisitorGroup | Assigns the visitor to a group in an A/B increment test. When set to `"CONTROL"`, notifications are created but hidden from the visitor to measure the impact of showing vs not showing them. When set to `"EXPOSED"`, notifications are displayed normally. Set to `null` to disable the test. Accepts an optional third argument — an array of notification template types — to restrict hiding to specific notification types only. When omitted, all notification types are hidden. | `"EXPOSED"`, `"CONTROL"`, `null` |
#### Example :
```javascript
window.iAdvizeInterface = window.iAdvizeInterface || [];
window.iAdvizeInterface.push(function (iAdvize) {
iAdvize.set('visitor:GDPRConsent', true);
// CMP scenario: store consent for 6 months and align the VUID cookie duration
iAdvize.set('visitor:cookiesConsent', true, 60 * 60 * 24 * 30 * 6);
});
```
#### Increment test usage examples
```javascript
window.iAdvizeInterface = window.iAdvizeInterface || [];
window.iAdvizeInterface.push(function (iAdvize) {
// Hide all notification types (default behaviour)
iAdvize.set('incrementTestVisitorGroup', 'CONTROL');
// Hide only custom buttons (FIXED)
iAdvize.set('incrementTestVisitorGroup', 'CONTROL', ['FIXED']);
// Hide only invitation notifications
iAdvize.set('incrementTestVisitorGroup', 'CONTROL', ['INVITATION']);
// Hide both embedded conversation starters and floating conversation starters
iAdvize.set('incrementTestVisitorGroup', 'CONTROL', [
'EMBEDDED_CONVERSATION_STARTER',
'FLOATING_CONVERSATION_STARTER',
]);
// Restore all notifications to normal display
iAdvize.set('incrementTestVisitorGroup', 'EXPOSED');
// Disable the increment test
iAdvize.set('incrementTestVisitorGroup', null);
});
```
Available notification template types for the third argument: `"FIXED"`, `"INVITATION"`, `"CLASSIC"`, `"MESSAGING"`, `"BADGE"`, `"MINI_BADGE"`, `"EMBEDDED_CONVERSATION_STARTER"`, `"FLOATING_CONVERSATION_STARTER"`, `"PRODUCT_LISTING_PAGE_CONVERSATION_STARTER"`, `"BOTTOM_BAR"`.
#### Custom data usage examples
Custom data allows you to send real‑time context to iAdvize based on the visitor’s navigation on your website. For example, you can send the product IDs being viewed so that iAdvize can adapt the content of Conversation Starter notifications, and so that the AI Shopping Assistant understands the visitor’s browsing context.
You can also pass other contextual information, such as page type, product categories, or details about the visitor’s identity (when logged in), to personalize the AI Shopping Assistant’s responses (advanced configuration may be required).
There are many other uses for custom data, such as engaging visitors based on these values, or transmitting contextual information about visitors and their conversations to the human agent who will handle them from the Desk.
```javascript
window.iAdvizeInterface = window.iAdvizeInterface || [];
window.iAdvizeInterface.push(function (iAdvize) {
// Update or add keys. This performs a shallow merge into the custom data store
iAdvize.set('customData', { productId: 'SKU-123' });
});
```
* Updating `customData` reruns engagement rules that depend on custom data and can refresh surfaces that leverage these values (for example, certain notifications or knowledge suggestions).
* The merge is shallow (top-level keys only) .
* Custom data is included when creating a conversation and can be used by multiple features (e.g., targeting, notifications, reporting).
* Reading: prefer `iAdvize.get('customData')` over direct access to the underlying store.
* Listening: `iAdvize.on('customData', (next, prev) => { /* ... */ })` provides the next and previous values.
* Supported types for targeting and visitor context: `string`, `number`, `boolean`, and `string[]` (arrays are serialized as CSV). Nested objects/arrays are not deeply merged (they are replaced) and are ignored for targeting.
{% hint style="info" %}
For more information on the use of custom data and its implementation, please read the following articles:
* [Integrate the Custom Data tag manually](https://help.iadvize.com/hc/en-gb/articles/29565124093202)
* [Create and use the Custom data](https://help.iadvize.com/hc/en-gb/articles/203401593)
{% endhint %}
## iAdvize.on
Listen to a property change.
`iAdvize.on` takes two arguments :
* The name of an event,
* A callback that takes the associated event value and the previous value as parameter.
Property
Description
Values
chatbox:statusChange
The status of the chatbox
OPENED, REDUCED, CLOSED (default)
conversation:idChange
The id of the conversation
string, null (default)
tag:versionChange
The tag version
"LIGHT", "FULL"
visitor:cookiesConsentChange
Whether the visitor consented to cookies or not
true, false, null (default)
visitor:GDPRConsentChange
Whether the visitor consented to GDPR or not
true, false, null (default)
visitor:sourceIdChange
The ID of the visitor
string, null (default)
customData
Fired when the custom data object is updated
object (listener receives next and previous values)
type: "BADGE", "CLASSIC", "MESSAGING", "INVITATION", "MINI_BADGE", "CUSTOM_BUTTON", "EMBEDDED_CONVERSATION_STARTER" id (notification id): string ruleId: string channel: "CHAT", "CALL", "VIDEO", "MESSENGER", "SMS", "WHATSAPP" text: string This field is populated only for EMBEDDED_CONVERSATION_STARTER notifications (except for the "last button"); otherwise, the value is null.
engagementNotification:controlled
Triggered when the notification is not authorized in the increment test
Triggered when the visitor's A/B test group assignment changes
"EXPOSED", "CONTROL", null (default)
#### Example :
```javascript
window.iAdvizeInterface = window.iAdvizeInterface || [];
window.iAdvizeInterface.push(function (iAdvize) {
iAdvize.on('visitor:cookiesConsentChange', function (visitorCookiesConsent, previousValue) {
// The new value
console.log(visitorCookiesConsent);
// The previous Value
console.log(previousValue);
});
});
```
## iAdvize.off
Remove the event listener.
`iAdvize.off` takes two arguments :
* The name of an event,
* A callback that takes the associated event value and the previous value as parameter.
#### Example :
```javascript
window.iAdvizeInterface = window.iAdvizeInterface || [];
window.iAdvizeInterface.push(function (iAdvize) {
const callback = (visitorCookiesConsent, previousValue) => console.log(visitorCookiesConsent, previousValue);
// Listen the changes
iAdvize.on('visitor:cookiesConsentChange', callback);
// Remove the listener
iAdvize.off('visitor:cookiesConsentChange', callback);
});
```
## iAdvize.recordTransaction
Allows to record transactions. See the dedicated article on the Help Center:
#### Example :
```javascript
window.iAdvizeInterface = window.iAdvizeInterface || [];
window.iAdvizeInterface.push(function (iAdvize) {
iAdvize.recordTransaction({
id: 'unique-id',
amount: 49.95,
});
});
```
## iAdvize.navigate
Argument
Type
Description
path
String
Path/URL you wish to tell iAdvize where the visitor is "virtually" browsing
If part of your web site is built using SPA technology that does not update your browser's history (=your site's url does not change, even though the page displayed to the visitor does), you can simulate a page change using the `iAdvize.navigate("YOUR_PATH")` method.
This will restart iAdvize's targeting engine to take into account the new URL/path value you enter as parameter.
# Guides
## "idzCustomData" is deprecated
You want to update your implementation, or you've noticed a warning in your browser console indicating that your iAdvize "Custom Data" implementation is outdated?
Don't worry, simply follow this guide, which will walk you through, step by step, how to adapt your implementation with practical examples.
{% hint style="warning" %}
## For Google Tag Manager users
If you see a deprecation message in your console related to Custom Data and you're using **Google Tag Manager** to deploy iAdvize on your website, you don't need to follow this guide.\
Simply make sure you're using the latest versions of the **iAdvize tags** available in the **Community Gallery**:
{% endhint %}
### Before (old implementation)
* You had to create a `idzCustomData` object within the global window object.
* When you wanted to add data, you had to make sure to update your existing object rather than overwrite it.
* You were required to set your Custom Data **BEFORE** the main iAdvize tag was loaded, which could be restrictive in some situations or cause race condition issues.
* If you wanted to update a custom data value or add a new one **AFTER** the iAdvize tag had loaded, you were stuck...
#### Example
```html
```
### Now (current implementation)
* You no longer need to worry about the loading order of your custom data relative to the main tag.
* You can safely update or add to your custom data without risking overwriting previously stored information.
#### Example
```html
```
If you need to add another Custom Data, you can simply call the method again:
```html
```
You can [read the documentation](/technologies/web-and-mobile-sdk/javascript-web-sdk/reference#custom-data-usage-examples) to learn more about Custom Data.
# Mobile SDK
Overview
This guide is designed to assist you in seamlessly integrating the iAdvize Mobile SDK into your mobile app.
### ⚛️ Finding the SDK for your mobile platform
{% tabs %}
{% tab title="Android" %}
{% content-ref url="/pages/tguKp5RGQgPGv5hpSRzd" %}
[Support Policy](/technologies/web-and-mobile-sdk/mobile-sdk/support-policy)
{% endcontent-ref %}
{% content-ref url="/pages/ytyKWWQnHJn1osFyCrXz" %}
[Frequently Asked Questions](/technologies/web-and-mobile-sdk/mobile-sdk/frequently-asked-questions)
{% endcontent-ref %}
# Herbillette (latest)
{% hint style="info" icon="star" %}
### What's new?
This major new version includes a completely new chat interface, offering a cleaner, more intuitive interface to your visitors. Consequently, the APIs of `ChatboxConfiguration` have evolved.
This version also removes support for video conversations, thereby eliminating the dependency on the Twilio Video library, which reduces the size of the SDK included in your app.
{% endhint %}
## ⚙️ Prerequisites
There are a few steps required before you start integrating the iAdvize Mobile SDK.
## 💬 Setting up your iAdvize environment
Before integrating the Mobile SDK, you need to check that your iAdvize environment is ready to use (i.e. you have an account ready to receive and answer to conversations from the Mobile SDK). You will also need some information related to the project for the Mobile SDK setup. Please ask your iAdvize administrator to follow the instructions available on the Mobile [SDK Knowledge Base](https://help.iadvize.com/hc/en-gb/articles/360019839480) and to provide you with the **Project Identifier** as well as a **Targeting Rule Identifier**.
{% hint style="warning" %}
*Your iAdvize administrator should already have configured the project on the* [*iAdvize Administration Desk*](https://ha.iadvize.com/admin/login/) *and created an operator account for you. If it is not yet the case please contact your iAdvize Technical Project Manager.*
{% endhint %}
## **🎯 Understanding Mobile SDK: triggers & targeting**
#### Key differences: Mobile SDK vs Web
**Web:**
* iAdvize automatically detects visitor behavior
* Targeting rules include criteria (URL patterns, visitor segments, timing conditions)
* Triggers fire automatically based on Admin configuration
**Mobile SDK:**
* **YOU implement ALL trigger detection logic** in your app code
* Targeting rules are routing identifiers ONLY (no criteria, no automatic triggering)
* The Mobile SDK provides the conversation infrastructure, not behavior detection
#### What the Mobile SDK provides vs what you should implement
✅ **Mobile** **SDK provides:**
* `activateTargetingRule(uuid)` - Shows chat button if operator/bot available
* `deactivateTargetingRule()` - Hides chat button
* Automatic 30-second availability checks
* Conversation interface and message handling
❌ **You must implement:**
* Detecting user behavior (idle time, scroll events, button taps, navigation)
* Implementing business rules (show after 10s on product page, hide on checkout, etc.)
* Frequency control (max 1x per session, cooldown periods)
* Session tracking and visitor preferences
* Deciding WHEN to call `activateTargetingRule()`
#### Example architecture
1. YOUR APP detects: "User idle 8 seconds on homepage"
2. YOUR APP decides: "Show chat button" (checks frequency cap, user preferences)
3. YOUR APP calls: `activateTargetingRule("homepage-uuid")`
4. Mobile SDK checks: Operator/bot available?
5. Mobile SDK shows: Chat button (if available)
## 💻 Connecting to your iAdvize Operator Desk
Using your operator account please log into the [iAdvize Desk](https://ha.iadvize.com/admin/login/).
{% hint style="warning" %}
*If you have the Administrator status in addition to your operator account, you will be directed to the Admin Desk when logging in. Just click on the `Chat` button in the upper right corner to open the Operator Desk.*
{% endhint %}
The iAdvize operator desk is the place where the conversations that are assigned to your account will pop up. Please ensure that your status is “Available" by enabling the corresponding chat or video toggle buttons in the upper right corner:
The chat button is green, your operator can receive incoming conversations.
If the toggle button is yellow, it means you have reached your maximum simultaneous chat slots, please end your current conversations to free a chat slot and allow the conversations to be assigned to you. If the toggle is red you are not available to chat.
## 🔐 Ensuring the Mobile SDK integrity
Before downloading the iAdvize Mobile SDK artifacts you can verify their integrity by generating their checksums and comparing them with the reference checksums available.
{% tabs %}
{% tab title="Android" %}
Reference checksums are available in the [GitHub release note](https://github.com/iadvize/iadvize-android-sdk/releases/latest)
The iAdvize Android SDK consists of an archive (`aar` file) and a Maven project description (`pom` file), you can generate their checksums using the following commands (replace `x.y.z` by the SDK version you are checking):
```bash
curl -sL https://github.com/iadvize/iadvize-android-sdk/raw/master/com/iadvize/iadvize-sdk/x.y.z/iadvize-sdk-x.y.z.aar | openssl sha256
curl -sL https://github.com/iadvize/iadvize-android-sdk/raw/master/com/iadvize/iadvize-sdk/x.y.z/iadvize-sdk-x.y.z.pom | openssl sha256
```
This ensures that the online packages are valid. In order to check those checksums on the fly, this process can be automated via Gradle by adding a metadata verification xml file at `$PROJECT_ROOT/gradle/verification-metadata.xml`:
```xml
truefalse
```
With this file present in your project structure, Gradle will automatically check the artifacts checksums before integrating them into your app. Please note that you will have to do this for **all dependencies** used in your project. To help you with that, `verification-metadata.xml` for the Mobile SDK sub-dependencies is delivered alongside the Mobile SDK. Those subdependencies checksums have been generated through the Gradle generation feature and not verified.
{% endtab %}
{% tab title="iOS" %}
Reference checksums are available in the [GitHub release note](https://github.com/iadvize/iadvize-ios-sdk/releases/latest)
**Swift Package Manager integration**
The iOS SDK only consists of an archive (`zip` file). You can generate its checksums using the following command (replace `x.y.z` by the SDK version you are checking):
```bash
curl -sL https://github.com/iadvize/iadvize-ios-sdk/releases/download/x.y.z/IAdvizeSDK.zip | openssl sha3-256
```
SPM will also automatically verify that the checksum of the artifact it downloads correspond to the one described in the `Package.swift` available in the public repository (it's a SHA2-256 checksum).
**CocoaPods integration**
The iAdvize iOS SDK consists of an archive (`zip` file) and a Cocoapods project description file (`podspec` file). You can generate their checksums using the following commands (replace `x.y.z` by the SDK version you are checking):
```bash
curl -sL https://github.com/iadvize/iadvize-ios-sdk/releases/download/x.y.z/IAdvizeSDK.zip | openssl sha3-256
curl -sL https://raw.githubusercontent.com/CocoaPods/Specs/master/Specs/d/0/0/iAdvize/x.y.z/iAdvize.podspec.json | openssl sha3-256
```
After downloading the SDK through CocoaPods, additional verifications can be made, first by comparing the podspec checksum at the end of the generated `Podfile.lock` with the SHA1 podspec reference checksum.
```
SPEC CHECKSUMS:
iAdvize: podspec-sha1-checksum
```
The downloaded framework integrity can also be checked by generating the local pod files checksums and comparing them with the online reference ones:
```bash
cd Pods/iAdvize
find IAdvizeConversationSDK.xcframework -type f -exec openssl sha3-256 {} \; >> IAdvizeSDK-local.checksums
```
{% endtab %}
{% tab title="React Native" %}
Our React Native SDK plugin is hosted on an external platform called [Node Package Manager (NPM)](https://www.npmjs.com/) that already has internal checksum validation strategies in order to ensure that the downloaded plugin code (the wrapper code) is untampered.
{% endtab %}
{% tab title="Flutter" %}
Our Flutter SDK plugin is hosted on an external platform called [pub.dev](https://pub.dev/), that already has internal checksum validation strategies in order to ensure that the downloaded plugin code (the wrapper code) is untampered.
{% endtab %}
{% endtabs %}
## ⚙️ Setting up the Mobile SDK
### **1️⃣ Setting up the Mobile SDK into your project configuration**
First of all, to be able to use the Mobile SDK you need to add the Mobile SDK dependency into your project. Some configuration steps will also be needed in order to use it.
{% tabs %}
{% tab title="Android" %}
Add the iAdvize repository to your project repositories inside your top-level Gradle build file:
```gradle
// Project-level build.gradle.kts
allprojects {
repositories {
maven(url = uri("https://raw.githubusercontent.com/iadvize/iadvize-android-sdk/master"))
maven(url = uri("https://jitpack.io"))
}
}
```
Add the iAdvize Mobile SDK dependency inside your module-level Gradle build file (replace `x.y.z` by the latest SDK version available):
```gradle
// Module-level build.gradle.kts
configurations {
all {
exclude(group = "xpp3", module = "xpp3")
}
}
dependencies {
implementation("com.iadvize:iadvize-sdk:x.y.z")
}
```
{% hint style="info" %}
*The `exclude` configuration is required because the iAdvize Mobile SDK uses* [*Smack*](https://github.com/igniterealtime/Smack)*, an XMPP library that is built upon `xpp3`, which is bundled by default in the Android framework. This exclude ensures that your app does not also bundle `xpp3` to avoid classes duplication errors.*
{% endhint %}
If you have build problems this may come from compatibility issues with the Android configuration, here are the versions used by the iAdvize Mobile SDK:
| Target SDK | `36` |
| --------------------- | -------- |
| Compile SDK | `36` |
| Minimum SDK | `24` |
| Build Tools | `36.0.0` |
| Kotlin | `2.2.21` |
| Gradle | `8.13` |
| Android Gradle Plugin | `8.13.2` |
After syncing your project you should be able to import the iAdvize dependency in your application code with `import com.iadvize.conversation.sdk.IAdvizeSDK`
You will then need to provide a reference to your application object and initialize the SDK with it.
In your `AndroidManifest.xml` declare your application class:
```xml
```
This class should then initialize the SDK:
```kotlin
package my.app.package.App
class App : Application() {
override fun onCreate() {
super.onCreate()
IAdvizeSDK.initiate(this)
}
}
```
⌨️ **In-context example:**
* [Project-level Gradle file](https://github.com/iadvize/iadvize-android-sdk/blob/master/example/build.gradle.kts)
* [Module-level Gradle file](https://github.com/iadvize/iadvize-android-sdk/blob/master/example/mobile/build.gradle.kts)
* [Import](https://github.com/iadvize/iadvize-android-sdk/blob/master/example/mobile/src/main/java/com/iadvize/conversation/sdk/demo/feature/App.kt#L5)
* [SDK Initiation](https://github.com/iadvize/iadvize-android-sdk/blob/master/example/mobile/src/main/java/com/iadvize/conversation/sdk/demo/feature/App.kt#L15)
{% endtab %}
{% tab title="iOS" %}
{% tabs %}
{% tab title="SPM" %}
From Xcode go to `File > Add Packages`, then paste the iAdvize Messenger SDK URL in the top-right search bar. Select the versioning strategy fitting your app then click on `Add Package`.
You should then be able to import the iAdvize dependency in your application code using `import IAdvizeConversationSDK`
⌨️ **In-context example:** [Import](https://github.com/iadvize/iadvize-ios-sdk/blob/master/example/SPMIntegration/SPMIntegration/Source/AppDelegate%2BiAdvize.swift#L10)
{% endtab %}
{% tab title="CocoaPods" %}
Add this line to your `Podfile`, inside the `target` section (replace `x.y.z` by the latest SDK version available, and choose the versioning strategy fitting your app):
```ruby
platform :ios, '15.0'
target 'YOUR_TARGET' do
project 'YOUR_PROJECT'
pod 'iAdvize', 'x.y.z'
end
```
{% hint style="warning" %}
*iAdvize Messenger SDK requires a **minimum iOS platform** of 15.0**.***
{% endhint %}
After running `pod install` you should be able to import the iAdvize dependency in your application code with `import IAdvizeConversationSDK`
⌨️ **In-context example:**
* [Podfile](https://github.com/iadvize/iadvize-ios-sdk/blob/master/example/CocoaPodsIntegration/Podfile#L1)
* [Import](https://github.com/iadvize/iadvize-ios-sdk/blob/master/example/CocoaPodsIntegration/CocoaPodsIntegration/Source/AppDelegate%2BiAdvize.swift#L10)
{% endtab %}
{% endtabs %}
{% endtab %}
{% tab title="React Native" %}
Download the library from `NPM` using the following command:
```bash
npm install @iadvize-oss/iadvize-react-native-sdk
```
Alternatively, you can use `Yarn`:
```bash
yarn add @iadvize-oss/iadvize-react-native-sdk
```
The SDK API is then available via the following import:
```javascript
import IAdvizeSDK from '@iadvize-oss/iadvize-react-native-sdk';
```
{% tabs %}
{% tab title="Android setup" %}
In your `android/build.gradle` file, and add the iAdvize SDK repository. You also need to ensure that you are using the right Android framework to build (iAdvize Mobile SDK is built with Android target 36):
```gradle
// android/build.gradle
buildscript {
ext {
buildToolsVersion = "36.0.0"
minSdkVersion = 24
compileSdkVersion = 36
targetSdkVersion = 36
kotlinVersion = "2.2.21"
gradleVersion = "8.13.2"
ndkVersion = "29.0.14206865"
}
}
allprojects {
repositories {
maven { url "https://raw.githubusercontent.com/iadvize/iadvize-android-sdk/master" }
maven { url "https://jitpack.io" }
}
}
```
{% hint style="warning" %}
*iAdvize Mobile SDK requires a **minSdkVersion** >= 24.*
{% endhint %}
On Android, the iAdvize Mobile SDK needs to be initialized before use to allow several functionalities to work. For instance, the default floating button use an ActivityLifecycleController that must be started before the main ReactNative activity is created, otherwise the controller won't be able to trigger the button display. Thus you need to add those lines in the `android/app/src/main/java/yourpackage/MainApplication.java` to initialize the SDK properly:
```java
// android/app/src/main/java/yourpackage/MainApplication.java
import com.iadvize.conversation.sdk.IAdvizeSDK;
public class MainApplication extends Application implements ReactApplication {
@Override
public void onCreate() {
super.onCreate();
IAdvizeSDK.initiate(this);
}
}
```
{% endtab %}
{% tab title="iOS setup" %}
Add this line to your `Podfile`, inside the `target` section (replace `x.y.z` by the latest SDK version available, and choose the versioning strategy fitting your app):
```ruby
target 'YOUR_TARGET' do
project 'YOUR_PROJECT'
pod 'iAdvize', 'x.y.z'
end
```
{% hint style="warning" %}
*iAdvize Mobile SDK requires a **minimum iOS platform** of 13.4*
{% endhint %}
Add the Camera Permission explanation into your `Info.plist` file:
```xml
...
NSCameraUsageDescriptionThis app requires access to the camera to take a picture.
```
Once this is done, make sure to go to `ios` folder and install CocoaPods dependencies:
```bash
cd ios && pod install --repo-update
```
{% endtab %}
{% endtabs %}
{% endtab %}
{% tab title="React Native + Expo" %}
Download the SDK as well as the `expo-build-properties` library from `NPM` using the following command:
```bash
npx expo install expo-build-properties
npx expo install @iadvize-oss/iadvize-react-native-sdk
```
Configure the build properties using `expo-build-properties` in the `app.json` file:
```json
{
"expo": {
...
"ios": {
...
"infoPlist": {
"NSCameraUsageDescription": "This application will use the camera to share photos.",
}
},
"plugins": [
...
[
"expo-build-properties",
{
"android": {
"compileSdkVersion": 36,
"targetSdkVersion": 36,
"buildToolsVersion": "36.0.0",
"minSdkVersion": 24
},
"ios": {
"deploymentTarget": "15.1"
}
}
],
"./iadvize.config.js"
],
...
}
}
```
For that step you will need to download the [iAdvize Mobile SDK Expo Plugin configuration file](https://github.com/iadvize/iadvize-react-native-sdk/tree/main/expo-integration) and save it alongside the `app.json` file of your project.
Be sure to double check the version used in you properties:
```
buildToolsVersion = "36.0.0"
minSdkVersion = 24
compileSdkVersion = 36
targetSdkVersion = 36
kotlinVersion = "2.2.21"
gradleVersion = "8.13.2"
ndkVersion = "29.0.14206865"
```
Afterwards you can generate the native code using the traditional Expo command:
```bash
npx expo prebuild --clean
```
{% endtab %}
{% tab title="Flutter" %}
Download the library from `pub.dev` using the following command:
```bash
flutter pub add iadvize_flutter_sdk
```
The SDK API is then available via the following import:
```dart
import 'package:iadvize_flutter_sdk/iadvize_sdk.dart';
```
{% tabs %}
{% tab title="Android setup" %}
In your `android/build.gradle` file, and add the iAdvize SDK repository:
```gradle
// android/build.gradle
allprojects {
repositories {
maven { url "https://raw.githubusercontent.com/iadvize/iadvize-android-sdk/master" }
maven { url "https://jitpack.io" }
}
}
```
You also need to ensure that you are using the right Android framework to build (iAdvize Messenger SDK is built with Android target 35), as a good practice, also check that you are using the latest Kotlin version in `android/build.gradle` (you can find the version used in the plugin through its README file)
```gradle
// android/build.gradle
allprojects {
ext {
buildToolsVersion = "36.0.0"
minSdkVersion = 24
compileSdkVersion = 36
targetSdkVersion = 36
kotlinVersion = "2.2.21"
gradleVersion = "8.13.2"
ndkVersion = "29.0.14206865"
}
}
```
{% hint style="warning" %}
*iAdvize Mobile SDK requires a **minSdkVersion** >= 24.*
{% endhint %}
{% endtab %}
{% tab title="iOS setup" %}
Add this line to your `Podfile`, inside the `target` section (replace `x.y.z` by the latest SDK version available, and choose the versioning strategy fitting your app):
```ruby
platform :ios, '15.0'
target 'YOUR_TARGET' do
project 'YOUR_PROJECT'
pod 'iAdvize', 'x.y.z'
end
```
{% hint style="warning" %}
*iAdvize Messenger SDK requires a **minimum iOS platform** of 15.0.*
{% endhint %}
Once this is done, make sure to go to `ios` folder and install CocoaPods dependencies:
```bash
cd ios && pod install --repo-update
```
{% endtab %}
{% endtabs %}
{% endtab %}
{% endtabs %}
### **2️⃣ Activating the Mobile SDK**
Now that the Mobile SDK is available into your project build, let's integrate it into your app, first by activating it. Activation is the step that logs a visitor into the iAdvize flow.
You can choose between multiple authentication options:
Anonymous
For an unidentified visitor browsing your app.
Simple
For a logged in visitor in your app. You must pass a unique string identifier so that the visitor will retrieve his conversation history across multiple devices and platforms.
The identifier that you pass must be unique and non-discoverable for each different logged-in visitor.
Secured
Use it in conjunction with your in-house authentication system. You must pass a JWE provider callback that will be called when an authentication is required, you will then have to call your third party authentication system for a valid JWE to provide to the Mobile SDK.
For a full understanding of how the secured authentication works in the iAdvize platform you can refer to thissection.
To activate the Mobile SDK you must use the `activate` function with your `projectId` (see the [Prerequisites](#prerequisites) section above to get that identifier). You have access to callbacks in order to know if the SDK has been successfully activated. In case of a Mobile SDK activation failure the callback will give you the reason of the failure and you may want to retry later.
{% tabs %}
{% tab title="Android" %}
```kotlin
IAdvizeSDK.activate(
projectId = projectId,
authenticationOption = authOption,
gdprOption = gdprOption,
callback = object : IAdvizeSDK.Callback {
override fun onSuccess() {
Log.d("iAdvize SDK", "The SDK has been activated.")
}
override fun onFailure(error: IAdvizeSDK.Error) {
Log.e("iAdvize SDK", "The SDK activation failed with:", error)
}
}
)
```
⌨️ **In-context example:** [SDK Activation](https://github.com/iadvize/iadvize-android-sdk/blob/master/example/mobile/src/main/java/com/iadvize/conversation/sdk/demo/feature/App.kt#L32)
{% endtab %}
{% tab title="iOS" %}
```swift
IAdvizeSDK.shared.activate(projectId: projectId,
authenticationOption: authOption,
gdprOption: gdprOption)) { success in
if success {
...
}
}
```
⌨️ **In-context example:** [SDK Activation](https://github.com/iadvize/iadvize-ios-sdk/blob/master/example/SPMIntegration/SPMIntegration/Source/AppDelegate%2BiAdvize.swift#L61)
{% endtab %}
{% tab title="React Native" %}
```javascript
try {
// Anonymous Auth => Do not set the onJWERequested listener & set an empty userId
await IAdvizeSDK.activate(projectId, '', ...);
// Simple Auth => Do not set the onJWERequested listener & set a non-empty userId
await IAdvizeSDK.activate(projectId, "my-user-unique-id", ...);
// Secured Auth => Set the onJWERequested listener
IAdvizeSDKListeners.onJWERequested(function (eventData: any) {
console.log('onJWERequested' + ' ' + eventData);
// Fetch JWE from your 3rd-party auth system
// In SDK v3, you must return the value here (synchronously)
var jwe = ... ;
return jwe;
// In SDK v4, you should the value using an asynchronous API call (here or elsewhere)
IAdvizeSDK.provideJWE(jwe);
});
await IAdvizeSDK.activate(projectId, '', ...);
// SDK is activated
} catch (e) {
// SDK failed to activate
}
```
{% endtab %}
{% tab title="Flutter" %}
```dart
IAdvizeSdk.activate(
projectId: 'projectId',
authenticationOption: authOption
gdprOption: gdprOption,
).then((bool activated) => activated
? log('iAdvize Example : SDK activated')
: log('iAdvize Example : SDK not activated'));
```
{% endtab %}
{% endtabs %}
Once the iAdvize Mobile SDK is successfully activated, you should see a success message in the console:
```
✅ iAdvize conversation activated, the version is x.y.z
```
### **3️⃣ Logging the visitor out**
You will have to explicitly call the `logout` function of the iAdvize Mobile SDK when the visitor sign out of your app.
{% tabs %}
{% tab title="Android" %}
```kotlin
IAdvizeSDK.logout()
```
{% endtab %}
{% tab title="iOS" %}
```swift
IAdvizeSDK.shared.logout()
```
{% endtab %}
{% tab title="React Native" %}
```javascript
IAdvizeSDK.logout()
```
{% endtab %}
{% tab title="Flutter" %}
```dart
IAdvizeSdk.logout();
```
{% endtab %}
{% endtabs %}
### **4️⃣ Displaying logs**
To have more information on what’s happening on the Mobile SDK side you can change the log level.
{% tabs %}
{% tab title="Android" %}
{% endtab %}
{% tab title="iOS" %}
```swift
// verbose, info, warning, error, success, none
// Default is warning
IAdvizeSDK.shared.logLevel = .verbose
```
{% endtab %}
{% tab title="React Native" %}
```javascript
// VERBOSE, INFO, WARNING, ERROR, SUCCESS, NONE
// Default is WARNING
IAdvizeSDK.setLogLevel(LogLevel.VERBOSE);
```
{% endtab %}
{% tab title="Flutter" %}
```dart
// verbose, info, warning, error, success, none
// Default is warning
IAdvizeSdk.setLogLevel(LogLevel.verbose);
```
{% endtab %}
{% endtabs %}
You can get a description of the Mobile SDK status at any time by using the `debugInfo` API:
{% tabs %}
{% tab title="Android" %}
IAdvizeSDK.debugInfo()
{% endtab %}
{% tab title="iOS" %}
```swift
IAdvizeSDK.shared.debugInfo()
```
{% endtab %}
{% tab title="React Native" %}
```javascript
const debugInfo = IAdvizeSDK.debugInfo();
```
{% endtab %}
{% tab title="Flutter" %}
```dart
final debugInfo = await IAdvizeSdk.debugInfo();
```
{% endtab %}
{% endtabs %}
This will generate a JSON object with the Mobile SDK status information, encoded into a string that you can easily add into your bug reporting tool payload:
## 💬 Starting a conversation
To be able to start a conversation you will first have to **trigger a targeting rule** in order for the default chat button to be displayed. The chatbox will then be accessible by clicking on that chat button.
### **1️⃣ Configuring the targeting language**
The targeting rule configured in the iAdvize Administration Panel is setup for a given language. This means that if, for example, you setup a targeting rule to be triggered only for `EN` language and the current visitor’s device is setup with a different targeting language (for instance `FR`), the targeting rule will not trigger.
By default, the targeting rule language used is the visitor’s device current language. You can force the targeting language to a specific value using:
{% tabs %}
{% tab title="Android" %}
```kotlin
IAdvizeSDK.targetingController.language = LanguageOption.Custom(Language.FR)
```
{% endtab %}
{% tab title="iOS" %}
```swift
IAdvizeSDK.shared.targetingController.language = .custom(value: .fr)
```
{% endtab %}
{% tab title="React Native" %}
```javascript
IAdvizeSDK.setLanguage('fr');
```
{% hint style="warning" %}
*The language string should respect* [*ISO 639-1*](https://en.wikipedia.org/wiki/ISO_639-1)*.*
{% endhint %}
{% endtab %}
{% tab title="Flutter" %}
```dart
IAdvizeSdk.setLanguage('fr');
```
{% hint style="warning" %}
*The language string should respect* [*ISO 639-1*](https://en.wikipedia.org/wiki/ISO_639-1)*.*
{% endhint %}
{% endtab %}
{% endtabs %}
{% hint style="warning" %}
*This `language` property is **NOT** intended to change the language displayed in the SDK. It is solely used for the targeting process purpose.*
{% endhint %}
### **2️⃣ Activating a targeting rule**
#### What is a targeting rule in Mobile SDK?
Unlike web targeting rules (which include criteria and automatic triggering), Mobile SDK targeting rules are **routing identifiers only**:
❌ No behavioral criteria (URL patterns, dwell time, scroll depth)
❌ No automatic triggering based on visitor behavior
✅ Routes conversations to specific routing rules/teams/bots
✅ Checks operator/bot availability
**Your responsibility:**
* Detect user behavior in your app (navigation, idle time, button taps)
* Implement business logic for WHEN to activate rules
* Call `activateTargetingRule()` when YOUR conditions are met
**SDK responsibility:**
* Check if operator/bot is available for this targeting rule
* Show/hide chat button based on availability
* Update availability every 30 seconds
**Best practice:** Create one targeting rule per app context:
* Homepage → `activateTargetingRule("homepage-uuid")`
* Product page → `activateTargetingRule("pdp-uuid")`
* Cart → `activateTargetingRule("cart-uuid")`
Each rule can route to different teams/bots while you control the triggering logic.
See [Understanding Mobile SDK: triggers and targeting](#understanding-mobile-sdk-triggers-and-targeting) for architecture details.
#### **Calling activateTargetingRule**
Using a targeting rule UUID (see the [Prerequisites](#prerequisites) section above to get that identifier), you can engage a visitor by calling:
{% tabs %}
{% tab title="Android" %}
```kotlin
IAdvizeSDK.targetingController.activateTargetingRule(
TargetingRule(
targetingRuleUUID
)
)
```
⌨️ **In-context example:** [Targeting rule activation](https://github.com/iadvize/iadvize-android-sdk/blob/da8b4ae56db4eff6f8539279b511ed442064b4cb/example/mobile/src/main/java/com/iadvize/conversation/sdk/demo/feature/product/ProductDetailFragment.kt#L43)
{% endtab %}
{% tab title="iOS" %}
let targetingRule = TargetingRule(id: UUID)
IAdvizeSDK.shared.targetingController.activateTargetingRule(targetingRule: targetingRule)
⌨️ **In-context example:** [Targeting rule activation](https://github.com/iadvize/iadvize-ios-sdk/blob/d279e8a7f90c1f79f2e897a798dd30a626d68227/example/SPMIntegration/SPMIntegration/Source/AppDelegate%2BiAdvize.swift#L65)
{% endtab %}
{% tab title="React Native" %}
```javascript
IAdvizeSDK.activateTargetingRule(targetingRuleUUIDString);
```
{% endtab %}
{% tab title="Flutter" %}
```dart
IAdvizeSdk.activateTargetingRule(TargetingRule(uuid: 'targeting-rule-uuid'));
```
{% endtab %}
{% endtabs %}
If all the following conditions are met, the default chat button should appear:
* the targeting rule exists and is enabled in the administration panel
* the targeting rule language set in the Mobile SDK matches the language configured for this rule
* an operator/bot assigned to this rule is available to answer (connected and with a free chat slot)
{% hint style="info" %}
After you activate a rule, those conditions are automatically re-evaluated **every 30 seconds**. The chat button is updated accordingly.
If the update fails (e.g.: if there is no connection), you do not need to perform any special actions. The iAdvize Mobile SDK will try to update it again 30 seconds later.
{% endhint %}
### **3️⃣ Initiating the conversation**
Once the default chat button is displayed, the visitor tap on it to access the chatbox. After composing and sending a message a new conversation should pop up in the operator desk (or being handled by a bot).
 
### **4️⃣ Following visitor navigation**
While your visitor navigates through your app, you may want to update the active targeting rule in order to engage him/her with the best conversation partner at any time. To do so, simply activate the new rule. It will replace the previous one.
{% tabs %}
{% tab title="Android" %}
```kotlin
val newTargetingRule = TargetingRule(
newTargetingRuleUUID
)
IAdvizeSDK.targetingController.activateTargetingRule(newTargetingRule)
```
{% endtab %}
{% tab title="iOS" %}
```swift
let newTargetingRule = TargetingRule(id: UUID)
IAdvizeSDK.shared.targetingController.activateTargetingRule(targetingRule: newTargetingRule)
```
{% endtab %}
{% tab title="React Native" %}
```javascript
IAdvizeSDK.activateTargetingRule(newTargetingRuleUUID);
```
{% endtab %}
{% tab title="Flutter" %}
```dart
final TargetingRule newTargetingRule = TargetingRule(
uuid: 'targeting-rule-uuid'
);
IAdvizeSdk.activateTargetingRule(newTargetingRule);
```
{% endtab %}
{% endtabs %}
### **5️⃣ Deactivating a targeting rule**
When you do not want to engage the visitor anymore, simply deactivate the targeting rule.
{% tabs %}
{% tab title="Android" %}
```swift
IAdvizeSDK.targetingController.deactivateTargetingRule()
```
{% endtab %}
{% tab title="iOS" %}
```swift
IAdvizeSDK.shared.targetingController.deactivateTargetingRule()
```
{% endtab %}
{% tab title="React Native" %}
```javascript
IAdvizeSDK.deactivateTargetingRule();
```
{% endtab %}
{% tab title="Flutter" %}
```dart
IAdvizeSDK.deactivateTargetingRule();
```
{% endtab %}
{% endtabs %}
{% hint style="info" %}
The current targeting rule is automatically deactivated when you call the `logout()` method.
{% endhint %}
### 6️⃣ Frequency control & proactive messaging limitations
#### Reactive-only nature
The Mobile SDK is **reactive-only**:
* ✅ Visitor must tap the chat button to start a conversation
* ❌ Cannot push messages to trigger conversation start
* ✅ Push notifications work for ongoing conversations (operator/bot replies)
* ❌ Cannot proactively message visitors to initiate conversation
While workflows/AI Shopping Assistant can "proactively" greet and guide visitors WITHIN a conversation, the visitor must first open the chatbox.
#### Frequency capping
The Mobile SDK does NOT provide built-in frequency control.
**Track locally:**
* How many times `activateTargetingRule()` is called per session/day
* Cooldown periods (don't show for X hours after dismissal)
* Visitor preferences ("don't show again")
#### Analytics for optimization
While the SDK doesn't control frequency, iAdvize tracks metrics for analysis:
* `TARGETING_RULE_DISPLAY_NUMBER` - Button display count
* `TARGETING_RULE_TRIGGERED` - Conversation start count
Access via [GraphQL API - Pre-aggregated Indicators](/use-cases/data-and-analytics/retrieve-messages-exchanged-within-a-conversation-1/pre-aggregated-indicators) for historical analysis and optimization (not real-time control).
## 👋 Configuring GDPR and welcome message
### **1️⃣ Adding a welcome message**
As seen above, the chatbox is empty by default. You can configure a welcome message that will be displayed to the visitor when no conversation is ongoing.
{% tabs %}
{% tab title="Android" %}
```kotlin
val configuration = ChatboxConfiguration()
configuration.automaticMessage = "Any question? Say Hello to Brand and we will answer you as soon as possible! 😊"
IAdvizeSDK.chatboxController.setupChatbox(configuration)
```
⌨️ **In-context example:** [Welcome message](https://github.com/iadvize/iadvize-android-sdk/blob/da8b4ae56db4eff6f8539279b511ed442064b4cb/example/mobile/src/main/java/com/iadvize/conversation/sdk/demo/feature/IAdvizeSDKConfig.kt#L78)
{% endtab %}
{% tab title="iOS" %}
```swift
var configuration = ChatboxConfiguration()
configuration.automaticMessage = "Any question? Say Hello to Brand and we will answer you as soon as possible! 😊"
IAdvizeSDK.shared.chatboxController.setupChatbox(configuration: configuration)
```
⌨️ **In-context example:** [Welcome message](https://github.com/iadvize/iadvize-ios-sdk/blob/d279e8a7f90c1f79f2e897a798dd30a626d68227/example/SPMIntegration/SPMIntegration/Source/AppDelegate%2BiAdvize.swift#L42C1-L42C1)
{% endtab %}
{% tab title="React Native" %}
```javascript
const configuration: ChatboxConfiguration = {
automaticMessage: "Any question? Say Hello to Smart and we will answer you as soon as possible! 😊",
};
IAdvizeSDK.setChatboxConfiguration(configuration);
```
{% endtab %}
{% tab title="Flutter" %}
```dart
final ChatboxConfiguration configuration = ChatboxConfiguration(
automaticMessage: "Any question? Say Hello to Smart and we will answer you as soon as possible! 😊",
);
IAdvizeSdk.setChatboxConfiguration(configuration);
```
{% endtab %}
{% endtabs %}
When no conversation is ongoing, the welcome message is displayed to the visitor:

### **2️⃣ Enabling GDPR approval**
If you need to get the visitor consent on GDPR before he starts chatting, you can pass a `GDPROption` while activating the SDK. By default this option is set to `Disabled`.
If enabled, a message will request the visitor approval before allowing him to send a message to start the conversation:

This GDPR option dictates how the SDK behaves when the visitor taps on the `More information` button. You can either:
* provide an URL pointing to your GDPR policy, it will be opened on visitor click
* provide a listener/delegate that will be called on visitor click and you can then implement your own custom behavior
{% hint style="warning" %}
*If your visitors have already consented to GDPR inside your application, you can activate the iAdvize Mobile SDK without the GDPR process. However, be careful to explicitly mention the iAdvize Chat part in your GDPR consent details.*
{% endhint %}
{% tabs %}
{% tab title="Android" %}
```kotlin
// Disabled
val gdprOption = GDPROption.Disabled
// URL
val gdprOption = GDPROption.Enabled(GDPREnabledOption.LegalUrl(URI.create("http://my.gdpr.rules.com")))
// Listener
val gdprOption = GDPROption.Enabled(GDPREnabledOption.Listener(object : GDPRListener {
override fun didTapMoreInformation() {
// Implement your own logic
}
}))
```
```kotlin
val configuration = ChatboxConfiguration()
configuration.gdprMessage = "Your own GDPR message."
IAdvizeSDK.chatboxController.setupChatbox(configuration)
```
⌨️ **In-context example:**
* [GDPR Option](https://github.com/iadvize/iadvize-android-sdk/blob/master/example/mobile/src/main/java/com/iadvize/conversation/sdk/demo/feature/IAdvizeSDKConfig.kt#L48)
* [GDPR Message](https://github.com/iadvize/iadvize-android-sdk/blob/master/example/mobile/src/main/java/com/iadvize/conversation/sdk/demo/feature/IAdvizeSDKConfig.kt#L69)
{% endtab %}
{% tab title="iOS" %}
```swift
// Disabled
let gdprOption = .disabled
// URL
if let legalInfoURL = URL(string: "http://my.gdpr.rules.com") {
let gdprOption = .enabled(option: .legalInformation(url: legalInfoURL))
}
// Listener
class GDPRMoreInfoListener: GDPRDelegate {
func didTapMoreInformation() {
// Implement your own logid
}
}
let gdprListener = GDPRMoreInfoListener()
let gdprOption = .enabled(option: .delegate(delegate: gdprListener))
```
```swift
var configuration = ChatboxConfiguration()
configuration.gdprMessage = "Your own GDPR message."
IAdvizeSDK.shared.chatboxController.setupChatbox(configuration: configuration)
```
⌨️ **In-context example:**
* [GDPR Option](https://github.com/iadvize/iadvize-ios-sdk/blob/d279e8a7f90c1f79f2e897a798dd30a626d68227/example/SPMIntegration/SPMIntegration/Source/AppDelegate%2BiAdvize.swift#L53)
* [GDPR Message](https://github.com/iadvize/iadvize-ios-sdk/blob/d279e8a7f90c1f79f2e897a798dd30a626d68227/example/SPMIntegration/SPMIntegration/Source/AppDelegate%2BiAdvize.swift#L43)
{% endtab %}
{% tab title="React Native" %}
```javascript
// No listener set + null URL => GDPR is disabled
await IAdvizeSDK.activate(projectId, userId, null);
// No listener set + non-null URL => GDPR is enabled, the webpage opens when visitor click on more info button
await IAdvizeSDK.activate(projectId, userId, "http://my.gdpr.rules.com");
// Listener set => GDPR is enabled, the listener is called when user click on more info button
IAdvizeSDKListeners.onGDPRMoreInfoClicked(function (eventData: any) {
// Implement your own behavior
});
await IAdvizeSDK.activate(projectId, userId, null);
```
{% hint style="warning" %}
*If you set both the listener and an URL, the listener will take priority.*
{% endhint %}
```javascript
const configuration: ChatboxConfiguration = {
gdprMessage: 'Your own custom GDPR message.'
};
IAdvizeSDK.setChatboxConfiguration(configuration)
```
{% endtab %}
{% tab title="Flutter" %}
```dart
// Disabled
GDPROption gdprOption = GDPROption.disabled();
// URL
GDPROption gdprOption = GDPROption.url(url: "http://my.gdpr.rules.com")
// Listener
GDPROption gdprOption = GDPROption.listener(onMoreInfoClicked: () {
log('iAdvize Example : GDPR More Info button clicked');
// Implement your own logic here
});
```
```dart
final ChatboxConfiguration configuration = ChatboxConfiguration(
gdprMessage: "Your own GDPR message",
);
IAdvizeSdk.setChatboxConfiguration(configuration);
```
{% endtab %}
{% endtabs %}
## 🎨 Branding the Chatbox
The `ChatboxConfiguration` object that we used in the previous section to customize the welcome and GDPR messages can also be used to change the Chatbox UI to better fit into the look and feel of your application.
{% hint style="warning" %}
*You should setup the configuration before presenting the chatbox. If you call this method while the chatbox is visible, some parameters will only apply for new messages or after closing/reopening the chatbox.*
{% endhint %}
### **1️⃣ Updating the font**
The font used in the Chatbox can easily be updated using your own font:
{% tabs %}
{% tab title="Android" %}
```kotlin
val configuration = ChatboxConfiguration()
configuration.font = context.resources.getFont(context, R.font.comic_sans_ms)
IAdvizeSDK.chatboxController.setupChatbox(configuration)
```
{% hint style="info" %}
*The font should be placed inside the assets folder. Here the file is located at `src/main/assets/fonts/comic_sans_ms_regular.ttf`*
{% endhint %}
{% endtab %}
{% tab title="iOS" %}
```swift
var configuration = ChatboxConfiguration()
configuration.font = UIFont(name: "AmericanTypewriter-Condensed", size: 11.0)
IAdvizeSDK.shared.chatboxController.setupChatbox(configuration: configuration)
```
{% hint style="warning" %}
*Even if the UIFont constructor needs a size attribute, the exact font size and traits are automatically chosen and the font is scaled to the current Dynamic Type setting.*
{% endhint %}
{% hint style="info" %}
*The font should either be a system font, or be a font embedded into the app, with a font file inside the bundle and its corresponding declaration into the `Info.plist` file.*
{% endhint %}
{% endtab %}
{% tab title="React Native" %}
```javascript
const configuration: ChatboxConfiguration = {
// For iOS devices
iosFontName: 'AmericanTypewriter-Condensed',
iosFontSize: 11, // iOS only
// For Android devices
androidFontPath: 'fonts/comic_sans_ms_regular.ttf',
};
```
{% hint style="info" %}
*On **iOS** the font should either be a system font, or be a font embedded into the app, with a font file inside the bundle and its corresponding declaration into the `Info.plist` file.*
*On **Android** the font should be placed inside the assets folder. Here the file is located at `src/main/assets/fonts/comic_sans_ms_regular.ttf`*
{% endhint %}
{% endtab %}
{% tab title="Flutter" %}
```dart
final ChatboxConfiguration configuration = ChatboxConfiguration(
// For iOS devices
iosFontName: 'AmericanTypewriter-Condensed',
iosFontSize: 11,
// For Android devices
androidFontPath: 'fonts/comic_sans_ms_regular.ttf',
);
IAdvizeSdk.setChatboxConfiguration(configuration);
```
{% hint style="info" %}
*On **iOS** the font should either be a system font, or be a font embedded into the app, with a font file inside the bundle and its corresponding declaration into the `Info.plist` file.*
*On **Android** the font should be placed inside the assets folder. Here the file is located at `src/main/assets/fonts/comic_sans_ms_regular.ttf`*
{% endhint %}
{% endtab %}
{% endtabs %}
### **2️⃣ Styling the navigation bar /** toolbar
You can customize the appearance of the navigation bar / toolbar at the top of the Chatbox by displaying:
* an avatar
* a title
{% tabs %}
{% tab title="Android" %}
```kotlin
val configuration = ChatboxConfiguration()
configuration.headerTitle = "Conversation"
configuration.headerAvatar = context.resources.getDrawable(R.drawable.brand_avatar),
IAdvizeSDK.chatboxController.setupChatbox(configuration)
```
{% endtab %}
{% tab title="iOS" %}
```swift
var configuration = ChatboxConfiguration()
configuration.avatar = UIImage(named: "BrandAvatar")
configuration.title = "Conversation"
IAdvizeSDK.shared.chatboxController.setupChatbox(configuration: configuration)
```
{% endtab %}
{% tab title="React Native" %}
```javascript
const configuration: ChatboxConfiguration = {
title: 'Conversation',
avatar: Image.resolveAssetSource(require('./brand_avatar.png')).uri,
};
IAdvizeSDK.setChatboxConfiguration(configuration);
```
{% endtab %}
{% tab title="Flutter" %}
```dart
final ChatboxConfiguration configuration = ChatboxConfiguration(
title: 'Conversation',
avatar: const AssetImage('assets/image.png'),
);
IAdvizeSdk.setChatboxConfiguration(configuration);
```
{% endtab %}
{% endtabs %}
{% hint style="warning" %}
*GIFs are not supported for the avatar.*
{% endhint %}
### **3️⃣ Changing the Chatbox colors**
You can customized some of the colors used in the Chatbox:
* The primary color, mainly used for visitor messages background and default floating button.
* The secondary color, mainly used for the Send button and other buttons displayed in the Chatbox.
* The primary text color, mainly used for texts displayed above the primary color, including in visitor messages.
* The secondary text color, mainly used for texts displayed above the secondary color, including in buttons.
{% tabs %}
{% tab title="Android" %}
{% endtab %}
{% tab title="iOS" %}
```swift
var configuration = ChatboxConfiguration()
configuration.primaryColor = .blue
configuration.secondaryColor = .yellow
configuration.primaryTextColor = .red
configuration.secondaryTextColor = .green
IAdvizeSDK.shared.chatboxController.setupChatbox(configuration: configuration)
```
{% endtab %}
{% tab title="React Native" %}
```javascript
var configuration = ChatboxConfiguration()
configuration.primaryColor = '#0000FF';
configuration.primaryTextColor = '#FF0000';
configuration.secondaryColor = '#FFFF00';
configuration.secondaryTextColor = '#00FF00';
IAdvizeSDK.setChatboxConfiguration(configuration: configuration)
```
{% endtab %}
{% tab title="Flutter" %}
```dart
final ChatboxConfiguration configuration = ChatboxConfiguration(
primaryColor: Colors.blue,
primaryTextColor: Colors.red,
secondaryColor: Colors.yellow,
secondaryTextColor: Colors.green
);
IAdvizeSdk.setChatboxConfiguration(configuration);
```
{% endtab %}
{% endtabs %}
### **4️⃣ Presenting a smaller Chatbox**
The Chatbox can be presented in a compact mode.
The visitor can then expand the chatbox manually. The chatbox is automatically expanded when the keyboard opens. This compact mode can be enabled by using a flag in the `ChatboxConfiguration.`
{% tabs %}
{% tab title="Android" %}
{% hint style="info" icon="triangle-exclamation" %}
*The smaller chatbox behavior is unavailable on Android.*
{% endhint %}
{% endtab %}
{% tab title="iOS" %}
```swift
var configuration = ChatboxConfiguration()
configuration.isSmallerChatboxEnabled = true // Default is false.
IAdvizeSDK.shared.chatboxController.setupChatbox(configuration: configuration)
```
{% endtab %}
{% tab title="React Native" %}
```javascript
const configuration: ChatboxConfiguration = {
...
isSmallerChatboxEnabled: true,
...
};
IAdvizeSDK.setChatboxConfiguration(configuration);
```
{% hint style="info" icon="triangle-exclamation" %}
*The smaller chatbox behavior is unavailable on Android.*
{% endhint %}
{% endtab %}
{% tab title="Flutter" %}
```dart
IAdvizeSdk.setChatboxConfiguration(ChatboxConfiguration(
// ...
isSmallerChatboxEnabled: true,
// ...
);
```
{% hint style="info" icon="triangle-exclamation" %}
*The smaller chatbox behavior is unavailable on Android.*
{% endhint %}
{% endtab %}
{% endtabs %}
## 🎨 Branding the Default Floating Button
By default, the Mobile SDK uses its own Default Floating Button for the visitor to engage in the conversation. This Default Floating Button display process is automated by the Mobile SDK and works out of the box. You have however limited possibilities to brand it to your needs.
{% tabs %}
{% tab title="Android" %}
The Default Floating Button can be customized, both in its look (colors / icon) and position (anchor / margins) using the appropriate configuration:
```kotlin
val configuration = DefaultFloatingButtonConfiguration(
anchor = Gravity.START or Gravity.BOTTOM,
margins = DefaultFloatingButtonMargins(),
backgroundTint = Color.BLUE,
iconResId = R.drawable.chat_icon,
iconTint = Color.WHITE
)
val option = DefaultFloatingButtonOption.Enabled(configuration)
IAdvizeSDK.defaultFloatingButtonController.setupDefaultFloatingButton(option)
```
⌨️ **In-context example:** [Default Floating Button Configuration](https://github.com/iadvize/iadvize-android-sdk/blob/master/example/mobile/src/main/java/com/iadvize/conversation/sdk/demo/feature/IAdvizeSDKConfig.kt#L52)
{% endtab %}
{% tab title="iOS" %}
The Default Floating Button will use hardcoded icons and the `ChatboxConfiguration.primaryColor` as background color:
```swift
var configuration = ChatboxConfiguration()
configuration.primaryColor = .red
IAdvizeSDK.shared.chatboxController.setupChatbox(configuration: configuration)
```
The Default Floating Button is anchored to the bottom left side of the screen. You can modify its placement by specifying the button margins:
```swift
IAdvizeSDK.shared.chatboxController.setFloatingButtonPosition(leftMargin: 20.0, bottomMargin: 20.0)
```
{% endtab %}
{% tab title="React Native" %}
The Default Floating Button will use hardcoded icons and the `ChatboxConfiguration.primaryColor` as background color:
```javascript
const configuration: ChatboxConfiguration = {
primaryColor: '#000000',
};
```
The Default Floating Button is anchored to the bottom left side of the screen. You can modify its placement by specifying the button margins:
```javascript
IAdvizeSDK.setFloatingButtonPosition(20, 20);
```
{% endtab %}
{% tab title="Flutter" %}
The Default Floating Button will use hardcoded icons and the `ChatboxConfiguration.primaryColor` as background color:
```dart
final ChatboxConfiguration configuration = ChatboxConfiguration(
primaryColor: Colors.red,
);
IAdvizeSdk.setChatboxConfiguration(configuration);
```
The Default Floating Button is anchored to the bottom left side of the screen. You can modify its placement by specifying the button margins:
```dart
IAdvizeSdk.setFloatingButtonPosition(leftMargin: 20, bottomMargin: 20);
```
{% endtab %}
{% endtabs %}
## ✨ Using a custom chat button
If you are not satisfied with the Default Floating Button look and feel or if you want to implement a specific behavior related to its display you may need to use a custom conversation button.
With a custom button it is your responsibility to:
* design the floating or fixed button to invite your visitor to chat
* hide/show the button following the active targeting rule availability and the ongoing conversation status
* open the Chatbox when the visitor presses your button
### **1️⃣ Disabling the Default Floating Button**
{% tabs %}
{% tab title="Android" %}
```kotlin
IAdvizeSDK.defaultFloatingButtonController.setupDefaultFloatingButton(DefaultFloatingButtonOption.Disabled)
```
{% endtab %}
{% tab title="iOS" %}
```swift
IAdvizeSDK.shared.chatboxController.useDefaultFloatingButton = false
```
{% endtab %}
{% tab title="React Native" %}
```javascript
IAdvizeSDK.setDefaultFloatingButton(false);
```
{% endtab %}
{% tab title="Flutter" %}
```dart
IAdvizeSdk.setDefaultFloatingButton(false);
```
{% endtab %}
{% endtabs %}
### **2️⃣ Displaying/hiding the chat button**
#### Understanding availability callbacks
These listeners notify you when:
* Targeting rule availability changes (operator/bot becomes available/unavailable)
* Availability update fails
* Conversation status changes
⚠️ **Important distinction:**
**Availability callbacks** (from Mobile SDK) tell you:
* "Is an operator/bot available for this targeting rule right now?"
**Your business logic** (in your app) determines:
* "Should I show the chat button based on user behavior, frequency caps, preferences?"
**Combined decision logic**
To show/hide your custom button, combine BOTH:
1. ✅ **Your conditions met?** (user behavior, frequency, preferences)
2. ✅ **Mobile** **SDK availability = true?** (operator/bot available)
3. → **Result:** Show button only if BOTH are true
#### Implementing the visibility logic
The chat button is linked to the targeting and conversation workflow and should update its visibility each time the status of those workflows is changed. First of all you need to implement the appropriate callbacks:
{% tabs %}
{% tab title="Android" %}
```kotlin
IAdvizeSDK.targetingController.listeners.add(object : TargetingListener {
override fun onActiveTargetingRuleAvailabilityUpdated(isActiveTargetingRuleAvailable: Boolean) {
// SDK active rule availability changed to isActiveTargetingRuleAvailable
updateChatButtonVisibility()
}
override fun onActiveTargetingRuleAvailabilityUpdateFailed(error: IAdvizeSDK.Error) {
// SDK active rule availability failed
updateChatButtonVisibility()
// You may launch the targeting again based on the error type
}
})
IAdvizeSDK.conversationController.listeners.add(object : ConversationListener {
override fun onOngoingConversationUpdated(ongoingConversation: OngoingConversation?) {
// SDK ongoing conversation has updated
updateChatButtonVisibility()
}
override fun onNewMessageReceived(content: String) {
// A new message was received via the SDK
}
override fun handleClickedUrl(uri: Uri): Boolean {
// A message link was tapped, return true if you want your app to handle it
return false
}
})
```
{% endtab %}
{% tab title="iOS" %}
```swift
extension IntegrationApp: TargetingControllerDelegate {
func activeTargetingRuleAvailabilityDidUpdate(isActiveTargetingRuleAvailable: Bool) {
// SDK active rule availability changed to isActiveTargetingRuleAvailable
updateChatButtonVisibility()
}
func activeTargetingRuleDidFailToUpdate(error: TargetingError) {
// SDK active rule availability failed
updateChatButtonVisibility()
// You may launch the targeting again based on the error type
}
}
extension IntegrationApp: ConversationControllerDelegate {
func ongoingConversationUpdated(ongoingConversation: IAdvizeConversationSDK.OngoingConversation?) {
// SDK ongoing conversation status changed
updateChatButtonVisibility()
}
func didReceiveNewMessage(content: String) {
// A new message was received via the SDK
}
func conversationController(_ controller: ConversationController, shouldOpen url: URL) -> Bool {
// A message link was tapped, return false if you want your app to handle it
}
}
class IntegrationApp {
IAdvizeSDK.shared.targetingController.delegate = self
IAdvizeSDK.shared.conversationController.delegate = self
}
```
{% endtab %}
{% tab title="React Native" %}
```javascript
IAdvizeSDKListeners.onActiveTargetingRuleAvailabilityUpdated(function (eventData: any) {
// SDK active rule availability changed
updateChatButtonVisibility()
});
IAdvizeSDKListeners.onActiveTargetingRuleAvailabilityUpdateFailed(function (eventData: any) {
// SDK active rule availability failed
updateChatButtonVisibility()
// You may launch the targeting again based on the error type
});
IAdvizeSDKListeners.onOngoingConversationStatusChanged(function (eventData: any) {
// SDK ongoing conversation status changed
updateChatButtonVisibility()
});
```
{% endtab %}
{% tab title="Flutter" %}
```dart
IAdvizeSdk.setConversationListener(manageUrlClick: true);
IAdvizeSdk.onOngoingConversationUpdated.listen((bool ongoing) {
// SDK ongoing conversation status changed
_updateCustomChatButtonVisibility();
});
IAdvizeSdk.setOnActiveTargetingRuleAvailabilityListener();
IAdvizeSdk.onActiveTargetingRuleAvailabilityUpdated.listen((bool available) {
// SDK active rule availability changed
_updateCustomChatButtonVisibility();
});
IAdvizeSdk.onActiveTargetingRuleAvailabilityUpdateFailed.listen((Map error) {
// SDK active rule availability failed
updateChatButtonVisibility()
// You may launch the targeting again based on the error type
});
```
{% endtab %}
{% endtabs %}
The chat button gives access to the Chatbox so it should be visible:
* at all times when a conversation is ongoing to allow the visitor to come back to the current conversation
* when the active targeting rule is available, to engage the visitor to chat
{% tabs %}
{% tab title="Android" %}
```kotlin
fun updateChatButtonVisibility() {
val sdkActivated = IAdvizeSDK.activationStatus == IAdvizeSDK.ActivationStatus.ACTIVATED
val chatboxOpened = IAdvizeSDK.chatboxController.isChatboxPresented()
val ruleAvailable = IAdvizeSDK.targetingController.isActiveTargetingRuleAvailable()
val hasOngoingConv = IAdvizeSDK.conversationController.ongoingConversation() != null
if (sdkActivated && !chatboxOpened && (hasOngoingConv || ruleAvailable)) {
showChatButton()
} else {
hideChatButton()
}
}
```
{% endtab %}
{% tab title="iOS" %}
```swift
func updateChatButtonVisibility() {
guard IAdvizeSDK.shared.activationStatus == .activated else {
hideChatButton()
return
}
guard !IAdvizeSDK.shared.chatboxController.isChatboxPresented() else {
hideChatButton()
return
}
guard IAdvizeSDK.shared.conversationController.ongoingConversation() != nil ||
IAdvizeSDK.shared.targetingController.isActiveTargetingRuleAvailable else {
hideChatButton()
return
}
showChatButton()
}
```
{% endtab %}
{% tab title="React Native" %}
```javascript
const updateChatButtonVisibility = async () => {
const ruleAvailable = IAdvizeSDK.isActiveTargetingRuleAvailable()
const hasOngoingConv = IAdvizeSDK.ongoingConversationId().trim().length !== 0
const chatboxOpened = IAdvizeSDK.isChatboxPresented()
if (!chatboxOpened && (hasOngoingConv || ruleAvailable)) {
showChatButton()
} else {
hideChatButton()
}
};
```
{% endtab %}
{% tab title="Flutter" %}
```dart
bool _showCustomButton = false;
Future _updateCustomChatButtonVisibility() async {
final bool sdkActivated = await IAdvizeSdk.isSDKActivated();
final bool ruleAvailable = await IAdvizeSdk.isActiveTargetingRuleAvailable();
final bool hasOngoingConv = await ongoingConversationId() != null;
setState(() {
_showCustomButton = sdkActivated && (hasOngoingConv || ruleAvailable);
});
}
```
{% endtab %}
{% endtabs %}
### **3️⃣ Opening the Chatbox**
When the visitor taps on your custom chat button you should open the Chatbox by calling the following method:
{% tabs %}
{% tab title="Android" %}
```kotlin
IAdvizeSDK.chatboxController.presentChatbox(context)
```
⌨️ **In-context example:** [Full custom chat button implementation](https://gist.github.com/Judas/d0a34a50f1b6b8d542d77af5db9d9787)
{% endtab %}
{% tab title="iOS" %}
```swift
IAdvizeSDK.shared.chatboxController.presentChatbox(
animated: Bool,
presentingViewController: UIViewController?
) {
// ...
}
```
⌨️ **In-context example:** [Full custom chat button implementation](https://gist.github.com/alexandrekarst/74da3ce5a9eaf68f7bd83eaf77c6d3dc)
{% endtab %}
{% tab title="React Native" %}
```javascript
IAdvizeSDK.presentChatbox()
```
{% endtab %}
{% tab title="Flutter" %}
```dart
IAdvizeSdk.presentChatbox();
```
{% endtab %}
{% endtabs %}
You can be informed of the Chatbox opening/closing by subscribing to the right listener:
{% tabs %}
{% tab title="Android" %}
```kotlin
IAdvizeSDK.chatboxController.listeners.add( object : ChatboxListener {
override fun onChatboxOpened() {
Log.d("TEST", "Chatbox has opened")
}
override fun onChatboxClosed() {
Log.d("TEST", "Chatbox has closed")
}
})
```
{% endtab %}
{% tab title="iOS" %}
```swift
IAdvizeSDK.shared.chatboxController.delegate = self
extension MyApp: ChatboxControllerDelegate {
public func chatboxDidOpen() {
print("Chatbox has opened")
}
public func chatboxDidClose() {
print("Chatbox has closed")
}
}
```
⌨️ **In-context example:** [Full custom chat button implementation](https://gist.github.com/alexandrekarst/74da3ce5a9eaf68f7bd83eaf77c6d3dc)
{% endtab %}
{% tab title="React Native" %}
```javascript
IAdvizeSDKListeners.onChatboxOpened(function (eventData: any) {
console.log('Chatbox has opened');
});
IAdvizeSDKListeners.onChatboxClosed(function (eventData: any) {
console.log('Chatbox has closed');
});
```
{% endtab %}
{% tab title="Flutter" %}
```dart
IAdvizeSdk.setChatboxListener();
StreamSubscription _chatboxOpenedSubscription = IAdvizeSdk.onChatboxOpened
.listen((event) => log('Chatbox has opened'));
StreamSubscription _chatboxClosedSubscription = IAdvizeSdk.onChatboxClosed
.listen((event) => log('Chatbox has closed'));
```
{% endtab %}
{% endtabs %}
## 🔔 Handling push notifications
{% hint style="warning" %}
*Before starting this part you will need to configure push notifications inside your application. You can refer to the following resources if needed:*
{% tabs %}
{% tab title="Android" %}
[Firebase Cloud Messaging documentation](https://firebase.google.com/docs/cloud-messaging/android/client)
{% endtab %}
{% tab title="iOS" %}
[Push notification setup tutorial](https://www.kodeco.com/11395893-push-notifications-tutorial-getting-started)
{% endtab %}
{% tab title="React Native" %}
[React Native Firebase Setup](https://rnfirebase.io/)
[React Native Firebase Messaging Setup](https://rnfirebase.io/messaging/usage)
{% endtab %}
{% tab title="Flutter" %}
[Flutter Firebase Setup](https://firebase.google.com/docs/flutter/setup)
[Flutter Firebase Messaging Setup](https://firebase.google.com/docs/cloud-messaging/flutter/client)
{% endtab %}
{% endtabs %}
*You will also need to ensure that the push notifications are setup in your iAdvize project. The process is described in the Mobile* [*SDK Knowledge Base*](https://help.iadvize.com/hc/en-gb/articles/360019839480)*.*
{% endhint %}
### **1️⃣ Registering the device token**
For the Mobile SDK to be able to send notifications to the visitor’s device, its unique `device push token` must be registered:
{% tabs %}
{% tab title="Android" %}
```kotlin
class NotificationService : FirebaseMessagingService() {
override fun onNewToken(token: String) {
super.onNewToken(token)
IAdvizeSDK.notificationController.registerPushToken(token)
}
}
```
⌨️ **In-context example:** [Device token register](https://github.com/iadvize/iadvize-android-sdk/blob/master/example/mobile/src/main/java/com/iadvize/conversation/sdk/demo/feature/notifications/NotificationService.kt#L55)
{% endtab %}
{% tab title="iOS" %}
```swift
IAdvizeSDK.shared.notificationController.registerPushToken("the_device_push_token", applicationMode: .prod)
```
⌨️ **In-context example:** [Device token register](https://github.com/iadvize/iadvize-ios-sdk/blob/master/example/SPMIntegration/SPMIntegration/Source/AppDelegate%2BPushNotification.swift#L27)
{% endtab %}
{% tab title="React Native" %}
```javascript
import { getMessaging, requestPermission, setBackgroundMessageHandler, onMessage, getToken, getAPNSToken } from '@react-native-firebase/messaging';
const messagingInstance = getMessaging();
const setupNotifications = async () => {
if (Platform.OS === 'ios') {
// Ask permission
console.log('Asking notification permission');
const authStatus = await requestPermission(messagingInstance);
console.log('iOS push notification permission', authStatus == 1 ? "authorized" : "refused");
} else if (Platform.OS === 'android') {
// Ask permission
console.log('Asking notification permission');
const enabled = await PermissionsAndroid.request(PermissionsAndroid.PERMISSIONS.POST_NOTIFICATIONS);
console.log('Android push notification permission', enabled === "granted" ? "authorized" : "refused");
// Create channel
console.log('Creating notification channel');
IAdvizeSDK.createNotificationChannel();
}
// Register the push token
try {
console.log('Retrieving push notification token');
let token = '';
if (Platform.OS === 'ios') {
const apnsToken = await getAPNSToken(messagingInstance);
token = apnsToken ?? '';
} else if (Platform.OS === 'android') {
token = await getToken(messagingInstance);
}
console.log('Push token:', token);
if (token !== '') {
IAdvizeSDK.registerPushToken(token, ApplicationMode.DEV); // or PROD
console.log('iAdvize SDK registerPushToken success');
}
} catch (e) {
console.error(e);
}
}
const registerPushToken = async () => {
try {
const token = await messaging().getToken();
IAdvizeSDK.registerPushToken(token, ApplicationMode.DEV);
console.log('iAdvize SDK registerPushToken success');
} catch (e) {
console.error(e);
}
};
```
{% hint style="warning" %}
*The `ApplicationMode` is used only for the iOS application.*
{% endhint %}
{% endtab %}
{% tab title="Flutter" %}
```dart
import 'package:firebase_messaging/firebase_messaging.dart';
FirebaseMessaging.instance.onTokenRefresh.listen((fcmToken) {
IAdvizeSdk.registerPushToken(pushToken: fcmToken, mode: ApplicationMode.dev);
}).onError((err) {
log('Error registering token: $err');
});
```
{% hint style="warning" %}
*The `ApplicationMode` is used only for the iOS application.*
{% endhint %}
{% endtab %}
{% endtabs %}
### **2️⃣ Enabling/disabling push notifications**
Push notifications are activated during Mobile SDK activation, as long as you have setup the push notifications information for your app on the iAdvize administration website (process is described in the [SDK Knowledge Base](https://help.iadvize.com/hc/en-gb/articles/360019839480)). You can manually enable/disable them at any time using:
{% tabs %}
{% tab title="Android" %}
```kotlin
IAdvizeSDK.notificationController.enablePushNotifications(object : IAdvizeSDK.Callback {
override fun onSuccess() {
// Enable succeded
}
override fun onFailure(error: IAdvizeSDK.Error) {
// Enable failed
}
})
IAdvizeSDK.notificationController.disablePushNotifications(object : IAdvizeSDK.Callback {
override fun onSuccess() {
// Disable succeded
}
override fun onFailure(error: IAdvizeSDK.Error) {
// Disable failed
}
})
```
{% endtab %}
{% tab title="iOS" %}
```swift
IAdvizeSDK.shared.notificationController.enablePushNotifications { success in
...
}
IAdvizeSDK.shared.notificationController.disablePushNotifications { success in
...
}
```
{% endtab %}
{% tab title="React Native" %}
```javascript
try {
await IAdvizeSDK.enablePushNotifications();
// Push notifications enabled
} catch (e) {
// Error enabling push notifications
}
try {
await IAdvizeSDK.disablePushNotifications();
// Push notifications disabled
} catch (e) {
// Error disabling push notifications
}
```
{% endtab %}
{% tab title="Flutter" %}
```dart
IAdvizeSdk.enablePushNotifications().then((bool success) =>
log('Push notifications enabled $success'));
IAdvizeSdk.disablePushNotifications().then((bool success) =>
log('Push notifications disabkled $success'));
```
{% endtab %}
{% endtabs %}
### **3️⃣ Handling push notifications reception**
Once setup, you will receive push notifications when the operator sends any message. As the SDK notifications are caught in the same place than your app other notifications, you first have to distinguish if the received notification comes from iAdvize or not.
{% tabs %}
{% tab title="Android" %}
```kotlin
class NotificationService : FirebaseMessagingService() {
override fun onMessageReceived(remoteMessage: RemoteMessage) {
if (IAdvizeSDK.notificationController.isIAdvizePushNotification(remoteMessage.data)) {
// This is an iAdvize SDK notification
}
}
}
```
{% endtab %}
{% tab title="iOS" %}
```swift
func application(
_ application: UIApplication,
didReceiveRemoteNotification userInfo: [AnyHashable: Any],
fetchCompletionHandler completionHandler: @escaping (UIBackgroundFetchResult) -> Void
) {
if IAdvizeSDK.shared.notificationController.isIAdvizePushNotification(with: userInfo) {
// This is an iAdvize SDK notification
}
}
```
{% endtab %}
{% tab title="React Native" %}
```javascript
// Firebase Messaging notification handlers
onMessage(messagingInstance, async remoteMessage => {
console.log('Received a foreground notification message');
handleNotification(remoteMessage)
});
setBackgroundMessageHandler(messagingInstance, async remoteMessage => {
console.log('Received a background notification message');
handleNotification(remoteMessage)
});
function handleNotification(remoteMessage: any) {
console.log('handling notification', JSON.stringify(remoteMessage));
var isIAdvizeSDKNotification = IAdvizeSDK.isIAdvizePushNotification(remoteMessage.data)
}
```
{% endtab %}
{% tab title="Flutter" %}
```dart
// Firebase Messaging notification handlers
@pragma('vm:entry-point')
Future _backgroundNotificationHandler(RemoteMessage message) async {
log('Received a background notification message ${message}');
handleNotification(message);
}
FirebaseMessaging.onBackgroundMessage(_backgroundNotificationHandler);
FirebaseMessaging.onMessage.listen((RemoteMessage message) {
log('Received a foreground notification message ${message}');
handleNotification(message);
});
void handleNotification(RemoteMessage message) {
log('handling notification $message');
IAdvizeSdk.isIAdvizePushNotification(message.data).then(
(bool isAdvizeNotification) =>
log('Notification from iAdvize ? $isAdvizeNotification'));
}
```
{% endtab %}
{% endtabs %}
{% hint style="warning" %}
*Notifications will be received in your app for all messages sent by the agent. It is your responsibility to display the notification and to check whether or not it is relevant to display it. For instance, you don’t need to show a notification to the visitor when the Chatbox is opened*
{% endhint %}
{% tabs %}
{% tab title="Android" %}
```kotlin
fun shouldDisplayNotification(remoteMessage: RemoteMessage) =
IAdvizeSDK.notificationController.isIAdvizePushNotification(remoteMessage.data)
&& !IAdvizeSDK.chatboxController.isChatboxPresented()
```
{% endtab %}
{% tab title="iOS" %}
```swift
func shouldDisplayNotification(userInfo: [AnyHashable: Any]) -> Bool {
guard IAdvizeSDK.shared.notificationController.isIAdvizePushNotification(with: userInfo) else {
return false
}
guard !IAdvizeSDK.shared.chatboxController.isChatboxPresented() else {
return false
}
return true
}
```
{% endtab %}
{% tab title="React Native" %}
```javascript
function handleNotification(remoteMessage: any) {
console.log('handling notification', JSON.stringify(remoteMessage));
var chatboxOpened = IAdvizeSDK.isChatboxPresented();
var isIAdvizeSDKNotification = IAdvizeSDK.isIAdvizePushNotification(remoteMessage.data);
var shouldDisplay = chatboxOpened == false && isIAdvizeSDKNotification;
var channelId = IAdvizeSDK.notificationChannelId();
console.log("chatboxOpened:", chatboxOpened, "isIAdvizeSDKNotification", isIAdvizeSDKNotification, "channel", channelId, "shouldDisplay=>", shouldDisplay);
}
```
{% endtab %}
{% tab title="Flutter" %}
```dart
void handleNotification(RemoteMessage message) {
log('handling notification $message');
Future isIAdvizeSDKNotification =IAdvizeSdk.isIAdvizePushNotification(message.data);
Future isChatboxPresented = IAdvizeSdk.isChatboxPresented();
Future.wait([isIAdvizeSDKNotification, isChatboxPresented]).then((List flags) {
bool shouldDisplay = flags[0] && !flags[1];
log("isIAdvizeSDKNotification:${flags[0]} isChatboxPresented:${flags[1]} shouldDisplay:$shouldDisplay");
});
}
```
{% endtab %}
{% endtabs %}
### **4️⃣ Customizing/localizing the notification**
{% tabs %}
{% tab title="Android" %}
You are responsible for displaying the notification so you can use any title / text / icon you want. The text sent by the agent is available in the `content` part of the notification data received.
```kotlin
override fun onMessageReceived(remoteMessage: RemoteMessage) {
if (IAdvizeSDK.notificationController.isIAdvizePushNotification(remoteMessage.data)) {
val agentMessageReceived = remoteMessage.data["content"] ?: "Default text"
}
}
```
⌨️ **In-context example:** [Handling received notification](https://github.com/iadvize/iadvize-android-sdk/blob/master/example/mobile/src/main/java/com/iadvize/conversation/sdk/demo/feature/notifications/NotificationService.kt#L64)
{% endtab %}
{% tab title="iOS" %}
Our SDK uses **APNs localization keys** so iOS fetches the translated title from **your app’s** localization resources.
**Key used by the SDK**
* `iadvize_notification_title` — shown when a new message arrives
*Recommended English value:* “You have received a new message”
**What you need to do**
1. Add the key to your app’s localization files
Use a String Catalog (`Localizable.xcstrings`) or a classic `Localizable.strings`.
Ensure the resource is included in **your app target**.
2. Provide translations for every language your app supports
**English**
```
"iadvize_notification_title" = "You have received a new message";
```
**French**
```
"iadvize_notification_title" = "Vous avez reçu un nouveau message";
```
**Why this is required**
When APNs payloads use title-loc-key, iOS resolves the key only against the app’s main bundle. Even though the SDK ships its own translations, notification title must exist in your app bundle so the system can find it. If a translation is missing for a given locale, iOS will fall back using your app’s standard localization rules (e.g., your development region).
**Translation suggestions**
Here are translations you can use if your app supports some of these languages.
Code
Language
iadvize_notification_title
cs
Czech
Dostali jste novou zprávu
da
Danish
Du har modtaget en ny besked
de
German
Sie haben eine neue Nachricht erhalten
en
English
You have received a new message
es
Spanish
Has recibido un nuevo mensaje
fr
French
Vous avez reçu un nouveau message
it
Italian
Hai ricevuto un nuovo messaggio
lt
Lithuanian
Jūs gavote naują žinutę
nl
Dutch
U hebt een nieuw bericht ontvangen
pl
Polish
Otrzymałeś nową wiadomość
pt
Portuguese
Recebeu uma nova mensagem
sk
Slovak
Dostali ste novú správu
sv
Swedish
Du har fått ett nytt meddelande
{% endtab %}
{% tab title="React Native" %}
```javascript
function handleNotification(remoteMessage: any) {
console.log('handling notification', JSON.stringify(remoteMessage));
var messageContent = remoteMessage.data.content
}
```
{% endtab %}
{% tab title="Flutter" %}
```dart
void handleNotification(RemoteMessage message) {
log('handling notification $message');
String messageContent = message.data["content"];
}
```
{% endtab %}
{% endtabs %}
### **5️⃣ Clearing push notifications**
The iAdvize Mobile SDK notifications are automatically cleared from the Notification Tray / Notification Center when the Chatbox is opened. If you want to clear them at any other given time you can call this API:
{% tabs %}
{% tab title="Android" %}
```kotlin
IAdvizeSDK.notificationController.clearIAdvizePushNotifications()
```
{% endtab %}
{% tab title="iOS" %}
```swift
IAdvizeSDK.shared.notificationController.clearIAdvizePushNotifications()
```
{% endtab %}
{% tab title="React Native" %}
```javascript
IAdvizeSDK.clearIAdvizePushNotifications()
```
{% endtab %}
{% tab title="Flutter" %}
```dart
IAdvizeSdk.clearIAdvizePushNotifications()
```
{% endtab %}
{% endtabs %}
However, as notifications display depends on the Notification Channel, some configuration is needed in order for this behavior to work correctly:
{% tabs %}
{% tab title="Android" %}
First of all create the Notification Channel:
```kotlin
IAdvizeSDK.notificationController.createNotificationChannel(context)
```
Then, when receiving the notification, send it through the SDK Notification Channel if the notification is from iAdvize:
```kotlin
if (IAdvizeSDK.notificationController.isIAdvizePushNotification(remoteMessage.data)) {
val notification = NotificationCompat.Builder(this, IAdvizeSDK.notificationController.channelId)
... // notification config
.build()
} else {
// Host app notification handling
}
```
{% endtab %}
{% tab title="iOS" %}
On iOS no setup is required, the clearing of the push notificatiosn works out of the box.
{% endtab %}
{% tab title="React Native" %}
First of all create the Notification Channel:
```javascript
IAdvizeSDK.createNotificationChannel();
```
You don't need to check that you are on the Android platform before calling this API, as it does nothing on the iOS platform.
Then, when receiving the notification, send it through the SDK Notification Channel if the notification is from iAdvize. In order to show a notification in a specific Notification Channel, please refer to your Notification library documentation.
{% endtab %}
{% tab title="Flutter" %}
First of all create the Notification Channel:
```javascript
IAdvizeSdk.createNotificationChannel();
```
You don't need to check that you are on the Android platform before calling this API, as it does nothing on the iOS platform.
Then, when receiving the notification, send it through the SDK Notification Channel if the notification is from iAdvize. In order to show a notification in a specific Notification Channel, please refer to your Notification library documentation.
{% endtab %}
{% endtabs %}
## 📈 Adding value to the conversation
### **1️⃣ Registering visitor transactions**
You can register a transaction made within your application:
{% tabs %}
{% tab title="Android" %}
```kotlin
IAdvizeSDK.transactionController.register(
Transaction(
"transactionId",
Date(),
10.00,
Currency.EUR
)
)
```
{% endtab %}
{% tab title="iOS" %}
```swift
let transaction = Transaction(externalTransactionId: "transactionId", date: Date(), amount: 10.0, currency: .eur)
IAdvizeSDK.shared.transactionController.registerTransaction(transaction)
```
{% endtab %}
{% tab title="React Native" %}
```javascript
const transaction: Transaction = {
transactionId: 'transactionId',
currency: 'EUR',
amount: 10
};
IAdvizeSDK.registerTransaction(transaction);
```
{% hint style="warning" %}
*The currency value should respect* [*ISO 4217*](https://en.wikipedia.org/wiki/ISO_4217)*.*
{% endhint %}
{% endtab %}
{% tab title="Flutter" %}
```javascript
IAdvizeSdk.registerTransaction(Transaction(
transactionId: 'transactionId',
currency: 'EUR',
amount: 10
));
```
{% hint style="warning" %}
*The currency value should respect* [*ISO 4217*](https://en.wikipedia.org/wiki/ISO_4217)*.*
{% endhint %}
{% endtab %}
{% endtabs %}
### **2️⃣ Saving visitor custom data**
#### How custom data is used
Custom data you register:
* **Operators:** See values in "Custom data" sidebar tab
* **Workflows/AI Shopping Assistant:** Use values as context parameters (e.g., `productId` to fetch product info)
* **Visitors:** Don't see raw values in chatbox
See [Using custom data with workflows & AI Shopping Assistant](/technologies/web-and-mobile-sdk/mobile-sdk/gaperon#id-3-using-custom-data-with-workflows-and-ai-shopping-assistant) for examples.
#### Example
The iAdvize Mobile SDK allows you to save data related to the visitor conversation:
{% tabs %}
{% tab title="Android" %}
```kotlin
IAdvizeSDK.visitorController.registerCustomData(listOf(
CustomData.fromString("Name", "Pi"),
CustomData.fromBoolean("Rational", false),
CustomData.fromDouble("Approx", 3.14),
CustomData.fromInt("Round", 3)
),
object : IAdvizeSDK.Callback {
override fun onSuccess() {
// Success
}
override fun onFailure(error: IAdvizeSDK.Error) {
// Failure
}
})
```
{% endtab %}
{% tab title="iOS" %}
```swift
IAdvizeSDK.shared.visitorController.registerCustomData(
customData:
["Name": .customDataString("Pi"),
"Rational": .customDataBoolean(false),
"Approx": .customDataDouble(3.14),
"Round": .customDataInt(3)]
) { success in
// completion handler
}
```
{% endtab %}
{% tab title="React Native" %}
```javascript
var customData = {
"Name": "Pi",
"Rational": false,
"Approx": 3.14,
"Round": 3
};
IAdvizeSDK.registerCustomData(customData);
```
{% endtab %}
{% tab title="Flutter" %}
```dart
List customData = [
CustomData.fromString("Name", "Pi"),
CustomData.fromBoolean("Rational", false),
CustomData.fromDouble("Approx", 3.14),
CustomData.fromInt("Round", 3)
];
IAdvizeSdk.registerCustomData(customData).then((bool success) =>
log('iAdvize Example : custom data registered: $success'));
```
{% endtab %}
{% endtabs %}
{% hint style="warning" %}
*As those data are related to the conversation they cannot be sent if there is no ongoing conversation. Custom data registered **before** the start of a conversation are stored and the Mobile SDK automatically tries to send them when the conversation starts.*
{% endhint %}
The visitor data you registered are displayed in the iAdvize Operator Desk in the conversation sidebar, in a tab labelled `Custom data`:

### **3️⃣ Using custom data with workflows & AI Shopping Assistant**
Custom data you register is:
* ✅ **Visible to operators** - Displayed in "Custom data" tab in operator desk
* ✅ **Usable by workflows/AI Shopping Assistant** - Passed as contextual parameters to retrieve information
* ❌ **Not shown to visitors** - Raw values don't appear in chatbox
#### How workflows and/or AI Shopping Assistant use custom data
The AI Shopping Assistant and workflows can use custom data (like `productId`) as context to retrieve relevant information from your configured knowledge sources.
**Example: Product Context on PDP**
```kotlin
// Register product ID when visitor views product page
IAdvizeSDK.visitorController.registerCustomData(
CustomData("productId", "SKU-12345"),
CustomData("productName", "Garden Hose 50ft"),
CustomData("productCategory", "Gardening")
)
```
When a conversation starts:
* The operator sees: productId = SKU-12345, productName = Garden Hose 50ft
* The AI Shopping Assistant uses productId to query your product catalog (if configured in knowledge sources)
* The bot can answer product-specific questions without the visitor repeating information
**Important:** The bot doesn't display raw custom data values to visitors. It uses them as lookup parameters to retrieve relevant information from your configured knowledge sources.
#### Channel-agnostic workflows/AI Shopping Assistant behavior
Workflows/AI Shopping Assistant configuration in iAdvize Admin works identically across:
* Web
* Mobile App (Mobile SDK)
* Social/Messaging channels
The Mobile SDK provides the conversation interface; the workflows/AI Shopping Assistant intelligence and behavior are configured in iAdvize Admin and remain consistent across all channels.
#### Use cases
* Product pages: pass productId for product-specific assistance
* Cart: pass cart contents for contextual recommendations
* Order tracking: pass orderId for WISMO (Where Is My Order) workflows
* Category pages: pass category info for relevant suggestions
Learn more about AI Shopping Assistant configuration: [documentation](https://help.iadvize.com/hc/en-gb/articles/14289921821586-AI-Shopping-Assistant-principles-and-usage)
## 👍 Fetching visitor satisfaction
The satisfaction survey is automatically sent to the visitor at the end of the conversation, as long as it is activated in the iAdvize administration website. The survey is presented to the visitor in a conversational approach, directly into the Chatbox.
{% hint style="info" %}
*Only the `CSAT`, `NPS` and `COMMENT` steps of the survey are supported.*
{% endhint %}
### 📊 Analytics & Monitoring
#### iAdvize Admin dashboard
Filter mobile conversations in Reports:
* **By targeting rule:** Name rules clearly ("Mobile - Homepage", "Mobile - PDP")
* **By routing rule:** Track performance per team/bot
* **Standard metrics:** Conversations, response time, CSAT, NPS
**Limitation:** Cannot differentiate iOS vs Android (both show as "Mobile App" channel)
#### Advanced Analytics: GraphQL API
For detailed metrics and historical analysis:
* `TARGETING_RULE_DISPLAY_NUMBER` - How often chat button was displayed
* `TARGETING_RULE_TRIGGERED` - How often conversations started
* Pre-aggregated indicators for periodic exports
Documentation: [Retrieve Messages & Pre-aggregated Indicators](/use-cases/data-and-analytics/retrieve-messages-exchanged-within-a-conversation-1/pre-aggregated-indicators)
⚠️ **Note:** These are historical/reporting metrics, not available in real-time for app logic.
#### App-side analytics
The Mobile SDK does NOT track or report:
* When/why you call `activateTargetingRule()`
* User behavior that leads to trigger activation
* Frequency of button displays per visitor
* Session tracking and user preferences
**You must instrument these in your analytics platform** (Google Analytics, Firebase, Mixpanel, etc.) for:
* Trigger effectiveness analysis
* A/B testing trigger strategies
* User engagement patterns
* Conversion funnel tracking
# Gaperon
{% hint style="info" %}
### 🆕 🚨 What's new?
The visitor targeting workflow has been simplified. You do not need to register the visitor navigation anymore.
Thus, the method `registerUserNavigation(navigationOption: NavigationOption)` is now deprecated.
Now, you manage targeting using only these 2 methods:
* To engage the visitor, call `activateTargetingRule(targetingRule: TargetingRule)` (as you already do).
* To stop engaging the visitor, calls `deactivateTargetingRule()` (this is new).
Between these 2 calls, the iAdvize Mobile SDK automatically updates the targeting rule availability (every 30 seconds) and updates the chat button accordingly. If the update fails (e.g.: if there is no connection), you do not need to perform any special actions. The iAdvize SDK will try to update it again 30 seconds later.
{% tabs %}
{% tab title="Android" %}
```kotlin
// Activating a new rule.
// - Before:
IAdvizeSDK.targetingController.registerUserNavigation(NavigationOption.ActivateNewRule(yourOtherTargetingRule))
// - After (if there is already a targeting rule activated, it is replaced):
IAdvizeSDK.targetingController.activateTargetingRule(yourOtherTargetingRule)
// Deactivating the rule.
// - Before:
IAdvizeSDK.targetingController.registerUserNavigation(NavigationOption.ClearActiveRule)
// - After:
IAdvizeSDK.targetingController.deactivateTargetingRule()
// Register new screen.
// - Before:
IAdvizeSDK.targetingController.registerUserNavigation(NavigationOption.KeepActiveRule)
// - After:
// Nothing to do.
```
{% endtab %}
{% tab title="iOS" %}
{% code fullWidth="false" %}
```swift
// Activating a new rule.
// - Before:
IAdvizeSDK.shared.targetingController.registerUserNavigation(navigationOption: .activateNewRule(targetingRule: yourOtherTargetingRule))
// - After (if there is already a targeting rule activated, it is replaced):
IAdvizeSDK.shared.targetingController.activateTargetingRule(targetingRule: yourOtherTargetingRule)
// Deactivating the rule.
// - Before:
IAdvizeSDK.shared.targetingController.registerUserNavigation(navigationOption: .clearActiveRule)
// - After:
IAdvizeSDK.shared.targetingController.deactivateTargetingRule()
// Register new screen.
// - Before:
IAdvizeSDK.shared.targetingController.registerUserNavigation(navigationOption: .keepActiveRule)
// - After:
// Nothing to do.
```
{% endcode %}
{% endtab %}
{% tab title="React Native" %}
```javascript
// Activating a new rule.
// - Before:
IAdvizeSDK.registerUserNavigation(NavigationOption.NEW, targetingRuleUUIDString, channel);
// - After (if there is already a targeting rule activated, it is replaced):
IAdvizeSDK.activateTargetingRule(targetingRuleUUIDString, channel)
// Deactivating the rule.
// - Before:
IAdvizeSDK.registerUserNavigation(NavigationOption.CLEAR, "", "");
// - After:
IAdvizeSDK.deactivateTargetingRule()
// Register new screen.
// - Before:
IAdvizeSDK.registerUserNavigation(NavigationOption.KEEP, "", "");
// - After:
// Nothing to do.
```
{% endtab %}
{% tab title="Flutter" %}
```dart
// Activating a new rule.
// - Before:
IAdvizeSdk.registerUserNavigation(
navigationOption: NavigationOption.optionNew,
newTargetingRule: TargetingRule(uuid: targetingRuleUUIDString, channel: channel)
);
// - After (if there is already a targeting rule activated, it is replaced):
IAdvizeSdk.activateTargetingRule(TargetingRule(uuid: targetingRuleUUIDString, channel: channel));
// Deactivating the rule.
// - Before:
IAdvizeSdk.registerUserNavigation(navigationOption: NavigationOption.optionClear);
// - After:
IAdvizeSDK.deactivateTargetingRule();
// Register new screen.
// - Before:
IAdvizeSdk.registerUserNavigation(navigationOption: NavigationOption.optionKeep);
// - After:
// Nothing to do.
```
{% endtab %}
{% endtabs %}
{% endhint %}
## ⚙️ Prerequisites
There are a few steps required before you start integrating the iAdvize Mobile SDK.
## 💬 Setting up your iAdvize environment
Before integrating the Mobile SDK, you need to check that your iAdvize environment is ready to use (i.e. you have an account ready to receive and answer to conversations from the Mobile SDK). You will also need some information related to the project for the Mobile SDK setup. Please ask your iAdvize administrator to follow the instructions available on the Mobile [SDK Knowledge Base](https://help.iadvize.com/hc/en-gb/articles/360019839480) and to provide you with the **Project Identifier** as well as a **Targeting Rule Identifier**.
{% hint style="warning" %}
*Your iAdvize administrator should already have configured the project on the* [*iAdvize Administration Desk*](https://ha.iadvize.com/admin/login/) *and created an operator account for you. If it is not yet the case please contact your iAdvize Technical Project Manager.*
{% endhint %}
## **🎯 Understanding Mobile SDK: triggers & targeting**
#### Key differences: Mobile SDK vs Web
**Web:**
* iAdvize automatically detects visitor behavior
* Targeting rules include criteria (URL patterns, visitor segments, timing conditions)
* Triggers fire automatically based on Admin configuration
**Mobile SDK:**
* **YOU implement ALL trigger detection logic** in your app code
* Targeting rules are routing identifiers ONLY (no criteria, no automatic triggering)
* The Mobile SDK provides the conversation infrastructure, not behavior detection
#### What the Mobile SDK provides vs what you should implement
✅ **Mobile** **SDK provides:**
* `activateTargetingRule(uuid)` - Shows chat button if operator/bot available
* `deactivateTargetingRule()` - Hides chat button
* Automatic 30-second availability checks
* Conversation interface and message handling
❌ **You must implement:**
* Detecting user behavior (idle time, scroll events, button taps, navigation)
* Implementing business rules (show after 10s on product page, hide on checkout, etc.)
* Frequency control (max 1x per session, cooldown periods)
* Session tracking and visitor preferences
* Deciding WHEN to call `activateTargetingRule()`
#### Example architecture
1. YOUR APP detects: "User idle 8 seconds on homepage"
2. YOUR APP decides: "Show chat button" (checks frequency cap, user preferences)
3. YOUR APP calls: `activateTargetingRule("homepage-uuid")`
4. Mobile SDK checks: Operator/bot available?
5. Mobile SDK shows: Chat button (if available)
## 💻 Connecting to your iAdvize Operator Desk
Using your operator account please log into the [iAdvize Desk](https://ha.iadvize.com/admin/login/).
{% hint style="warning" %}
*If you have the Administrator status in addition to your operator account, you will be directed to the Admin Desk when logging in. Just click on the `Chat` button in the upper right corner to open the Operator Desk.*
{% endhint %}
The iAdvize operator desk is the place where the conversations that are assigned to your account will pop up. Please ensure that your status is “Available" by enabling the corresponding chat or video toggle buttons in the upper right corner:
The chat button is green, your operator can receive incoming conversations.
If the toggle button is yellow, it means you have reached your maximum simultaneous chat slots, please end your current conversations to free a chat slot and allow the conversations to be assigned to you. If the toggle is red you are not available to chat.
## 🔐 Ensuring the Mobile SDK integrity
Before downloading the iAdvize Mobile SDK artifacts you can verify their integrity by generating their checksums and comparing them with the reference checksums available.
{% tabs %}
{% tab title="Android" %}
Reference checksums are available:
* in the [GitHub release note](https://github.com/iadvize/iadvize-android-sdk/releases/latest)
* in the [dedicated spreadsheet](https://docs.google.com/spreadsheets/d/11A5RScYGCg17rFXp-RaMyVIUqsd3WacXiTjxk3GNZyk)
The iAdvize Android SDK consists of an archive (`aar` file) and a Maven project description (`pom` file), you can generate their checksums using the following commands (replace `x.y.z` by the SDK version you are checking):
```bash
curl -sL https://github.com/iadvize/iadvize-android-sdk/raw/master/com/iadvize/iadvize-sdk/x.y.z/iadvize-sdk-x.y.z.aar | openssl sha256
curl -sL https://github.com/iadvize/iadvize-android-sdk/raw/master/com/iadvize/iadvize-sdk/x.y.z/iadvize-sdk-x.y.z.pom | openssl sha256
```
This ensures that the online packages are valid. In order to check those checksums on the fly, this process can be automated via Gradle by adding a metadata verification xml file at `$PROJECT_ROOT/gradle/verification-metadata.xml`:
```xml
truefalse
```
With this file present in your project structure, Gradle will automatically check the artifacts checksums before integrating them into your app. Please note that you will have to do this for **all dependencies** used in your project. To help you with that, `verification-metadata.xml` for the Mobile SDK sub-dependencies is delivered alongside the Mobile SDK. Those subdependencies checksums have been generated through the Gradle generation feature and not verified.
{% endtab %}
{% tab title="iOS" %}
Reference checksums are available:
* in the [GitHub release note](https://github.com/iadvize/iadvize-ios-sdk/releases/latest)
* in the [dedicated spreadsheet](https://docs.google.com/spreadsheets/d/11A5RScYGCg17rFXp-RaMyVIUqsd3WacXiTjxk3GNZyk)
**Swift Package Manager integration**
The iOS SDK only consists of an archive (`zip` file). You can generate its checksums using the following command (replace `x.y.z` by the SDK version you are checking):
```bash
curl -sL https://github.com/iadvize/iadvize-ios-sdk/releases/download/x.y.z/IAdvizeSDK.zip | openssl sha3-256
```
SPM will also automatically verify that the checksum of the artifact it downloads correspond to the one described in the `Package.swift` available in the public repository (it's a SHA2-256 checksum).
**CocoaPods integration**
The iAdvize iOS SDK consists of an archive (`zip` file) and a Cocoapods project description file (`podspec` file). You can generate their checksums using the following commands (replace `x.y.z` by the SDK version you are checking):
```bash
curl -sL https://github.com/iadvize/iadvize-ios-sdk/releases/download/x.y.z/IAdvizeSDK.zip | openssl sha3-256
curl -sL https://raw.githubusercontent.com/CocoaPods/Specs/master/Specs/d/0/0/iAdvize/x.y.z/iAdvize.podspec.json | openssl sha3-256
```
After downloading the SDK through CocoaPods, additional verifications can be made, first by comparing the podspec checksum at the end of the generated `Podfile.lock` with the SHA1 podspec reference checksum.
```
SPEC CHECKSUMS:
iAdvize: podspec-sha1-checksum
```
The downloaded framework integrity can also be checked by generating the local pod files checksums and comparing them with the online reference ones:
```bash
cd Pods/iAdvize
find IAdvizeConversationSDK.xcframework -type f -exec openssl sha3-256 {} \; >> IAdvizeSDK-local.checksums
```
{% endtab %}
{% tab title="React Native" %}
Our React Native SDK plugin is hosted on an external platform called [Node Package Manager (NPM)](https://www.npmjs.com/) that already has internal checksum validation strategies in order to ensure that the downloaded plugin code (the wrapper code) is untampered.
{% endtab %}
{% tab title="Flutter" %}
Our Flutter SDK plugin is hosted on an external platform called [pub.dev](https://pub.dev/), that already has internal checksum validation strategies in order to ensure that the downloaded plugin code (the wrapper code) is untampered.
{% endtab %}
{% endtabs %}
## ⚙️ Setting up the Mobile SDK
### **1️⃣ Setting up the Mobile SDK into your project configuration**
First of all, to be able to use the Mobile SDK you need to add the Mobile SDK dependency into your project. Some configuration steps will also be needed in order to use it.
{% tabs %}
{% tab title="Android" %}
Add the iAdvize repository to your project repositories inside your top-level Gradle build file:
```gradle
// Project-level build.gradle.kts
allprojects {
repositories {
maven(url = uri("https://raw.githubusercontent.com/iadvize/iadvize-android-sdk/master"))
maven(url = uri("https://jitpack.io"))
}
}
```
Add the iAdvize Mobile SDK dependency inside your module-level Gradle build file (replace `x.y.z` by the latest SDK version available):
```gradle
// Module-level build.gradle.kts
configurations {
all {
exclude(group = "xpp3", module = "xpp3")
}
}
dependencies {
implementation("com.iadvize:iadvize-sdk:x.y.z")
}
```
{% hint style="info" %}
*The `exclude` configuration is required because the iAdvize Mobile SDK uses* [*Smack*](https://github.com/igniterealtime/Smack)*, an XMPP library that is built upon `xpp3`, which is bundled by default in the Android framework. This exclude ensures that your app does not also bundle `xpp3` to avoid classes duplication errors.*
{% endhint %}
If you have build problems this may come from compatibility issues with the Android configuration, here are the versions used by the iAdvize Mobile SDK:
| Target SDK | `35` |
| --------------------- | -------- |
| Compile SDK | `35` |
| Minimum SDK | `24` |
| Build Tools | `35.0.0` |
| Kotlin | `2.1.10` |
| Gradle | `8.13` |
| Android Gradle Plugin | `8.9.0` |
After syncing your project you should be able to import the iAdvize dependency in your application code with `import com.iadvize.conversation.sdk.IAdvizeSDK`
You will then need to provide a reference to your application object and initialize the SDK with it.
In your `AndroidManifest.xml` declare your application class:
```xml
```
This class should then initialize the SDK:
```kotlin
package my.app.package.App
class App : Application() {
override fun onCreate() {
super.onCreate()
IAdvizeSDK.initiate(this)
}
}
```
⌨️ **In-context example:**
* [Project-level Gradle file](https://github.com/iadvize/iadvize-android-sdk/blob/master/example/build.gradle.kts)
* [Module-level Gradle file](https://github.com/iadvize/iadvize-android-sdk/blob/master/example/mobile/build.gradle.kts)
* [Import](https://github.com/iadvize/iadvize-android-sdk/blob/master/example/mobile/src/main/java/com/iadvize/conversation/sdk/demo/feature/App.kt#L5)
* [SDK Initiation](https://github.com/iadvize/iadvize-android-sdk/blob/master/example/mobile/src/main/java/com/iadvize/conversation/sdk/demo/feature/App.kt#L15)
{% hint style="info" %}
*The SDK supports video conversations using a third-party native (C++) binaries. If you are delivering your app using an APK you will note a size increase as the default behavior of the build system is to include the binaries for each ABI in a single APK. We strongly recommended that you take advantage of either* [*App Bundles*](https://developer.android.com/guide/app-bundle) *or* [*APK Splits*](https://developer.android.com/studio/build/configure-apk-splits) *to reduce the size of your APKs while still maintaining maximum device compatibility.*
{% endhint %}
{% endtab %}
{% tab title="iOS" %}
{% tabs %}
{% tab title="SPM" %}
From Xcode go to `File > Add Packages`, then paste the iAdvize Messenger SDK URL in the top-right search bar. Select the versioning strategy fitting your app then click on `Add Package`.
You should then be able to import the iAdvize dependency in your application code using `import IAdvizeConversationSDK`
⌨️ **In-context example:** [Import](https://github.com/iadvize/iadvize-ios-sdk/blob/master/example/SPMIntegration/SPMIntegration/Source/AppDelegate%2BiAdvize.swift#L10)
{% endtab %}
{% tab title="CocoaPods" %}
Add this line to your `Podfile`, inside the `target` section (replace `x.y.z` by the latest SDK version available, and choose the versioning strategy fitting your app):
```ruby
platform :ios, '13.0'
target 'YOUR_TARGET' do
project 'YOUR_PROJECT'
pod 'iAdvize', 'x.y.z'
end
```
{% hint style="warning" %}
*iAdvize Messenger SDK requires a **minimum iOS platform** of 13.0**.***
{% endhint %}
After running `pod install` you should be able to import the iAdvize dependency in your application code with `import IAdvizeConversationSDK`
⌨️ **In-context example:**
* [Podfile](https://github.com/iadvize/iadvize-ios-sdk/blob/master/example/CocoaPodsIntegration/Podfile#L1)
* [Import](https://github.com/iadvize/iadvize-ios-sdk/blob/master/example/CocoaPodsIntegration/CocoaPodsIntegration/Source/AppDelegate%2BiAdvize.swift#L10)
{% endtab %}
{% endtabs %}
{% hint style="info" %}
*The SDK supports video conversations. Thus it will request camera and microphone access before entering a video call. To avoid the app to crash, you have to setup two keys in your app Info.plist*
```
NSCameraUsageDescriptionThis application will use the camera to share photos and during video calls.NSMicrophoneUsageDescriptionThis application will use the microphone during video calls.
```
{% endhint %}
{% endtab %}
{% tab title="React Native" %}
Download the library from `NPM` using the following command:
```bash
npm install @iadvize-oss/iadvize-react-native-sdk
```
Alternatively, you can use `Yarn`:
```bash
yarn add @iadvize-oss/iadvize-react-native-sdk
```
The SDK API is then available via the following import:
```javascript
import IAdvizeSDK from '@iadvize-oss/iadvize-react-native-sdk';
```
{% tabs %}
{% tab title="Android setup" %}
In your `android/build.gradle` file, and add the iAdvize SDK repository. You also need to ensure that you are using the right Android framework to build (iAdvize Mobile SDK is built with Android target 35):
```gradle
// android/build.gradle
buildscript {
ext {
buildToolsVersion = "35.0.0"
minSdkVersion = 24
compileSdkVersion = 35
targetSdkVersion = 35
kotlinVersion = "2.1.10"
gradleVersion = "8.9.0"
ndkVersion = "29.0.13113456"
}
}
allprojects {
repositories {
maven { url "https://raw.githubusercontent.com/iadvize/iadvize-android-sdk/master" }
maven { url "https://jitpack.io" }
}
}
```
{% hint style="warning" %}
*iAdvize Mobile SDK requires a **minSdkVersion** >= 24.*
{% endhint %}
On Android, the iAdvize Mobile SDK needs to be initialized before use to allow several functionalities to work. For instance, the default floating button use an ActivityLifecycleController that must be started before the main ReactNative activity is created, otherwise the controller won't be able to trigger the button display. Thus you need to add those lines in the `android/app/src/main/java/yourpackage/MainApplication.java` to initialize the SDK properly:
```java
// android/app/src/main/java/yourpackage/MainApplication.java
import com.iadvize.conversation.sdk.IAdvizeSDK;
public class MainApplication extends Application implements ReactApplication {
@Override
public void onCreate() {
super.onCreate();
IAdvizeSDK.initiate(this);
}
}
```
{% endtab %}
{% tab title="iOS setup" %}
Add this line to your `Podfile`, inside the `target` section (replace `x.y.z` by the latest SDK version available, and choose the versioning strategy fitting your app):
```ruby
target 'YOUR_TARGET' do
project 'YOUR_PROJECT'
pod 'iAdvize', 'x.y.z'
end
```
{% hint style="warning" %}
*iAdvize Mobile SDK requires a **minimum iOS platform** of 13.4*
{% endhint %}
Once this is done, make sure to go to `ios` folder and install CocoaPods dependencies:
```bash
cd ios && pod install --repo-update
```
{% hint style="info" %}
*The SDK supports video conversations. Thus it will request camera and microphone access before entering a video call. To avoid the app to crash, you have to setup two keys in your app Info.plist*
```
NSCameraUsageDescriptionThis application will use the camera to share photos and during video calls.NSMicrophoneUsageDescriptionThis application will use the microphone during video calls.
```
{% endhint %}
{% endtab %}
{% endtabs %}
{% endtab %}
{% tab title="React Native + Expo" %}
Download the SDK as well as the `expo-build-properties` library from `NPM` using the following command:
```bash
npx expo install expo-build-properties
npx expo install @iadvize-oss/iadvize-react-native-sdk
```
Configure the build properties using `expo-build-properties` in the `app.json` file:
```json
{
"expo": {
...
"ios": {
...
"infoPlist": {
"NSCameraUsageDescription": "This application will use the camera to share photos and during video calls.",
"NSMicrophoneUsageDescription": "This application will use the microphone during video calls."
}
},
"plugins": [
...
[
"expo-build-properties",
{
"android": {
"compileSdkVersion": 35,
"targetSdkVersion": 35,
"buildToolsVersion": "35.0.0",
"minSdkVersion": 24
},
"ios": {
"deploymentTarget": "15.1"
}
}
],
"./iadvize.config.js"
],
...
}
}
```
For that step you will need to download the [iAdvize Mobile SDK Expo Plugin configuration file](https://github.com/iadvize/iadvize-react-native-sdk/tree/main/expo-integration) and save it alongside the `app.json` file of your project.
Afterwards you can generate the native code using the traditional Expo command:
```bash
npx expo prebuild --clean
```
{% endtab %}
{% tab title="Flutter" %}
Download the library from `pub.dev` using the following command:
```bash
flutter pub add iadvize_flutter_sdk
```
The SDK API is then available via the following import:
```dart
import 'package:iadvize_flutter_sdk/iadvize_sdk.dart';
```
{% tabs %}
{% tab title="Android setup" %}
In your `android/build.gradle` file, and add the iAdvize SDK repository:
```gradle
// android/build.gradle
allprojects {
repositories {
maven { url "https://raw.githubusercontent.com/iadvize/iadvize-android-sdk/master" }
maven { url "https://jitpack.io" }
}
}
```
You also need to ensure that you are using the right Android framework to build (iAdvize Messenger SDK is built with Android target 35), as a good practice, also check that you are using the latest Kotlin version in `android/build.gradle` (you can find the version used in the plugin through its README file)
```gradle
// android/build.gradle
allprojects {
ext {
buildToolsVersion = "35.0.0"
minSdkVersion = 24
compileSdkVersion = 35
targetSdkVersion = 35
kotlinVersion = "2.1.10"
gradleVersion = "8.9.0"
ndkVersion = "29.0.13113456"
}
}
```
{% hint style="warning" %}
*iAdvize Messenger SDK requires a **minSdkVersion** >= 24.*
{% endhint %}
{% endtab %}
{% tab title="iOS setup" %}
Add this line to your `Podfile`, inside the `target` section (replace `x.y.z` by the latest SDK version available, and choose the versioning strategy fitting your app):
```ruby
platform :ios, '13.4'
target 'YOUR_TARGET' do
project 'YOUR_PROJECT'
pod 'iAdvize', 'x.y.z'
end
```
{% hint style="warning" %}
*iAdvize Messenger SDK requires a **minimum iOS platform** of 13.4*
{% endhint %}
Once this is done, make sure to go to `ios` folder and install CocoaPods dependencies:
```bash
cd ios && pod install --repo-update
```
{% hint style="info" %}
*The SDK supports video conversations. Thus it will request camera and microphone access before entering a video call. To avoid the app to crash, you have to setup two keys in your app Info.plist*
```
NSCameraUsageDescriptionThis application will use the camera to share photos and during video calls.NSMicrophoneUsageDescriptionThis application will use the microphone during video calls.
```
{% endhint %}
{% endtab %}
{% endtabs %}
{% endtab %}
{% endtabs %}
### **2️⃣ Activating the Mobile SDK**
Now that the Mobile SDK is available into your project build, let's integrate it into your app, first by activating it. Activation is the step that logs a visitor into the iAdvize flow.
You can choose between multiple authentication options:
Anonymous
For an unidentified visitor browsing your app.
Simple
For a logged in visitor in your app. You must pass a unique string identifier so that the visitor will retrieve his conversation history across multiple devices and platforms.
The identifier that you pass must be unique and non-discoverable for each different logged-in visitor.
Secured
Use it in conjunction with your in-house authentication system. You must pass a JWE provider callback that will be called when an authentication is required, you will then have to call your third party authentication system for a valid JWE to provide to the Mobile SDK.
For a full understanding of how the secured authentication works in the iAdvize platform you can refer to thissection.
To activate the Mobile SDK you must use the `activate` function with your `projectId` (see the [Prerequisites](#prerequisites) section above to get that identifier). You have access to callbacks in order to know if the SDK has been successfully activated. In case of a Mobile SDK activation failure the callback will give you the reason of the failure and you may want to retry later.
{% tabs %}
{% tab title="Android" %}
```kotlin
IAdvizeSDK.activate(
projectId = projectId,
authenticationOption = authOption,
gdprOption = gdprOption,
callback = object : IAdvizeSDK.Callback {
override fun onSuccess() {
Log.d("iAdvize SDK", "The SDK has been activated.")
}
override fun onFailure(error: IAdvizeSDK.Error) {
Log.e("iAdvize SDK", "The SDK activation failed with:", error)
}
}
)
```
⌨️ **In-context example:** [SDK Activation](https://github.com/iadvize/iadvize-android-sdk/blob/master/example/mobile/src/main/java/com/iadvize/conversation/sdk/demo/feature/App.kt#L32)
{% endtab %}
{% tab title="iOS" %}
```swift
IAdvizeSDK.shared.activate(projectId: projectId,
authenticationOption: authOption,
gdprOption: gdprOption)) { success in
if success {
...
}
}
```
⌨️ **In-context example:** [SDK Activation](https://github.com/iadvize/iadvize-ios-sdk/blob/master/example/SPMIntegration/SPMIntegration/Source/AppDelegate%2BiAdvize.swift#L61)
{% endtab %}
{% tab title="React Native" %}
```javascript
try {
// Anonymous Auth => Do not set the onJWERequested listener & set an empty userId
await IAdvizeSDK.activate(projectId, '', ...);
// Simple Auth => Do not set the onJWERequested listener & set a non-empty userId
await IAdvizeSDK.activate(projectId, "my-user-unique-id", ...);
// Secured Auth => Set the onJWERequested listener
IAdvizeSDKListeners.onJWERequested(function (eventData: any) {
console.log('onJWERequested' + ' ' + eventData);
// Fetch JWE from your 3rd-party auth system
// In SDK v3, you must return the value here (synchronously)
var jwe = ... ;
return jwe;
// In SDK v4, you should the value using an asynchronous API call (here or elsewhere)
IAdvizeSDK.provideJWE(jwe);
});
await IAdvizeSDK.activate(projectId, '', ...);
// SDK is activated
} catch (e) {
// SDK failed to activate
}
```
{% endtab %}
{% tab title="Flutter" %}
```dart
IAdvizeSdk.activate(
projectId: 'projectId',
authenticationOption: authOption
gdprOption: gdprOption,
).then((bool activated) => activated
? log('iAdvize Example : SDK activated')
: log('iAdvize Example : SDK not activated'));
```
{% endtab %}
{% endtabs %}
Once the iAdvize Mobile SDK is successfully activated, you should see a success message in the console:
```
✅ iAdvize conversation activated, the version is x.y.z
```
### **3️⃣ Logging the visitor out**
You will have to explicitly call the `logout` function of the iAdvize Mobile SDK when the visitor sign out of your app.
{% tabs %}
{% tab title="Android" %}
```kotlin
IAdvizeSDK.logout()
```
{% endtab %}
{% tab title="iOS" %}
```swift
IAdvizeSDK.shared.logout()
```
{% endtab %}
{% tab title="React Native" %}
```javascript
IAdvizeSDK.logout()
```
{% endtab %}
{% tab title="Flutter" %}
```dart
IAdvizeSdk.logout();
```
{% endtab %}
{% endtabs %}
### **4️⃣ Displaying logs**
To have more information on what’s happening on the Mobile SDK side you can change the log level.
{% tabs %}
{% tab title="Android" %}
{% endtab %}
{% tab title="iOS" %}
```swift
// verbose, info, warning, error, success, none
// Default is warning
IAdvizeSDK.shared.logLevel = .verbose
```
{% endtab %}
{% tab title="React Native" %}
```javascript
// VERBOSE, INFO, WARNING, ERROR, SUCCESS, NONE
// Default is WARNING
IAdvizeSDK.setLogLevel(LogLevel.VERBOSE);
```
{% endtab %}
{% tab title="Flutter" %}
```dart
// verbose, info, warning, error, success, none
// Default is warning
IAdvizeSdk.setLogLevel(LogLevel.verbose);
```
{% endtab %}
{% endtabs %}
You can get a description of the Mobile SDK status at any time by using the `debugInfo` API:
{% tabs %}
{% tab title="Android" %}
IAdvizeSDK.debugInfo()
{% endtab %}
{% tab title="iOS" %}
```swift
IAdvizeSDK.shared.debugInfo()
```
{% endtab %}
{% tab title="React Native" %}
```javascript
const debugInfo = IAdvizeSDK.debugInfo();
```
{% endtab %}
{% tab title="Flutter" %}
```dart
final debugInfo = await IAdvizeSdk.debugInfo();
```
{% endtab %}
{% endtabs %}
This will generate a JSON object with the Mobile SDK status information, encoded into a string that you can easily add into your bug reporting tool payload:
## 💬 Starting a conversation
To be able to start a conversation you will first have to **trigger a targeting rule** in order for the default chat button to be displayed. The chatbox will then be accessible by clicking on that chat button.
### **1️⃣ Configuring the targeting language**
The targeting rule configured in the iAdvize Administration Panel is setup for a given language. This means that if, for example, you setup a targeting rule to be triggered only for `EN` language and the current visitor’s device is setup with a different targeting language (for instance `FR`), the targeting rule will not trigger.
By default, the targeting rule language used is the visitor’s device current language. You can force the targeting language to a specific value using:
{% tabs %}
{% tab title="Android" %}
```kotlin
IAdvizeSDK.targetingController.language = LanguageOption.Custom(Language.FR)
```
{% endtab %}
{% tab title="iOS" %}
```swift
IAdvizeSDK.shared.targetingController.language = .custom(value: .fr)
```
{% endtab %}
{% tab title="React Native" %}
```javascript
IAdvizeSDK.setLanguage('fr');
```
{% hint style="warning" %}
*The language string should respect* [*ISO 639-1*](https://en.wikipedia.org/wiki/ISO_639-1)*.*
{% endhint %}
{% endtab %}
{% tab title="Flutter" %}
```dart
IAdvizeSdk.setLanguage('fr');
```
{% hint style="warning" %}
*The language string should respect* [*ISO 639-1*](https://en.wikipedia.org/wiki/ISO_639-1)*.*
{% endhint %}
{% endtab %}
{% endtabs %}
{% hint style="warning" %}
*This `language` property is **NOT** intended to change the language displayed in the SDK. It is solely used for the targeting process purpose.*
{% endhint %}
### **2️⃣ Activating a targeting rule**
#### What is a targeting rule in Mobile SDK?
Unlike web targeting rules (which include criteria and automatic triggering), Mobile SDK targeting rules are **routing identifiers only**:
❌ No behavioral criteria (URL patterns, dwell time, scroll depth)
❌ No automatic triggering based on visitor behavior
✅ Routes conversations to specific routing rules/teams/bots
✅ Checks operator/bot availability
**Your responsibility:**
* Detect user behavior in your app (navigation, idle time, button taps)
* Implement business logic for WHEN to activate rules
* Call `activateTargetingRule()` when YOUR conditions are met
**SDK responsibility:**
* Check if operator/bot is available for this targeting rule
* Show/hide chat button based on availability
* Update availability every 30 seconds
**Best practice:** Create one targeting rule per app context:
* Homepage → `activateTargetingRule("homepage-uuid")`
* Product page → `activateTargetingRule("pdp-uuid")`
* Cart → `activateTargetingRule("cart-uuid")`
Each rule can route to different teams/bots while you control the triggering logic.
See [Understanding Mobile SDK: triggers and targeting](#understanding-mobile-sdk-triggers-and-targeting) for architecture details.
#### **Calling activateTargetingRule**
Using a targeting rule UUID (see the [Prerequisites](#prerequisites) section above to get that identifier), you can engage a visitor by calling:
{% tabs %}
{% tab title="Android" %}
```kotlin
IAdvizeSDK.targetingController.activateTargetingRule(
TargetingRule(
targetingRuleUUID,
ConversationChannel.CHAT // or ConversationChannel.VIDEO
)
)
```
⌨️ **In-context example:** [Targeting rule activation](https://github.com/iadvize/iadvize-android-sdk/blob/da8b4ae56db4eff6f8539279b511ed442064b4cb/example/mobile/src/main/java/com/iadvize/conversation/sdk/demo/feature/product/ProductDetailFragment.kt#L43)
{% endtab %}
{% tab title="iOS" %}
let targetingRule = TargetingRule(id: UUID, conversationChannel: .chat) // or .video
IAdvizeSDK.shared.targetingController.activateTargetingRule(targetingRule: targetingRule)
⌨️ **In-context example:** [Targeting rule activation](https://github.com/iadvize/iadvize-ios-sdk/blob/d279e8a7f90c1f79f2e897a798dd30a626d68227/example/SPMIntegration/SPMIntegration/Source/AppDelegate%2BiAdvize.swift#L65)
{% endtab %}
{% tab title="React Native" %}
```javascript
IAdvizeSDK.activateTargetingRule(targetingRuleUUIDString, ConversationChannel.CHAT); // OR ConversationChannel.VIDEO
```
{% endtab %}
{% tab title="Flutter" %}
```dart
IAdvizeSdk.activateTargetingRule(TargetingRule(uuid: 'targeting-rule-uuid', channel: ConversationChannel.chat)); // or ConversationChannel.video
```
{% endtab %}
{% endtabs %}
If all the following conditions are met, the default chat button should appear:
* the targeting rule exists and is enabled in the administration panel
* the targeting rule language set in the Mobile SDK matches the language configured for this rule
* an operator/bot assigned to this rule is available to answer (connected and with a free chat slot)
{% hint style="info" %}
After you activate a rule, those conditions are automatically re-evaluated **every 30 seconds**. The chat button is updated accordingly.
If the update fails (e.g.: if there is no connection), you do not need to perform any special actions. The iAdvize Mobile SDK will try to update it again 30 seconds later.
{% endhint %}
### **3️⃣ Initiating the conversation**
Once the default chat button is displayed, the visitor tap on it to access the chatbox. After composing and sending a message a new conversation should pop up in the operator desk.
 
### **4️⃣ Following visitor navigation**
While your visitor navigates through your app, you may want to update the active targeting rule in order to engage him/her with the best conversation partner at any time. To do so, simply activate the new rule. It will replace the previous one.
{% tabs %}
{% tab title="Android" %}
```kotlin
val newTargetingRule = TargetingRule(
newTargetingRuleUUID,
ConversationChannel.CHAT // or ConversationChannel.VIDEO
)
IAdvizeSDK.targetingController.activateTargetingRule(newTargetingRule)
```
{% endtab %}
{% tab title="iOS" %}
```swift
let newTargetingRule = TargetingRule(id: UUID, conversationChannel: .chat) // or .video
IAdvizeSDK.shared.targetingController.activateTargetingRule(targetingRule: newTargetingRule)
```
{% endtab %}
{% tab title="React Native" %}
```javascript
IAdvizeSDK.activateTargetingRule(newTargetingRuleUUID, ConversationChannel.CHAT); // OR ConversationChannel.VIDEO
```
{% endtab %}
{% tab title="Flutter" %}
```dart
final TargetingRule newTargetingRule = TargetingRule(
uuid: 'targeting-rule-uuid',
channel: ConversationChannel.chat // or ConversationChannel.video
);
IAdvizeSdk.activateTargetingRule(newTargetingRule);
```
{% endtab %}
{% endtabs %}
### **5️⃣ Deactivating a targeting rule**
When you do not want to engage the visitor anymore, simply deactivate the targeting rule.
{% tabs %}
{% tab title="Android" %}
```swift
IAdvizeSDK.targetingController.deactivateTargetingRule()
```
{% endtab %}
{% tab title="iOS" %}
```swift
IAdvizeSDK.shared.targetingController.deactivateTargetingRule()
```
{% endtab %}
{% tab title="React Native" %}
```javascript
IAdvizeSDK.deactivateTargetingRule();
```
{% endtab %}
{% tab title="Flutter" %}
```dart
IAdvizeSDK.deactivateTargetingRule();
```
{% endtab %}
{% endtabs %}
{% hint style="info" %}
The current targeting rule is automatically deactivated when you call the `logout()` method.
{% endhint %}
### 6️⃣ Frequency control & proactive messaging limitations
#### Reactive-only nature
The Mobile SDK is **reactive-only**:
* ✅ Visitor must tap the chat button to start a conversation
* ❌ Cannot push messages to trigger conversation start
* ✅ Push notifications work for ongoing conversations (operator/bot replies)
* ❌ Cannot proactively message visitors to initiate conversation
While workflows/AI Shopping Assistant can "proactively" greet and guide visitors WITHIN a conversation, the visitor must first open the chatbox.
#### Frequency capping
The Mobile SDK does NOT provide built-in frequency control.
**Track locally:**
* How many times `activateTargetingRule()` is called per session/day
* Cooldown periods (don't show for X hours after dismissal)
* Visitor preferences ("don't show again")
#### Analytics for optimization
While the SDK doesn't control frequency, iAdvize tracks metrics for analysis:
* `TARGETING_RULE_DISPLAY_NUMBER` - Button display count
* `TARGETING_RULE_TRIGGERED` - Conversation start count
Access via [GraphQL API - Pre-aggregated Indicators](/use-cases/data-and-analytics/retrieve-messages-exchanged-within-a-conversation-1/pre-aggregated-indicators) for historical analysis and optimization (not real-time control).
## 👋 Configuring GDPR and welcome message
### **1️⃣ Adding a welcome message**
As seen above, the chatbox is empty by default. You can configure a welcome message that will be displayed to the visitor when no conversation is ongoing.
{% tabs %}
{% tab title="Android" %}
```kotlin
val configuration = ChatboxConfiguration()
configuration.automaticMessage = "Any question? Say Hello to Smart and we will answer you as soon as possible! 😊"
IAdvizeSDK.chatboxController.setupChatbox(configuration)
```
⌨️ **In-context example:** [Welcome message](https://github.com/iadvize/iadvize-android-sdk/blob/da8b4ae56db4eff6f8539279b511ed442064b4cb/example/mobile/src/main/java/com/iadvize/conversation/sdk/demo/feature/IAdvizeSDKConfig.kt#L78)
{% endtab %}
{% tab title="iOS" %}
```swift
var configuration = ChatboxConfiguration()
configuration.automaticMessage = NSLocalizedString(
"Any question? Say Hello to Smart and we will answer you as soon as possible! 😊",
comment: ""
)
IAdvizeSDK.shared.chatboxController.setupChatbox(configuration: configuration)
```
⌨️ **In-context example:** [Welcome message](https://github.com/iadvize/iadvize-ios-sdk/blob/d279e8a7f90c1f79f2e897a798dd30a626d68227/example/SPMIntegration/SPMIntegration/Source/AppDelegate%2BiAdvize.swift#L42C1-L42C1)
{% endtab %}
{% tab title="React Native" %}
```javascript
const configuration: ChatboxConfiguration = {
automaticMessage: "Any question? Say Hello to Smart and we will answer you as soon as possible! 😊",
};
IAdvizeSDK.setChatboxConfiguration(configuration);
```
{% endtab %}
{% tab title="Flutter" %}
```dart
final ChatboxConfiguration configuration = ChatboxConfiguration(
automaticMessage: "Any question? Say Hello to Smart and we will answer you as soon as possible! 😊",
);
IAdvizeSdk.setChatboxConfiguration(configuration);
```
{% endtab %}
{% endtabs %}
When no conversation is ongoing, the welcome message is displayed to the visitor:

### **2️⃣ Enabling GDPR approval**
If you need to get the visitor consent on GDPR before he starts chatting, you can pass a `GDPROption` while activating the SDK. By default this option is set to `Disabled`.
If enabled, a message will request the visitor approval before allowing him to send a message to start the conversation:

This GDPR option dictates how the SDK behaves when the visitor taps on the `More information` button. You can either:
* provide an URL pointing to your GPDR policy, it will be opened on visitor click
* provide a listener/delegate that will be called on visitor click and you can then implement your own custom behavior
{% hint style="warning" %}
*If your visitors have already consented to GDPR inside your application, you can activate the iAdvize Mobile SDK without the GDPR process. However, be careful to explicitly mention the iAdvize Chat part in your GDPR consent details.*
{% endhint %}
{% tabs %}
{% tab title="Android" %}
```kotlin
// Disabled
val gdprOption = GDPROption.Disabled
// URL
val gdprOption = GDPROption.Enabled(GDPREnabledOption.LegalUrl(URI.create("http://my.gdpr.rules.com")))
// Listener
val gdprOption = GDPROption.Enabled(GDPREnabledOption.Listener(object : GDPRListener {
override fun didTapMoreInformation() {
// Implement your own logic
}
}))
```
```kotlin
val configuration = ChatboxConfiguration()
configuration.automaticMessage = "Any question? Say Hello to Smart and we will answer you as soon as possible! 😊"
configuration.gdprMessage = "Your own GDPR message."
IAdvizeSDK.chatboxController.setupChatbox(configuration)
```
⌨️ **In-context example:**
* [GDPR Option](https://github.com/iadvize/iadvize-android-sdk/blob/master/example/mobile/src/main/java/com/iadvize/conversation/sdk/demo/feature/IAdvizeSDKConfig.kt#L48)
* [GDPR Message](https://github.com/iadvize/iadvize-android-sdk/blob/master/example/mobile/src/main/java/com/iadvize/conversation/sdk/demo/feature/IAdvizeSDKConfig.kt#L69)
{% endtab %}
{% tab title="iOS" %}
```swift
// Disabled
let gdprOption = .disabled
// URL
if let legalInfoURL = URL(string: "http://my.gdpr.rules.com") {
let gdprOption = .enabled(option: .legalInformation(url: legalInfoURL))
}
// Listener
class GDPRMoreInfoListener: GDPRDelegate {
func didTapMoreInformation() {
// Implement your own logid
}
}
let gdprListener = GDPRMoreInfoListener()
let gdprOption = .enabled(option: .delegate(delegate: gdprListener))
```
```swift
var configuration = ChatboxConfiguration()
configuration.automaticMessage = NSLocalizedString(
"Any question? Say Hello to Smart and we will answer you as soon as possible! 😊",
comment: ""
)
configuration.gdprMessage = "Your own GDPR message."
IAdvizeSDK.shared.chatboxController.setupChatbox(configuration: configuration)
```
⌨️ **In-context example:**
* [GDPR Option](https://github.com/iadvize/iadvize-ios-sdk/blob/d279e8a7f90c1f79f2e897a798dd30a626d68227/example/SPMIntegration/SPMIntegration/Source/AppDelegate%2BiAdvize.swift#L53)
* [GDPR Message](https://github.com/iadvize/iadvize-ios-sdk/blob/d279e8a7f90c1f79f2e897a798dd30a626d68227/example/SPMIntegration/SPMIntegration/Source/AppDelegate%2BiAdvize.swift#L43)
{% endtab %}
{% tab title="React Native" %}
```javascript
// No listener set + null URL => GDPR is disabled
await IAdvizeSDK.activate(projectId, userId, null);
// No listener set + non-null URL => GDPR is enabled, the webpage opens when visitor click on more info button
await IAdvizeSDK.activate(projectId, userId, "http://my.gdpr.rules.com");
// Listener set => GDPR is enabled, the listener is called when user click on more info button
IAdvizeSDKListeners.onGDPRMoreInfoClicked(function (eventData: any) {
// Implement your own behavior
});
await IAdvizeSDK.activate(projectId, userId, null);
```
{% hint style="warning" %}
*If you set both the listener and an URL, the listener will take priority.*
{% endhint %}
```javascript
const configuration: ChatboxConfiguration = {
automaticMessage: 'Hello! Please ask your question :)',
gdprMessage: 'Your own custom GDPR message.'
};
IAdvizeSDK.setChatboxConfiguration(configuration)
```
{% endtab %}
{% tab title="Flutter" %}
```dart
// Disabled
GDPROption gdprOption = GDPROption.disabled();
// URL
GDPROption gdprOption = GDPROption.url(url: "http://my.gdpr.rules.com")
// Listener
GDPROption gdprOption = GDPROption.listener(onMoreInfoClicked: () {
log('iAdvize Example : GDPR More Info button clicked');
// Implement your own logic here
});
```
```dart
final ChatboxConfiguration configuration = ChatboxConfiguration(
gdprMessage: "Your own GDPR message",
);
IAdvizeSdk.setChatboxConfiguration(configuration);
```
{% endtab %}
{% endtabs %}
## 🎨 Branding the Chatbox
The `ChatboxConfiguration` object that we used in the previous section to customize the welcome and GDPR messages can also be used to change the Chatbox UI to better fit into the look and feel of your application.
{% hint style="warning" %}
*You should setup the configuration before presenting the chatbox. If you call this method while the chatbox is visible, some parameters will only apply for new messages or after closing/reopening the chatbox.*
{% endhint %}
### **1️⃣ Updating the font**
The font used in the Chatbox can easily be updated using your own font:
{% tabs %}
{% tab title="Android" %}
```kotlin
val configuration = ChatboxConfiguration()
configuration.fontPath = "fonts/comic_sans_ms_regular.ttf"
IAdvizeSDK.chatboxController.setupChatbox(configuration)
```
{% hint style="info" %}
*The font should be placed inside the assets folder. Here the file is located at `src/main/assets/fonts/comic_sans_ms_regular.ttf`*
{% endhint %}
{% endtab %}
{% tab title="iOS" %}
```swift
var configuration = ChatboxConfiguration()
configuration.font = UIFont(name: "AmericanTypewriter-Condensed", size: 11.0)
IAdvizeSDK.shared.chatboxController.setupChatbox(configuration: configuration)
```
{% hint style="warning" %}
*Even if the UIFont constructor needs a size attribute, the exact font size and traits are automatically chosen and the font is scaled to the current Dynamic Type setting.*
{% endhint %}
{% hint style="info" %}
*The font should either be a system font, or be a font embedded into the app, with a font file inside the bundle and its corresponding declaration into the `Info.plist` file.*
{% endhint %}
{% endtab %}
{% tab title="React Native" %}
```javascript
const configuration: ChatboxConfiguration = {
// For iOS devices
fontName: 'AmericanTypewriter-Condensed',
fontSize: 11, // iOS only
// For Android devices
fontPath: 'fonts/comic_sans_ms_regular.ttf',
};
```
{% hint style="info" %}
*On **iOS** the font should either be a system font, or be a font embedded into the app, with a font file inside the bundle and its corresponding declaration into the `Info.plist` file.*
*On **Android** the font should be placed inside the assets folder. Here the file is located at `src/main/assets/fonts/comic_sans_ms_regular.ttf`*
{% endhint %}
{% endtab %}
{% tab title="Flutter" %}
```dart
final ChatboxConfiguration configuration = ChatboxConfiguration(
// For iOS devices
iosFontName: 'AmericanTypewriter-Condensed',
iosFontSize: 11,
// For Android devices
androidFontPath: 'fonts/comic_sans_ms_regular.ttf',
);
IAdvizeSdk.setChatboxConfiguration(configuration);
```
{% hint style="info" %}
*On **iOS** the font should either be a system font, or be a font embedded into the app, with a font file inside the bundle and its corresponding declaration into the `Info.plist` file.*
*On **Android** the font should be placed inside the assets folder. Here the file is located at `src/main/assets/fonts/comic_sans_ms_regular.ttf`*
{% endhint %}
{% endtab %}
{% endtabs %}
### **2️⃣ Styling the navigation bar**
Some parts of the he toolbar/navigationbar appearing at the top of the Chatbox can also be customized:
* the background color
* the main color
* the title
{% tabs %}
{% tab title="Android" %}
```kotlin
val configuration = ChatboxConfiguration()
configuration.toolbarBackgroundColor = Color.BLACK,
configuration.toolbarMainColor = COLOR.WHITE,
configuration.toolbarTitle = "Conversation"
IAdvizeSDK.chatboxController.setupChatbox(configuration)
```
{% endtab %}
{% tab title="iOS" %}
```swift
var configuration = ChatboxConfiguration()
configuration.navigationBarBackgroundColor = .black
configuration.navigationBarMainColor = .white
configuration.navigationBarTitle = "Conversation"
IAdvizeSDK.shared.chatboxController.setupChatbox(configuration: configuration)
```
{% endtab %}
{% tab title="React Native" %}
```javascript
const configuration: ChatboxConfiguration = {
navigationBarBackgroundColor: '#000000',
navigationBarMainColor: '#FFFFFF',
navigationBarTitle: 'Conversation'
};
IAdvizeSDK.setChatboxConfiguration(configuration);
```
{% endtab %}
{% tab title="Flutter" %}
```dart
final ChatboxConfiguration configuration = ChatboxConfiguration(
navigationBarBackgroundColor: Colors.black,
navigationBarMainColor: Colors.yellow,
navigationBarTitle: 'Conversation',
);
IAdvizeSdk.setChatboxConfiguration(configuration);
```
{% endtab %}
{% endtabs %}
### **3️⃣ Changing the Chatbox colors**
The displayed messages colors can be customized, either the ones from the agent (`incomingMessages`) or the ones from the visitor (`outgoingMessages`):
* the message bubble background color
* the message text color
* the message bubble stroke/border color
* the accent color, used for all message controls (same color for both agent & visitor): quick answers, file messages, send button, typing indicator...
{% tabs %}
{% tab title="Android" %}
{% endtab %}
{% tab title="iOS" %}
```swift
var configuration = ChatboxConfiguration()
configuration.incomingMessageBackgroundColor = .black
configuration.incomingMessageTextColor = .yellow
configuration.incomingMessageBorderColor = .yellow
configuration.outgoingMessageBackgroundColor = .yellow
configuration.outgoingMessageTextColor = .black
configuration.outgoingMessageBorderColor = .black
configuration.accentColor = .magenta
IAdvizeSDK.shared.chatboxController.setupChatbox(configuration: configuration)
```
{% endtab %}
{% tab title="React Native" %}
```javascript
var configuration = ChatboxConfiguration()
configuration.incomingMessageBackgroundColor = '#000000';
configuration.incomingMessageTextColor = '#FFFF00';
configuration.incomingMessageStrokeColor = '#FFFF00';
configuration.outgoingMessageBackgroundColor = '#FFFF00';
configuration.outgoingMessageTextColor = '#000000';
configuration.outgoingMessageStrokeColor = '#000000';
configuration.accentColor = '#FF00FF';
IAdvizeSDK.setChatboxConfiguration(configuration: configuration)
```
{% endtab %}
{% tab title="Flutter" %}
```dart
final ChatboxConfiguration configuration = ChatboxConfiguration(
incomingMessageBackgroundColor: Colors.black,
incomingMessageTextColor: Colors.yellow,
incomingMessageStrokeColor: Colors.yellow,
outgoingMessageBackgroundColor: Colors.yellow,
outgoingMessageTextColor: Colors.black,
outgoingMessageStrokeColor: Colors.black,
accentColor: Colors.magenta,
);
IAdvizeSdk.setChatboxConfiguration(configuration);
```
{% endtab %}
{% endtabs %}
### **4️⃣ Using a brand avatar**
The operator avatar displayed alongside his messages can be updated for branding purposes. You can specify a drawable either via an URL or a local resource.
{% tabs %}
{% tab title="Android" %}
```kotlin
val configuration = ChatboxConfiguration()
// Update the incoming message avatar with a Drawable resource.
configuration.incomingMessageAvatar = IncomingMessageAvatar.Image(
ContextCompat.getDrawable(context, R.drawable.ic_brand_avatar)
)
// Update the incoming message avatar with an URL.
configuration.incomingMessageAvatar = IncomingMessageAvatar.Url(URL("http://avatar.url"))
IAdvizeSDK.chatboxController.setupChatbox(configuration)
```
{% endtab %}
{% tab title="iOS" %}
```swift
var configuration = ChatboxConfiguration()
// Update the incoming message avatar with a UIImage.
configuration.incomingMessageAvatar = .image(image: UIImage(named: "BrandAvatar"))
// Update the incoming message avatar with an URL.
configuration.incomingMessageAvatar = .url(url: "http://avatar.url")
IAdvizeSDK.shared.chatboxController.setupChatbox(configuration: configuration)
```
{% endtab %}
{% tab title="React Native" %}
```javascript
const configuration: ChatboxConfiguration = {
incomingMessageAvatarImageName: Image.resolveAssetSource(require('./test.jpeg')).uri,
incomingMessageAvatarURL: 'https://picsum.photos/200/200',
};
```
{% hint style="warning" %}
*If you fill both fields, `incomingMessageAvatarImageName` will take priority over `incomingMessageAvatarURL`.*
{% endhint %}
{% endtab %}
{% tab title="Flutter" %}
```dart
final ChatboxConfiguration configuration = ChatboxConfiguration(
incomingMessageAvatarImage: const AssetImage('assets/test.jpeg'),
// OR
incomingMessageAvatarURL: 'https://picsum.photos/200/200',
);
IAdvizeSdk.setChatboxConfiguration(configuration);
```
{% hint style="warning" %}
*If you fill both fields, `incomingMessageAvatarImageName` will take priority over `incomingMessageAvatarURL`.*
{% endhint %}
{% endtab %}
{% endtabs %}
{% hint style="warning" %}
*GIFs are not supported.*
{% endhint %}
### **5️⃣ Presenting a smaller Chatbox**
The Chatbox can be presented in a compact mode.
The visitor can then expand the chatbox manually. The chatbox is automatically expanded when the keyboard opens. This compact mode can be enabled by using a flag in the `ChatboxConfiguration.`
{% tabs %}
{% tab title="Android" %}
```kotlin
val configuration = ChatboxConfiguration()
configuration.smallerChatboxEnabled = true // Default is false
IAdvizeSDK.chatboxController.setupChatbox(configuration)
```
{% endtab %}
{% tab title="iOS" %}
```swift
var configuration = ChatboxConfiguration()
configuration.isSmallerChatboxEnabled = true // Default is false.
IAdvizeSDK.shared.chatboxController.setupChatbox(configuration: configuration)
```
{% endtab %}
{% tab title="React Native" %}
```javascript
const configuration: ChatboxConfiguration = {
...
isSmallerChatboxEnabled: true,
...
};
IAdvizeSDK.setChatboxConfiguration(configuration);
```
{% endtab %}
{% tab title="Flutter" %}
```dart
IAdvizeSdk.setChatboxConfiguration(ChatboxConfiguration(
// ...
isSmallerChatboxEnabled: true,
// ...
);
```
{% endtab %}
{% endtabs %}
## 🎨 Branding the Default Floating Button
By default, the Mobile SDK uses its own Default Floating Button for the visitor to engage in the conversation. This Default Floating Button display process is automated by the Mobile SDK and works out of the box. You have however limited possibilities to brand it to your needs.
{% tabs %}
{% tab title="Android" %}
The Default Floating Button can be parametrized, both in its look (colors / icon) and position (anchor / margins) using the appropriate configuration:
```kotlin
val configuration = DefaultFloatingButtonConfiguration(
anchor = Gravity.START or Gravity.BOTTOM,
margins = DefaultFloatingButtonMargins(),
backgroundTint = ContextCompat.getColor(this, R.color.colorPrimary),
iconResIds = mapOf(
ConversationChannel.CHAT to R.drawable.chat_icon,
ConversationChannel.VIDEO to R.drawable.video_icon
)
iconTint = Color.WHITE
)
val option = DefaultFloatingButtonOption.Enabled(configuration)
IAdvizeSDK.defaultFloatingButtonController.setupDefaultFloatingButton(option)
```
⌨️ **In-context example:** [Default Floating Button Configuration](https://github.com/iadvize/iadvize-android-sdk/blob/master/example/mobile/src/main/java/com/iadvize/conversation/sdk/demo/feature/IAdvizeSDKConfig.kt#L52)
{% endtab %}
{% tab title="iOS" %}
The Default Floating Button will use hardcoded icons and the `ChatboxConfiguration.accentColor` as background color:
```swift
var configuration = ChatboxConfiguration()
configuration.accentColor = .red
IAdvizeSDK.shared.chatboxController.setupChatbox(configuration: configuration)
```
The Default Floating Button is anchored to the bottom left side of the screen. You can modify its placement by specifying the button margins:
```swift
IAdvizeSDK.shared.chatboxController.setFloatingButtonPosition(leftMargin: 20.0, bottomMargin: 20.0)
```
{% endtab %}
{% tab title="React Native" %}
The Default Floating Button will use hardcoded icons and the `ChatboxConfiguration.accentColor` as background color:
```javascript
const configuration: ChatboxConfiguration = {
accentColor: '#000000',
};
```
The Default Floating Button is anchored to the bottom left side of the screen. You can modify its placement by specifying the button margins:
```javascript
IAdvizeSDK.setFloatingButtonPosition(20, 20);
```
{% endtab %}
{% tab title="Flutter" %}
The Default Floating Button will use hardcoded icons and the `ChatboxConfiguration.accentColor` as background color:
```dart
final ChatboxConfiguration configuration = ChatboxConfiguration(
accentColor: Colors.red,
);
IAdvizeSdk.setChatboxConfiguration(configuration);
```
The Default Floating Button is anchored to the bottom left side of the screen. You can modify its placement by specifying the button margins:
```dart
IAdvizeSdk.setFloatingButtonPosition(leftMargin: 20, bottomMargin: 20);
```
{% endtab %}
{% endtabs %}
## ✨ Using a custom chat button
If you are not satisfied with the Default Floating Button look and feel or if you want to implement a specific behavior related to its display you may need to use a custom conversation button.
With a custom button it is your responsibility to:
* design the floating or fixed button to invite your visitor to chat
* hide/show the button following the active targeting rule availability and the ongoing conversation status
* open the Chatbox when the visitor presses your button
### **1️⃣ Disabling the Default Floating Button**
{% tabs %}
{% tab title="Android" %}
```kotlin
IAdvizeSDK.defaultFloatingButtonController.setupDefaultFloatingButton(DefaultFloatingButtonOption.Disabled)
```
{% endtab %}
{% tab title="iOS" %}
```swift
IAdvizeSDK.shared.chatboxController.useDefaultFloatingButton = false
```
{% endtab %}
{% tab title="React Native" %}
```javascript
IAdvizeSDK.setDefaultFloatingButton(false);
```
{% endtab %}
{% tab title="Flutter" %}
```dart
IAdvizeSdk.setDefaultFloatingButton(false);
```
{% endtab %}
{% endtabs %}
### **2️⃣ Displaying/hiding the chat button**
#### Understanding availability callbacks
These listeners notify you when:
* Targeting rule availability changes (operator/bot becomes available/unavailable)
* Availability update fails
* Conversation status changes
⚠️ **Important distinction:**
**Availability callbacks** (from Mobile SDK) tell you:
* "Is an operator/bot available for this targeting rule right now?"
**Your business logic** (in your app) determines:
* "Should I show the chat button based on user behavior, frequency caps, preferences?"
**Combined decision logic**
To show/hide your custom button, combine BOTH:
1. ✅ **Your conditions met?** (user behavior, frequency, preferences)
2. ✅ **Mobile** **SDK availability = true?** (operator/bot available)
3. → **Result:** Show button only if BOTH are true
#### Implementing the visibility logic
The chat button is linked to the targeting and conversation workflow and should update its visibility each time the status of those workflows is changed. First of all you need to implement the appropriate callbacks:
{% tabs %}
{% tab title="Android" %}
```kotlin
IAdvizeSDK.targetingController.listeners.add(object : TargetingListener {
override fun onActiveTargetingRuleAvailabilityUpdated(isActiveTargetingRuleAvailable: Boolean) {
// SDK active rule availability changed to isActiveTargetingRuleAvailable
updateChatButtonVisibility()
}
override fun onActiveTargetingRuleAvailabilityUpdateFailed(error: IAdvizeSDK.Error) {
// SDK active rule availability failed
updateChatButtonVisibility()
// You may launch the targeting again based on the error type
}
})
IAdvizeSDK.conversationController.listeners.add(object : ConversationListener {
override fun onOngoingConversationUpdated(ongoingConversation: OngoingConversation?) {
// SDK ongoing conversation has updated
updateChatButtonVisibility()
}
override fun onNewMessageReceived(content: String) {
// A new message was received via the SDK
}
override fun handleClickedUrl(uri: Uri): Boolean {
// A message link was tapped, return true if you want your app to handle it
return false
}
})
```
{% endtab %}
{% tab title="iOS" %}
```swift
extension IntegrationApp: TargetingControllerDelegate {
func activeTargetingRuleAvailabilityDidUpdate(isActiveTargetingRuleAvailable: Bool) {
// SDK active rule availability changed to isActiveTargetingRuleAvailable
updateChatButtonVisibility()
}
func activeTargetingRuleDidFailToUpdate(error: TargetingError) {
// SDK active rule availability failed
updateChatButtonVisibility()
// You may launch the targeting again based on the error type
}
}
extension IntegrationApp: ConversationControllerDelegate {
func ongoingConversationUpdated(ongoingConversation: IAdvizeConversationSDK.OngoingConversation?) {
// SDK ongoing conversation status changed
updateChatButtonVisibility()
}
func didReceiveNewMessage(content: String) {
// A new message was received via the SDK
}
func conversationController(_ controller: ConversationController, shouldOpen url: URL) -> Bool {
// A message link was tapped, return false if you want your app to handle it
}
}
class IntegrationApp {
IAdvizeSDK.shared.targetingController.delegate = self
IAdvizeSDK.shared.conversationController.delegate = self
}
```
{% endtab %}
{% tab title="React Native" %}
```javascript
IAdvizeSDKListeners.onActiveTargetingRuleAvailabilityUpdated(function (eventData: any) {
// SDK active rule availability changed
updateChatButtonVisibility()
});
IAdvizeSDKListeners.onActiveTargetingRuleAvailabilityUpdateFailed(function (eventData: any) {
// SDK active rule availability failed
updateChatButtonVisibility()
// You may launch the targeting again based on the error type
});
IAdvizeSDKListeners.onOngoingConversationStatusChanged(function (eventData: any) {
// SDK ongoing conversation status changed
updateChatButtonVisibility()
});
```
{% endtab %}
{% tab title="Flutter" %}
```dart
IAdvizeSdk.setConversationListener(manageUrlClick: true);
IAdvizeSdk.onOngoingConversationUpdated.listen((bool ongoing) {
// SDK ongoing conversation status changed
_updateCustomChatButtonVisibility();
});
IAdvizeSdk.setOnActiveTargetingRuleAvailabilityListener();
IAdvizeSdk.onActiveTargetingRuleAvailabilityUpdated.listen((bool available) {
// SDK active rule availability changed
_updateCustomChatButtonVisibility();
});
IAdvizeSdk.onActiveTargetingRuleAvailabilityUpdateFailed.listen((Map error) {
// SDK active rule availability failed
updateChatButtonVisibility()
// You may launch the targeting again based on the error type
});
```
{% endtab %}
{% endtabs %}
The chat button gives access to the Chatbox so it should be visible:
* at all times when a conversation is ongoing to allow the visitor to come back to the current conversation
* when the active targeting rule is available, to engage the visitor to chat
{% tabs %}
{% tab title="Android" %}
```kotlin
fun updateChatButtonVisibility() {
val sdkActivated = IAdvizeSDK.activationStatus == IAdvizeSDK.ActivationStatus.ACTIVATED
val chatboxOpened = IAdvizeSDK.chatboxController.isChatboxPresented()
val ruleAvailable = IAdvizeSDK.targetingController.isActiveTargetingRuleAvailable()
val hasOngoingConv = IAdvizeSDK.conversationController.ongoingConversation() != null
if (sdkActivated && !chatboxOpened && (hasOngoingConv || ruleAvailable)) {
showChatButton()
} else {
hideChatButton()
}
}
```
{% endtab %}
{% tab title="iOS" %}
```swift
func updateChatButtonVisibility() {
guard IAdvizeSDK.shared.activationStatus == .activated else {
hideChatButton()
return
}
guard !IAdvizeSDK.shared.chatboxController.isChatboxPresented() else {
hideChatButton()
return
}
guard IAdvizeSDK.shared.conversationController.ongoingConversation() != nil ||
IAdvizeSDK.shared.targetingController.isActiveTargetingRuleAvailable else {
hideChatButton()
return
}
showChatButton()
}
```
{% endtab %}
{% tab title="React Native" %}
```javascript
const updateChatButtonVisibility = async () => {
const ruleAvailable = IAdvizeSDK.isActiveTargetingRuleAvailable()
const hasOngoingConv = IAdvizeSDK.ongoingConversationId().trim().length !== 0
const chatboxOpened = IAdvizeSDK.isChatboxPresented()
if (!chatboxOpened && (hasOngoingConv || ruleAvailable)) {
showChatButton()
} else {
hideChatButton()
}
};
```
{% endtab %}
{% tab title="Flutter" %}
```dart
bool _showCustomButton = false;
Future _updateCustomChatButtonVisibility() async {
final bool sdkActivated = await IAdvizeSdk.isSDKActivated();
final bool ruleAvailable = await IAdvizeSdk.isActiveTargetingRuleAvailable();
final bool hasOngoingConv = await ongoingConversationId() != null;
setState(() {
_showCustomButton = sdkActivated && (hasOngoingConv || ruleAvailable);
});
}
```
{% endtab %}
{% endtabs %}
### **3️⃣ Opening the Chatbox**
When the visitor taps on your custom chat button you should open the Chatbox by calling the following method:
{% tabs %}
{% tab title="Android" %}
```kotlin
IAdvizeSDK.chatboxController.presentChatbox(context)
```
⌨️ **In-context example:** [Full custom chat button implementation](https://gist.github.com/Judas/d0a34a50f1b6b8d542d77af5db9d9787)
{% endtab %}
{% tab title="iOS" %}
```swift
IAdvizeSDK.shared.chatboxController.presentChatbox(
animated: Bool,
presentingViewController: UIViewController?
) {
// ...
}
```
⌨️ **In-context example:** [Full custom chat button implementation](https://gist.github.com/alexandrekarst/74da3ce5a9eaf68f7bd83eaf77c6d3dc)
{% endtab %}
{% tab title="React Native" %}
```javascript
IAdvizeSDK.presentChatbox()
```
{% endtab %}
{% tab title="Flutter" %}
```dart
IAdvizeSdk.presentChatbox();
```
{% endtab %}
{% endtabs %}
You can be informed of the Chatbox opening/closing by subscribing to the right listener:
{% tabs %}
{% tab title="Android" %}
```kotlin
IAdvizeSDK.chatboxController.listeners.add( object : ChatboxListener {
override fun onChatboxOpened() {
Log.d("TEST", "Chatbox has opened")
}
override fun onChatboxClosed() {
Log.d("TEST", "Chatbox has closed")
}
})
```
{% endtab %}
{% tab title="iOS" %}
```swift
IAdvizeSDK.shared.chatboxController.delegate = self
extension MyApp: ChatboxControllerDelegate {
public func chatboxDidOpen() {
print("Chatbox has opened")
}
public func chatboxDidClose() {
print("Chatbox has closed")
}
}
```
⌨️ **In-context example:** [Full custom chat button implementation](https://gist.github.com/alexandrekarst/74da3ce5a9eaf68f7bd83eaf77c6d3dc)
{% endtab %}
{% tab title="React Native" %}
```javascript
IAdvizeSDKListeners.onChatboxOpened(function (eventData: any) {
console.log('Chatbox has opened');
});
IAdvizeSDKListeners.onChatboxClosed(function (eventData: any) {
console.log('Chatbox has closed');
});
```
{% endtab %}
{% tab title="Flutter" %}
```dart
IAdvizeSdk.setChatboxListener();
StreamSubscription _chatboxOpenedSubscription = IAdvizeSdk.onChatboxOpened
.listen((event) => log('Chatbox has opened'));
StreamSubscription _chatboxClosedSubscription = IAdvizeSdk.onChatboxClosed
.listen((event) => log('Chatbox has closed'));
```
{% endtab %}
{% endtabs %}
## 🔔 Handling push notifications
{% hint style="warning" %}
*Before starting this part you will need to configure push notifications inside your application. You can refer to the following resources if needed:*
{% tabs %}
{% tab title="Android" %}
[Firebase Cloud Messaging documentation](https://firebase.google.com/docs/cloud-messaging/android/client)
{% endtab %}
{% tab title="iOS" %}
[Push notification setup tutorial](https://www.kodeco.com/11395893-push-notifications-tutorial-getting-started)
{% endtab %}
{% tab title="React Native" %}
[React Native Firebase Setup](https://rnfirebase.io/)
[React Native Firebase Messaging Setup](https://rnfirebase.io/messaging/usage)
{% endtab %}
{% tab title="Flutter" %}
[Flutter Firebase Setup](https://firebase.google.com/docs/flutter/setup)
[Flutter Firebase Messaging Setup](https://firebase.google.com/docs/cloud-messaging/flutter/client)
{% endtab %}
{% endtabs %}
*You will also need to ensure that the push notifications are setup in your iAdvize project. The process is described in the Mobile* [*SDK Knowledge Base*](https://help.iadvize.com/hc/en-gb/articles/360019839480)*.*
{% endhint %}
### **1️⃣ Registering the device token**
For the Mobile SDK to be able to send notifications to the visitor’s device, its unique `device push token` must be registered:
{% tabs %}
{% tab title="Android" %}
```kotlin
class NotificationService : FirebaseMessagingService() {
override fun onNewToken(token: String) {
super.onNewToken(token)
IAdvizeSDK.notificationController.registerPushToken(token)
}
}
```
⌨️ **In-context example:** [Device token register](https://github.com/iadvize/iadvize-android-sdk/blob/master/example/mobile/src/main/java/com/iadvize/conversation/sdk/demo/feature/notifications/NotificationService.kt#L55)
{% endtab %}
{% tab title="iOS" %}
```swift
IAdvizeSDK.shared.notificationController.registerPushToken("the_device_push_token", applicationMode: .prod)
```
⌨️ **In-context example:** [Device token register](https://github.com/iadvize/iadvize-ios-sdk/blob/master/example/SPMIntegration/SPMIntegration/Source/AppDelegate%2BPushNotification.swift#L27)
{% endtab %}
{% tab title="React Native" %}
```javascript
import messaging from '@react-native-firebase/messaging';
const registerPushToken = async () => {
try {
const token = await messaging().getToken();
IAdvizeSDK.registerPushToken(token, ApplicationMode.DEV);
console.log('iAdvize SDK registerPushToken success');
} catch (e) {
console.error(e);
}
};
```
{% hint style="warning" %}
*The `ApplicationMode` is used only for the iOS application.*
{% endhint %}
{% endtab %}
{% tab title="Flutter" %}
```dart
import 'package:firebase_messaging/firebase_messaging.dart';
FirebaseMessaging.instance.onTokenRefresh.listen((fcmToken) {
IAdvizeSdk.registerPushToken(pushToken: fcmToken, mode: ApplicationMode.dev);
}).onError((err) {
log('Error registering token: $err');
});
```
{% hint style="warning" %}
*The `ApplicationMode` is used only for the iOS application.*
{% endhint %}
{% endtab %}
{% endtabs %}
### **2️⃣ Enabling/disabling push notifications**
Push notifications are activated during Mobile SDK activation, as long as you have setup the push notifications information for your app on the iAdvize administration website (process is described in the [SDK Knowledge Base](https://help.iadvize.com/hc/en-gb/articles/360019839480)). You can manually enable/disable them at any time using:
{% tabs %}
{% tab title="Android" %}
```kotlin
IAdvizeSDK.notificationController.enablePushNotifications(object : IAdvizeSDK.Callback {
override fun onSuccess() {
// Enable succeded
}
override fun onFailure(error: IAdvizeSDK.Error) {
// Enable failed
}
})
IAdvizeSDK.notificationController.disablePushNotifications(object : IAdvizeSDK.Callback {
override fun onSuccess() {
// Disable succeded
}
override fun onFailure(error: IAdvizeSDK.Error) {
// Disable failed
}
})
```
{% endtab %}
{% tab title="iOS" %}
```swift
IAdvizeSDK.shared.notificationController.enablePushNotifications { success in
...
}
IAdvizeSDK.shared.notificationController.disablePushNotifications { success in
...
}
```
{% endtab %}
{% tab title="React Native" %}
```javascript
try {
await IAdvizeSDK.enablePushNotifications();
// Push notifications enabled
} catch (e) {
// Error enabling push notifications
}
try {
await IAdvizeSDK.disablePushNotifications();
// Push notifications disabled
} catch (e) {
// Error disabling push notifications
}
```
{% endtab %}
{% tab title="Flutter" %}
```dart
IAdvizeSdk.enablePushNotifications().then((bool success) =>
log('Push notifications enabled $success'));
IAdvizeSdk.disablePushNotifications().then((bool success) =>
log('Push notifications disabkled $success'));
```
{% endtab %}
{% endtabs %}
### **3️⃣ Handling push notifications reception**
Once setup, you will receive push notifications when the operator sends any message. As the SDK notifications are caught in the same place than your app other notifications, you first have to distinguish if the received notification comes from iAdvize or not.
{% tabs %}
{% tab title="Android" %}
```kotlin
class NotificationService : FirebaseMessagingService() {
override fun onMessageReceived(remoteMessage: RemoteMessage) {
if (IAdvizeSDK.notificationController.isIAdvizePushNotification(remoteMessage.data)) {
// This is an iAdvize SDK notification
}
}
}
```
{% endtab %}
{% tab title="iOS" %}
```swift
func application(
_ application: UIApplication,
didReceiveRemoteNotification userInfo: [AnyHashable: Any],
fetchCompletionHandler completionHandler: @escaping (UIBackgroundFetchResult) -> Void
) {
if IAdvizeSDK.shared.notificationController.isIAdvizePushNotification(with: userInfo) {
// This is an iAdvize SDK notification
}
}
```
{% endtab %}
{% tab title="React Native" %}
```javascript
// Firebase Messaging notification handlers
messaging().onMessage(async remoteMessage => {
console.log('Received a foreground notification message');
handleNotification(remoteMessage)
});
messaging().setBackgroundMessageHandler(async remoteMessage => {
console.log('Received a background notification message');
handleNotification(remoteMessage)
});
function handleNotification(remoteMessage: any) {
console.log('handling notification', JSON.stringify(remoteMessage));
var isIAdvizeSDKNotification = IAdvizeSDK.isIAdvizePushNotification(remoteMessage.data)
}
```
{% endtab %}
{% tab title="Flutter" %}
```dart
// Firebase Messaging notification handlers
@pragma('vm:entry-point')
Future _backgroundNotificationHandler(RemoteMessage message) async {
log('Received a background notification message ${message}');
handleNotification(message);
}
FirebaseMessaging.onBackgroundMessage(_backgroundNotificationHandler);
FirebaseMessaging.onMessage.listen((RemoteMessage message) {
log('Received a foreground notification message ${message}');
handleNotification(message);
});
void handleNotification(RemoteMessage message) {
log('handling notification $message');
IAdvizeSdk.isIAdvizePushNotification(message.data).then(
(bool isAdvizeNotification) =>
log('Notification from iAdvize ? $isAdvizeNotification'));
}
```
{% endtab %}
{% endtabs %}
{% hint style="warning" %}
*Notifications will be received in your app for all messages sent by the agent. It is your responsibility to display the notification and to check whether or not it is relevant to display it. For instance, you don’t need to show a notification to the visitor when the Chatbox is opened*
{% endhint %}
{% tabs %}
{% tab title="Android" %}
```kotlin
fun shouldDisplayNotification(remoteMessage: RemoteMessage) =
IAdvizeSDK.notificationController.isIAdvizePushNotification(remoteMessage.data)
&& !IAdvizeSDK.chatboxController.isChatboxPresented()
```
{% endtab %}
{% tab title="iOS" %}
```swift
func shouldDisplayNotification(userInfo: [AnyHashable: Any]) -> Bool {
guard IAdvizeSDK.shared.notificationController.isIAdvizePushNotification(with: userInfo) else {
return false
}
guard !IAdvizeSDK.shared.chatboxController.isChatboxPresented() else {
return false
}
return true
}
```
{% endtab %}
{% tab title="React Native" %}
```javascript
function handleNotification(remoteMessage: any) {
console.log('handling notification', JSON.stringify(remoteMessage));
var chatboxOpened = IAdvizeSDK.isChatboxPresented()
var isIAdvizeSDKNotification = IAdvizeSDK.isIAdvizePushNotification(remoteMessage.data)
var shouldDisplay = chatboxOpened == false && isIAdvizeSDKNotification
console.log("chatboxOpened:", chatboxOpened, "isIAdvizeSDKNotification", isIAdvizeSDKNotification, "shouldDisplay=>", shouldDisplay);
}
```
{% endtab %}
{% tab title="Flutter" %}
```dart
void handleNotification(RemoteMessage message) {
log('handling notification $message');
Future isIAdvizeSDKNotification =IAdvizeSdk.isIAdvizePushNotification(message.data);
Future isChatboxPresented = IAdvizeSdk.isChatboxPresented();
Future.wait([isIAdvizeSDKNotification, isChatboxPresented]).then((List flags) {
bool shouldDisplay = flags[0] && !flags[1];
log("isIAdvizeSDKNotification:${flags[0]} isChatboxPresented:${flags[1]} shouldDisplay:$shouldDisplay");
});
}
```
{% endtab %}
{% endtabs %}
### **4️⃣ Customizing/localizing the notification**
{% tabs %}
{% tab title="Android" %}
You are responsible for displaying the notification so you can use any title / text / icon you want. The text sent by the agent is available in the `content` part of the notification data received.
```kotlin
override fun onMessageReceived(remoteMessage: RemoteMessage) {
if (IAdvizeSDK.notificationController.isIAdvizePushNotification(remoteMessage.data)) {
val agentMessageReceived = remoteMessage.data["content"] ?: "Default text"
}
}
```
⌨️ **In-context example:** [Handling received notification](https://github.com/iadvize/iadvize-android-sdk/blob/master/example/mobile/src/main/java/com/iadvize/conversation/sdk/demo/feature/notifications/NotificationService.kt#L64)
{% endtab %}
{% tab title="iOS" %}
Our SDK uses **APNs localization keys** so iOS fetches the translated title from **your app’s** localization resources.
**Key used by the SDK**
* `iadvize_notification_title` — shown when a new message arrives
*Recommended English value:* “You have received a new message”
**What you need to do**
1. Add the key to your app’s localization files
Use a String Catalog (`Localizable.xcstrings`) or a classic `Localizable.strings`.
Ensure the resource is included in **your app target**.
2. Provide translations for every language your app supports
**English**
```
"iadvize_notification_title" = "You have received a new message";
```
**French**
```
"iadvize_notification_title" = "Vous avez reçu un nouveau message";
```
**Why this is required**
When APNs payloads use title-loc-key, iOS resolves the key only against the app’s main bundle. Even though the SDK ships its own translations, notification title must exist in your app bundle so the system can find it. If a translation is missing for a given locale, iOS will fall back using your app’s standard localization rules (e.g., your development region).
**Translation suggestions**
Here are translations you can use if your app supports some of these languages.
Code
Language
iadvize_notification_title
cs
Czech
Dostali jste novou zprávu
da
Danish
Du har modtaget en ny besked
de
German
Sie haben eine neue Nachricht erhalten
en
English
You have received a new message
es
Spanish
Has recibido un nuevo mensaje
fr
French
Vous avez reçu un nouveau message
it
Italian
Hai ricevuto un nuovo messaggio
lt
Lithuanian
Jūs gavote naują žinutę
nl
Dutch
U hebt een nieuw bericht ontvangen
pl
Polish
Otrzymałeś nową wiadomość
pt
Portuguese
Recebeu uma nova mensagem
sk
Slovak
Dostali ste novú správu
sv
Swedish
Du har fått ett nytt meddelande
{% endtab %}
{% tab title="React Native" %}
```javascript
function handleNotification(remoteMessage: any) {
console.log('handling notification', JSON.stringify(remoteMessage));
var messageContent = remoteMessage.data.content
}
```
{% endtab %}
{% tab title="Flutter" %}
```dart
void handleNotification(RemoteMessage message) {
log('handling notification $message');
String messageContent = message.data["content"];
}
```
{% endtab %}
{% endtabs %}
### **5️⃣ Clearing push notifications**
The iAdvize Mobile SDK notifications are automatically cleared from the Notification Tray / Notification Center when the Chatbox is opened. If you want to clear them at any other given time you can call this API:
{% tabs %}
{% tab title="Android" %}
```kotlin
IAdvizeSDK.notificationController.clearIAdvizePushNotifications()
```
{% endtab %}
{% tab title="iOS" %}
```swift
IAdvizeSDK.shared.notificationController.clearIAdvizePushNotifications()
```
{% endtab %}
{% tab title="React Native" %}
```javascript
IAdvizeSDK.clearIAdvizePushNotifications()
```
{% endtab %}
{% tab title="Flutter" %}
```dart
IAdvizeSdk.clearIAdvizePushNotifications()
```
{% endtab %}
{% endtabs %}
However, as notifications display depends on the Notification Channel, some configuration is needed in order for this behavior to work correctly:
{% tabs %}
{% tab title="Android" %}
First of all create the Notification Channel:
```kotlin
IAdvizeSDK.notificationController.createNotificationChannel(context)
```
Then, when receiving the notification, send it through the SDK Notification Channel if the notification is from iAdvize:
```kotlin
if (IAdvizeSDK.notificationController.isIAdvizePushNotification(remoteMessage.data)) {
val notification = NotificationCompat.Builder(this, IAdvizeSDK.notificationController.channelId)
... // notification config
.build()
} else {
// Host app notification handling
}
```
{% endtab %}
{% tab title="iOS" %}
On iOS no setup is required, the clearing of the push notificatiosn works out of the box.
{% endtab %}
{% tab title="React Native" %}
First of all create the Notification Channel:
```javascript
IAdvizeSDK.createNotificationChannel();
```
You don't need to check that you are on the Android platform before calling this API, as it does nothing on the iOS platform.
Then, when receiving the notification, send it through the SDK Notification Channel if the notification is from iAdvize. In order to show a notification in a specific Notification Channel, please refer to your Notification library documentation.
{% endtab %}
{% tab title="Flutter" %}
First of all create the Notification Channel:
```javascript
IAdvizeSdk.createNotificationChannel();
```
You don't need to check that you are on the Android platform before calling this API, as it does nothing on the iOS platform.
Then, when receiving the notification, send it through the SDK Notification Channel if the notification is from iAdvize. In order to show a notification in a specific Notification Channel, please refer to your Notification library documentation.
{% endtab %}
{% endtabs %}
## 📈 Adding value to the conversation
### **1️⃣ Registering visitor transactions**
You can register a transaction made within your application:
{% tabs %}
{% tab title="Android" %}
```kotlin
IAdvizeSDK.transactionController.register(
Transaction(
"transactionId",
Date(),
10.00,
Currency.EUR
)
)
```
{% endtab %}
{% tab title="iOS" %}
```swift
let transaction = Transaction(externalTransactionId: "transactionId", date: Date(), amount: 10.0, currency: .eur)
IAdvizeSDK.shared.transactionController.registerTransaction(transaction)
```
{% endtab %}
{% tab title="React Native" %}
```javascript
const transaction: Transaction = {
transactionId: 'transactionId',
currency: 'EUR',
amount: 10
};
IAdvizeSDK.registerTransaction(transaction);
```
{% hint style="warning" %}
*The currency value should respect* [*ISO 4217*](https://en.wikipedia.org/wiki/ISO_4217)*.*
{% endhint %}
{% endtab %}
{% tab title="Flutter" %}
```javascript
IAdvizeSdk.registerTransaction(Transaction(
transactionId: 'transactionId',
currency: 'EUR',
amount: 10
));
```
{% hint style="warning" %}
*The currency value should respect* [*ISO 4217*](https://en.wikipedia.org/wiki/ISO_4217)*.*
{% endhint %}
{% endtab %}
{% endtabs %}
### **2️⃣ Saving visitor custom data**
#### How custom data is used
Custom data you register:
* **Operators:** See values in "Custom data" sidebar tab
* **Workflows/AI Shopping Assistant:** Use values as context parameters (e.g., `productId` to fetch product info)
* **Visitors:** Don't see raw values in chatbox
See [Using custom data with workflows & AI Shopping Assistant](#id-3-using-custom-data-with-workflows-and-ai-shopping-assistant) for examples.
#### Example
The iAdvize Mobile SDK allows you to save data related to the visitor conversation:
{% tabs %}
{% tab title="Android" %}
```kotlin
IAdvizeSDK.visitorController.registerCustomData(listOf(
CustomData.fromString("Test", "Test"),
CustomData.fromBoolean("Test2", false),
CustomData.fromDouble("Test3", 2.0),
CustomData.fromInt("Test4", 3)
),
object : IAdvizeSDK.Callback {
override fun onSuccess() {
// Success
}
override fun onFailure(error: IAdvizeSDK.Error) {
// Failure
}
})
```
{% endtab %}
{% tab title="iOS" %}
```swift
IAdvizeSDK.shared.visitorController.registerCustomData(
customData:
["Test": .customDataString("Test"),
"Test2": .customDataBoolean(false),
"Test3": .customDataDouble(2.0),
"Test4": .customDataInt(3)]
) { success in
// completion handler
}
```
{% endtab %}
{% tab title="React Native" %}
```javascript
var customData = {
"Test": "Test",
"Test2": false,
"Test3": 2.5,
"Test4": 3
};
IAdvizeSDK.registerCustomData(customData);
```
{% endtab %}
{% tab title="Flutter" %}
```dart
List customData = [
CustomData.fromString("Test", "Test"),
CustomData.fromBoolean("Test2", false),
CustomData.fromDouble("Test3", 2.0),
CustomData.fromInt("Test4", 3)
];
IAdvizeSdk.registerCustomData(customData).then((bool success) =>
log('iAdvize Example : custom data registered: $success'));
```
{% endtab %}
{% endtabs %}
{% hint style="warning" %}
*As those data are related to the conversation they cannot be sent if there is no ongoing conversation. Custom data registered **before** the start of a conversation are stored and the Mobile SDK automatically tries to send them when the conversation starts.*
{% endhint %}
The visitor data you registered are displayed in the iAdvize Operator Desk in the conversation sidebar, in a tab labelled `Custom data`:

### **3️⃣ Using custom data with workflows & AI Shopping Assistant**
Custom data you register is:
* ✅ **Visible to operators** - Displayed in "Custom data" tab in operator desk
* ✅ **Usable by workflows/AI Shopping Assistant** - Passed as contextual parameters to retrieve information
* ❌ **Not shown to visitors** - Raw values don't appear in chatbox
#### How workflows and/or AI Shopping Assistant use custom data
The AI Shopping Assistant and workflows can use custom data (like `productId`) as context to retrieve relevant information from your configured knowledge sources.
**Example: Product Context on PDP**
```kotlin
// Register product ID when visitor views product page
IAdvizeSDK.visitorController.registerCustomData(
CustomData("productId", "SKU-12345"),
CustomData("productName", "Garden Hose 50ft"),
CustomData("productCategory", "Gardening")
)
```
When a conversation starts:
* The operator sees: productId = SKU-12345, productName = Garden Hose 50ft
* The AI Shopping Assistant uses productId to query your product catalog (if configured in knowledge sources)
* The bot can answer product-specific questions without the visitor repeating information
**Important:** The bot doesn't display raw custom data values to visitors. It uses them as lookup parameters to retrieve relevant information from your configured knowledge sources.
#### Channel-agnostic workflows/AI Shopping Assistant behavior
Workflows/AI Shopping Assistant configuration in iAdvize Admin works identically across:
* Web
* Mobile App (Mobile SDK)
* Social/Messaging channels
The Mobile SDK provides the conversation interface; the workflows/AI Shopping Assistant intelligence and behavior are configured in iAdvize Admin and remain consistent across all channels.
#### Use cases
* Product pages: pass productId for product-specific assistance
* Cart: pass cart contents for contextual recommendations
* Order tracking: pass orderId for WISMO (Where Is My Order) workflows
* Category pages: pass category info for relevant suggestions
Learn more about AI Shopping Assistant configuration: [documentation](https://help.iadvize.com/hc/en-gb/articles/14289921821586-AI-Shopping-Assistant-principles-and-usage)
## 👍 Fetching visitor satisfaction
The satisfaction survey is automatically sent to the visitor at the end of the conversation, as long as it is activated in the iAdvize administration website. The survey is presented to the visitor in a conversational approach, directly into the Chatbox.
{% hint style="info" %}
*Only the `CSAT`, `NPS` and `COMMENT` steps of the survey are supported.*
{% endhint %}
### 📊 Analytics & Monitoring
#### iAdvize Admin dashboard
Filter mobile conversations in Reports:
* **By targeting rule:** Name rules clearly ("Mobile - Homepage", "Mobile - PDP")
* **By routing rule:** Track performance per team/bot
* **Standard metrics:** Conversations, response time, CSAT, NPS
**Limitation:** Cannot differentiate iOS vs Android (both show as "Mobile App" channel)
#### Advanced Analytics: GraphQL API
For detailed metrics and historical analysis:
* `TARGETING_RULE_DISPLAY_NUMBER` - How often chat button was displayed
* `TARGETING_RULE_TRIGGERED` - How often conversations started
* Pre-aggregated indicators for periodic exports
Documentation: [Retrieve Messages & Pre-aggregated Indicators](/use-cases/data-and-analytics/retrieve-messages-exchanged-within-a-conversation-1/pre-aggregated-indicators)
⚠️ **Note:** These are historical/reporting metrics, not available in real-time for app logic.
#### App-side analytics
The Mobile SDK does NOT track or report:
* When/why you call `activateTargetingRule()`
* User behavior that leads to trigger activation
* Frequency of button displays per visitor
* Session tracking and user preferences
**You must instrument these in your analytics platform** (Google Analytics, Firebase, Mixpanel, etc.) for:
* Trigger effectiveness analysis
* A/B testing trigger strategies
* User engagement patterns
* Conversion funnel tracking
# Fourme
{% hint style="info" %}
### 🆕 🚨 What's new?
The Chatbox can now be presented in a compact mode.
The visitor can then expand the chatbox manually. The chatbox is automatically expanded when the keyboard opens. This compact mode can be enabled by using a flag in the `ChatboxConfiguration.`
{% tabs %}
{% tab title="Android" %}
```kotlin
val configuration = ChatboxConfiguration()
configuration.smallerChatboxEnabled = true // Default is false
IAdvizeSDK.chatboxController.setupChatbox(configuration)
```
{% endtab %}
{% tab title="iOS" %}
```swift
var configuration = ChatboxConfiguration()
configuration.isSmallerChatboxEnabled = true // Default is false.
IAdvizeSDK.shared.chatboxController.setupChatbox(configuration: configuration)
```
{% endtab %}
{% tab title="React Native" %}
```javascript
const configuration: ChatboxConfiguration = {
...
isSmallerChatboxEnabled: true,
...
};
IAdvizeSDK.setChatboxConfiguration(configuration);
```
{% endtab %}
{% tab title="Flutter" %}
```dart
IAdvizeSdk.setChatboxConfiguration(ChatboxConfiguration(
// ...
isSmallerChatboxEnabled: true,
// ...
);
```
{% endtab %}
{% endtabs %}
{% endhint %}
## ⚙️ Prerequisites
There are a few steps required before you start integrating the iAdvize Mobile SDK.
## 💬 Setting up your iAdvize environment
Before integrating the SDK, you need to check that your iAdvize environment is ready to use (i.e. you have an account ready to receive and answer to conversations from the SDK). You will also need some information related to the project for the SDK setup. Please ask your iAdvize administrator to follow the instructions available on the [SDK Knowledge Base](https://help.iadvize.com/hc/en-gb/articles/360019839480) and to provide you with the **Project Identifier** as well as a **Targeting Rule Identifier**.
{% hint style="warning" %}
*Your iAdvize administrator should already have configured the project on the* [*iAdvize Administration Desk*](https://ha.iadvize.com/admin/login/) *and created an operator account for you. If it is not yet the case please contact your iAdvize Technical Project Manager.*
{% endhint %}
## 💻 Connecting to your iAdvize Operator Desk
Using your operator account please log into the [iAdvize Desk](https://ha.iadvize.com/admin/login/).
{% hint style="warning" %}
*If you have the Administrator status in addition to your operator account, you will be directed to the Admin Desk when logging in. Just click on the `Chat` button in the upper right corner to open the Operator Desk.*
{% endhint %}
The iAdvize operator desk is the place where the conversations that are assigned to your account will pop up. Please ensure that your status is “Available" by enabling the corresponding chat or video toggle buttons in the upper right corner:
The chat button is green, your operator can receive incoming conversations.
If the toggle button is yellow, it means you have reached your maximum simultaneous chat slots, please end your current conversations to free a chat slot and allow the conversations to be assigned to you. If the toggle is red you are not available to chat.
## 🔐 Ensuring the SDK integrity
Before downloading the iAdvize Mobile SDK artifacts you can verify their integrity by generating their checksums and comparing them with the reference checksums available.
{% tabs %}
{% tab title="Android" %}
Reference checksums are available:
* in the [GitHub release note](https://github.com/iadvize/iadvize-android-sdk/releases/latest)
* in the [dedicated spreadsheet](https://docs.google.com/spreadsheets/d/11A5RScYGCg17rFXp-RaMyVIUqsd3WacXiTjxk3GNZyk)
The Android SDK consists of an archive (`aar` file) and a Maven project description (`pom` file), you can generate their checksums using the following commands (replace `x.y.z` by the SDK version you are checking):
```bash
curl -sL https://github.com/iadvize/iadvize-android-sdk/raw/master/com/iadvize/iadvize-sdk/x.y.z/iadvize-sdk-x.y.z.aar | openssl sha256
curl -sL https://github.com/iadvize/iadvize-android-sdk/raw/master/com/iadvize/iadvize-sdk/x.y.z/iadvize-sdk-x.y.z.pom | openssl sha256
```
This ensures that the online packages are valid. In order to check those checksums on the fly, this process can be automated via Gradle by adding a metadata verification xml file at `$PROJECT_ROOT/gradle/verification-metadata.xml`:
```xml
truefalse
```
With this file present in your project structure, Gradle will automatically check the artifacts checksums before integrating them into your app. Please note that you will have to do this for **all dependencies** used in your project. To help you with that, `verification-metadata.xml` for the SDK sub-dependencies is delivered alongside the SDK. Those subdependencies checksums have been generated through the Gradle generation feature and not verified.
{% endtab %}
{% tab title="iOS" %}
Reference checksums are available:
* in the [GitHub release note](https://github.com/iadvize/iadvize-ios-sdk/releases/latest)
* in the [dedicated spreadsheet](https://docs.google.com/spreadsheets/d/11A5RScYGCg17rFXp-RaMyVIUqsd3WacXiTjxk3GNZyk)
**Swift Package Manager integration**
The iOS SDK only consists of an archive (`zip` file). You can generate its checksums using the following command (replace `x.y.z` by the SDK version you are checking):
```bash
curl -sL https://github.com/iadvize/iadvize-ios-sdk/releases/download/x.y.z/IAdvizeSDK.zip | openssl sha3-256
```
SPM will also automatically verify that the checksum of the artifact it downloads correspond to the one described in the `Package.swift` available in the public repository (it's a SHA2-256 checksum).
**CocoaPods integration**
The iOS SDK consists of an archive (`zip` file) and a Cocoapods project description file (`podspec` file). You can generate their checksums using the following commands (replace `x.y.z` by the SDK version you are checking):
```bash
curl -sL https://github.com/iadvize/iadvize-ios-sdk/releases/download/x.y.z/IAdvizeSDK.zip | openssl sha3-256
curl -sL https://raw.githubusercontent.com/CocoaPods/Specs/master/Specs/d/0/0/iAdvize/x.y.z/iAdvize.podspec.json | openssl sha3-256
```
After downloading the SDK through CocoaPods, additional verifications can be made, first by comparing the podspec checksum at the end of the generated `Podfile.lock` with the SHA1 podspec reference checksum.
```
SPEC CHECKSUMS:
iAdvize: podspec-sha1-checksum
```
The downloaded framework integrity can also be checked by generating the local pod files checksums and comparing them with the online reference ones:
```bash
cd Pods/iAdvize
find IAdvizeConversationSDK.xcframework -type f -exec openssl sha3-256 {} \; >> IAdvizeSDK-local.checksums
```
{% endtab %}
{% tab title="React Native" %}
Our React Native SDK plugin is hosted on an external platform called [Node Package Manager (NPM)](https://www.npmjs.com/) that already has internal checksum validation strategies in order to ensure that the downloaded plugin code (the wrapper code) is untampered.
{% endtab %}
{% tab title="Flutter" %}
Our Flutter SDK plugin is hosted on an external platform called [pub.dev](https://pub.dev/), that already has internal checksum validation strategies in order to ensure that the downloaded plugin code (the wrapper code) is untampered.
{% endtab %}
{% endtabs %}
## ⚙️ Setting up the SDK
### **1️⃣ Setting up the SDK into your project configuration**
First of all, to be able to use the SDK you need to add the SDK dependency into your project. Some configuration steps will also be needed in order to use it.
{% tabs %}
{% tab title="Android" %}
Add the iAdvize repository to your project repositories inside your top-level Gradle build file:
```gradle
// Project-level build.gradle.kts
allprojects {
repositories {
maven(url = uri("https://raw.github.com/iadvize/iadvize-android-sdk/master"))
maven(url = uri("https://jitpack.io"))
}
}
```
Add the iAdvize Mobile SDK dependency inside your module-level Gradle build file (replace `x.y.z` by the latest SDK version available):
```gradle
// Module-level build.gradle.kts
configurations {
all {
exclude(group = "xpp3", module = "xpp3")
}
}
dependencies {
implementation("com.iadvize:iadvize-sdk:x.y.z")
}
```
{% hint style="info" %}
*The `exclude` configuration is required because the iAdvize Mobile SDK uses* [*Smack*](https://github.com/igniterealtime/Smack)*, an XMPP library that is built upon `xpp3`, which is bundled by default in the Android framework. This exclude ensures that your app does not also bundle `xpp3` to avoid classes duplication errors.*
{% endhint %}
If you have build problems this may come from compatibility issues with the Android configuration, here are the versions used by the iAdvize Mobile SDK:
| Target SDK | `35` |
| --------------------- | -------- |
| Compile SDK | `35` |
| Minimum SDK | `24` |
| Build Tools | `35.0.0` |
| Kotlin | `2.1.10` |
| Gradle | `8.13` |
| Android Gradle Plugin | `8.9.0` |
After syncing your project you should be able to import the iAdvize dependency in your application code with `import com.iadvize.conversation.sdk.IAdvizeSDK`
You will then need to provide a reference to your application object and initialize the SDK with it.
In your `AndroidManifest.xml` declare your application class:
```xml
```
This class should then initialize the SDK:
```kotlin
package my.app.package.App
class App : Application() {
override fun onCreate() {
super.onCreate()
IAdvizeSDK.initiate(this)
}
}
```
⌨️ **In-context example:**
* [Project-level Gradle file](https://github.com/iadvize/iadvize-android-sdk/blob/master/example/build.gradle.kts)
* [Module-level Gradle file](https://github.com/iadvize/iadvize-android-sdk/blob/master/example/mobile/build.gradle.kts)
* [Import](https://github.com/iadvize/iadvize-android-sdk/blob/master/example/mobile/src/main/java/com/iadvize/conversation/sdk/demo/feature/App.kt#L5)
* [SDK Initiation](https://github.com/iadvize/iadvize-android-sdk/blob/master/example/mobile/src/main/java/com/iadvize/conversation/sdk/demo/feature/App.kt#L15)
{% hint style="info" %}
*The SDK supports video conversations using a third-party native (C++) binaries. If you are delivering your app using an APK you will note a size increase as the default behavior of the build system is to include the binaries for each ABI in a single APK. We strongly recommended that you take advantage of either* [*App Bundles*](https://developer.android.com/guide/app-bundle) *or* [*APK Splits*](https://developer.android.com/studio/build/configure-apk-splits) *to reduce the size of your APKs while still maintaining maximum device compatibility.*
{% endhint %}
{% endtab %}
{% tab title="iOS" %}
{% tabs %}
{% tab title="SPM" %}
From Xcode go to `File > Add Packages`, then paste the iAdvize Messenger SDK URL in the top-right search bar. Select the versioning strategy fitting your app then click on `Add Package`.
You should then be able to import the iAdvize dependency in your application code using `import IAdvizeConversationSDK`
⌨️ **In-context example:** [Import](https://github.com/iadvize/iadvize-ios-sdk/blob/master/example/SPMIntegration/SPMIntegration/Source/AppDelegate%2BiAdvize.swift#L10)
{% endtab %}
{% tab title="CocoaPods" %}
Add this line to your `Podfile`, inside the `target` section (replace `x.y.z` by the latest SDK version available, and choose the versioning strategy fitting your app):
```ruby
platform :ios, '13.0'
target 'YOUR_TARGET' do
project 'YOUR_PROJECT'
pod 'iAdvize', 'x.y.z'
end
```
{% hint style="warning" %}
*iAdvize Messenger SDK requires a **minimum iOS platform** of 13.0**.***
{% endhint %}
After running `pod install` you should be able to import the iAdvize dependency in your application code with `import IAdvizeConversationSDK`
⌨️ **In-context example:**
* [Podfile](https://github.com/iadvize/iadvize-ios-sdk/blob/master/example/CocoaPodsIntegration/Podfile#L1)
* [Import](https://github.com/iadvize/iadvize-ios-sdk/blob/master/example/CocoaPodsIntegration/CocoaPodsIntegration/Source/AppDelegate%2BiAdvize.swift#L10)
{% endtab %}
{% endtabs %}
{% hint style="info" %}
*The SDK supports video conversations. Thus it will request camera and microphone access before entering a video call. To avoid the app to crash, you have to setup two keys in your app Info.plist*
```
NSCameraUsageDescriptionThis application will use the camera to share photos and during video calls.NSMicrophoneUsageDescriptionThis application will use the microphone during video calls.
```
{% endhint %}
{% endtab %}
{% tab title="React Native" %}
Download the library from `NPM` using the following command:
```bash
npm install @iadvize-oss/iadvize-react-native-sdk
```
Alternatively, you can use `Yarn`:
```bash
yarn add @iadvize-oss/iadvize-react-native-sdk
```
The SDK API is then available via the following import:
```javascript
import IAdvizeSDK from '@iadvize-oss/iadvize-react-native-sdk';
```
{% tabs %}
{% tab title="Android setup" %}
In your `android/build.gradle` file, and add the iAdvize SDK repository. You also need to ensure that you are using the right Android framework to build (iAdvize Mobile SDK is built with Android target 35):
```gradle
// android/build.gradle
buildscript {
ext {
buildToolsVersion = "35.0.0"
minSdkVersion = 24
compileSdkVersion = 35
targetSdkVersion = 35
kotlinVersion = "2.1.10"
gradleVersion = "8.9.0"
ndkVersion = "29.0.13113456"
}
}
allprojects {
repositories {
maven { url "https://raw.github.com/iadvize/iadvize-android-sdk/master" }
maven { url "https://jitpack.io" }
}
}
```
{% hint style="warning" %}
*iAdvize Messenger SDK requires a **minSdkVersion** >= 24.*
{% endhint %}
On Android, the iAdvize Messenger SDK needs to be initialized before use to allow several functionalities to work. For instance, the default floating button use an ActivityLifecycleController that must be started before the main ReactNative activity is created, otherwise the controller won't be able to trigger the button display. Thus you need to add those lines in the `android/app/src/main/java/yourpackage/MainApplication.java` to initialize the SDK properly:
```java
// android/app/src/main/java/yourpackage/MainApplication.java
import com.iadvize.conversation.sdk.IAdvizeSDK;
public class MainApplication extends Application implements ReactApplication {
@Override
public void onCreate() {
super.onCreate();
IAdvizeSDK.initiate(this);
}
}
```
{% endtab %}
{% tab title="iOS setup" %}
Add this line to your `Podfile`, inside the `target` section (replace `x.y.z` by the latest SDK version available, and choose the versioning strategy fitting your app):
```ruby
target 'YOUR_TARGET' do
project 'YOUR_PROJECT'
pod 'iAdvize', 'x.y.z'
end
```
{% hint style="warning" %}
*iAdvize Messenger SDK requires a **minimum iOS platform** of 13.4*
{% endhint %}
Once this is done, make sure to go to `ios` folder and install CocoaPods dependencies:
```bash
cd ios && pod install --repo-update
```
{% hint style="info" %}
*The SDK supports video conversations. Thus it will request camera and microphone access before entering a video call. To avoid the app to crash, you have to setup two keys in your app Info.plist*
```
NSCameraUsageDescriptionThis application will use the camera to share photos and during video calls.NSMicrophoneUsageDescriptionThis application will use the microphone during video calls.
```
{% endhint %}
{% endtab %}
{% endtabs %}
{% endtab %}
{% tab title="Flutter" %}
Download the library from `pub.dev` using the following command:
```bash
flutter pub add iadvize_flutter_sdk
```
The SDK API is then available via the following import:
```dart
import 'package:iadvize_flutter_sdk/iadvize_sdk.dart';
```
{% tabs %}
{% tab title="Android setup" %}
In your `android/build.gradle` file, and add the iAdvize SDK repository:
```gradle
// android/build.gradle
allprojects {
repositories {
maven { url "https://raw.github.com/iadvize/iadvize-android-sdk/master" }
maven { url "https://jitpack.io" }
}
}
```
You also need to ensure that you are using the right Android framework to build (iAdvize Messenger SDK is built with Android target 35), as a good practice, also check that you are using the latest Kotlin version in `android/build.gradle` (you can find the version used in the plugin through its README file)
```gradle
// android/build.gradle
allprojects {
ext {
buildToolsVersion = "35.0.0"
minSdkVersion = 24
compileSdkVersion = 35
targetSdkVersion = 35
kotlinVersion = "2.1.10"
gradleVersion = "8.9.0"
ndkVersion = "29.0.13113456"
}
}
```
{% hint style="warning" %}
*iAdvize Messenger SDK requires a **minSdkVersion** >= 24.*
{% endhint %}
{% endtab %}
{% tab title="iOS setup" %}
Add this line to your `Podfile`, inside the `target` section (replace `x.y.z` by the latest SDK version available, and choose the versioning strategy fitting your app):
```ruby
platform :ios, '13.4'
target 'YOUR_TARGET' do
project 'YOUR_PROJECT'
pod 'iAdvize', 'x.y.z'
end
```
{% hint style="warning" %}
*iAdvize Messenger SDK requires a **minimum iOS platform** of 13.4*
{% endhint %}
Once this is done, make sure to go to `ios` folder and install CocoaPods dependencies:
```bash
cd ios && pod install --repo-update
```
{% hint style="info" %}
*The SDK supports video conversations. Thus it will request camera and microphone access before entering a video call. To avoid the app to crash, you have to setup two keys in your app Info.plist*
```
NSCameraUsageDescriptionThis application will use the camera to share photos and during video calls.NSMicrophoneUsageDescriptionThis application will use the microphone during video calls.
```
{% endhint %}
{% endtab %}
{% endtabs %}
{% endtab %}
{% endtabs %}
### **2️⃣ Activating the SDK**
Now that the SDK is available into your project build, let's integrate it into your app, first by activating it. Activation is the step that logs a user into the iAdvize flow.
You can choose between multiple authentication options:
Anonymous
For an unidentified user browsing your app.
Simple
For a logged in user in your app. You must pass a unique string identifier so that the visitor will retrieve his conversation history across multiple devices and platforms.
The identifier that you pass must be unique and non-discoverable for each different logged-in user.
Secured
Use it in conjunction with your in-house authentication system. You must pass a JWE provider callback that will be called when an authentication is required, you will then have to call your third party authentication system for a valid JWE to provide to the SDK.
For a full understanding of how the secured authentication works in the iAdvize platform you can refer to thissection.
To activate the SDK you must use the `activate` function with your `projectId` (see the [Prerequisites](#prerequisites) section above to get that identifier). You have access to callbacks in order to know if the SDK has been successfully activated. In case of an SDK activation failure the callback will give you the reason of the failure and you may want to retry later.
{% tabs %}
{% tab title="Android" %}
```kotlin
IAdvizeSDK.activate(
projectId = projectId,
authenticationOption = authOption,
gdprOption = gdprOption,
callback = object : IAdvizeSDK.Callback {
override fun onSuccess() {
Log.d("iAdvize SDK", "The SDK has been activated.")
}
override fun onFailure(error: IAdvizeSDK.Error) {
Log.e("iAdvize SDK", "The SDK activation failed with:", error)
}
}
)
```
⌨️ **In-context example:** [SDK Activation](https://github.com/iadvize/iadvize-android-sdk/blob/master/example/mobile/src/main/java/com/iadvize/conversation/sdk/demo/feature/App.kt#L32)
{% endtab %}
{% tab title="iOS" %}
```swift
IAdvizeSDK.shared.activate(projectId: projectId,
authenticationOption: authOption,
gdprOption: gdprOption)) { success in
if success {
...
}
}
```
⌨️ **In-context example:** [SDK Activation](https://github.com/iadvize/iadvize-ios-sdk/blob/master/example/SPMIntegration/SPMIntegration/Source/AppDelegate%2BiAdvize.swift#L61)
{% endtab %}
{% tab title="React Native" %}
```javascript
try {
// Anonymous Auth => Do not set the onJWERequested listener & set an empty userId
await IAdvizeSDK.activate(projectId, '', ...);
// Simple Auth => Do not set the onJWERequested listener & set a non-empty userId
await IAdvizeSDK.activate(projectId, "my-user-unique-id", ...);
// Secured Auth => Set the onJWERequested listener
IAdvizeSDKListeners.onJWERequested(function (eventData: any) {
console.log('onJWERequested' + ' ' + eventData);
// Fetch JWE from your 3rd-party auth system
// In SDK v3, you must return the value here (synchronously)
var jwe = ... ;
return jwe;
// In SDK v4, you should the value using an asynchronous API call (here or elsewhere)
IAdvizeSDK.provideJWE(jwe);
});
await IAdvizeSDK.activate(projectId, '', ...);
// SDK is activated
} catch (e) {
// SDK failed to activate
}
```
{% endtab %}
{% tab title="Flutter" %}
```dart
IAdvizeSdk.activate(
projectId: 'projectId',
authenticationOption: authOption
gdprOption: gdprOption,
).then((bool activated) => activated
? log('iAdvize Example : SDK activated')
: log('iAdvize Example : SDK not activated'));
```
{% endtab %}
{% endtabs %}
Once the iAdvize Mobile SDK is successfully activated, you should see a success message in the console:
```
✅ iAdvize conversation activated, the version is x.y.z
```
### **3️⃣ Logging the user out**
You will have to explicitly call the `logout` function of the iAdvize Mobile SDK when the user sign out of your app.
{% tabs %}
{% tab title="Android" %}
```kotlin
IAdvizeSDK.logout()
```
{% endtab %}
{% tab title="iOS" %}
```swift
IAdvizeSDK.shared.logout()
```
{% endtab %}
{% tab title="React Native" %}
```javascript
IAdvizeSDK.logout()
```
{% endtab %}
{% tab title="Flutter" %}
```dart
IAdvizeSdk.logout();
```
{% endtab %}
{% endtabs %}
### **4️⃣ Displaying logs**
To have more information on what’s happening on the SDK side you can change the log level.
{% tabs %}
{% tab title="Android" %}
{% endtab %}
{% tab title="iOS" %}
```swift
// verbose, info, warning, error, success, none
// Default is warning
IAdvizeSDK.shared.logLevel = .verbose
```
{% endtab %}
{% tab title="React Native" %}
```javascript
// VERBOSE, INFO, WARNING, ERROR, SUCCESS, NONE
// Default is WARNING
IAdvizeSDK.setLogLevel(LogLevel.VERBOSE);
```
{% endtab %}
{% tab title="Flutter" %}
```dart
// verbose, info, warning, error, success, none
// Default is warning
IAdvizeSdk.setLogLevel(LogLevel.verbose);
```
{% endtab %}
{% endtabs %}
You can get a description of the SDK status at any time by using the `debugInfo` API:
{% tabs %}
{% tab title="Android" %}
IAdvizeSDK.debugInfo()
{% endtab %}
{% tab title="iOS" %}
```swift
IAdvizeSDK.shared.debugInfo()
```
{% endtab %}
{% tab title="React Native" %}
```javascript
const debugInfo = IAdvizeSDK.debugInfo();
```
{% endtab %}
{% tab title="Flutter" %}
```dart
final debugInfo = await IAdvizeSdk.debugInfo();
```
{% endtab %}
{% endtabs %}
This will generate a JSON object with the SDK status information, encoded into a string that you can easily add into your bug reporting tool payload:
## 💬 Starting a conversation
To be able to start a conversation you will first have to **trigger a targeting rule** in order for the default chat button to be displayed. The Chatbox will then be accessible by clicking on that chat button.
### **1️⃣ Configuring the targeting language**
The targeting rule configured in the iAdvize Administration Panel is setup for a given language. This means that if, for example, you setup a targeting rule to be triggered only for `EN` language and the current user’s device is setup with a different targeting language (for instance `FR`), the targeting rule will not trigger.
By default, the targeting rule language used is the user’s device current language. You can force the targeting language to a specific value using:
{% tabs %}
{% tab title="Android" %}
```kotlin
IAdvizeSDK.targetingController.language = LanguageOption.Custom(Language.FR)
```
{% endtab %}
{% tab title="iOS" %}
```swift
IAdvizeSDK.shared.targetingController.language = .custom(value: .fr)
```
{% endtab %}
{% tab title="React Native" %}
```javascript
IAdvizeSDK.setLanguage('fr');
```
{% hint style="warning" %}
*The language string should respect* [*ISO 639-1*](https://en.wikipedia.org/wiki/ISO_639-1)*.*
{% endhint %}
{% endtab %}
{% tab title="Flutter" %}
```dart
IAdvizeSdk.setLanguage('fr');
```
{% hint style="warning" %}
*The language string should respect* [*ISO 639-1*](https://en.wikipedia.org/wiki/ISO_639-1)*.*
{% endhint %}
{% endtab %}
{% endtabs %}
{% hint style="warning" %}
*This `language` property is **NOT** intended to change the language displayed in the SDK. It is solely used for the targeting process purpose.*
{% endhint %}
### **2️⃣ Activating a targeting rule**
Using a targeting rule UUID (see the [Prerequisites](#prerequisites) section above to get that identifier), you can engage a user by calling:
{% tabs %}
{% tab title="Android" %}
```kotlin
IAdvizeSDK.targetingController.activateTargetingRule(
TargetingRule(
targetingRuleUUID,
ConversationChannel.CHAT // or ConversationChannel.VIDEO
)
)
```
⌨️ **In-context example:** [Targeting rule activation](https://github.com/iadvize/iadvize-android-sdk/blob/da8b4ae56db4eff6f8539279b511ed442064b4cb/example/mobile/src/main/java/com/iadvize/conversation/sdk/demo/feature/product/ProductDetailFragment.kt#L43)
{% endtab %}
{% tab title="iOS" %}
```swift
let targetingRule = TargetingRule(id: UUID, conversationChannel: .chat) // or .video
IAdvizeSDK.shared.targetingController.activateTargetingRule(targetingRule: targetingRule)
```
⌨️ **In-context example:** [Targeting rule activation](https://github.com/iadvize/iadvize-ios-sdk/blob/d279e8a7f90c1f79f2e897a798dd30a626d68227/example/SPMIntegration/SPMIntegration/Source/AppDelegate%2BiAdvize.swift#L65)
{% endtab %}
{% tab title="React Native" %}
```javascript
IAdvizeSDK.activateTargetingRule(targetingRuleUUIDString, ConversationChannel.CHAT); // OR ConversationChannel.VIDEO
```
{% endtab %}
{% tab title="Flutter" %}
```dart
IAdvizeSdk.activateTargetingRule(TargetingRule(uuid: 'targeting-rule-uuid', channel: ConversationChannel.chat)); // or ConversationChannel.video
```
{% endtab %}
{% endtabs %}
If all the following conditions are met, the default chat button should appear:
* the targeting rule exists and is enabled in the administration panel
* the targeting rule language set in the SDK matches the language configured for this rule
* an operator assigned to this rule is available to answer (connected and with a free chat slot)
{% hint style="info" %}
*After you activate a rule and it succeeds (by displaying the button), those conditions are checked **every 30 seconds** to verify that the button should still be displayed or not.*
*Upon the **first encountered failure** from this periodic check, the button is hidden and the SDK **stops verifying** the conditions. It means that if the rule cannot be triggered (after the first call, or after any successive check), you will have to call the `activateTargetingRule` (or `registerUserNavigation`) method again in order to restart the engagement process.*
{% endhint %}
### **3️⃣ Initiating the conversation**
Once the default chat button is displayed, the visitor tap on it to access the Chatbox. After composing and sending a message a new conversation should pop up in the operator desk.
 
### **4️⃣ Following user navigation**
While your user navigates through your app, you will have to update the active targeting rule in order to engage him/her with the best conversation partner at any time. In order to so, the SDK provides you with multiple navigation options to customize the behavior according to your needs:
{% tabs %}
{% tab title="Android" %}
```kotlin
// To clear the active targeting rule and thus stopping the engagement process (this is the default behavior)
val navOption = NavigationOption.ClearActiveRule
// To keep/start the engagement process with the same active targeting rule in the new user screen
val navOption = NavigationOption.KeepActiveRule
// To keep/start the engagement process but with another targeting rule for this screen
val navOption = NavigationOption.ActivateNewRule(newRule)
// Register the user navigation through your app
IAdvizeSDK.targetingController.registerUserNavigation(navOption)
```
{% endtab %}
{% tab title="iOS" %}
```swift
// To clear the active targeting rule and thus stopping the engagement process (this is the default behavior)
let navOption: NavigationOption = .clearActiveRule
// To keep/start the engagement process with the same active targeting rule in the new user screen
let navOption: NavigationOption = .keepActiveRule
// To keep/start the engagement process but with another targeting rule for this screen
let navOption: NavigationOption = .activateNewRule(targetinRuleId: newRuleId)
// Register the user navigation through your app
IAdvizeSDK.shared.targetingController.registerUserNavigation(navigationOption: navOption)
```
{% endtab %}
{% tab title="React Native" %}
```javascript
// To clear the active targeting rule and thus stopping the engagement process (this is the default behavior)
IAdvizeSDK.registerUserNavigation(NavigationOption.CLEAR, "", "");
// To keep/start the engagement process with the same active targeting rule in the new user screen
IAdvizeSDK.registerUserNavigation(NavigationOption.KEEP, "", "");
// To keep/start the engagement process but with another targeting rule for this screen
IAdvizeSDK.registerUserNavigation(NavigationOption.NEW, targetingRuleUUIDString, channel);
```
{% endtab %}
{% tab title="Flutter" %}
```dart
// To clear the active targeting rule and thus stopping the engagement process (this is the default behavior)
IAdvizeSdk.registerUserNavigation(navigationOption: NavigationOption.optionClear);
// To keep/start the engagement process with the same active targeting rule in the new user screen
IAdvizeSdk.registerUserNavigation(navigationOption: NavigationOption.optionKeep);
// To keep/start the engagement process but with another targeting rule for this screen
IAdvizeSdk.registerUserNavigation(
navigationOption: NavigationOption.optionNew,
newTargetingRule: TargetingRule(uuid: 'targeting-rule-uuid', channel: ConversationChannel.chat) // or ConversationChannel.video
)
```
{% endtab %}
{% endtabs %}
{% hint style="info" %}
*Please note that calling `registerUserNavigation` with the `CLEAR NavigationOption` will stop the engagement process, and calling it with other options will start it if it is stopped.*
{% endhint %}
## 👋 Configuring GDPR and welcome message
### **1️⃣ Adding a welcome message**
As seen above, the Chatbox is empty by default. You can configure a welcome message that will be displayed to the visitor when no conversation is ongoing.
{% tabs %}
{% tab title="Android" %}
```kotlin
val configuration = ChatboxConfiguration()
configuration.automaticMessage = "Any question? Say Hello to Smart and we will answer you as soon as possible! 😊"
IAdvizeSDK.chatboxController.setupChatbox(configuration)
```
⌨️ **In-context example:** [Welcome message](https://github.com/iadvize/iadvize-android-sdk/blob/da8b4ae56db4eff6f8539279b511ed442064b4cb/example/mobile/src/main/java/com/iadvize/conversation/sdk/demo/feature/IAdvizeSDKConfig.kt#L78)
{% endtab %}
{% tab title="iOS" %}
```swift
var configuration = ChatboxConfiguration()
configuration.automaticMessage = NSLocalizedString(
"Any question? Say Hello to Smart and we will answer you as soon as possible! 😊",
comment: ""
)
IAdvizeSDK.shared.chatboxController.setupChatbox(configuration: configuration)
```
⌨️ **In-context example:** [Welcome message](https://github.com/iadvize/iadvize-ios-sdk/blob/d279e8a7f90c1f79f2e897a798dd30a626d68227/example/SPMIntegration/SPMIntegration/Source/AppDelegate%2BiAdvize.swift#L42C1-L42C1)
{% endtab %}
{% tab title="React Native" %}
```javascript
const configuration: ChatboxConfiguration = {
automaticMessage: "Any question? Say Hello to Smart and we will answer you as soon as possible! 😊",
};
IAdvizeSDK.setChatboxConfiguration(configuration);
```
{% endtab %}
{% tab title="Flutter" %}
```dart
final ChatboxConfiguration configuration = ChatboxConfiguration(
automaticMessage: "Any question? Say Hello to Smart and we will answer you as soon as possible! 😊",
);
IAdvizeSdk.setChatboxConfiguration(configuration);
```
{% endtab %}
{% endtabs %}
When no conversation is ongoing, the welcome message is displayed to the visitor:

### **2️⃣ Enabling GDPR approval**
If you need to get the visitor consent on GDPR before he starts chatting, you can pass a `GDPROption` while activating the SDK. By default this option is set to `Disabled`.
If enabled, a message will request the visitor approval before allowing him to send a message to start the conversation:

This GDPR option dictates how the SDK behaves when the user taps on the `More information` button. You can either:
* provide an URL pointing to your GPDR policy, it will be opened on user click
* provide a listener/delegate that will be called on user click and you can then implement your own custom behavior
{% hint style="warning" %}
*If your visitors have already consented to GDPR inside your application, you can activate the iAdvize SDK without the GDPR process. However, be careful to explicitly mention the iAdvize Chat part in your GDPR consent details.*
{% endhint %}
{% tabs %}
{% tab title="Android" %}
```kotlin
// Disabled
val gdprOption = GDPROption.Disabled
// URL
val gdprOption = GDPROption.Enabled(GDPREnabledOption.LegalUrl(URI.create("http://my.gdpr.rules.com")))
// Listener
val gdprOption = GDPROption.Enabled(GDPREnabledOption.Listener(object : GDPRListener {
override fun didTapMoreInformation() {
// Implement your own logic
}
}))
```
```kotlin
val configuration = ChatboxConfiguration()
configuration.automaticMessage = "Any question? Say Hello to Smart and we will answer you as soon as possible! 😊"
configuration.gdprMessage = "Your own GDPR message."
IAdvizeSDK.chatboxController.setupChatbox(configuration)
```
⌨️ **In-context example:**
* [GDPR Option](https://github.com/iadvize/iadvize-android-sdk/blob/master/example/mobile/src/main/java/com/iadvize/conversation/sdk/demo/feature/IAdvizeSDKConfig.kt#L48)
* [GDPR Message](https://github.com/iadvize/iadvize-android-sdk/blob/master/example/mobile/src/main/java/com/iadvize/conversation/sdk/demo/feature/IAdvizeSDKConfig.kt#L69)
{% endtab %}
{% tab title="iOS" %}
```swift
// Disabled
let gdprOption = .disabled
// URL
if let legalInfoURL = URL(string: "http://my.gdpr.rules.com") {
let gdprOption = .enabled(option: .legalInformation(url: legalInfoURL))
}
// Listener
class GDPRMoreInfoListener: GDPRDelegate {
func didTapMoreInformation() {
// Implement your own logid
}
}
let gdprListener = GDPRMoreInfoListener()
let gdprOption = .enabled(option: .delegate(delegate: gdprListener))
```
```swift
var configuration = ChatboxConfiguration()
configuration.automaticMessage = NSLocalizedString(
"Any question? Say Hello to Smart and we will answer you as soon as possible! 😊",
comment: ""
)
configuration.gdprMessage = "Your own GDPR message."
IAdvizeSDK.shared.chatboxController.setupChatbox(configuration: configuration)
```
⌨️ **In-context example:**
* [GDPR Option](https://github.com/iadvize/iadvize-ios-sdk/blob/d279e8a7f90c1f79f2e897a798dd30a626d68227/example/SPMIntegration/SPMIntegration/Source/AppDelegate%2BiAdvize.swift#L53)
* [GDPR Message](https://github.com/iadvize/iadvize-ios-sdk/blob/d279e8a7f90c1f79f2e897a798dd30a626d68227/example/SPMIntegration/SPMIntegration/Source/AppDelegate%2BiAdvize.swift#L43)
{% endtab %}
{% tab title="React Native" %}
```javascript
// No listener set + null URL => GDPR is disabled
await IAdvizeSDK.activate(projectId, userId, null);
// No listener set + non-null URL => GDPR is enabled, the webpage opens when user click on more info button
await IAdvizeSDK.activate(projectId, userId, "http://my.gdpr.rules.com");
// Listener set => GDPR is enabled, the listener is called when user click on more info button
IAdvizeSDKListeners.onGDPRMoreInfoClicked(function (eventData: any) {
// Implement your own behavior
});
await IAdvizeSDK.activate(projectId, userId, null);
```
{% hint style="warning" %}
*If you set both the listener and an URL, the listener will take priority.*
{% endhint %}
```javascript
const configuration: ChatboxConfiguration = {
automaticMessage: 'Hello! Please ask your question :)',
gdprMessage: 'Your own custom GDPR message.'
};
IAdvizeSDK.setChatboxConfiguration(configuration)
```
{% endtab %}
{% tab title="Flutter" %}
```dart
// Disabled
GDPROption gdprOption = GDPROption.disabled();
// URL
GDPROption gdprOption = GDPROption.url(url: "http://my.gdpr.rules.com")
// Listener
GDPROption gdprOption = GDPROption.listener(onMoreInfoClicked: () {
log('iAdvize Example : GDPR More Info button clicked');
// Implement your own logic here
});
```
```dart
final ChatboxConfiguration configuration = ChatboxConfiguration(
gdprMessage: "Your own GDPR message",
);
IAdvizeSdk.setChatboxConfiguration(configuration);
```
{% endtab %}
{% endtabs %}
## 🎨 Branding the Chatbox
The `ChatboxConfiguration` object that we used in the previous section to customize the welcome and GDPR messages can also be used to change the Chatbox UI to better fit into the look and feel of your application.
{% hint style="warning" %}
*You should setup the configuration before presenting the chatbox. If you call this method while the chatbox is visible, some parameters will only apply for new messages or after closing/reopening the chatbox.*
{% endhint %}
### **1️⃣ Updating the font**
The font used in the Chatbox can easily be updated using your own font:
{% tabs %}
{% tab title="Android" %}
```kotlin
val configuration = ChatboxConfiguration()
configuration.fontPath = "fonts/comic_sans_ms_regular.ttf"
IAdvizeSDK.chatboxController.setupChatbox(configuration)
```
{% hint style="info" %}
*The font should be placed inside the assets folder. Here the file is located at `src/main/assets/fonts/comic_sans_ms_regular.ttf`*
{% endhint %}
{% endtab %}
{% tab title="iOS" %}
```swift
var configuration = ChatboxConfiguration()
configuration.font = UIFont(name: "AmericanTypewriter-Condensed", size: 11.0)
IAdvizeSDK.shared.chatboxController.setupChatbox(configuration: configuration)
```
{% hint style="warning" %}
*Even if the UIFont constructor needs a size attribute, the exact font size and traits are automatically chosen and the font is scaled to the current Dynamic Type setting.*
{% endhint %}
{% hint style="info" %}
*The font should either be a system font, or be a font embedded into the app, with a font file inside the bundle and its corresponding declaration into the `Info.plist` file.*
{% endhint %}
{% endtab %}
{% tab title="React Native" %}
```javascript
const configuration: ChatboxConfiguration = {
// For iOS devices
fontName: 'AmericanTypewriter-Condensed',
fontSize: 11, // iOS only
// For Android devices
fontPath: 'fonts/comic_sans_ms_regular.ttf',
};
```
{% hint style="info" %}
*On **iOS** the font should either be a system font, or be a font embedded into the app, with a font file inside the bundle and its corresponding declaration into the `Info.plist` file.*
*On **Android** the font should be placed inside the assets folder. Here the file is located at `src/main/assets/fonts/comic_sans_ms_regular.ttf`*
{% endhint %}
{% endtab %}
{% tab title="Flutter" %}
```dart
final ChatboxConfiguration configuration = ChatboxConfiguration(
// For iOS devices
iosFontName: 'AmericanTypewriter-Condensed',
iosFontSize: 11,
// For Android devices
androidFontPath: 'fonts/comic_sans_ms_regular.ttf',
);
IAdvizeSdk.setChatboxConfiguration(configuration);
```
{% hint style="info" %}
*On **iOS** the font should either be a system font, or be a font embedded into the app, with a font file inside the bundle and its corresponding declaration into the `Info.plist` file.*
*On **Android** the font should be placed inside the assets folder. Here the file is located at `src/main/assets/fonts/comic_sans_ms_regular.ttf`*
{% endhint %}
{% endtab %}
{% endtabs %}
### **2️⃣ Styling the navigation bar**
Some parts of the he toolbar/navigationbar appearing at the top of the Chatbox can also be customized:
* the background color
* the main color
* the title
{% tabs %}
{% tab title="Android" %}
```kotlin
val configuration = ChatboxConfiguration()
configuration.toolbarBackgroundColor = Color.BLACK,
configuration.toolbarMainColor = COLOR.WHITE,
configuration.toolbarTitle = "Conversation"
IAdvizeSDK.chatboxController.setupChatbox(configuration)
```
{% endtab %}
{% tab title="iOS" %}
```swift
var configuration = ChatboxConfiguration()
configuration.navigationBarBackgroundColor = .black
configuration.navigationBarMainColor = .white
configuration.navigationBarTitle = "Conversation"
IAdvizeSDK.shared.chatboxController.setupChatbox(configuration: configuration)
```
{% endtab %}
{% tab title="React Native" %}
```javascript
const configuration: ChatboxConfiguration = {
navigationBarBackgroundColor: '#000000',
navigationBarMainColor: '#FFFFFF',
navigationBarTitle: 'Conversation'
};
IAdvizeSDK.setChatboxConfiguration(configuration);
```
{% endtab %}
{% tab title="Flutter" %}
```dart
final ChatboxConfiguration configuration = ChatboxConfiguration(
navigationBarBackgroundColor: Colors.black,
navigationBarMainColor: Colors.yellow,
navigationBarTitle: 'Conversation',
);
IAdvizeSdk.setChatboxConfiguration(configuration);
```
{% endtab %}
{% endtabs %}
### **3️⃣ Changing the Chatbox colors**
The displayed messages colors can be customized, either the ones from the agent (`incomingMessages`) or the ones from the visitor (`outgoingMessages`):
* the message bubble background color
* the message text color
* the message bubble stroke/border color
* the accent color, used for all message controls (same color for both agent & visitor): quick answers, file messages, send button, typing indicator...
{% tabs %}
{% tab title="Android" %}
{% endtab %}
{% tab title="iOS" %}
```swift
var configuration = ChatboxConfiguration()
configuration.incomingMessageBackgroundColor = .black
configuration.incomingMessageTextColor = .yellow
configuration.incomingMessageBorderColor = .yellow
configuration.outgoingMessageBackgroundColor = .yellow
configuration.outgoingMessageTextColor = .black
configuration.outgoingMessageBorderColor = .black
configuration.accentColor = .magenta
IAdvizeSDK.shared.chatboxController.setupChatbox(configuration: configuration)
```
{% endtab %}
{% tab title="React Native" %}
```javascript
var configuration = ChatboxConfiguration()
configuration.incomingMessageBackgroundColor = '#000000';
configuration.incomingMessageTextColor = '#FFFF00';
configuration.incomingMessageStrokeColor = '#FFFF00';
configuration.outgoingMessageBackgroundColor = '#FFFF00';
configuration.outgoingMessageTextColor = '#000000';
configuration.outgoingMessageStrokeColor = '#000000';
configuration.accentColor = '#FF00FF';
IAdvizeSDK.setChatboxConfiguration(configuration: configuration)
```
{% endtab %}
{% tab title="Flutter" %}
```dart
final ChatboxConfiguration configuration = ChatboxConfiguration(
incomingMessageBackgroundColor: Colors.black,
incomingMessageTextColor: Colors.yellow,
incomingMessageStrokeColor: Colors.yellow,
outgoingMessageBackgroundColor: Colors.yellow,
outgoingMessageTextColor: Colors.black,
outgoingMessageStrokeColor: Colors.black,
accentColor: Colors.magenta,
);
IAdvizeSdk.setChatboxConfiguration(configuration);
```
{% endtab %}
{% endtabs %}
### **4️⃣ Using a brand avatar**
The operator avatar displayed alongside his messages can be updated for branding purposes. You can specify a drawable either via an URL or a local resource.
{% tabs %}
{% tab title="Android" %}
```kotlin
val configuration = ChatboxConfiguration()
// Update the incoming message avatar with a Drawable resource.
configuration.incomingMessageAvatar = IncomingMessageAvatar.Image(
ContextCompat.getDrawable(context, R.drawable.ic_brand_avatar)
)
// Update the incoming message avatar with an URL.
configuration.incomingMessageAvatar = IncomingMessageAvatar.Url(URL("http://avatar.url"))
IAdvizeSDK.chatboxController.setupChatbox(configuration)
```
{% endtab %}
{% tab title="iOS" %}
```swift
var configuration = ChatboxConfiguration()
// Update the incoming message avatar with a UIImage.
configuration.incomingMessageAvatar = .image(image: UIImage(named: "BrandAvatar"))
// Update the incoming message avatar with an URL.
configuration.incomingMessageAvatar = .url(url: "http://avatar.url")
IAdvizeSDK.shared.chatboxController.setupChatbox(configuration: configuration)
```
{% endtab %}
{% tab title="React Native" %}
```javascript
const configuration: ChatboxConfiguration = {
incomingMessageAvatarImageName: Image.resolveAssetSource(require('./test.jpeg')).uri,
incomingMessageAvatarURL: 'https://picsum.photos/200/200',
};
```
{% hint style="warning" %}
*If you fill both fields, `incomingMessageAvatarImageName` will take priority over `incomingMessageAvatarURL`.*
{% endhint %}
{% endtab %}
{% tab title="Flutter" %}
```dart
final ChatboxConfiguration configuration = ChatboxConfiguration(
incomingMessageAvatarImage: const AssetImage('assets/test.jpeg'),
// OR
incomingMessageAvatarURL: 'https://picsum.photos/200/200',
);
IAdvizeSdk.setChatboxConfiguration(configuration);
```
{% hint style="warning" %}
*If you fill both fields, `incomingMessageAvatarImageName` will take priority over `incomingMessageAvatarURL`.*
{% endhint %}
{% endtab %}
{% endtabs %}
{% hint style="warning" %}
*GIFs are not supported.*
{% endhint %}
### **5️⃣ Presenting a smaller Chatbox**
The Chatbox can be presented in a compact mode.
The visitor can then expand the chatbox manually. The chatbox is automatically expanded when the keyboard opens. This compact mode can be enabled by using a flag in the `ChatboxConfiguration.`
{% tabs %}
{% tab title="Android" %}
```kotlin
val configuration = ChatboxConfiguration()
configuration.smallerChatboxEnabled = true // Default is false
IAdvizeSDK.chatboxController.setupChatbox(configuration)
```
{% endtab %}
{% tab title="iOS" %}
```swift
var configuration = ChatboxConfiguration()
configuration.isSmallerChatboxEnabled = true // Default is false.
IAdvizeSDK.shared.chatboxController.setupChatbox(configuration: configuration)
```
{% endtab %}
{% tab title="React Native" %}
```javascript
const configuration: ChatboxConfiguration = {
...
isSmallerChatboxEnabled: true,
...
};
IAdvizeSDK.setChatboxConfiguration(configuration);
```
{% endtab %}
{% tab title="Flutter" %}
```dart
IAdvizeSdk.setChatboxConfiguration(ChatboxConfiguration(
// ...
isSmallerChatboxEnabled: true,
// ...
);
```
{% endtab %}
{% endtabs %}
## 🎨 Branding the Default Floating Button
By default, the SDK uses its own Default Floating Button for the user to engage in the conversation. This Default Floating Button display process is automated by the SDK and works out of the box. You have however limited possibilities to brand it to your needs.
{% tabs %}
{% tab title="Android" %}
The Default Floating Button can be parametrized, both in its look (colors / icon) and position (anchor / margins) using the appropriate configuration:
```kotlin
val configuration = DefaultFloatingButtonConfiguration(
anchor = Gravity.START or Gravity.BOTTOM,
margins = DefaultFloatingButtonMargins(),
backgroundTint = ContextCompat.getColor(this, R.color.colorPrimary),
iconResIds = mapOf(
ConversationChannel.CHAT to R.drawable.chat_icon,
ConversationChannel.VIDEO to R.drawable.video_icon
)
iconTint = Color.WHITE
)
val option = DefaultFloatingButtonOption.Enabled(configuration)
IAdvizeSDK.defaultFloatingButtonController.setupDefaultFloatingButton(option)
```
⌨️ **In-context example:** [Default Floating Button Configuration](https://github.com/iadvize/iadvize-android-sdk/blob/master/example/mobile/src/main/java/com/iadvize/conversation/sdk/demo/feature/IAdvizeSDKConfig.kt#L52)
{% endtab %}
{% tab title="iOS" %}
The Default Floating Button will use hardcoded icons and the `ChatboxConfiguration.accentColor` as background color:
```swift
var configuration = ChatboxConfiguration()
configuration.accentColor = .red
IAdvizeSDK.shared.chatboxController.setupChatbox(configuration: configuration)
```
The Default Floating Button is anchored to the bottom left side of the screen. You can modify its placement by specifying the button margins:
```swift
IAdvizeSDK.shared.chatboxController.setFloatingButtonPosition(leftMargin: 20.0, bottomMargin: 20.0)
```
{% endtab %}
{% tab title="React Native" %}
The Default Floating Button will use hardcoded icons and the `ChatboxConfiguration.accentColor` as background color:
```javascript
const configuration: ChatboxConfiguration = {
accentColor: '#000000',
};
```
The Default Floating Button is anchored to the bottom left side of the screen. You can modify its placement by specifying the button margins:
```javascript
IAdvizeSDK.setFloatingButtonPosition(20, 20);
```
{% endtab %}
{% tab title="Flutter" %}
The Default Floating Button will use hardcoded icons and the `ChatboxConfiguration.accentColor` as background color:
```dart
final ChatboxConfiguration configuration = ChatboxConfiguration(
accentColor: Colors.red,
);
IAdvizeSdk.setChatboxConfiguration(configuration);
```
The Default Floating Button is anchored to the bottom left side of the screen. You can modify its placement by specifying the button margins:
```dart
IAdvizeSdk.setFloatingButtonPosition(leftMargin: 20, bottomMargin: 20);
```
{% endtab %}
{% endtabs %}
## ✨ Using a custom chat button
If you are not satisfied with the Default Floating Button look and feel or if you want to implement a specific behavior related to its display you may need to use a custom conversation button.
With a custom button it is your responsibility to:
* design the floating or fixed button to invite your user to chat
* hide/show the button following the active targeting rule availability and the ongoing conversation status
* open the Chatbox when the user presses your button
### **1️⃣ Disabling the Default Floating Button**
{% tabs %}
{% tab title="Android" %}
```kotlin
IAdvizeSDK.defaultFloatingButtonController.setupDefaultFloatingButton(DefaultFloatingButtonOption.Disabled)
```
{% endtab %}
{% tab title="iOS" %}
```swift
IAdvizeSDK.shared.chatboxController.useDefaultFloatingButton = false
```
{% endtab %}
{% tab title="React Native" %}
```javascript
IAdvizeSDK.setDefaultFloatingButton(false);
```
{% endtab %}
{% tab title="Flutter" %}
```dart
IAdvizeSdk.setDefaultFloatingButton(false);
```
{% endtab %}
{% endtabs %}
### **2️⃣ Displaying/hiding the chat button**
The chat button is linked to the targeting and conversation workflow and should update its visibility each time the status of those workflows is changed. First of all you need to implement the appropriate callbacks:
{% tabs %}
{% tab title="Android" %}
```kotlin
IAdvizeSDK.targetingController.listeners.add(object : TargetingListener {
override fun onActiveTargetingRuleAvailabilityUpdated(isActiveTargetingRuleAvailable: Boolean) {
// SDK active rule availability changed to isActiveTargetingRuleAvailable
updateChatButtonVisibility()
}
override fun onActiveTargetingRuleAvailabilityUpdateFailed(error: IAdvizeSDK.Error) {
// SDK active rule availability failed
updateChatButtonVisibility()
// You may launch the targeting again based on the error type
}
})
IAdvizeSDK.conversationController.listeners.add(object : ConversationListener {
override fun onOngoingConversationUpdated(ongoingConversation: OngoingConversation?) {
// SDK ongoing conversation has updated
updateChatButtonVisibility()
}
override fun onNewMessageReceived(content: String) {
// A new message was received via the SDK
}
override fun handleClickedUrl(uri: Uri): Boolean {
// A message link was tapped, return true if you want your app to handle it
return false
}
})
```
{% endtab %}
{% tab title="iOS" %}
```swift
extension IntegrationApp: TargetingControllerDelegate {
func activeTargetingRuleAvailabilityDidUpdate(isActiveTargetingRuleAvailable: Bool) {
// SDK active rule availability changed to isActiveTargetingRuleAvailable
updateChatButtonVisibility()
}
func activeTargetingRuleDidFailToUpdate(error: TargetingError) {
// SDK active rule availability failed
updateChatButtonVisibility()
// You may launch the targeting again based on the error type
}
}
extension IntegrationApp: ConversationControllerDelegate {
func ongoingConversationUpdated(ongoingConversation: IAdvizeConversationSDK.OngoingConversation?) {
// SDK ongoing conversation status changed
updateChatButtonVisibility()
}
func didReceiveNewMessage(content: String) {
// A new message was received via the SDK
}
func conversationController(_ controller: ConversationController, shouldOpen url: URL) -> Bool {
// A message link was tapped, return false if you want your app to handle it
}
}
class IntegrationApp {
IAdvizeSDK.shared.targetingController.delegate = self
IAdvizeSDK.shared.conversationController.delegate = self
}
```
{% endtab %}
{% tab title="React Native" %}
```javascript
IAdvizeSDKListeners.onActiveTargetingRuleAvailabilityUpdated(function (eventData: any) {
// SDK active rule availability changed
updateChatButtonVisibility()
});
IAdvizeSDKListeners.onActiveTargetingRuleAvailabilityUpdateFailed(function (eventData: any) {
// SDK active rule availability failed
updateChatButtonVisibility()
// You may launch the targeting again based on the error type
});
IAdvizeSDKListeners.onOngoingConversationStatusChanged(function (eventData: any) {
// SDK ongoing conversation status changed
updateChatButtonVisibility()
});
```
{% endtab %}
{% tab title="Flutter" %}
```dart
IAdvizeSdk.setConversationListener(manageUrlClick: true);
IAdvizeSdk.onOngoingConversationUpdated.listen((bool ongoing) {
// SDK ongoing conversation status changed
_updateCustomChatButtonVisibility();
});
IAdvizeSdk.setOnActiveTargetingRuleAvailabilityListener();
IAdvizeSdk.onActiveTargetingRuleAvailabilityUpdated.listen((bool available) {
// SDK active rule availability changed
_updateCustomChatButtonVisibility();
});
IAdvizeSdk.onActiveTargetingRuleAvailabilityUpdateFailed.listen((Map error) {
// SDK active rule availability failed
updateChatButtonVisibility()
// You may launch the targeting again based on the error type
});
```
{% endtab %}
{% endtabs %}
The chat button gives access to the Chatbox so it should be visible:
* at all times when a conversation is ongoing to allow the visitor to come back to the current conversation
* when the active targeting rule is available, to engage the visitor to chat
{% tabs %}
{% tab title="Android" %}
```kotlin
fun updateChatButtonVisibility() {
val sdkActivated = IAdvizeSDK.activationStatus == IAdvizeSDK.ActivationStatus.ACTIVATED
val chatboxOpened = IAdvizeSDK.chatboxController.isChatboxPresented()
val ruleAvailable = IAdvizeSDK.targetingController.isActiveTargetingRuleAvailable()
val hasOngoingConv = IAdvizeSDK.conversationController.ongoingConversation() != null
if (sdkActivated && !chatboxOpened && (hasOngoingConv || ruleAvailable)) {
showChatButton()
} else {
hideChatButton()
}
}
```
{% endtab %}
{% tab title="iOS" %}
```swift
func updateChatButtonVisibility() {
guard IAdvizeSDK.shared.activationStatus == .activated else {
hideChatButton()
return
}
guard !IAdvizeSDK.shared.chatboxController.isChatboxPresented() else {
hideChatButton()
return
}
guard IAdvizeSDK.shared.conversationController.ongoingConversation() != nil ||
IAdvizeSDK.shared.targetingController.isActiveTargetingRuleAvailable else {
hideChatButton()
return
}
showChatButton()
}
```
{% endtab %}
{% tab title="React Native" %}
```javascript
const updateChatButtonVisibility = async () => {
const ruleAvailable = IAdvizeSDK.isActiveTargetingRuleAvailable()
const hasOngoingConv = IAdvizeSDK.ongoingConversationId().trim().length !== 0
const chatboxOpened = IAdvizeSDK.isChatboxPresented()
if (!chatboxOpened && (hasOngoingConv || ruleAvailable)) {
showChatButton()
} else {
hideChatButton()
}
};
```
{% endtab %}
{% tab title="Flutter" %}
```dart
bool _showCustomButton = false;
Future _updateCustomChatButtonVisibility() async {
final bool sdkActivated = await IAdvizeSdk.isSDKActivated();
final bool ruleAvailable = await IAdvizeSdk.isActiveTargetingRuleAvailable();
final bool hasOngoingConv = await ongoingConversationId() != null;
setState(() {
_showCustomButton = sdkActivated && (hasOngoingConv || ruleAvailable);
});
}
```
{% endtab %}
{% endtabs %}
### **3️⃣ Opening the Chatbox**
When the visitor taps on your custom chat button you should open the Chatbox by calling the following method:
{% tabs %}
{% tab title="Android" %}
```kotlin
IAdvizeSDK.chatboxController.presentChatbox(context)
```
⌨️ **In-context example:** [Full custom chat button implementation](https://gist.github.com/Judas/d0a34a50f1b6b8d542d77af5db9d9787)
{% endtab %}
{% tab title="iOS" %}
```swift
IAdvizeSDK.shared.chatboxController.presentChatbox(
animated: Bool,
presentingViewController: UIViewController?
) {
// ...
}
```
⌨️ **In-context example:** [Full custom chat button implementation](https://gist.github.com/alexandrekarst/74da3ce5a9eaf68f7bd83eaf77c6d3dc)
{% endtab %}
{% tab title="React Native" %}
```javascript
IAdvizeSDK.presentChatbox()
```
{% endtab %}
{% tab title="Flutter" %}
```dart
IAdvizeSdk.presentChatbox();
```
{% endtab %}
{% endtabs %}
You can be informed of the Chatbox opening/closing by subscribing to the right listener:
{% tabs %}
{% tab title="Android" %}
```kotlin
IAdvizeSDK.chatboxController.listeners.add( object : ChatboxListener {
override fun onChatboxOpened() {
Log.d("TEST", "Chatbox has opened")
}
override fun onChatboxClosed() {
Log.d("TEST", "Chatbox has closed")
}
})
```
{% endtab %}
{% tab title="iOS" %}
```swift
IAdvizeSDK.shared.chatboxController.delegate = self
extension MyApp: ChatboxControllerDelegate {
public func chatboxDidOpen() {
print("Chatbox has opened")
}
public func chatboxDidClose() {
print("Chatbox has closed")
}
}
```
⌨️ **In-context example:** [Full custom chat button implementation](https://gist.github.com/alexandrekarst/74da3ce5a9eaf68f7bd83eaf77c6d3dc)
{% endtab %}
{% tab title="React Native" %}
```javascript
IAdvizeSDKListeners.onChatboxOpened(function (eventData: any) {
console.log('Chatbox has opened');
});
IAdvizeSDKListeners.onChatboxClosed(function (eventData: any) {
console.log('Chatbox has closed');
});
```
{% endtab %}
{% tab title="Flutter" %}
```dart
IAdvizeSdk.setChatboxListener();
StreamSubscription _chatboxOpenedSubscription = IAdvizeSdk.onChatboxOpened
.listen((event) => log('Chatbox has opened'));
StreamSubscription _chatboxClosedSubscription = IAdvizeSdk.onChatboxClosed
.listen((event) => log('Chatbox has closed'));
```
{% endtab %}
{% endtabs %}
## 🔔 Handling push notifications
{% hint style="warning" %}
*Before starting this part you will need to configure push notifications inside your application. You can refer to the following resources if needed:*
{% tabs %}
{% tab title="Android" %}
[Firebase Cloud Messaging documentation](https://firebase.google.com/docs/cloud-messaging/android/client)
{% endtab %}
{% tab title="iOS" %}
[Push notification setup tutorial](https://www.kodeco.com/11395893-push-notifications-tutorial-getting-started)
{% endtab %}
{% tab title="React Native" %}
[React Native Firebase Setup](https://rnfirebase.io/)
[React Native Firebase Messaging Setup](https://rnfirebase.io/messaging/usage)
{% endtab %}
{% tab title="Flutter" %}
[Flutter Firebase Setup](https://firebase.google.com/docs/flutter/setup)
[Flutter Firebase Messaging Setup](https://firebase.google.com/docs/cloud-messaging/flutter/client)
{% endtab %}
{% endtabs %}
*You will also need to ensure that the push notifications are setup in your iAdvize project. The process is described in the* [*SDK Knowledge Base*](https://help.iadvize.com/hc/en-gb/articles/360019839480)*.*
{% endhint %}
### **1️⃣ Registering the device token**
For the SDK to be able to send notifications to the visitor’s device, its unique `device push token` must be registered:
{% tabs %}
{% tab title="Android" %}
```kotlin
class NotificationService : FirebaseMessagingService() {
override fun onNewToken(token: String) {
super.onNewToken(token)
IAdvizeSDK.notificationController.registerPushToken(token)
}
}
```
⌨️ **In-context example:** [Device token register](https://github.com/iadvize/iadvize-android-sdk/blob/master/example/mobile/src/main/java/com/iadvize/conversation/sdk/demo/feature/notifications/NotificationService.kt#L55)
{% endtab %}
{% tab title="iOS" %}
```swift
IAdvizeSDK.shared.notificationController.registerPushToken("the_device_push_token", applicationMode: .prod)
```
⌨️ **In-context example:** [Device token register](https://github.com/iadvize/iadvize-ios-sdk/blob/master/example/SPMIntegration/SPMIntegration/Source/AppDelegate%2BPushNotification.swift#L27)
{% endtab %}
{% tab title="React Native" %}
```javascript
import messaging from '@react-native-firebase/messaging';
const registerPushToken = async () => {
try {
const token = await messaging().getToken();
IAdvizeSDK.registerPushToken(token, ApplicationMode.DEV);
console.log('iAdvize SDK registerPushToken success');
} catch (e) {
console.error(e);
}
};
```
{% hint style="warning" %}
*The `ApplicationMode` is used only for the iOS application.*
{% endhint %}
{% endtab %}
{% tab title="Flutter" %}
```dart
import 'package:firebase_messaging/firebase_messaging.dart';
FirebaseMessaging.instance.onTokenRefresh.listen((fcmToken) {
IAdvizeSdk.registerPushToken(pushToken: fcmToken, mode: ApplicationMode.dev);
}).onError((err) {
log('Error registering token: $err');
});
```
{% hint style="warning" %}
*The `ApplicationMode` is used only for the iOS application.*
{% endhint %}
{% endtab %}
{% endtabs %}
### **2️⃣ Enabling/disabling push notifications**
Push notifications are activated during SDK activation, as long as you have setup the push notifications information for your app on the iAdvize administration website (process is described in the [SDK Knowledge Base](https://help.iadvize.com/hc/en-gb/articles/360019839480)). You can manually enable/disable them at any time using:
{% tabs %}
{% tab title="Android" %}
```kotlin
IAdvizeSDK.notificationController.enablePushNotifications(object : IAdvizeSDK.Callback {
override fun onSuccess() {
// Enable succeded
}
override fun onFailure(error: IAdvizeSDK.Error) {
// Enable failed
}
})
IAdvizeSDK.notificationController.disablePushNotifications(object : IAdvizeSDK.Callback {
override fun onSuccess() {
// Disable succeded
}
override fun onFailure(error: IAdvizeSDK.Error) {
// Disable failed
}
})
```
{% endtab %}
{% tab title="iOS" %}
```swift
IAdvizeSDK.shared.notificationController.enablePushNotifications { success in
...
}
IAdvizeSDK.shared.notificationController.disablePushNotifications { success in
...
}
```
{% endtab %}
{% tab title="React Native" %}
```javascript
try {
await IAdvizeSDK.enablePushNotifications();
// Push notifications enabled
} catch (e) {
// Error enabling push notifications
}
try {
await IAdvizeSDK.disablePushNotifications();
// Push notifications disabled
} catch (e) {
// Error disabling push notifications
}
```
{% endtab %}
{% tab title="Flutter" %}
```dart
IAdvizeSdk.enablePushNotifications().then((bool success) =>
log('Push notifications enabled $success'));
IAdvizeSdk.disablePushNotifications().then((bool success) =>
log('Push notifications disabkled $success'));
```
{% endtab %}
{% endtabs %}
### **3️⃣ Handling push notifications reception**
Once setup, you will receive push notifications when the operator sends any message. As the SDK notifications are caught in the same place than your app other notifications, you first have to distinguish if the received notification comes from iAdvize or not.
{% tabs %}
{% tab title="Android" %}
```kotlin
class NotificationService : FirebaseMessagingService() {
override fun onMessageReceived(remoteMessage: RemoteMessage) {
if (IAdvizeSDK.notificationController.isIAdvizePushNotification(remoteMessage.data)) {
// This is an iAdvize SDK notification
}
}
}
```
{% endtab %}
{% tab title="iOS" %}
```swift
func application(
_ application: UIApplication,
didReceiveRemoteNotification userInfo: [AnyHashable: Any],
fetchCompletionHandler completionHandler: @escaping (UIBackgroundFetchResult) -> Void
) {
if IAdvizeSDK.shared.notificationController.isIAdvizePushNotification(with: userInfo) {
// This is an iAdvize SDK notification
}
}
```
{% endtab %}
{% tab title="React Native" %}
```javascript
// Firebase Messaging notification handlers
messaging().onMessage(async remoteMessage => {
console.log('Received a foreground notification message');
handleNotification(remoteMessage)
});
messaging().setBackgroundMessageHandler(async remoteMessage => {
console.log('Received a background notification message');
handleNotification(remoteMessage)
});
function handleNotification(remoteMessage: any) {
console.log('handling notification', JSON.stringify(remoteMessage));
var isIAdvizeSDKNotification = IAdvizeSDK.isIAdvizePushNotification(remoteMessage.data)
}
```
{% endtab %}
{% tab title="Flutter" %}
```dart
// Firebase Messaging notification handlers
@pragma('vm:entry-point')
Future _backgroundNotificationHandler(RemoteMessage message) async {
log('Received a background notification message ${message}');
handleNotification(message);
}
FirebaseMessaging.onBackgroundMessage(_backgroundNotificationHandler);
FirebaseMessaging.onMessage.listen((RemoteMessage message) {
log('Received a foreground notification message ${message}');
handleNotification(message);
});
void handleNotification(RemoteMessage message) {
log('handling notification $message');
IAdvizeSdk.isIAdvizePushNotification(message.data).then(
(bool isAdvizeNotification) =>
log('Notification from iAdvize ? $isAdvizeNotification'));
}
```
{% endtab %}
{% endtabs %}
{% hint style="warning" %}
*Notifications will be received in your app for all messages sent by the agent. It is your responsibility to display the notification and to check whether or not it is relevant to display it. For instance, you don’t need to show a notification to the visitor when the Chatbox is opened*
{% endhint %}
{% tabs %}
{% tab title="Android" %}
```kotlin
fun shouldDisplayNotification(remoteMessage: RemoteMessage) =
IAdvizeSDK.notificationController.isIAdvizePushNotification(remoteMessage.data)
&& !IAdvizeSDK.chatboxController.isChatboxPresented()
```
{% endtab %}
{% tab title="iOS" %}
```swift
func shouldDisplayNotification(userInfo: [AnyHashable: Any]) -> Bool {
guard IAdvizeSDK.shared.notificationController.isIAdvizePushNotification(with: userInfo) else {
return false
}
guard !IAdvizeSDK.shared.chatboxController.isChatboxPresented() else {
return false
}
return true
}
```
{% endtab %}
{% tab title="React Native" %}
```javascript
function handleNotification(remoteMessage: any) {
console.log('handling notification', JSON.stringify(remoteMessage));
var chatboxOpened = IAdvizeSDK.isChatboxPresented()
var isIAdvizeSDKNotification = IAdvizeSDK.isIAdvizePushNotification(remoteMessage.data)
var shouldDisplay = chatboxOpened == false && isIAdvizeSDKNotification
console.log("chatboxOpened:", chatboxOpened, "isIAdvizeSDKNotification", isIAdvizeSDKNotification, "shouldDisplay=>", shouldDisplay);
}
```
{% endtab %}
{% tab title="Flutter" %}
```dart
void handleNotification(RemoteMessage message) {
log('handling notification $message');
Future isIAdvizeSDKNotification =IAdvizeSdk.isIAdvizePushNotification(message.data);
Future isChatboxPresented = IAdvizeSdk.isChatboxPresented();
Future.wait([isIAdvizeSDKNotification, isChatboxPresented]).then((List flags) {
bool shouldDisplay = flags[0] && !flags[1];
log("isIAdvizeSDKNotification:${flags[0]} isChatboxPresented:${flags[1]} shouldDisplay:$shouldDisplay");
});
}
```
{% endtab %}
{% endtabs %}
### **4️⃣ Customizing the notification**
{% tabs %}
{% tab title="Android" %}
You are responsible for displaying the notification so you can use any title / text / icon you want. The text sent by the agent is available in the `content` part of the notification data received.
```kotlin
override fun onMessageReceived(remoteMessage: RemoteMessage) {
if (IAdvizeSDK.notificationController.isIAdvizePushNotification(remoteMessage.data)) {
val agentMessageReceived = remoteMessage.data["content"] ?: "Default text"
}
}
```
⌨️ **In-context example:** [Handling received notification](https://github.com/iadvize/iadvize-android-sdk/blob/master/example/mobile/src/main/java/com/iadvize/conversation/sdk/demo/feature/notifications/NotificationService.kt#L64)
{% endtab %}
{% tab title="iOS" %}
By default, the title of the notification is set to the string key `iadvize_notification_title`. If you want to update/translate this title you can override this value by adding the `iadvize_notification_title` key in your `Localizable.strings` file:
```swift
"iadvize_notification_title" = "You have received a new message";
```
{% endtab %}
{% tab title="React Native" %}
```javascript
function handleNotification(remoteMessage: any) {
console.log('handling notification', JSON.stringify(remoteMessage));
var messageContent = remoteMessage.data.content
}
```
{% endtab %}
{% tab title="Flutter" %}
```dart
void handleNotification(RemoteMessage message) {
log('handling notification $message');
String messageContent = message.data["content"];
}
```
{% endtab %}
{% endtabs %}
### **5️⃣ Clearing push notifications**
The iAdvize SDK notifications are automatically cleared from the Notification Tray / Notification Center when the Chatbox is opened. If you want to clear them at any other given time you can call this API:
{% tabs %}
{% tab title="Android" %}
```kotlin
IAdvizeSDK.notificationController.clearIAdvizePushNotifications()
```
{% endtab %}
{% tab title="iOS" %}
```swift
IAdvizeSDK.shared.notificationController.clearIAdvizePushNotifications()
```
{% endtab %}
{% tab title="React Native" %}
```javascript
IAdvizeSDK.clearIAdvizePushNotifications()
```
{% endtab %}
{% tab title="Flutter" %}
```dart
IAdvizeSdk.clearIAdvizePushNotifications()
```
{% endtab %}
{% endtabs %}
However, as notifications display depends on the Notification Channel, some configuration is needed in order for this behavior to work correctly:
{% tabs %}
{% tab title="Android" %}
First of all create the Notification Channel:
```kotlin
IAdvizeSDK.notificationController.createNotificationChannel(context)
```
Then, when receiving the notification, send it through the SDK Notification Channel if the notification is from iAdvize:
```kotlin
if (IAdvizeSDK.notificationController.isIAdvizePushNotification(remoteMessage.data)) {
val notification = NotificationCompat.Builder(this, IAdvizeSDK.notificationController.channelId)
... // notification config
.build()
} else {
// Host app notification handling
}
```
{% endtab %}
{% tab title="iOS" %}
On iOS no setup is required, the clearing of the push notificatiosn works out of the box.
{% endtab %}
{% tab title="React Native" %}
First of all create the Notification Channel:
```javascript
IAdvizeSDK.createNotificationChannel();
```
You don't need to check that you are on the Android platform before calling this API, as it does nothing on the iOS platform.
Then, when receiving the notification, send it through the SDK Notification Channel if the notification is from iAdvize. In order to show a notification in a specific Notification Channel, please refer to your Notification library documentation.
{% endtab %}
{% tab title="Flutter" %}
First of all create the Notification Channel:
```javascript
IAdvizeSdk.createNotificationChannel();
```
You don't need to check that you are on the Android platform before calling this API, as it does nothing on the iOS platform.
Then, when receiving the notification, send it through the SDK Notification Channel if the notification is from iAdvize. In order to show a notification in a specific Notification Channel, please refer to your Notification library documentation.
{% endtab %}
{% endtabs %}
## 📈 Adding value to the conversation
### **1️⃣ Registering visitor transactions**
You can register a transaction made within your application:
{% tabs %}
{% tab title="Android" %}
```kotlin
IAdvizeSDK.transactionController.register(
Transaction(
"transactionId",
Date(),
10.00,
Currency.EUR
)
)
```
{% endtab %}
{% tab title="iOS" %}
```swift
let transaction = Transaction(externalTransactionId: "transactionId", date: Date(), amount: 10.0, currency: .eur)
IAdvizeSDK.shared.transactionController.registerTransaction(transaction)
```
{% endtab %}
{% tab title="React Native" %}
```javascript
const transaction: Transaction = {
transactionId: 'transactionId',
currency: 'EUR',
amount: 10
};
IAdvizeSDK.registerTransaction(transaction);
```
{% hint style="warning" %}
*The currency value should respect* [*ISO 4217*](https://en.wikipedia.org/wiki/ISO_4217)*.*
{% endhint %}
{% endtab %}
{% tab title="Flutter" %}
```javascript
IAdvizeSdk.registerTransaction(Transaction(
transactionId: 'transactionId',
currency: 'EUR',
amount: 10
));
```
{% hint style="warning" %}
*The currency value should respect* [*ISO 4217*](https://en.wikipedia.org/wiki/ISO_4217)*.*
{% endhint %}
{% endtab %}
{% endtabs %}
### **2️⃣ Saving visitor custom data**
The iAdvize Mobile SDK allows you to save data related to the visitor conversation:
{% tabs %}
{% tab title="Android" %}
```kotlin
IAdvizeSDK.visitorController.registerCustomData(listOf(
CustomData.fromString("Test", "Test"),
CustomData.fromBoolean("Test2", false),
CustomData.fromDouble("Test3", 2.0),
CustomData.fromInt("Test4", 3)
),
object : IAdvizeSDK.Callback {
override fun onSuccess() {
// Success
}
override fun onFailure(error: IAdvizeSDK.Error) {
// Failure
}
})
```
{% endtab %}
{% tab title="iOS" %}
```swift
IAdvizeSDK.shared.visitorController.registerCustomData(
customData:
["Test": .customDataString("Test"),
"Test2": .customDataBoolean(false),
"Test3": .customDataDouble(2.0),
"Test4": .customDataInt(3)]
) { success in
// completion handler
}
```
{% endtab %}
{% tab title="React Native" %}
```javascript
var customData = {
"Test": "Test",
"Test2": false,
"Test3": 2.5,
"Test4": 3
};
IAdvizeSDK.registerCustomData(customData);
```
{% endtab %}
{% tab title="Flutter" %}
```dart
List customData = [
CustomData.fromString("Test", "Test"),
CustomData.fromBoolean("Test2", false),
CustomData.fromDouble("Test3", 2.0),
CustomData.fromInt("Test4", 3)
];
IAdvizeSdk.registerCustomData(customData).then((bool success) =>
log('iAdvize Example : custom data registered: $success'));
```
{% endtab %}
{% endtabs %}
{% hint style="warning" %}
*As those data are related to the conversation they cannot be sent if there is no ongoing conversation. Custom data registered **before** the start of a conversation are stored and the SDK automatically tries to send them when the conversation starts.*
{% endhint %}
The visitor data you registered are displayed in the iAdvize Operator Desk in the conversation sidebar, in a tab labelled `Custom data`:

## 👍 Fetching visitor satisfaction
The satisfaction survey is automatically sent to the visitor at the end of the conversation, as long as it is activated in the iAdvize administration website. The survey is presented to the visitor in a conversational approach, directly into the Chatbox.
{% hint style="info" %}
*Only the `CSAT`, `NPS` and `COMMENT` steps of the survey are supported.*
{% endhint %}
# Epoisses
{% hint style="info" %}
### 🆕 🚨 What's new?
This release brings a few changes to help better debug SDK error management and debugging.
#### 1️⃣ Debug Info
This releases adds a new `debugInfo` API that returns the status of the SDK at any given moment. This API can be used for debugging purposes, providing you with a JSON string output that you can easily add to your log reporting tool payload. [More info in the dedicated section](#id-4-displaying-logs).
#### 2️⃣ Targeting failure callback
This release also adds a callback to notify the integrator when there are targeting rule trigger failures. This callback will be called when the targeting rule fails and also give the reason of the failure when it is known.
*Please note that triggering a targeting rule may fail for standard reasons, for instance if there is no agent available to answer. In those cases this callback would not be called. You would be informed via the traditional availability update callback (sending a* *`false`* *value in this case).*
{% tabs %}
{% tab title="Android" %}
```kotlin
interface TargetingListener {
fun onActiveTargetingRuleAvailabilityUpdated(isActiveTargetingRuleAvailable: Boolean)
fun onActiveTargetingRuleAvailabilityUpdateFailed(error: IAdvizeSDK.Error)
}
```
{% endtab %}
{% tab title="iOS" %}
```swift
public protocol TargetingControllerDelegate: AnyObject {
func activeTargetingRuleAvailabilityDidUpdate(isActiveTargetingRuleAvailable: Bool)
func activeTargetingRuleDidFailToUpdate(error: TargetingError)
}
```
{% endtab %}
{% tab title="React Native" %}
```javascript
IAdvizeSDKListeners.onActiveTargetingRuleAvailabilityUpdateFailed(function (eventData: any) {
console.log('onActiveTargetingRuleAvailabilityUpdateFailed', eventData.code, "=>", eventData.message);
});
```
{% endtab %}
{% tab title="Flutter" %}
```dart
IAdvizeSdk.onActiveTargetingRuleAvailabilityUpdateFailed.listen((Map error) {
log('iAdvize Example : Targeting Rule availability update error: $error');
});
```
{% endtab %}
{% endtabs %}
> **⚠️ To integrate this update you will have to update your code to add this new callback.**
#### 3️⃣ Error encapsulation
On Android, all the iAdvize Mobile SDK are now part of a generic `IAdvizeSDK.Error` object. This type now replaces the argument of the failure method in all the `IAdvizeSDK.Callback` that are used widely across the SDK APIs as an asynchronous return callback.
> **⚠️ To integrate this update you will have to update your code wherever you use an**** ****`IAdvizeSDK.Callback`****. This has no impact on the iOS and Flutter SDKs, but the React Native SDK must change its**** ****`initiate`**** ****method (in the Android code).**
{% tabs %}
{% tab title="Android" %}
```kotlin
object : IAdvizeSDK.Callback {
override fun onSuccess() {
// Success
}
override fun onFailure(t: Throwable) {
// Error
}
}
becomes
object : IAdvizeSDK.Callback {
override fun onSuccess() {
// Success
}
override fun onFailure(error: IAdvizeSDK.Error) {
// Error
}
}
```
{% endtab %}
{% endtabs %}
{% endhint %}
## ⚙️ Prerequisites
There are a few steps required before you start integrating the iAdvize Mobile SDK.
## 💬 Setting up your iAdvize environment
Before integrating the SDK, you need to check that your iAdvize environment is ready to use (i.e. you have an account ready to receive and answer to conversations from the SDK). You will also need some information related to the project for the SDK setup. Please ask your iAdvize administrator to follow the instructions available on the [SDK Knowledge Base](https://help.iadvize.com/hc/en-gb/articles/360019839480) and to provide you with the **Project Identifier** as well as a **Targeting Rule Identifier**.
{% hint style="warning" %}
*Your iAdvize administrator should already have configured the project on the* [*iAdvize Administration Desk*](https://ha.iadvize.com/admin/login/) *and created an operator account for you. If it is not yet the case please contact your iAdvize Technical Project Manager.*
{% endhint %}
## 💻 Connecting to your iAdvize Operator Desk
Using your operator account please log into the [iAdvize Desk](https://ha.iadvize.com/admin/login/).
{% hint style="warning" %}
*If you have the Administrator status in addition to your operator account, you will be directed to the Admin Desk when logging in. Just click on the `Chat` button in the upper right corner to open the Operator Desk.*
{% endhint %}
The iAdvize operator desk is the place where the conversations that are assigned to your account will pop up. Please ensure that your status is “Available" by enabling the corresponding chat or video toggle buttons in the upper right corner:
The chat button is green, your operator can receive incoming conversations.
If the toggle button is yellow, it means you have reached your maximum simultaneous chat slots, please end your current conversations to free a chat slot and allow the conversations to be assigned to you. If the toggle is red you are not available to chat.
## 🔐 Ensuring the SDK integrity
Before downloading the iAdvize Mobile SDK artifacts you can verify their integrity by generating their checksums and comparing them with the reference checksums available.
{% tabs %}
{% tab title="Android" %}
Reference checksums are available:
* in the [GitHub release note](https://github.com/iadvize/iadvize-android-sdk/releases/latest)
* in the [dedicated spreadsheet](https://docs.google.com/spreadsheets/d/11A5RScYGCg17rFXp-RaMyVIUqsd3WacXiTjxk3GNZyk)
The Android SDK consists of an archive (`aar` file) and a Maven project description (`pom` file), you can generate their checksums using the following commands (replace `x.y.z` by the SDK version you are checking):
```bash
curl -sL https://github.com/iadvize/iadvize-android-sdk/raw/master/com/iadvize/iadvize-sdk/x.y.z/iadvize-sdk-x.y.z.aar | openssl sha256
curl -sL https://github.com/iadvize/iadvize-android-sdk/raw/master/com/iadvize/iadvize-sdk/x.y.z/iadvize-sdk-x.y.z.pom | openssl sha256
```
This ensures that the online packages are valid. In order to check those checksums on the fly, this process can be automated via Gradle by adding a metadata verification xml file at `$PROJECT_ROOT/gradle/verification-metadata.xml`:
```xml
truefalse
```
With this file present in your project structure, Gradle will automatically check the artifacts checksums before integrating them into your app. Please note that you will have to do this for **all dependencies** used in your project. To help you with that, `verification-metadata.xml` for the SDK sub-dependencies is delivered alongside the SDK. Those subdependencies checksums have been generated through the Gradle generation feature and not verified.
{% endtab %}
{% tab title="iOS" %}
Reference checksums are available:
* in the [GitHub release note](https://github.com/iadvize/iadvize-ios-sdk/releases/latest)
* in the [dedicated spreadsheet](https://docs.google.com/spreadsheets/d/11A5RScYGCg17rFXp-RaMyVIUqsd3WacXiTjxk3GNZyk)
**Swift Package Manager integration**
The iOS SDK only consists of an archive (`zip` file). You can generate its checksums using the following command (replace `x.y.z` by the SDK version you are checking):
```bash
curl -sL https://github.com/iadvize/iadvize-ios-sdk/releases/download/x.y.z/IAdvizeSDK.zip | openssl sha3-256
```
SPM will also automatically verify that the checksum of the artifact it downloads correspond to the one described in the `Package.swift` available in the public repository (it's a SHA2-256 checksum).
**CocoaPods integration**
The iOS SDK consists of an archive (`zip` file) and a Cocoapods project description file (`podspec` file). You can generate their checksums using the following commands (replace `x.y.z` by the SDK version you are checking):
```bash
curl -sL https://github.com/iadvize/iadvize-ios-sdk/releases/download/x.y.z/IAdvizeSDK.zip | openssl sha3-256
curl -sL https://raw.githubusercontent.com/CocoaPods/Specs/master/Specs/d/0/0/iAdvize/x.y.z/iAdvize.podspec.json | openssl sha3-256
```
After downloading the SDK through CocoaPods, additional verifications can be made, first by comparing the podspec checksum at the end of the generated `Podfile.lock` with the SHA1 podspec reference checksum.
```
SPEC CHECKSUMS:
iAdvize: podspec-sha1-checksum
```
The downloaded framework integrity can also be checked by generating the local pod files checksums and comparing them with the online reference ones:
```bash
cd Pods/iAdvize
find IAdvizeConversationSDK.xcframework -type f -exec openssl sha3-256 {} \; >> IAdvizeSDK-local.checksums
```
{% endtab %}
{% tab title="React Native" %}
Our React Native SDK plugin is hosted on an external platform called [Node Package Manager (NPM)](https://www.npmjs.com/) that already has internal checksum validation strategies in order to ensure that the downloaded plugin code (the wrapper code) is untampered.
{% endtab %}
{% tab title="Flutter" %}
Our Flutter SDK plugin is hosted on an external platform called [pub.dev](https://pub.dev/), that already has internal checksum validation strategies in order to ensure that the downloaded plugin code (the wrapper code) is untampered.
{% endtab %}
{% endtabs %}
## ⚙️ Setting up the SDK
### **1️⃣ Setting up the SDK into your project configuration**
First of all, to be able to use the SDK you need to add the SDK dependency into your project. Some configuration steps will also be needed in order to use it.
{% tabs %}
{% tab title="Android" %}
Add the iAdvize repository to your project repositories inside your top-level Gradle build file:
```gradle
// Project-level build.gradle.kts
allprojects {
repositories {
maven(url = uri("https://raw.github.com/iadvize/iadvize-android-sdk/master"))
maven(url = uri("https://jitpack.io"))
}
}
```
Add the iAdvize Mobile SDK dependency inside your module-level Gradle build file (replace `x.y.z` by the latest SDK version available):
```gradle
// Module-level build.gradle.kts
configurations {
all {
exclude(group = "xpp3", module = "xpp3")
}
}
dependencies {
implementation("com.iadvize:iadvize-sdk:x.y.z")
}
```
{% hint style="info" %}
*The `exclude` configuration is required because the iAdvize Mobile SDK uses* [*Smack*](https://github.com/igniterealtime/Smack)*, an XMPP library that is built upon `xpp3`, which is bundled by default in the Android framework. This exclude ensures that your app does not also bundle `xpp3` to avoid classes duplication errors.*
{% endhint %}
In that same file, you also need to ensure that you are using the right Android target to build (iAdvize Mobile SDK is built with Android target 33):
```gradle
// Module-level build.gradle.kts
android {
buildToolsVersion "33.0.1"
defaultConfig {
minSdk = 21
targetSdk = 33
compileSdk = 33
}
}
```
{% hint style="warning" %}
*iAdvize Mobile SDK requires a **minSdkVersion** >= 21.*
{% endhint %}
After syncing your project you should be able to import the iAdvize dependency in your application code with `import com.iadvize.conversation.sdk.IAdvizeSDK`
You will then need to provide a reference to your application object and initialize the SDK with it.
In your `AndroidManifest.xml` declare your application class:
```xml
```
This class should then initialize the SDK:
```kotlin
package my.app.package.App
class App : Application() {
override fun onCreate() {
super.onCreate()
IAdvizeSDK.initiate(this)
}
}
```
⌨️ **In-context example:**
* [Project-level Gradle file](https://github.com/iadvize/iadvize-android-sdk/blob/master/example/build.gradle.kts)
* [Module-level Gradle file](https://github.com/iadvize/iadvize-android-sdk/blob/master/example/mobile/build.gradle.kts)
* [Import](https://github.com/iadvize/iadvize-android-sdk/blob/master/example/mobile/src/main/java/com/iadvize/conversation/sdk/demo/feature/App.kt#L5)
* [SDK Initiation](https://github.com/iadvize/iadvize-android-sdk/blob/master/example/mobile/src/main/java/com/iadvize/conversation/sdk/demo/feature/App.kt#L15)
{% hint style="info" %}
*The SDK supports video conversations using a third-party native (C++) binaries. If you are delivering your app using an APK you will note a size increase as the default behavior of the build system is to include the binaries for each ABI in a single APK. We strongly recommended that you take advantage of either* [*App Bundles*](https://developer.android.com/guide/app-bundle) *or* [*APK Splits*](https://developer.android.com/studio/build/configure-apk-splits) *to reduce the size of your APKs while still maintaining maximum device compatibility.*
{% endhint %}
{% endtab %}
{% tab title="iOS" %}
{% tabs %}
{% tab title="SPM" %}
From Xcode go to `File > Add Packages`, then paste the iAdvize Messenger SDK URL in the top-right search bar. Select the versioning strategy fitting your app then click on `Add Package`.
You should then be able to import the iAdvize dependency in your application code using `import IAdvizeConversationSDK`
⌨️ **In-context example:** [Import](https://github.com/iadvize/iadvize-ios-sdk/blob/master/example/SPMIntegration/SPMIntegration/Source/AppDelegate%2BiAdvize.swift#L10)
{% endtab %}
{% tab title="CocoaPods" %}
Add this line to your `Podfile`, inside the `target` section (replace `x.y.z` by the latest SDK version available, and choose the versioning strategy fitting your app):
```ruby
platform :ios, '13.0'
target 'YOUR_TARGET' do
project 'YOUR_PROJECT'
pod 'iAdvize', 'x.y.z'
end
```
{% hint style="warning" %}
*iAdvize Messenger SDK requires a **minimum iOS platform** of 13.0**.***
{% endhint %}
After running `pod install` you should be able to import the iAdvize dependency in your application code with `import IAdvizeConversationSDK`
⌨️ **In-context example:**
* [Podfile](https://github.com/iadvize/iadvize-ios-sdk/blob/master/example/CocoaPodsIntegration/Podfile#L1)
* [Import](https://github.com/iadvize/iadvize-ios-sdk/blob/master/example/CocoaPodsIntegration/CocoaPodsIntegration/Source/AppDelegate%2BiAdvize.swift#L10)
{% endtab %}
{% endtabs %}
{% hint style="info" %}
*The SDK supports video conversations. Thus it will request camera and microphone access before entering a video call. To avoid the app to crash, you have to setup two keys in your app Info.plist*
```
NSCameraUsageDescriptionThis application will use the camera to share photos and during video calls.NSMicrophoneUsageDescriptionThis application will use the microphone during video calls.
```
{% endhint %}
{% endtab %}
{% tab title="React Native" %}
Download the library from `NPM` using the following command:
```bash
npm install @iadvize-oss/iadvize-react-native-sdk
```
Alternatively, you can use `Yarn`:
```bash
yarn add @iadvize-oss/iadvize-react-native-sdk
```
The SDK API is then available via the following import:
```javascript
import IAdvizeSDK from '@iadvize-oss/iadvize-react-native-sdk';
```
{% tabs %}
{% tab title="Android setup" %}
In your `android/build.gradle` file, and add the iAdvize SDK repository. You also need to ensure that you are using the right Android framework to build (iAdvize Messenger SDK is built with Android target 33):
```gradle
// android/build.gradle
buildscript {
ext {
buildToolsVersion = "33.0.1"
minSdkVersion = 21
compileSdkVersion = 33
targetSdkVersion = 33
}
}
allprojects {
repositories {
maven { url "https://raw.github.com/iadvize/iadvize-android-sdk/master" }
maven { url "https://jitpack.io" }
}
}
```
{% hint style="warning" %}
*iAdvize Messenger SDK requires a **minSdkVersion** >= 21.*
{% endhint %}
On Android, the iAdvize Messenger SDK needs to be initialized before use to allow several functionalities to work. For instance, the default floating button use an ActivityLifecycleController that must be started before the main ReactNative activity is created, otherwise the controller won't be able to trigger the button display. Thus you need to add those lines in the `android/app/src/main/java/yourpackage/MainApplication.java` to initialize the SDK properly:
```java
// android/app/src/main/java/yourpackage/MainApplication.java
import com.iadvize.conversation.sdk.IAdvizeSDK;
public class MainApplication extends Application implements ReactApplication {
@Override
public void onCreate() {
super.onCreate();
IAdvizeSDK.initiate(this);
}
}
```
{% endtab %}
{% tab title="iOS setup" %}
Add this line to your `Podfile`, inside the `target` section (replace `x.y.z` by the latest SDK version available, and choose the versioning strategy fitting your app):
```ruby
platform :ios, '13.0'
target 'YOUR_TARGET' do
project 'YOUR_PROJECT'
pod 'iAdvize', 'x.y.z'
end
```
{% hint style="warning" %}
*iAdvize Messenger SDK requires a **minimum iOS platform** of 13.0**.***
{% endhint %}
Once this is done, make sure to go to `ios` folder and install CocoaPods dependencies:
```bash
cd ios && pod install --repo-update
```
{% hint style="info" %}
*The SDK supports video conversations. Thus it will request camera and microphone access before entering a video call. To avoid the app to crash, you have to setup two keys in your app Info.plist*
```
NSCameraUsageDescriptionThis application will use the camera to share photos and during video calls.NSMicrophoneUsageDescriptionThis application will use the microphone during video calls.
```
{% endhint %}
{% endtab %}
{% endtabs %}
{% endtab %}
{% tab title="Flutter" %}
Download the library from `pub.dev` using the following command:
```bash
flutter pub add iadvize_flutter_sdk
```
The SDK API is then available via the following import:
```dart
import 'package:iadvize_flutter_sdk/iadvize_sdk.dart';
```
{% tabs %}
{% tab title="Android setup" %}
In your `android/build.gradle` file, and add the iAdvize SDK repository:
```gradle
// android/build.gradle
allprojects {
repositories {
maven { url "https://raw.github.com/iadvize/iadvize-android-sdk/master" }
maven { url "https://jitpack.io" }
}
}
```
You also need to ensure that you are using the right Android framework to build (iAdvize Messenger SDK is built with Android target 33), as a good practice, also check that you are using the latest Kotlin version in `android/build.gradle` (you can find the version used in the plugin through its README file)
```gradle
// android/build.gradle
buildscript {
ext.kotlin_version = '1.8.10'
}
```
```gradle
// android/app/build.gradle
defaultConfig {
minSdkVersion 21
targetSdkVersion 33
}
```
{% hint style="warning" %}
*iAdvize Messenger SDK requires a **minSdkVersion** >= 21.*
{% endhint %}
{% endtab %}
{% tab title="iOS setup" %}
Add this line to your `Podfile`, inside the `target` section (replace `x.y.z` by the latest SDK version available, and choose the versioning strategy fitting your app):
```ruby
platform :ios, '13.0'
target 'YOUR_TARGET' do
project 'YOUR_PROJECT'
pod 'iAdvize', 'x.y.z'
end
```
{% hint style="warning" %}
*iAdvize Messenger SDK requires a **minimum iOS platform** of 13.0**.***
{% endhint %}
Once this is done, make sure to go to `ios` folder and install CocoaPods dependencies:
```bash
cd ios && pod install --repo-update
```
{% hint style="info" %}
*The SDK supports video conversations. Thus it will request camera and microphone access before entering a video call. To avoid the app to crash, you have to setup two keys in your app Info.plist*
```
NSCameraUsageDescriptionThis application will use the camera to share photos and during video calls.NSMicrophoneUsageDescriptionThis application will use the microphone during video calls.
```
{% endhint %}
{% endtab %}
{% endtabs %}
{% endtab %}
{% endtabs %}
### **2️⃣ Activating the SDK**
Now that the SDK is available into your project build, let's integrate it into your app, first by activating it. Activation is the step that logs a user into the iAdvize flow.
You can choose between multiple authentication options:
Anonymous
For an unidentified user browsing your app.
Simple
For a logged in user in your app. You must pass a unique string identifier so that the visitor will retrieve his conversation history across multiple devices and platforms.
The identifier that you pass must be unique and non-discoverable for each different logged-in user.
Secured
Use it in conjunction with your in-house authentication system. You must pass a JWE provider callback that will be called when an authentication is required, you will then have to call your third party authentication system for a valid JWE to provide to the SDK.
For a full understanding of how the secured authentication works in the iAdvize platform you can refer to thissection.
To activate the SDK you must use the `activate` function with your `projectId` (see the [Prerequisites](#prerequisites) section above to get that identifier). You have access to callbacks in order to know if the SDK has been successfully activated. In case of an SDK activation failure the callback will give you the reason of the failure and you may want to retry later.
{% tabs %}
{% tab title="Android" %}
```kotlin
IAdvizeSDK.activate(
projectId = projectId,
authenticationOption = authOption,
gdprOption = gdprOption,
callback = object : IAdvizeSDK.Callback {
override fun onSuccess() {
Log.d("iAdvize SDK", "The SDK has been activated.")
}
override fun onFailure(error: IAdvizeSDK.Error) {
Log.e("iAdvize SDK", "The SDK activation failed with:", error)
}
}
)
```
⌨️ **In-context example:** [SDK Activation](https://github.com/iadvize/iadvize-android-sdk/blob/master/example/mobile/src/main/java/com/iadvize/conversation/sdk/demo/feature/App.kt#L32)
{% endtab %}
{% tab title="iOS" %}
```swift
IAdvizeSDK.shared.activate(projectId: projectId,
authenticationOption: authOption,
gdprOption: gdprOption)) { success in
if success {
...
}
}
```
⌨️ **In-context example:** [SDK Activation](https://github.com/iadvize/iadvize-ios-sdk/blob/master/example/SPMIntegration/SPMIntegration/Source/AppDelegate%2BiAdvize.swift#L61)
{% endtab %}
{% tab title="React Native" %}
```javascript
try {
// Anonymous Auth => Do not set the onJWERequested listener & set an empty userId
await IAdvizeSDK.activate(projectId, '', ...);
// Simple Auth => Do not set the onJWERequested listener & set a non-empty userId
await IAdvizeSDK.activate(projectId, "my-user-unique-id", ...);
// Secured Auth => Set the onJWERequested listener
IAdvizeSDKListeners.onJWERequested(function (eventData: any) {
console.log('onJWERequested' + ' ' + eventData);
// Fetch JWE from your 3rd-party auth system
// In SDK v3, you must return the value here (synchronously)
var jwe = ... ;
return jwe;
// In SDK v4, you should the value using an asynchronous API call (here or elsewhere)
IAdvizeSDK.provideJWE(jwe);
});
await IAdvizeSDK.activate(projectId, '', ...);
// SDK is activated
} catch (e) {
// SDK failed to activate
}
```
{% endtab %}
{% tab title="Flutter" %}
```dart
IAdvizeSdk.activate(
projectId: 'projectId',
authenticationOption: authOption
gdprOption: gdprOption,
).then((bool activated) => activated
? log('iAdvize Example : SDK activated')
: log('iAdvize Example : SDK not activated'));
```
{% endtab %}
{% endtabs %}
Once the iAdvize Mobile SDK is successfully activated, you should see a success message in the console:
```
✅ iAdvize conversation activated, the version is x.y.z
```
### **3️⃣ Logging the user out**
You will have to explicitly call the `logout` function of the iAdvize Mobile SDK when the user sign out of your app.
{% tabs %}
{% tab title="Android" %}
```kotlin
IAdvizeSDK.logout()
```
{% endtab %}
{% tab title="iOS" %}
```swift
IAdvizeSDK.shared.logout()
```
{% endtab %}
{% tab title="React Native" %}
```javascript
IAdvizeSDK.logout()
```
{% endtab %}
{% tab title="Flutter" %}
```dart
IAdvizeSdk.logout();
```
{% endtab %}
{% endtabs %}
### **4️⃣ Displaying logs**
To have more information on what’s happening on the SDK side you can change the log level.
{% tabs %}
{% tab title="Android" %}
{% endtab %}
{% tab title="iOS" %}
```swift
// verbose, info, warning, error, success, none
// Default is warning
IAdvizeSDK.shared.logLevel = .verbose
```
{% endtab %}
{% tab title="React Native" %}
```javascript
// VERBOSE, INFO, WARNING, ERROR, SUCCESS, NONE
// Default is WARNING
IAdvizeSDK.setLogLevel(LogLevel.VERBOSE);
```
{% endtab %}
{% tab title="Flutter" %}
```dart
// verbose, info, warning, error, success, none
// Default is warning
IAdvizeSdk.setLogLevel(LogLevel.verbose);
```
{% endtab %}
{% endtabs %}
You can get a description of the SDK status at any time by using the `debugInfo` API:
{% tabs %}
{% tab title="Android" %}
IAdvizeSDK.debugInfo()
{% endtab %}
{% tab title="iOS" %}
```swift
IAdvizeSDK.shared.debugInfo()
```
{% endtab %}
{% tab title="React Native" %}
```javascript
const debugInfo = IAdvizeSDK.debugInfo();
```
{% endtab %}
{% tab title="Flutter" %}
```dart
final debugInfo = await IAdvizeSdk.debugInfo();
```
{% endtab %}
{% endtabs %}
This will generate a JSON object with the SDK status information, encoded into a string that you can easily add into your bug reporting tool payload:
## 💬 Starting a conversation
To be able to start a conversation you will first have to **trigger a targeting rule** in order for the default chat button to be displayed. The Chatbox will then be accessible by clicking on that chat button.
### **1️⃣ Configuring the targeting language**
The targeting rule configured in the iAdvize Administration Panel is setup for a given language. This means that if, for example, you setup a targeting rule to be triggered only for `EN` language and the current user’s device is setup with a different targeting language (for instance `FR`), the targeting rule will not trigger.
By default, the targeting rule language used is the user’s device current language. You can force the targeting language to a specific value using:
{% tabs %}
{% tab title="Android" %}
```kotlin
IAdvizeSDK.targetingController.language = LanguageOption.Custom(Language.FR)
```
{% endtab %}
{% tab title="iOS" %}
```swift
IAdvizeSDK.shared.targetingController.language = .custom(value: .fr)
```
{% endtab %}
{% tab title="React Native" %}
```javascript
IAdvizeSDK.setLanguage('fr');
```
{% hint style="warning" %}
*The language string should respect* [*ISO 639-1*](https://en.wikipedia.org/wiki/ISO_639-1)*.*
{% endhint %}
{% endtab %}
{% tab title="Flutter" %}
```dart
IAdvizeSdk.setLanguage('fr');
```
{% hint style="warning" %}
*The language string should respect* [*ISO 639-1*](https://en.wikipedia.org/wiki/ISO_639-1)*.*
{% endhint %}
{% endtab %}
{% endtabs %}
{% hint style="warning" %}
*This `language` property is **NOT** intended to change the language displayed in the SDK. It is solely used for the targeting process purpose.*
{% endhint %}
### **2️⃣ Activating a targeting rule**
Using a targeting rule UUID (see the [Prerequisites](#prerequisites) section above to get that identifier), you can engage a user by calling:
{% tabs %}
{% tab title="Android" %}
```kotlin
IAdvizeSDK.targetingController.activateTargetingRule(
TargetingRule(
targetingRuleUUID,
ConversationChannel.CHAT // or ConversationChannel.VIDEO
)
)
```
⌨️ **In-context example:** [Targeting rule activation](https://github.com/iadvize/iadvize-android-sdk/blob/da8b4ae56db4eff6f8539279b511ed442064b4cb/example/mobile/src/main/java/com/iadvize/conversation/sdk/demo/feature/product/ProductDetailFragment.kt#L43)
{% endtab %}
{% tab title="iOS" %}
```swift
let targetingRule = TargetingRule(id: UUID, conversationChannel: .chat) // or .video
IAdvizeSDK.shared.targetingController.activateTargetingRule(targetingRule: targetingRule)
```
⌨️ **In-context example:** [Targeting rule activation](https://github.com/iadvize/iadvize-ios-sdk/blob/d279e8a7f90c1f79f2e897a798dd30a626d68227/example/SPMIntegration/SPMIntegration/Source/AppDelegate%2BiAdvize.swift#L65)
{% endtab %}
{% tab title="React Native" %}
```javascript
IAdvizeSDK.activateTargetingRule(targetingRuleUUIDString, ConversationChannel.CHAT); // OR ConversationChannel.VIDEO
```
{% endtab %}
{% tab title="Flutter" %}
```dart
IAdvizeSdk.activateTargetingRule(TargetingRule(uuid: 'targeting-rule-uuid', channel: ConversationChannel.chat)); // or ConversationChannel.video
```
{% endtab %}
{% endtabs %}
If all the following conditions are met, the default chat button should appear:
* the targeting rule exists and is enabled in the administration panel
* the targeting rule language set in the SDK matches the language configured for this rule
* an operator assigned to this rule is available to answer (connected and with a free chat slot)
{% hint style="info" %}
*After you activate a rule and it succeeds (by displaying the button), those conditions are checked **every 30 seconds** to verify that the button should still be displayed or not.*
*Upon the **first encountered failure** from this periodic check, the button is hidden and the SDK **stops verifying** the conditions. It means that if the rule cannot be triggered (after the first call, or after any successive check), you will have to call the `activateTargetingRule` (or `registerUserNavigation`) method again in order to restart the engagement process.*
{% endhint %}
### **3️⃣ Initiating the conversation**
Once the default chat button is displayed, the visitor tap on it to access the Chatbox. After composing and sending a message a new conversation should pop up in the operator desk.
 
### **4️⃣ Following user navigation**
While your user navigates through your app, you will have to update the active targeting rule in order to engage him/her with the best conversation partner at any time. In order to so, the SDK provides you with multiple navigation options to customize the behavior according to your needs:
{% tabs %}
{% tab title="Android" %}
```kotlin
// To clear the active targeting rule and thus stopping the engagement process (this is the default behavior)
val navOption = NavigationOption.ClearActiveRule
// To keep/start the engagement process with the same active targeting rule in the new user screen
val navOption = NavigationOption.KeepActiveRule
// To keep/start the engagement process but with another targeting rule for this screen
val navOption = NavigationOption.ActivateNewRule(newRule)
// Register the user navigation through your app
IAdvizeSDK.targetingController.registerUserNavigation(navOption)
```
{% endtab %}
{% tab title="iOS" %}
```swift
// To clear the active targeting rule and thus stopping the engagement process (this is the default behavior)
let navOption: NavigationOption = .clearActiveRule
// To keep/start the engagement process with the same active targeting rule in the new user screen
let navOption: NavigationOption = .keepActiveRule
// To keep/start the engagement process but with another targeting rule for this screen
let navOption: NavigationOption = .activateNewRule(targetinRuleId: newRuleId)
// Register the user navigation through your app
IAdvizeSDK.shared.targetingController.registerUserNavigation(navigationOption: navOption)
```
{% endtab %}
{% tab title="React Native" %}
```javascript
// To clear the active targeting rule and thus stopping the engagement process (this is the default behavior)
IAdvizeSDK.registerUserNavigation(NavigationOption.CLEAR, "", "");
// To keep/start the engagement process with the same active targeting rule in the new user screen
IAdvizeSDK.registerUserNavigation(NavigationOption.KEEP, "", "");
// To keep/start the engagement process but with another targeting rule for this screen
IAdvizeSDK.registerUserNavigation(NavigationOption.NEW, targetingRuleUUIDString, channel);
```
{% endtab %}
{% tab title="Flutter" %}
```dart
// To clear the active targeting rule and thus stopping the engagement process (this is the default behavior)
IAdvizeSdk.registerUserNavigation(navigationOption: NavigationOption.optionClear);
// To keep/start the engagement process with the same active targeting rule in the new user screen
IAdvizeSdk.registerUserNavigation(navigationOption: NavigationOption.optionKeep);
// To keep/start the engagement process but with another targeting rule for this screen
IAdvizeSdk.registerUserNavigation(
navigationOption: NavigationOption.optionNew,
newTargetingRule: TargetingRule(uuid: 'targeting-rule-uuid', channel: ConversationChannel.chat) // or ConversationChannel.video
)
```
{% endtab %}
{% endtabs %}
{% hint style="info" %}
*Please note that calling `registerUserNavigation` with the `CLEAR NavigationOption` will stop the engagement process, and calling it with other options will start it if it is stopped.*
{% endhint %}
## 👋 Configuring GDPR and welcome message
### **1️⃣ Adding a welcome message**
As seen above, the Chatbox is empty by default. You can configure a welcome message that will be displayed to the visitor when no conversation is ongoing.
{% tabs %}
{% tab title="Android" %}
```kotlin
val configuration = ChatboxConfiguration()
configuration.automaticMessage = "Any question? Say Hello to Smart and we will answer you as soon as possible! 😊"
IAdvizeSDK.chatboxController.setupChatbox(configuration)
```
⌨️ **In-context example:** [Welcome message](https://github.com/iadvize/iadvize-android-sdk/blob/da8b4ae56db4eff6f8539279b511ed442064b4cb/example/mobile/src/main/java/com/iadvize/conversation/sdk/demo/feature/IAdvizeSDKConfig.kt#L78)
{% endtab %}
{% tab title="iOS" %}
```swift
var configuration = ChatboxConfiguration()
configuration.automaticMessage = NSLocalizedString(
"Any question? Say Hello to Smart and we will answer you as soon as possible! 😊",
comment: ""
)
IAdvizeSDK.shared.chatboxController.setupChatbox(configuration: configuration)
```
⌨️ **In-context example:** [Welcome message](https://github.com/iadvize/iadvize-ios-sdk/blob/d279e8a7f90c1f79f2e897a798dd30a626d68227/example/SPMIntegration/SPMIntegration/Source/AppDelegate%2BiAdvize.swift#L42C1-L42C1)
{% endtab %}
{% tab title="React Native" %}
```javascript
const configuration: ChatboxConfiguration = {
automaticMessage: "Any question? Say Hello to Smart and we will answer you as soon as possible! 😊",
};
IAdvizeSDK.setChatboxConfiguration(configuration);
```
{% endtab %}
{% tab title="Flutter" %}
```dart
final ChatboxConfiguration configuration = ChatboxConfiguration(
automaticMessage: "Any question? Say Hello to Smart and we will answer you as soon as possible! 😊",
);
IAdvizeSdk.setChatboxConfiguration(configuration);
```
{% endtab %}
{% endtabs %}
When no conversation is ongoing, the welcome message is displayed to the visitor:

### **2️⃣ Enabling GDPR approval**
If you need to get the visitor consent on GDPR before he starts chatting, you can pass a `GDPROption` while activating the SDK. By default this option is set to `Disabled`.
If enabled, a message will request the visitor approval before allowing him to send a message to start the conversation:

This GDPR option dictates how the SDK behaves when the user taps on the `More information` button. You can either:
* provide an URL pointing to your GPDR policy, it will be opened on user click
* provide a listener/delegate that will be called on user click and you can then implement your own custom behavior
{% hint style="warning" %}
*If your visitors have already consented to GDPR inside your application, you can activate the iAdvize SDK without the GDPR process. However, be careful to explicitly mention the iAdvize Chat part in your GDPR consent details.*
{% endhint %}
{% tabs %}
{% tab title="Android" %}
```kotlin
// Disabled
val gdprOption = GDPROption.Disabled
// URL
val gdprOption = GDPROption.Enabled(GDPREnabledOption.LegalUrl(URI.create("http://my.gdpr.rules.com")))
// Listener
val gdprOption = GDPROption.Enabled(GDPREnabledOption.Listener(object : GDPRListener {
override fun didTapMoreInformation() {
// Implement your own logic
}
}))
```
```kotlin
val configuration = ChatboxConfiguration()
configuration.automaticMessage = "Any question? Say Hello to Smart and we will answer you as soon as possible! 😊"
configuration.gdprMessage = "Your own GDPR message."
IAdvizeSDK.chatboxController.setupChatbox(configuration)
```
⌨️ **In-context example:**
* [GDPR Option](https://github.com/iadvize/iadvize-android-sdk/blob/master/example/mobile/src/main/java/com/iadvize/conversation/sdk/demo/feature/IAdvizeSDKConfig.kt#L48)
* [GDPR Message](https://github.com/iadvize/iadvize-android-sdk/blob/master/example/mobile/src/main/java/com/iadvize/conversation/sdk/demo/feature/IAdvizeSDKConfig.kt#L69)
{% endtab %}
{% tab title="iOS" %}
```swift
// Disabled
let gdprOption = .disabled
// URL
if let legalInfoURL = URL(string: "http://my.gdpr.rules.com") {
let gdprOption = .enabled(option: .legalInformation(url: legalInfoURL))
}
// Listener
class GDPRMoreInfoListener: GDPRDelegate {
func didTapMoreInformation() {
// Implement your own logid
}
}
let gdprListener = GDPRMoreInfoListener()
let gdprOption = .enabled(option: .delegate(delegate: gdprListener))
```
```swift
var configuration = ChatboxConfiguration()
configuration.automaticMessage = NSLocalizedString(
"Any question? Say Hello to Smart and we will answer you as soon as possible! 😊",
comment: ""
)
configuration.gdprMessage = "Your own GDPR message."
IAdvizeSDK.shared.chatboxController.setupChatbox(configuration: configuration)
```
⌨️ **In-context example:**
* [GDPR Option](https://github.com/iadvize/iadvize-ios-sdk/blob/d279e8a7f90c1f79f2e897a798dd30a626d68227/example/SPMIntegration/SPMIntegration/Source/AppDelegate%2BiAdvize.swift#L53)
* [GDPR Message](https://github.com/iadvize/iadvize-ios-sdk/blob/d279e8a7f90c1f79f2e897a798dd30a626d68227/example/SPMIntegration/SPMIntegration/Source/AppDelegate%2BiAdvize.swift#L43)
{% endtab %}
{% tab title="React Native" %}
```javascript
// No listener set + null URL => GDPR is disabled
await IAdvizeSDK.activate(projectId, userId, null);
// No listener set + non-null URL => GDPR is enabled, the webpage opens when user click on more info button
await IAdvizeSDK.activate(projectId, userId, "http://my.gdpr.rules.com");
// Listener set => GDPR is enabled, the listener is called when user click on more info button
IAdvizeSDKListeners.onGDPRMoreInfoClicked(function (eventData: any) {
// Implement your own behavior
});
await IAdvizeSDK.activate(projectId, userId, null);
```
{% hint style="warning" %}
*If you set both the listener and an URL, the listener will take priority.*
{% endhint %}
```javascript
const configuration: ChatboxConfiguration = {
automaticMessage: 'Hello! Please ask your question :)',
gdprMessage: 'Your own custom GDPR message.'
};
IAdvizeSDK.setChatboxConfiguration(configuration)
```
{% endtab %}
{% tab title="Flutter" %}
```dart
// Disabled
GDPROption gdprOption = GDPROption.disabled();
// URL
GDPROption gdprOption = GDPROption.url(url: "http://my.gdpr.rules.com")
// Listener
GDPROption gdprOption = GDPROption.listener(onMoreInfoClicked: () {
log('iAdvize Example : GDPR More Info button clicked');
// Implement your own logic here
});
```
```dart
final ChatboxConfiguration configuration = ChatboxConfiguration(
gdprMessage: "Your own GDPR message",
);
IAdvizeSdk.setChatboxConfiguration(configuration);
```
{% endtab %}
{% endtabs %}
## 🎨 Branding the Chatbox
The `ChatboxConfiguration` object that we used in the previous section to customize the welcome and GDPR messages can also be used to change the Chatbox UI to better fit into the look and feel of your application.
{% hint style="warning" %}
*You should setup the configuration before presenting the chatbox. If you call this method while the chatbox is visible, some parameters will only apply for new messages or after closing/reopening the chatbox.*
{% endhint %}
### **1️⃣ Updating the font**
The font used in the Chatbox can easily be updated using your own font:
{% tabs %}
{% tab title="Android" %}
```kotlin
val configuration = ChatboxConfiguration()
configuration.fontPath = "fonts/comic_sans_ms_regular.ttf"
IAdvizeSDK.chatboxController.setupChatbox(configuration)
```
{% hint style="info" %}
*The font should be placed inside the assets folder. Here the file is located at `src/main/assets/fonts/comic_sans_ms_regular.ttf`*
{% endhint %}
{% endtab %}
{% tab title="iOS" %}
```swift
var configuration = ChatboxConfiguration()
configuration.font = UIFont(name: "AmericanTypewriter-Condensed", size: 11.0)
IAdvizeSDK.shared.chatboxController.setupChatbox(configuration: configuration)
```
{% hint style="warning" %}
*Even if the UIFont constructor needs a size attribute, the exact font size and traits are automatically chosen and the font is scaled to the current Dynamic Type setting.*
{% endhint %}
{% hint style="info" %}
*The font should either be a system font, or be a font embedded into the app, with a font file inside the bundle and its corresponding declaration into the `Info.plist` file.*
{% endhint %}
{% endtab %}
{% tab title="React Native" %}
```javascript
const configuration: ChatboxConfiguration = {
// For iOS devices
fontName: 'AmericanTypewriter-Condensed',
fontSize: 11, // iOS only
// For Android devices
fontPath: 'fonts/comic_sans_ms_regular.ttf',
};
```
{% hint style="info" %}
*On **iOS** the font should either be a system font, or be a font embedded into the app, with a font file inside the bundle and its corresponding declaration into the `Info.plist` file.*
*On **Android** the font should be placed inside the assets folder. Here the file is located at `src/main/assets/fonts/comic_sans_ms_regular.ttf`*
{% endhint %}
{% endtab %}
{% tab title="Flutter" %}
```dart
final ChatboxConfiguration configuration = ChatboxConfiguration(
// For iOS devices
iosFontName: 'AmericanTypewriter-Condensed',
iosFontSize: 11,
// For Android devices
androidFontPath: 'fonts/comic_sans_ms_regular.ttf',
);
IAdvizeSdk.setChatboxConfiguration(configuration);
```
{% hint style="info" %}
*On **iOS** the font should either be a system font, or be a font embedded into the app, with a font file inside the bundle and its corresponding declaration into the `Info.plist` file.*
*On **Android** the font should be placed inside the assets folder. Here the file is located at `src/main/assets/fonts/comic_sans_ms_regular.ttf`*
{% endhint %}
{% endtab %}
{% endtabs %}
### **2️⃣ Styling the navigation bar**
Some parts of the he toolbar/navigationbar appearing at the top of the Chatbox can also be customized:
* the background color
* the main color
* the title
{% tabs %}
{% tab title="Android" %}
```kotlin
val configuration = ChatboxConfiguration()
configuration.toolbarBackgroundColor = Color.BLACK,
configuration.toolbarMainColor = COLOR.WHITE,
configuration.toolbarTitle = "Conversation"
IAdvizeSDK.chatboxController.setupChatbox(configuration)
```
{% endtab %}
{% tab title="iOS" %}
```swift
var configuration = ChatboxConfiguration()
configuration.navigationBarBackgroundColor = .black
configuration.navigationBarMainColor = .white
configuration.navigationBarTitle = "Conversation"
IAdvizeSDK.shared.chatboxController.setupChatbox(configuration: configuration)
```
{% endtab %}
{% tab title="React Native" %}
```javascript
const configuration: ChatboxConfiguration = {
navigationBarBackgroundColor: '#000000',
navigationBarMainColor: '#FFFFFF',
navigationBarTitle: 'Conversation'
};
IAdvizeSDK.setChatboxConfiguration(configuration);
```
{% endtab %}
{% tab title="Flutter" %}
```dart
final ChatboxConfiguration configuration = ChatboxConfiguration(
navigationBarBackgroundColor: Colors.black,
navigationBarMainColor: Colors.yellow,
navigationBarTitle: 'Conversation',
);
IAdvizeSdk.setChatboxConfiguration(configuration);
```
{% endtab %}
{% endtabs %}
### **3️⃣ Changing the Chatbox colors**
The displayed messages colors can be customized, either the ones from the agent (`incomingMessages`) or the ones from the visitor (`outgoingMessages`):
* the message bubble background color
* the message text color
* the message bubble stroke/border color
* the accent color, used for all message controls (same color for both agent & visitor): quick answers, file messages, send button, typing indicator...
{% tabs %}
{% tab title="Android" %}
{% endtab %}
{% tab title="iOS" %}
```swift
var configuration = ChatboxConfiguration()
configuration.incomingMessageBackgroundColor = .black
configuration.incomingMessageTextColor = .yellow
configuration.incomingMessageBorderColor = .yellow
configuration.outgoingMessageBackgroundColor = .yellow
configuration.outgoingMessageTextColor = .black
configuration.outgoingMessageBorderColor = .black
configuration.accentColor = .magenta
IAdvizeSDK.shared.chatboxController.setupChatbox(configuration: configuration)
```
{% endtab %}
{% tab title="React Native" %}
```javascript
var configuration = ChatboxConfiguration()
configuration.incomingMessageBackgroundColor = '#000000';
configuration.incomingMessageTextColor = '#FFFF00';
configuration.incomingMessageStrokeColor = '#FFFF00';
configuration.outgoingMessageBackgroundColor = '#FFFF00';
configuration.outgoingMessageTextColor = '#000000';
configuration.outgoingMessageStrokeColor = '#000000';
configuration.accentColor = '#FF00FF';
IAdvizeSDK.setChatboxConfiguration(configuration: configuration)
```
{% endtab %}
{% tab title="Flutter" %}
```dart
final ChatboxConfiguration configuration = ChatboxConfiguration(
incomingMessageBackgroundColor: Colors.black,
incomingMessageTextColor: Colors.yellow,
incomingMessageStrokeColor: Colors.yellow,
outgoingMessageBackgroundColor: Colors.yellow,
outgoingMessageTextColor: Colors.black,
outgoingMessageStrokeColor: Colors.black,
accentColor: Colors.magenta,
);
IAdvizeSdk.setChatboxConfiguration(configuration);
```
{% endtab %}
{% endtabs %}
### **4️⃣ Using a brand avatar**
The operator avatar displayed alongside his messages can be updated for branding purposes. You can specify a drawable either via an URL or a local resource.
{% tabs %}
{% tab title="Android" %}
```kotlin
val configuration = ChatboxConfiguration()
// Update the incoming message avatar with a Drawable resource.
configuration.incomingMessageAvatar = IncomingMessageAvatar.Image(
ContextCompat.getDrawable(context, R.drawable.ic_brand_avatar)
)
// Update the incoming message avatar with an URL.
configuration.incomingMessageAvatar = IncomingMessageAvatar.Url(URL("http://avatar.url"))
IAdvizeSDK.chatboxController.setupChatbox(configuration)
```
{% endtab %}
{% tab title="iOS" %}
```swift
var configuration = ChatboxConfiguration()
// Update the incoming message avatar with a UIImage.
configuration.incomingMessageAvatar = .image(image: UIImage(named: "BrandAvatar"))
// Update the incoming message avatar with an URL.
configuration.incomingMessageAvatar = .url(url: "http://avatar.url")
IAdvizeSDK.shared.chatboxController.setupChatbox(configuration: configuration)
```
{% endtab %}
{% tab title="React Native" %}
```javascript
const configuration: ChatboxConfiguration = {
incomingMessageAvatarImageName: Image.resolveAssetSource(require('./test.jpeg')).uri,
incomingMessageAvatarURL: 'https://picsum.photos/200/200',
};
```
{% hint style="warning" %}
*If you fill both fields, `incomingMessageAvatarImageName` will take priority over `incomingMessageAvatarURL`.*
{% endhint %}
{% endtab %}
{% tab title="Flutter" %}
```dart
final ChatboxConfiguration configuration = ChatboxConfiguration(
incomingMessageAvatarImage: const AssetImage('assets/test.jpeg'),
// OR
incomingMessageAvatarURL: 'https://picsum.photos/200/200',
);
IAdvizeSdk.setChatboxConfiguration(configuration);
```
{% hint style="warning" %}
*If you fill both fields, `incomingMessageAvatarImageName` will take priority over `incomingMessageAvatarURL`.*
{% endhint %}
{% endtab %}
{% endtabs %}
{% hint style="warning" %}
*GIFs are not supported.*
{% endhint %}
## 🎨 Branding the Default Floating Button
By default, the SDK uses its own Default Floating Button for the user to engage in the conversation. This Default Floating Button display process is automated by the SDK and works out of the box. You have however limited possibilities to brand it to your needs.
{% tabs %}
{% tab title="Android" %}
The Default Floating Button can be parametrized, both in its look (colors / icon) and position (anchor / margins) using the appropriate configuration:
```kotlin
val configuration = DefaultFloatingButtonConfiguration(
anchor = Gravity.START or Gravity.BOTTOM,
margins = DefaultFloatingButtonMargins(),
backgroundTint = ContextCompat.getColor(this, R.color.colorPrimary),
iconResIds = mapOf(
ConversationChannel.CHAT to R.drawable.chat_icon,
ConversationChannel.VIDEO to R.drawable.video_icon
)
iconTint = Color.WHITE
)
val option = DefaultFloatingButtonOption.Enabled(configuration)
IAdvizeSDK.defaultFloatingButtonController.setupDefaultFloatingButton(option)
```
⌨️ **In-context example:** [Default Floating Button Configuration](https://github.com/iadvize/iadvize-android-sdk/blob/master/example/mobile/src/main/java/com/iadvize/conversation/sdk/demo/feature/IAdvizeSDKConfig.kt#L52)
{% endtab %}
{% tab title="iOS" %}
The Default Floating Button will use hardcoded icons and the `ChatboxConfiguration.accentColor` as background color:
```swift
var configuration = ChatboxConfiguration()
configuration.accentColor = .red
IAdvizeSDK.shared.chatboxController.setupChatbox(configuration: configuration)
```
The Default Floating Button is anchored to the bottom left side of the screen. You can modify its placement by specifying the button margins:
```swift
IAdvizeSDK.shared.chatboxController.setFloatingButtonPosition(leftMargin: 20.0, bottomMargin: 20.0)
```
{% endtab %}
{% tab title="React Native" %}
The Default Floating Button will use hardcoded icons and the `ChatboxConfiguration.accentColor` as background color:
```javascript
const configuration: ChatboxConfiguration = {
accentColor: '#000000',
};
```
The Default Floating Button is anchored to the bottom left side of the screen. You can modify its placement by specifying the button margins:
```javascript
IAdvizeSDK.setFloatingButtonPosition(20, 20);
```
{% endtab %}
{% tab title="Flutter" %}
The Default Floating Button will use hardcoded icons and the `ChatboxConfiguration.accentColor` as background color:
```dart
final ChatboxConfiguration configuration = ChatboxConfiguration(
accentColor: Colors.red,
);
IAdvizeSdk.setChatboxConfiguration(configuration);
```
The Default Floating Button is anchored to the bottom left side of the screen. You can modify its placement by specifying the button margins:
```dart
IAdvizeSdk.setFloatingButtonPosition(leftMargin: 20, bottomMargin: 20);
```
{% endtab %}
{% endtabs %}
## ✨ Using a custom chat button
If you are not satisfied with the Default Floating Button look and feel or if you want to implement a specific behavior related to its display you may need to use a custom conversation button.
With a custom button it is your responsibility to:
* design the floating or fixed button to invite your user to chat
* hide/show the button following the active targeting rule availability and the ongoing conversation status
* open the Chatbox when the user presses your button
### **1️⃣ Disabling the Default Floating Button**
{% tabs %}
{% tab title="Android" %}
```kotlin
IAdvizeSDK.defaultFloatingButtonController.setupDefaultFloatingButton(DefaultFloatingButtonOption.Disabled)
```
{% endtab %}
{% tab title="iOS" %}
```swift
IAdvizeSDK.shared.chatboxController.useDefaultFloatingButton = false
```
{% endtab %}
{% tab title="React Native" %}
```javascript
IAdvizeSDK.setDefaultFloatingButton(false);
```
{% endtab %}
{% tab title="Flutter" %}
```dart
IAdvizeSdk.setDefaultFloatingButton(false);
```
{% endtab %}
{% endtabs %}
### **2️⃣ Displaying/hiding the chat button**
The chat button is linked to the targeting and conversation workflow and should update its visibility each time the status of those workflows is changed. First of all you need to implement the appropriate callbacks:
{% tabs %}
{% tab title="Android" %}
```kotlin
IAdvizeSDK.targetingController.listeners.add(object : TargetingListener {
override fun onActiveTargetingRuleAvailabilityUpdated(isActiveTargetingRuleAvailable: Boolean) {
// SDK active rule availability changed to isActiveTargetingRuleAvailable
updateChatButtonVisibility()
}
override fun onActiveTargetingRuleAvailabilityUpdateFailed(error: IAdvizeSDK.Error) {
// SDK active rule availability failed
updateChatButtonVisibility()
// You may launch the targeting again based on the error type
}
})
IAdvizeSDK.conversationController.listeners.add(object : ConversationListener {
override fun onOngoingConversationUpdated(ongoingConversation: OngoingConversation?) {
// SDK ongoing conversation has updated
updateChatButtonVisibility()
}
override fun onNewMessageReceived(content: String) {
// A new message was received via the SDK
}
override fun handleClickedUrl(uri: Uri): Boolean {
// A message link was tapped, return true if you want your app to handle it
return false
}
})
```
{% endtab %}
{% tab title="iOS" %}
```swift
extension IntegrationApp: TargetingControllerDelegate {
func activeTargetingRuleAvailabilityDidUpdate(isActiveTargetingRuleAvailable: Bool) {
// SDK active rule availability changed to isActiveTargetingRuleAvailable
updateChatButtonVisibility()
}
func activeTargetingRuleDidFailToUpdate(error: TargetingError) {
// SDK active rule availability failed
updateChatButtonVisibility()
// You may launch the targeting again based on the error type
}
}
extension IntegrationApp: ConversationControllerDelegate {
func ongoingConversationUpdated(ongoingConversation: IAdvizeConversationSDK.OngoingConversation?) {
// SDK ongoing conversation status changed
updateChatButtonVisibility()
}
func didReceiveNewMessage(content: String) {
// A new message was received via the SDK
}
func conversationController(_ controller: ConversationController, shouldOpen url: URL) -> Bool {
// A message link was tapped, return false if you want your app to handle it
}
}
class IntegrationApp {
IAdvizeSDK.shared.targetingController.delegate = self
IAdvizeSDK.shared.conversationController.delegate = self
}
```
{% endtab %}
{% tab title="React Native" %}
```javascript
IAdvizeSDKListeners.onActiveTargetingRuleAvailabilityUpdated(function (eventData: any) {
// SDK active rule availability changed
updateChatButtonVisibility()
});
IAdvizeSDKListeners.onActiveTargetingRuleAvailabilityUpdateFailed(function (eventData: any) {
// SDK active rule availability failed
updateChatButtonVisibility()
// You may launch the targeting again based on the error type
});
IAdvizeSDKListeners.onOngoingConversationStatusChanged(function (eventData: any) {
// SDK ongoing conversation status changed
updateChatButtonVisibility()
});
```
{% endtab %}
{% tab title="Flutter" %}
```dart
IAdvizeSdk.setConversationListener(manageUrlClick: true);
IAdvizeSdk.onOngoingConversationUpdated.listen((bool ongoing) {
// SDK ongoing conversation status changed
_updateCustomChatButtonVisibility();
});
IAdvizeSdk.setOnActiveTargetingRuleAvailabilityListener();
IAdvizeSdk.onActiveTargetingRuleAvailabilityUpdated.listen((bool available) {
// SDK active rule availability changed
_updateCustomChatButtonVisibility();
});
IAdvizeSdk.onActiveTargetingRuleAvailabilityUpdateFailed.listen((Map error) {
// SDK active rule availability failed
updateChatButtonVisibility()
// You may launch the targeting again based on the error type
});
```
{% endtab %}
{% endtabs %}
The chat button gives access to the Chatbox so it should be visible:
* at all times when a conversation is ongoing to allow the visitor to come back to the current conversation
* when the active targeting rule is available, to engage the visitor to chat
{% tabs %}
{% tab title="Android" %}
```kotlin
fun updateChatButtonVisibility() {
val sdkActivated = IAdvizeSDK.activationStatus == IAdvizeSDK.ActivationStatus.ACTIVATED
val chatboxOpened = IAdvizeSDK.chatboxController.isChatboxPresented()
val ruleAvailable = IAdvizeSDK.targetingController.isActiveTargetingRuleAvailable()
val hasOngoingConv = IAdvizeSDK.conversationController.ongoingConversation() != null
if (sdkActivated && !chatboxOpened && (hasOngoingConv || ruleAvailable)) {
showChatButton()
} else {
hideChatButton()
}
}
```
{% endtab %}
{% tab title="iOS" %}
```swift
func updateChatButtonVisibility() {
guard IAdvizeSDK.shared.activationStatus == .activated else {
hideChatButton()
return
}
guard !IAdvizeSDK.shared.chatboxController.isChatboxPresented() else {
hideChatButton()
return
}
guard IAdvizeSDK.shared.conversationController.ongoingConversation() != nil ||
IAdvizeSDK.shared.targetingController.isActiveTargetingRuleAvailable else {
hideChatButton()
return
}
showChatButton()
}
```
{% endtab %}
{% tab title="React Native" %}
```javascript
const updateChatButtonVisibility = async () => {
const ruleAvailable = IAdvizeSDK.isActiveTargetingRuleAvailable()
const hasOngoingConv = IAdvizeSDK.ongoingConversationId().trim().length !== 0
const chatboxOpened = IAdvizeSDK.isChatboxPresented()
if (!chatboxOpened && (hasOngoingConv || ruleAvailable)) {
showChatButton()
} else {
hideChatButton()
}
};
```
{% endtab %}
{% tab title="Flutter" %}
```dart
bool _showCustomButton = false;
Future _updateCustomChatButtonVisibility() async {
final bool sdkActivated = await IAdvizeSdk.isSDKActivated();
final bool ruleAvailable = await IAdvizeSdk.isActiveTargetingRuleAvailable();
final bool hasOngoingConv = await ongoingConversationId() != null;
setState(() {
_showCustomButton = sdkActivated && (hasOngoingConv || ruleAvailable);
});
}
```
{% endtab %}
{% endtabs %}
### **3️⃣ Opening the Chatbox**
When the visitor taps on your custom chat button you should open the Chatbox by calling the following method:
{% tabs %}
{% tab title="Android" %}
```kotlin
IAdvizeSDK.chatboxController.presentChatbox(context)
```
⌨️ **In-context example:** [Full custom chat button implementation](https://gist.github.com/Judas/d0a34a50f1b6b8d542d77af5db9d9787)
{% endtab %}
{% tab title="iOS" %}
```swift
IAdvizeSDK.shared.chatboxController.presentChatbox(
animated: Bool,
presentingViewController: UIViewController?
) {
// ...
}
```
⌨️ **In-context example:** [Full custom chat button implementation](https://gist.github.com/alexandrekarst/74da3ce5a9eaf68f7bd83eaf77c6d3dc)
{% endtab %}
{% tab title="React Native" %}
```javascript
IAdvizeSDK.presentChatbox()
```
{% endtab %}
{% tab title="Flutter" %}
```dart
IAdvizeSdk.presentChatbox();
```
{% endtab %}
{% endtabs %}
You can be informed of the Chatbox opening/closing by subscribing to the right listener:
{% tabs %}
{% tab title="Android" %}
```kotlin
IAdvizeSDK.chatboxController.listeners.add( object : ChatboxListener {
override fun onChatboxOpened() {
Log.d("TEST", "Chatbox has opened")
}
override fun onChatboxClosed() {
Log.d("TEST", "Chatbox has closed")
}
})
```
{% endtab %}
{% tab title="iOS" %}
```swift
IAdvizeSDK.shared.chatboxController.delegate = self
extension MyApp: ChatboxControllerDelegate {
public func chatboxDidOpen() {
print("Chatbox has opened")
}
public func chatboxDidClose() {
print("Chatbox has closed")
}
}
```
⌨️ **In-context example:** [Full custom chat button implementation](https://gist.github.com/alexandrekarst/74da3ce5a9eaf68f7bd83eaf77c6d3dc)
{% endtab %}
{% tab title="React Native" %}
```javascript
IAdvizeSDKListeners.onChatboxOpened(function (eventData: any) {
console.log('Chatbox has opened');
});
IAdvizeSDKListeners.onChatboxClosed(function (eventData: any) {
console.log('Chatbox has closed');
});
```
{% endtab %}
{% tab title="Flutter" %}
```dart
IAdvizeSdk.setChatboxListener();
StreamSubscription _chatboxOpenedSubscription = IAdvizeSdk.onChatboxOpened
.listen((event) => log('Chatbox has opened'));
StreamSubscription _chatboxClosedSubscription = IAdvizeSdk.onChatboxClosed
.listen((event) => log('Chatbox has closed'));
```
{% endtab %}
{% endtabs %}
## 🔔 Handling push notifications
{% hint style="warning" %}
*Before starting this part you will need to configure push notifications inside your application. You can refer to the following resources if needed:*
{% tabs %}
{% tab title="Android" %}
[Firebase Cloud Messaging documentation](https://firebase.google.com/docs/cloud-messaging/android/client)
{% endtab %}
{% tab title="iOS" %}
[Push notification setup tutorial](https://www.kodeco.com/11395893-push-notifications-tutorial-getting-started)
{% endtab %}
{% tab title="React Native" %}
[React Native Firebase Setup](https://rnfirebase.io/)
[React Native Firebase Messaging Setup](https://rnfirebase.io/messaging/usage)
{% endtab %}
{% tab title="Flutter" %}
[Flutter Firebase Setup](https://firebase.google.com/docs/flutter/setup)
[Flutter Firebase Messaging Setup](https://firebase.google.com/docs/cloud-messaging/flutter/client)
{% endtab %}
{% endtabs %}
*You will also need to ensure that the push notifications are setup in your iAdvize project. The process is described in the* [*SDK Knowledge Base*](https://help.iadvize.com/hc/en-gb/articles/360019839480)*.*
{% endhint %}
### **1️⃣ Registering the device token**
For the SDK to be able to send notifications to the visitor’s device, its unique `device push token` must be registered:
{% tabs %}
{% tab title="Android" %}
```kotlin
class NotificationService : FirebaseMessagingService() {
override fun onNewToken(token: String) {
super.onNewToken(token)
IAdvizeSDK.notificationController.registerPushToken(token)
}
}
```
⌨️ **In-context example:** [Device token register](https://github.com/iadvize/iadvize-android-sdk/blob/master/example/mobile/src/main/java/com/iadvize/conversation/sdk/demo/feature/notifications/NotificationService.kt#L55)
{% endtab %}
{% tab title="iOS" %}
```swift
IAdvizeSDK.shared.notificationController.registerPushToken("the_device_push_token", applicationMode: .prod)
```
⌨️ **In-context example:** [Device token register](https://github.com/iadvize/iadvize-ios-sdk/blob/master/example/SPMIntegration/SPMIntegration/Source/AppDelegate%2BPushNotification.swift#L27)
{% endtab %}
{% tab title="React Native" %}
```javascript
import messaging from '@react-native-firebase/messaging';
const registerPushToken = async () => {
try {
const token = await messaging().getToken();
IAdvizeSDK.registerPushToken(token, ApplicationMode.DEV);
console.log('iAdvize SDK registerPushToken success');
} catch (e) {
console.error(e);
}
};
```
{% hint style="warning" %}
*The `ApplicationMode` is used only for the iOS application.*
{% endhint %}
{% endtab %}
{% tab title="Flutter" %}
```dart
import 'package:firebase_messaging/firebase_messaging.dart';
FirebaseMessaging.instance.onTokenRefresh.listen((fcmToken) {
IAdvizeSdk.registerPushToken(pushToken: fcmToken, mode: ApplicationMode.dev);
}).onError((err) {
log('Error registering token: $err');
});
```
{% hint style="warning" %}
*The `ApplicationMode` is used only for the iOS application.*
{% endhint %}
{% endtab %}
{% endtabs %}
### **2️⃣ Enabling/disabling push notifications**
Push notifications are activated during SDK activation, as long as you have setup the push notifications information for your app on the iAdvize administration website (process is described in the [SDK Knowledge Base](https://help.iadvize.com/hc/en-gb/articles/360019839480)). You can manually enable/disable them at any time using:
{% tabs %}
{% tab title="Android" %}
```kotlin
IAdvizeSDK.notificationController.enablePushNotifications(object : IAdvizeSDK.Callback {
override fun onSuccess() {
// Enable succeded
}
override fun onFailure(error: IAdvizeSDK.Error) {
// Enable failed
}
})
IAdvizeSDK.notificationController.disablePushNotifications(object : IAdvizeSDK.Callback {
override fun onSuccess() {
// Disable succeded
}
override fun onFailure(error: IAdvizeSDK.Error) {
// Disable failed
}
})
```
{% endtab %}
{% tab title="iOS" %}
```swift
IAdvizeSDK.shared.notificationController.enablePushNotifications { success in
...
}
IAdvizeSDK.shared.notificationController.disablePushNotifications { success in
...
}
```
{% endtab %}
{% tab title="React Native" %}
```javascript
try {
await IAdvizeSDK.enablePushNotifications();
// Push notifications enabled
} catch (e) {
// Error enabling push notifications
}
try {
await IAdvizeSDK.disablePushNotifications();
// Push notifications disabled
} catch (e) {
// Error disabling push notifications
}
```
{% endtab %}
{% tab title="Flutter" %}
```dart
IAdvizeSdk.enablePushNotifications().then((bool success) =>
log('Push notifications enabled $success'));
IAdvizeSdk.disablePushNotifications().then((bool success) =>
log('Push notifications disabkled $success'));
```
{% endtab %}
{% endtabs %}
### **3️⃣ Handling push notifications reception**
Once setup, you will receive push notifications when the operator sends any message. As the SDK notifications are caught in the same place than your app other notifications, you first have to distinguish if the received notification comes from iAdvize or not.
{% tabs %}
{% tab title="Android" %}
```kotlin
class NotificationService : FirebaseMessagingService() {
override fun onMessageReceived(remoteMessage: RemoteMessage) {
if (IAdvizeSDK.notificationController.isIAdvizePushNotification(remoteMessage.data)) {
// This is an iAdvize SDK notification
}
}
}
```
{% endtab %}
{% tab title="iOS" %}
```swift
func application(
_ application: UIApplication,
didReceiveRemoteNotification userInfo: [AnyHashable: Any],
fetchCompletionHandler completionHandler: @escaping (UIBackgroundFetchResult) -> Void
) {
if IAdvizeSDK.shared.notificationController.isIAdvizePushNotification(with: userInfo) {
// This is an iAdvize SDK notification
}
}
```
{% endtab %}
{% tab title="React Native" %}
```javascript
// Firebase Messaging notification handlers
messaging().onMessage(async remoteMessage => {
console.log('Received a foreground notification message');
handleNotification(remoteMessage)
});
messaging().setBackgroundMessageHandler(async remoteMessage => {
console.log('Received a background notification message');
handleNotification(remoteMessage)
});
function handleNotification(remoteMessage: any) {
console.log('handling notification', JSON.stringify(remoteMessage));
var isIAdvizeSDKNotification = IAdvizeSDK.isIAdvizePushNotification(remoteMessage.data)
}
```
{% endtab %}
{% tab title="Flutter" %}
```dart
// Firebase Messaging notification handlers
@pragma('vm:entry-point')
Future _backgroundNotificationHandler(RemoteMessage message) async {
log('Received a background notification message ${message}');
handleNotification(message);
}
FirebaseMessaging.onBackgroundMessage(_backgroundNotificationHandler);
FirebaseMessaging.onMessage.listen((RemoteMessage message) {
log('Received a foreground notification message ${message}');
handleNotification(message);
});
void handleNotification(RemoteMessage message) {
log('handling notification $message');
IAdvizeSdk.isIAdvizePushNotification(message.data).then(
(bool isAdvizeNotification) =>
log('Notification from iAdvize ? $isAdvizeNotification'));
}
```
{% endtab %}
{% endtabs %}
{% hint style="warning" %}
*Notifications will be received in your app for all messages sent by the agent. It is your responsibility to display the notification and to check whether or not it is relevant to display it. For instance, you don’t need to show a notification to the visitor when the Chatbox is opened*
{% endhint %}
{% tabs %}
{% tab title="Android" %}
```kotlin
fun shouldDisplayNotification(remoteMessage: RemoteMessage) =
IAdvizeSDK.notificationController.isIAdvizePushNotification(remoteMessage.data)
&& !IAdvizeSDK.chatboxController.isChatboxPresented()
```
{% endtab %}
{% tab title="iOS" %}
```swift
func shouldDisplayNotification(userInfo: [AnyHashable: Any]) -> Bool {
guard IAdvizeSDK.shared.notificationController.isIAdvizePushNotification(with: userInfo) else {
return false
}
guard !IAdvizeSDK.shared.chatboxController.isChatboxPresented() else {
return false
}
return true
}
```
{% endtab %}
{% tab title="React Native" %}
```javascript
function handleNotification(remoteMessage: any) {
console.log('handling notification', JSON.stringify(remoteMessage));
var chatboxOpened = IAdvizeSDK.isChatboxPresented()
var isIAdvizeSDKNotification = IAdvizeSDK.isIAdvizePushNotification(remoteMessage.data)
var shouldDisplay = chatboxOpened == false && isIAdvizeSDKNotification
console.log("chatboxOpened:", chatboxOpened, "isIAdvizeSDKNotification", isIAdvizeSDKNotification, "shouldDisplay=>", shouldDisplay);
}
```
{% endtab %}
{% tab title="Flutter" %}
```dart
void handleNotification(RemoteMessage message) {
log('handling notification $message');
Future isIAdvizeSDKNotification =IAdvizeSdk.isIAdvizePushNotification(message.data);
Future isChatboxPresented = IAdvizeSdk.isChatboxPresented();
Future.wait([isIAdvizeSDKNotification, isChatboxPresented]).then((List flags) {
bool shouldDisplay = flags[0] && !flags[1];
log("isIAdvizeSDKNotification:${flags[0]} isChatboxPresented:${flags[1]} shouldDisplay:$shouldDisplay");
});
}
```
{% endtab %}
{% endtabs %}
### **4️⃣ Customizing the notification**
{% tabs %}
{% tab title="Android" %}
You are responsible for displaying the notification so you can use any title / text / icon you want. The text sent by the agent is available in the `content` part of the notification data received.
```kotlin
override fun onMessageReceived(remoteMessage: RemoteMessage) {
if (IAdvizeSDK.notificationController.isIAdvizePushNotification(remoteMessage.data)) {
val agentMessageReceived = remoteMessage.data["content"] ?: "Default text"
}
}
```
⌨️ **In-context example:** [Handling received notification](https://github.com/iadvize/iadvize-android-sdk/blob/master/example/mobile/src/main/java/com/iadvize/conversation/sdk/demo/feature/notifications/NotificationService.kt#L64)
{% endtab %}
{% tab title="iOS" %}
By default, the title of the notification is set to the string key `iadvize_notification_title`. If you want to update/translate this title you can override this value by adding the `iadvize_notification_title` key in your `Localizable.strings` file:
```swift
"iadvize_notification_title" = "You have received a new message";
```
{% endtab %}
{% tab title="React Native" %}
```javascript
function handleNotification(remoteMessage: any) {
console.log('handling notification', JSON.stringify(remoteMessage));
var messageContent = remoteMessage.data.content
}
```
{% endtab %}
{% tab title="Flutter" %}
```dart
void handleNotification(RemoteMessage message) {
log('handling notification $message');
String messageContent = message.data["content"];
}
```
{% endtab %}
{% endtabs %}
### **5️⃣ Clearing push notifications**
The iAdvize SDK notifications are automatically cleared from the Notification Tray / Notification Center when the Chatbox is opened. If you want to clear them at any other given time you can call this API:
{% tabs %}
{% tab title="Android" %}
```kotlin
IAdvizeSDK.notificationController.clearIAdvizePushNotifications()
```
{% endtab %}
{% tab title="iOS" %}
```swift
IAdvizeSDK.shared.notificationController.clearIAdvizePushNotifications()
```
{% endtab %}
{% tab title="React Native" %}
```javascript
IAdvizeSDK.clearIAdvizePushNotifications()
```
{% endtab %}
{% tab title="Flutter" %}
```dart
IAdvizeSdk.clearIAdvizePushNotifications()
```
{% endtab %}
{% endtabs %}
However, as notifications display depends on the Notification Channel, some configuration is needed in order for this behavior to work correctly:
{% tabs %}
{% tab title="Android" %}
First of all create the Notification Channel:
```kotlin
IAdvizeSDK.notificationController.createNotificationChannel(context)
```
Then, when receiving the notification, send it through the SDK Notification Channel if the notification is from iAdvize:
```kotlin
if (IAdvizeSDK.notificationController.isIAdvizePushNotification(remoteMessage.data)) {
val notification = NotificationCompat.Builder(this, IAdvizeSDK.notificationController.channelId)
... // notification config
.build()
} else {
// Host app notification handling
}
```
{% endtab %}
{% tab title="iOS" %}
On iOS no setup is required, the clearing of the push notificatiosn works out of the box.
{% endtab %}
{% tab title="React Native" %}
First of all create the Notification Channel:
```javascript
IAdvizeSDK.createNotificationChannel();
```
You don't need to check that you are on the Android platform before calling this API, as it does nothing on the iOS platform.
Then, when receiving the notification, send it through the SDK Notification Channel if the notification is from iAdvize. In order to show a notification in a specific Notification Channel, please refer to your Notification library documentation.
{% endtab %}
{% tab title="Flutter" %}
First of all create the Notification Channel:
```javascript
IAdvizeSdk.createNotificationChannel();
```
You don't need to check that you are on the Android platform before calling this API, as it does nothing on the iOS platform.
Then, when receiving the notification, send it through the SDK Notification Channel if the notification is from iAdvize. In order to show a notification in a specific Notification Channel, please refer to your Notification library documentation.
{% endtab %}
{% endtabs %}
## 📈 Adding value to the conversation
### **1️⃣ Registering visitor transactions**
You can register a transaction made within your application:
{% tabs %}
{% tab title="Android" %}
```kotlin
IAdvizeSDK.transactionController.register(
Transaction(
"transactionId",
Date(),
10.00,
Currency.EUR
)
)
```
{% endtab %}
{% tab title="iOS" %}
```swift
let transaction = Transaction(externalTransactionId: "transactionId", date: Date(), amount: 10.0, currency: .eur)
IAdvizeSDK.shared.transactionController.registerTransaction(transaction)
```
{% endtab %}
{% tab title="React Native" %}
```javascript
const transaction: Transaction = {
transactionId: 'transactionId',
currency: 'EUR',
amount: 10
};
IAdvizeSDK.registerTransaction(transaction);
```
{% hint style="warning" %}
*The currency value should respect* [*ISO 4217*](https://en.wikipedia.org/wiki/ISO_4217)*.*
{% endhint %}
{% endtab %}
{% tab title="Flutter" %}
```javascript
IAdvizeSdk.registerTransaction(Transaction(
transactionId: 'transactionId',
currency: 'EUR',
amount: 10
));
```
{% hint style="warning" %}
*The currency value should respect* [*ISO 4217*](https://en.wikipedia.org/wiki/ISO_4217)*.*
{% endhint %}
{% endtab %}
{% endtabs %}
### **2️⃣ Saving visitor custom data**
The iAdvize Mobile SDK allows you to save data related to the visitor conversation:
{% tabs %}
{% tab title="Android" %}
```kotlin
IAdvizeSDK.visitorController.registerCustomData(listOf(
CustomData.fromString("Test", "Test"),
CustomData.fromBoolean("Test2", false),
CustomData.fromDouble("Test3", 2.0),
CustomData.fromInt("Test4", 3)
),
object : IAdvizeSDK.Callback {
override fun onSuccess() {
// Success
}
override fun onFailure(error: IAdvizeSDK.Error) {
// Failure
}
})
```
{% endtab %}
{% tab title="iOS" %}
```swift
IAdvizeSDK.shared.visitorController.registerCustomData(
customData:
["Test": .customDataString("Test"),
"Test2": .customDataBoolean(false),
"Test3": .customDataDouble(2.0),
"Test4": .customDataInt(3)]
) { success in
// completion handler
}
```
{% endtab %}
{% tab title="React Native" %}
```javascript
var customData = {
"Test": "Test",
"Test2": false,
"Test3": 2.5,
"Test4": 3
};
IAdvizeSDK.registerCustomData(customData);
```
{% endtab %}
{% tab title="Flutter" %}
```dart
List customData = [
CustomData.fromString("Test", "Test"),
CustomData.fromBoolean("Test2", false),
CustomData.fromDouble("Test3", 2.0),
CustomData.fromInt("Test4", 3)
];
IAdvizeSdk.registerCustomData(customData).then((bool success) =>
log('iAdvize Example : custom data registered: $success'));
```
{% endtab %}
{% endtabs %}
{% hint style="warning" %}
*As those data are related to the conversation they cannot be sent if there is no ongoing conversation. Custom data registered **before** the start of a conversation are stored and the SDK automatically tries to send them when the conversation starts.*
{% endhint %}
The visitor data you registered are displayed in the iAdvize Operator Desk in the conversation sidebar, in a tab labelled `Custom data`:

## 👍 Fetching visitor satisfaction
The satisfaction survey is automatically sent to the visitor at the end of the conversation, as long as it is activated in the iAdvize administration website. The survey is presented to the visitor in a conversational approach, directly into the Chatbox.
{% hint style="info" %}
*Only the `CSAT`, `NPS` and `COMMENT` steps of the survey are supported.*
{% endhint %}
---
[Next Page](/llms-full.txt/1)
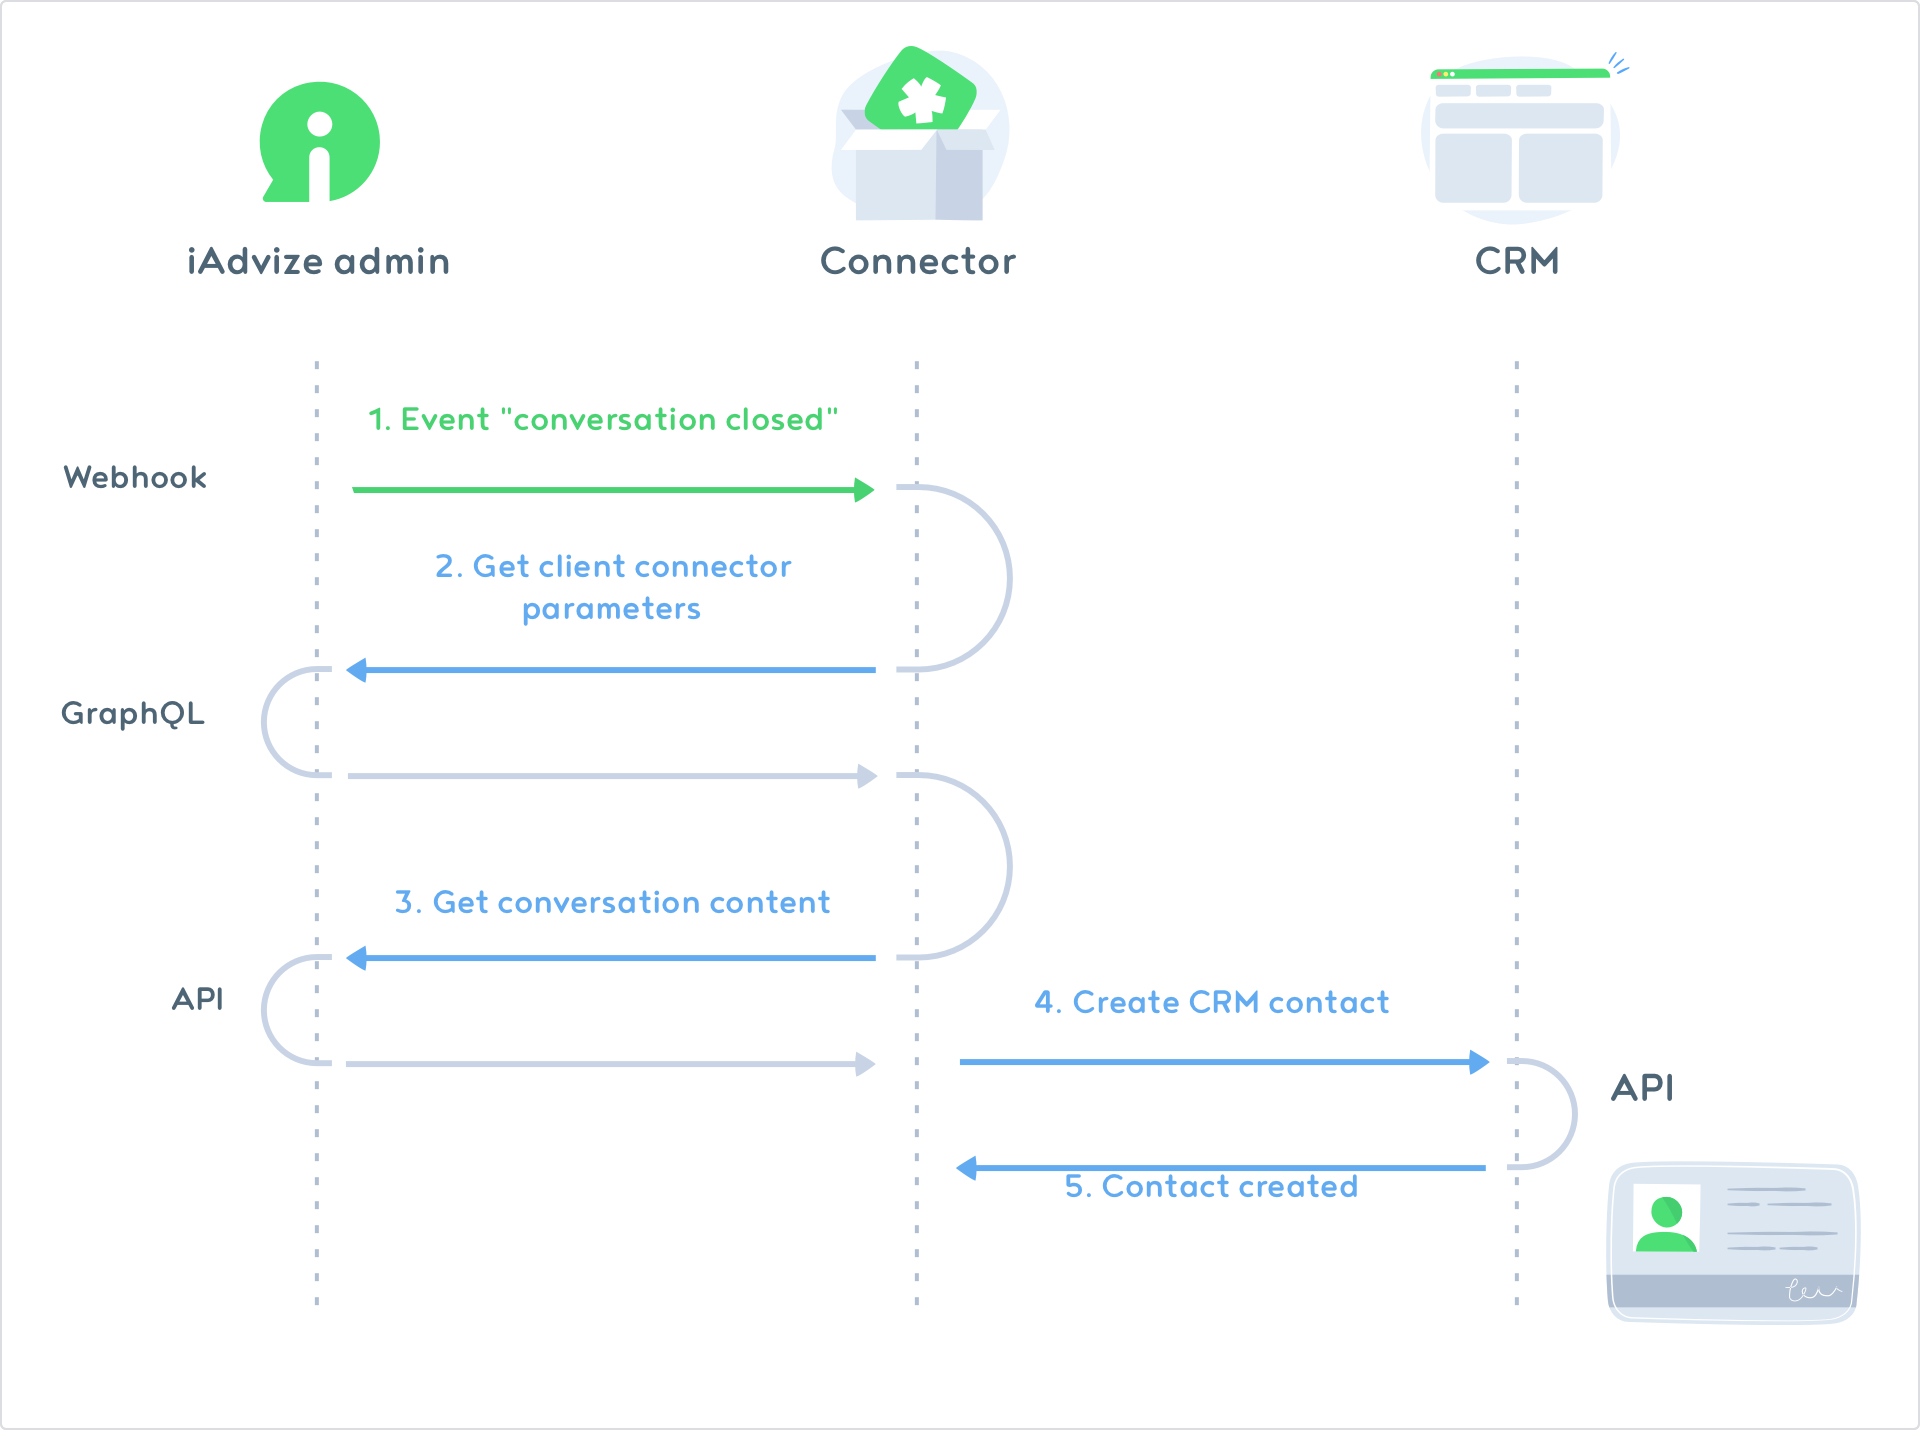 # Features Overview
The developer platform offers many resources to customize your solution and integrate it into your company's stack.
You can choose from the main sections the one that meets your needs:
* **Apps:** Consult the list of public applications available to easily integrate with your tools (Salesforce, Zendesk, and others) or create your own application to meet a particular integration case.
* **Use Cases:** browse our use cases and follow our step-by-step guides to implement them in your environment (install the iAdvize tag, identify your visitors, automate the creation of your users, etc.).
* **Technologies:** Find our technical references and discover all the functions available to personalize or automate your processing (API, SDK, SSO, etc.).
Browse through each section and choose the theme that interests you to obtain complete and detailed information.
# Security: IP Whitelisting
In order for the iAdvize SaaS solution to operate correctly, certain features require communication between our systems and your servers. To secure these exchanges in accordance with your internal security policies, you may need to whitelist specific iAdvize IP addresses.
### Outgoing Connections from iAdvize – Use Cases
Here are a few common scenarios where iAdvize may initiate outgoing requests to your infrastructure:
* When a bot connects to an [**external API**](https://help.iadvize.com/hc/en-gb/articles/4439565717906) to retrieve or send information
* When deploying an [**external bot**](/technologies/external-bot)
* For the use of [**Webhooks**](/technologies/webhooks)
* When running [**Custom Apps**](/technologies/custom-app-in-iadvize-desk) from the agent interface
* When using an [**App**](/apps/build-your-app/app-plugins) (also known as a connector) integrated into iAdvize
* During testing or staging phases carried out by iAdvize teams on protected environments
* ...
***
### IP Addresses to Whitelist
#### 1. **iAdvize Server IP Addresses**
These IPs are used by our production servers to initiate outgoing connections to your systems:
```
35.158.241.155
35.158.90.142
35.156.32.28
```
> 💡 These addresses should be whitelisted if your APIs or services are restricted to allow traffic only from trusted IPs.
***
#### 2. **iAdvize VPN IP Addresses (Human/Test Access)**
In some situations, iAdvize teams may need direct access to your systems via VPN — for example, to access a protected test environment or to perform validations during implementation or troubleshooting.
The following IPs are used for such VPN-based access:
```
193.39.2.173
185.160.53.38
185.160.53.166
34.107.108.253
34.86.72.25
```
***
### Recommendations
* **IP Restrictions**: To enhance security, we recommend allowing access to your systems only from the IP addresses listed above.
* **Regular Review**: This list may evolve over time. Please consult your iAdvize contact or check our technical documentation regularly for updates.
* **Segmentation**: Clearly distinguish between **machine/server access** and **human/VPN access** in your access control policies.
# Public Apps
Discover our Public Apps
## We are connected with your internal tools!
# Features Overview
The developer platform offers many resources to customize your solution and integrate it into your company's stack.
You can choose from the main sections the one that meets your needs:
* **Apps:** Consult the list of public applications available to easily integrate with your tools (Salesforce, Zendesk, and others) or create your own application to meet a particular integration case.
* **Use Cases:** browse our use cases and follow our step-by-step guides to implement them in your environment (install the iAdvize tag, identify your visitors, automate the creation of your users, etc.).
* **Technologies:** Find our technical references and discover all the functions available to personalize or automate your processing (API, SDK, SSO, etc.).
Browse through each section and choose the theme that interests you to obtain complete and detailed information.
# Security: IP Whitelisting
In order for the iAdvize SaaS solution to operate correctly, certain features require communication between our systems and your servers. To secure these exchanges in accordance with your internal security policies, you may need to whitelist specific iAdvize IP addresses.
### Outgoing Connections from iAdvize – Use Cases
Here are a few common scenarios where iAdvize may initiate outgoing requests to your infrastructure:
* When a bot connects to an [**external API**](https://help.iadvize.com/hc/en-gb/articles/4439565717906) to retrieve or send information
* When deploying an [**external bot**](/technologies/external-bot)
* For the use of [**Webhooks**](/technologies/webhooks)
* When running [**Custom Apps**](/technologies/custom-app-in-iadvize-desk) from the agent interface
* When using an [**App**](/apps/build-your-app/app-plugins) (also known as a connector) integrated into iAdvize
* During testing or staging phases carried out by iAdvize teams on protected environments
* ...
***
### IP Addresses to Whitelist
#### 1. **iAdvize Server IP Addresses**
These IPs are used by our production servers to initiate outgoing connections to your systems:
```
35.158.241.155
35.158.90.142
35.156.32.28
```
> 💡 These addresses should be whitelisted if your APIs or services are restricted to allow traffic only from trusted IPs.
***
#### 2. **iAdvize VPN IP Addresses (Human/Test Access)**
In some situations, iAdvize teams may need direct access to your systems via VPN — for example, to access a protected test environment or to perform validations during implementation or troubleshooting.
The following IPs are used for such VPN-based access:
```
193.39.2.173
185.160.53.38
185.160.53.166
34.107.108.253
34.86.72.25
```
***
### Recommendations
* **IP Restrictions**: To enhance security, we recommend allowing access to your systems only from the IP addresses listed above.
* **Regular Review**: This list may evolve over time. Please consult your iAdvize contact or check our technical documentation regularly for updates.
* **Segmentation**: Clearly distinguish between **machine/server access** and **human/VPN access** in your access control policies.
# Public Apps
Discover our Public Apps
## We are connected with your internal tools!