> For the complete documentation index, see [llms.txt](https://docs.iadvize.dev/llms.txt). Markdown versions of documentation pages are available by appending `.md` to page URLs; this page is available as [Markdown](https://docs.iadvize.dev/technologies/external-bot/configuration.md).
# Configuration
To be able to configure a bot on the iAdvize platform, you will need to:
1. [Create the external bot application, in the iAdvize dev platform](#in-the-dev-platform)
2. [Install the external bot application in the iAdvize admin](#install-the-external-bot-application-in-the-iadvize-admin)
3. [Create a bot operator using the newly installed external bot application](#create-a-bot-operator-using-the-newly-installed-external-bot-application)
4. [Distribute your visitors' conversations to your external bot](#distribute-your-visitors-conversations-to-your-external-bot)
{% hint style="warning" %}
In order to be be able to complete this process you will have to implement the [Configuration flow](/technologies/external-bot/implementation/configuration-flow.md) first (or you will be stuck at the “Create bot agent” step)
{% endhint %}
## Create the external bot application in the iAdvize dev platform
First, you hav to be logged in. Then go to “My apps” section, and click on “Build”. In our case we will call it “My bot”. To build a bot, you need to go to “Plugins” then select “Bot”. You have just one URL to set: the base URL of your connector. All the requests will go to this URL.
{% hint style="info" %}
Note that it has to be secured with HTTPS
{% endhint %}
Click on save and… congratulations! You created your bot application. Of course this is just a stub. If you want this to be fully functional you have to implement the [Conversation flow](/technologies/external-bot/implementation/conversation-flow.md).
## **Install the external bot application in the iAdvize admin**
In the [admin](https://ha.iadvize.com/admin/login/), go to “Apps” and mind to select the project you want to install your external bot app on. In the list, find your connector, in our case the “My bot” section. Click on the card. You should land on an installation page such as:
You just have to click on “Install” and go through the installation process. Finalise the installation by clicking on “Install” and you are done.
You just enabled some bot capabilities on the project you selected. It means that from now on, you can create an operator of type Bot 🎉.
## Create a bot operator using the newly installed external bot application
In the Automation menu, then Bots, click on "Create a bot".
Select "External" then "Create a bot".
{% hint style="info" %}
If you do not have any bot application installed on your iAdvize project, you will not see the “External” option in this window.
{% endhint %}
Fill in the different information of your bot:
{% hint style="info" %}
A bot operator is associated with ONE and only ONE language. So, if you want your bot to answer several languages, you have to create multiple bot operators.
{% endhint %}
{% hint style="warning" %}
Make sure you specify the right language because **you can't change the language** of a bot.
{% endhint %}
## Distribute your visitors' conversations to your external bot
To be able to chat on iAdvize you need to take several steps:
1. [Install the iAdvize tag on your website](https://help.iadvize.com/hc/en-gb/articles/202575988)
2. Create a campaign
3. Create a targeting rule
4. Create a routing group
5. Create a routing rule
### Create a campaign
In the admin, go to “Engagement”. Create a new campaign such as: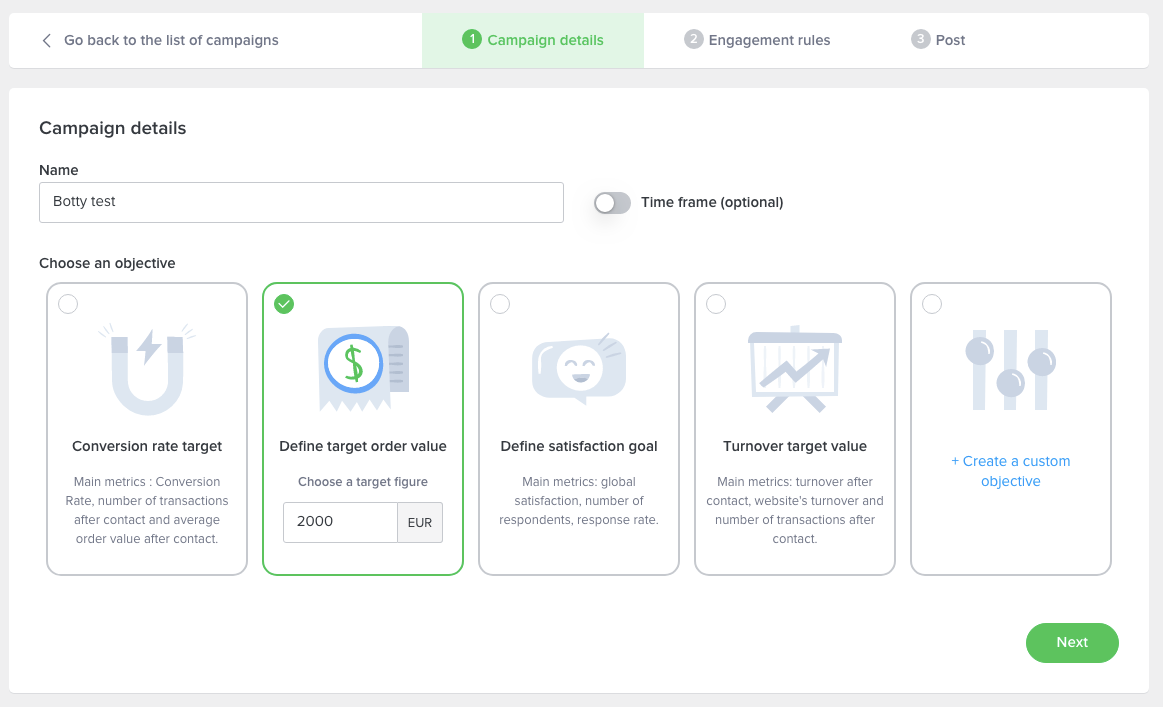
### Create a targeting rule
Now we need to define “engagement rules” i.e. how to target the visitor. Click on the “➕” and create a rule “Bot”. In our case, we will define that the button is being displayed when the current url contains the name “bot”. Which means you can add ?bot to any url and it will display the notification.
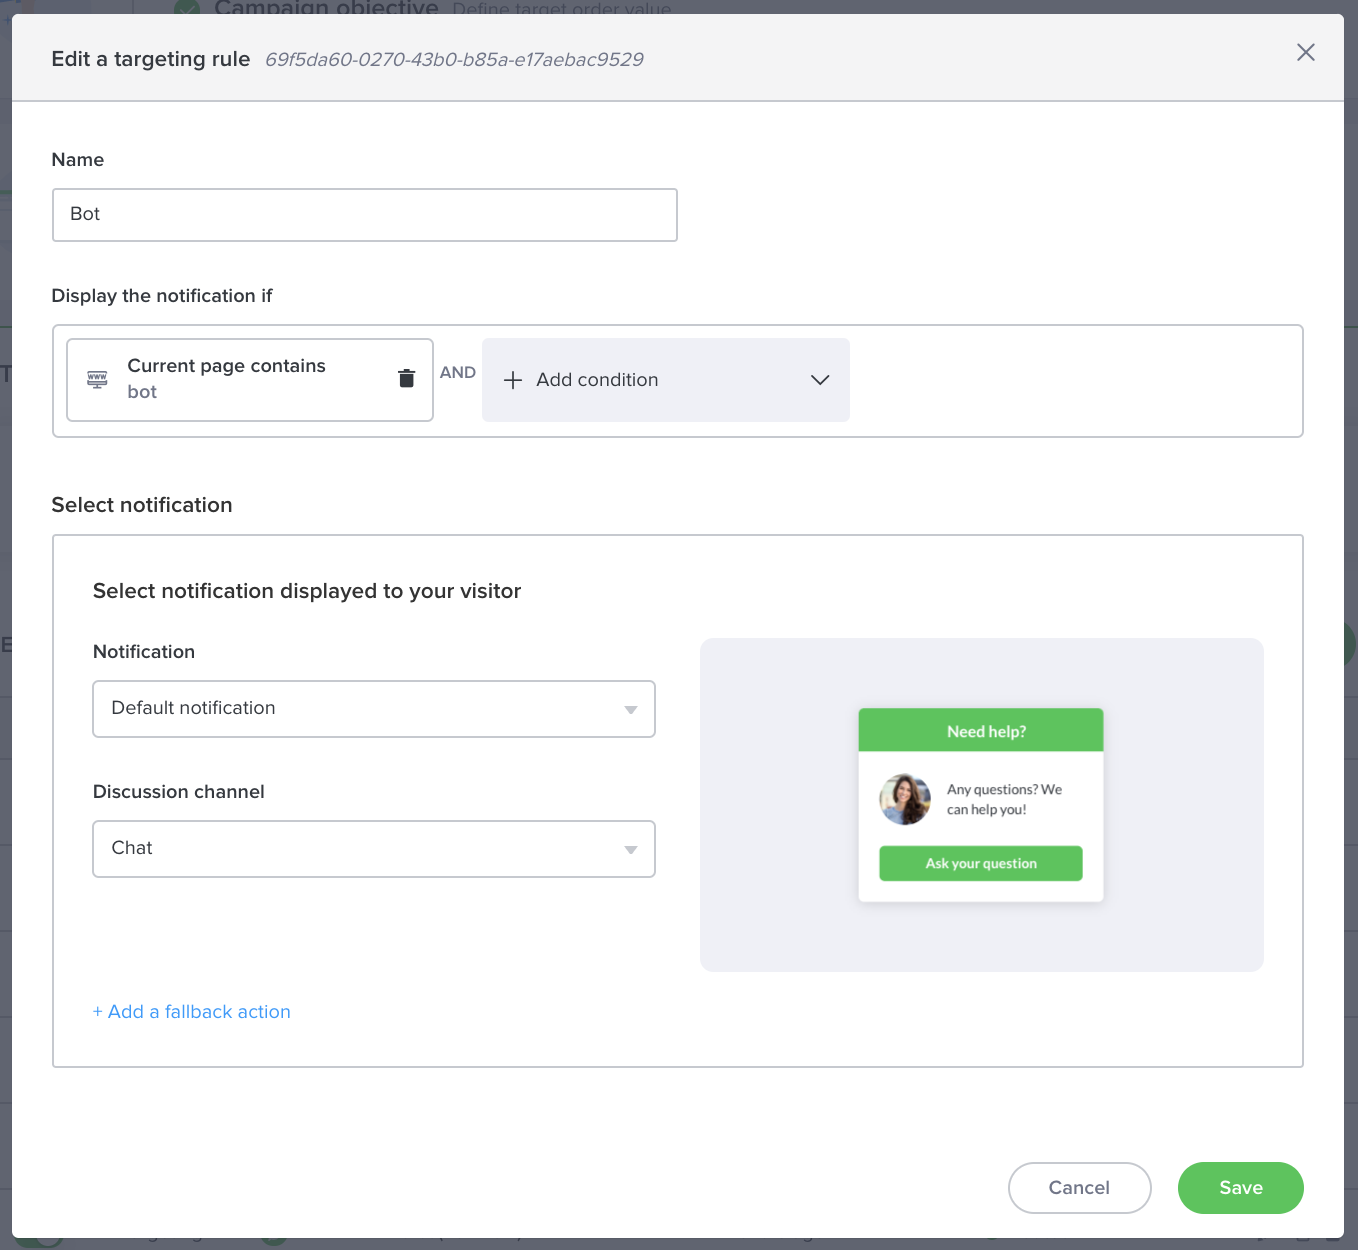
Add the rule, and publish your campaign.
### Create a routing group
It is no longer necessary to manually create a routing group since it is automatically created for each bot you create via the "Automation" section.
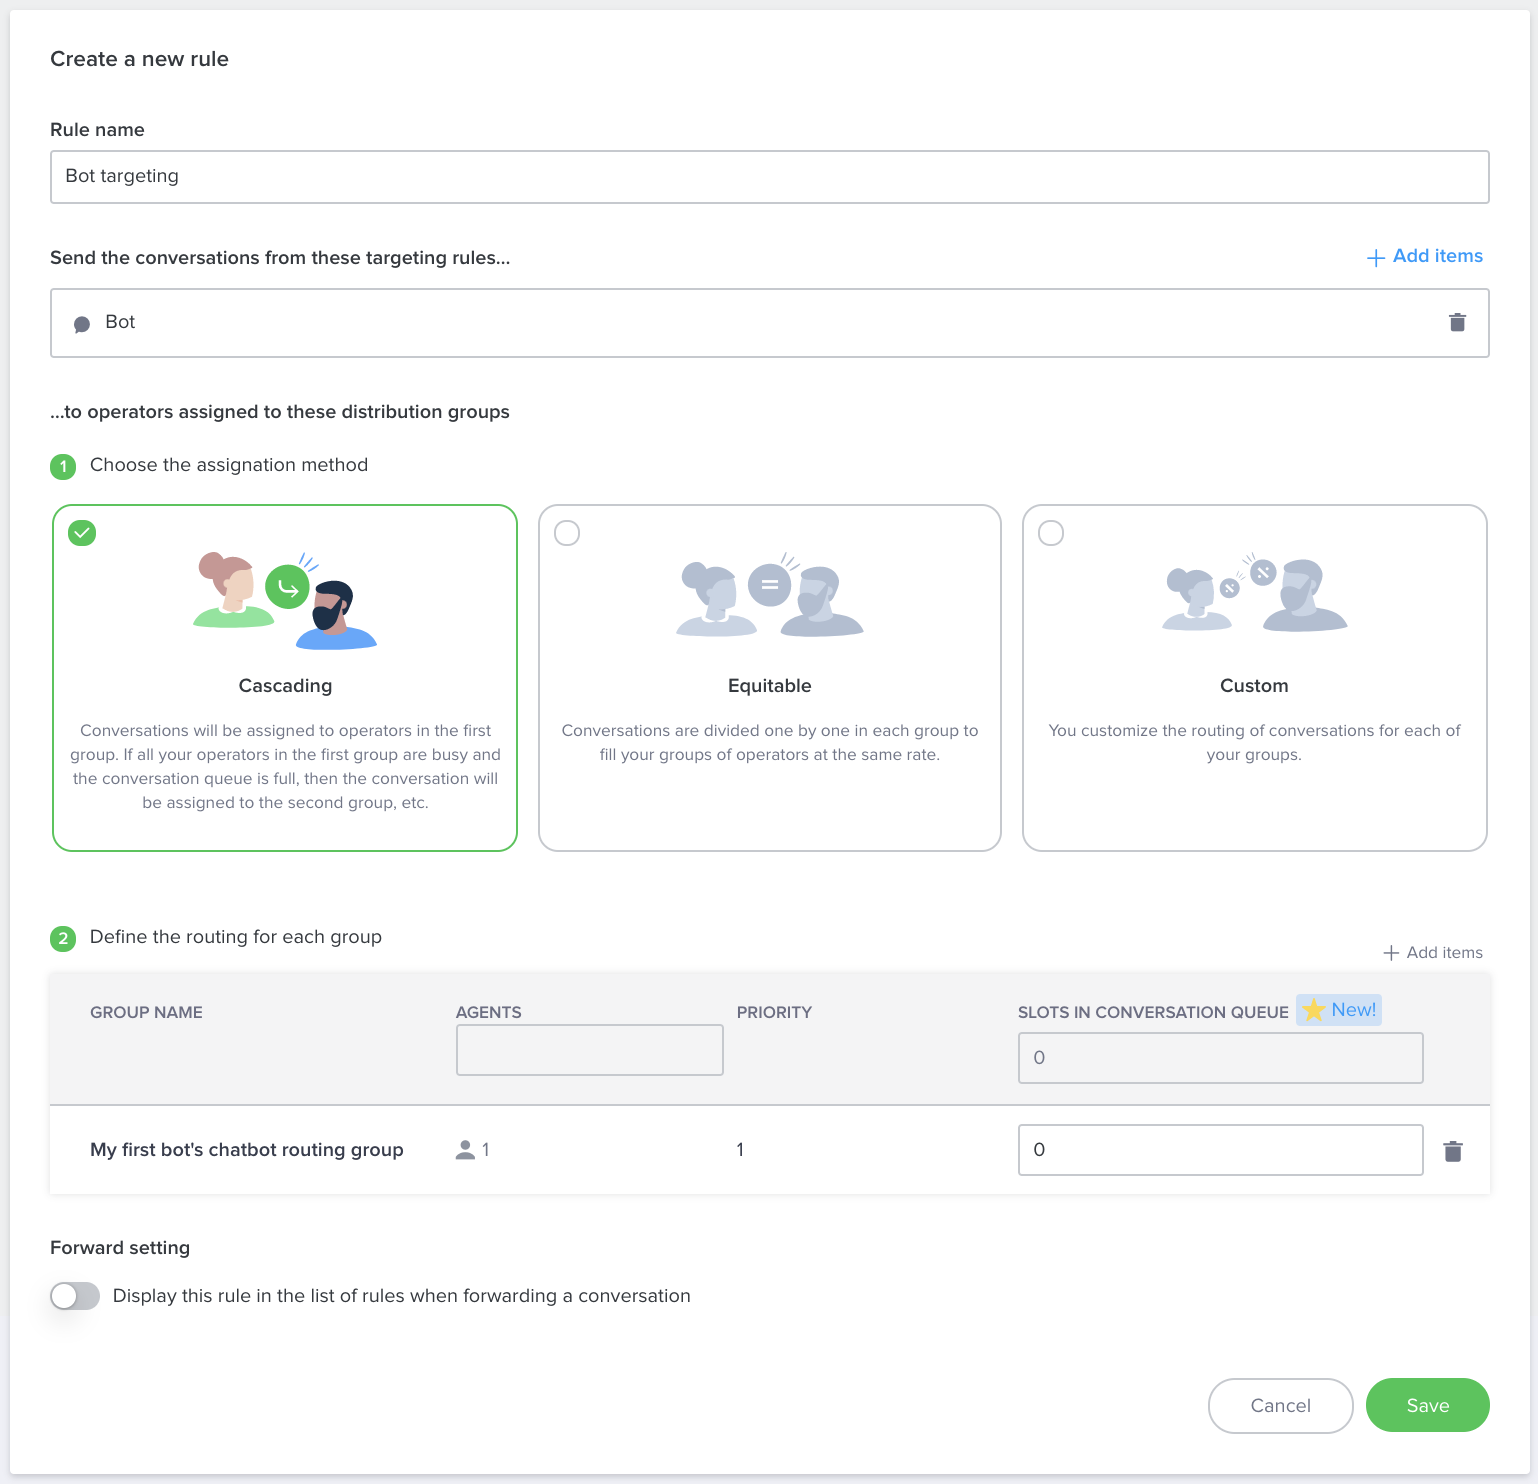
### Create a routing rule
To finish, we need to create a routing rule. Go to “Routing”, in the upper left select picker, select “Routing rules” and create a rule “Bot targeting”, for the “Bot” notification, that will handover the conversations to the agents of group “\[NAME OF YOUR BOT] chatbot routing group”. Such as:
### Check that everything is correctly setup
Go to “Campaigns” and click on the “edit” button. If you did everything correctly you should see that your campaign is routed this way:
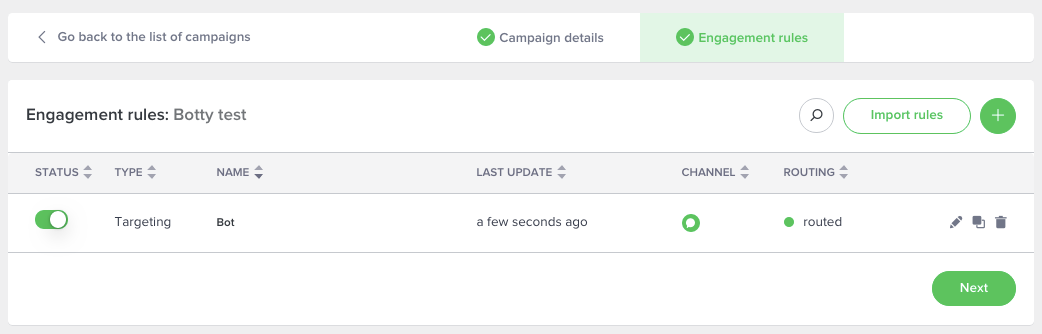
To sum up, you created a campaign that you associated some engagement rules (when the visitor will see the notification) with, some targeting rules (to which agents the conversations should be handed to).
### Chat with your bot
Last but not least let's trigger the chat. Go to the website you installed the iAdvize tag on. Just append `?bot` to the current URL and reload the page. You should see the chat.
You are ready to chat! 🎉